background image

Source NDP Cleaning 


4–2  

4326 

6295–002 

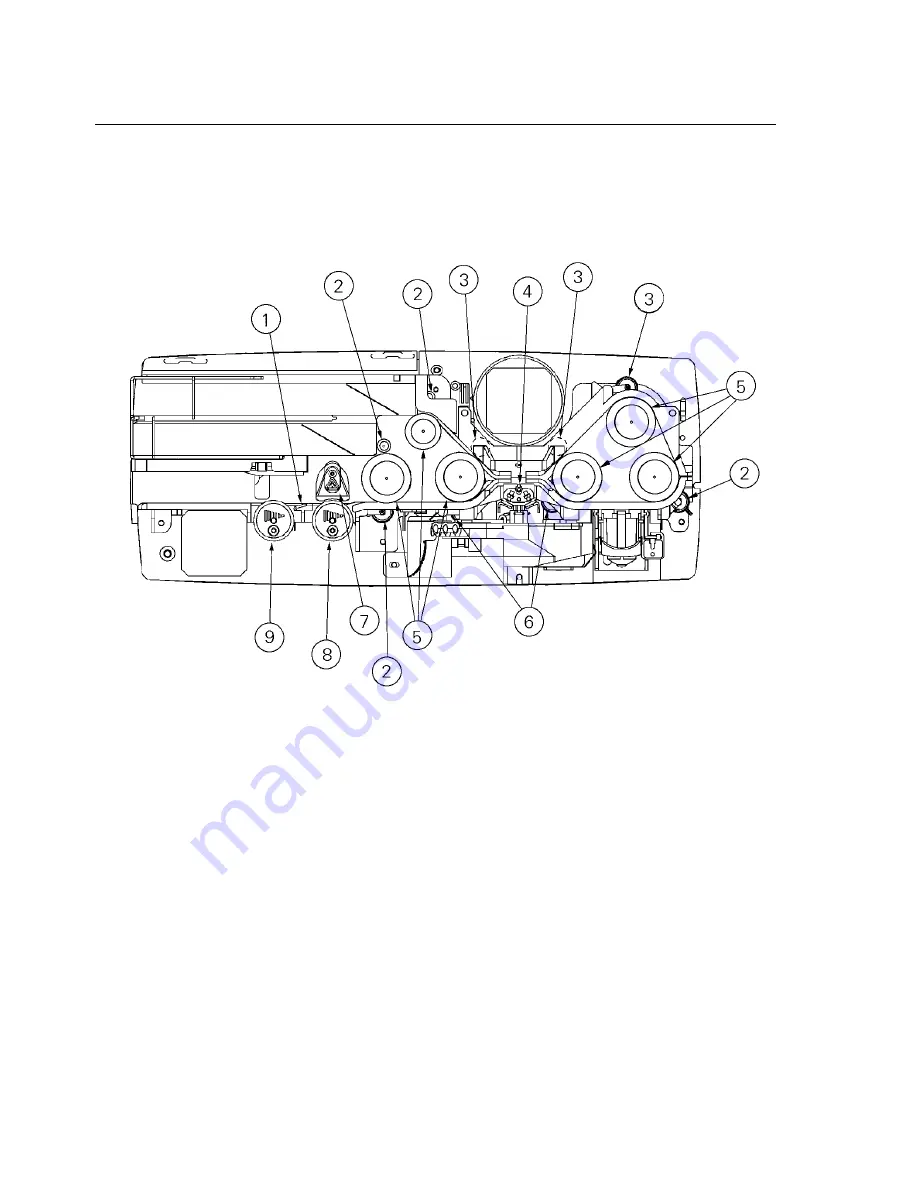
Location of Components for Cleaning 

Figure 4-1 shows the location of components for cleaning.  


Legend 

1

Reflective sensor

6

Idler roller (not accessible)

2

Idler roller in track (4 sets of rollers)

7

Separator

Idler roller in removable track wall 

Feed roller 

4 Image glass 

Nudge roller

5

Drive roller (6 rollers)

Figure 4–1.  Location of Components for Cleaning 

Summary of Contents for e-action Source NDP

Page 1: ...Unisys e ction Source Capture Network Document Processor Installation and Operation Guide Printed in USA July 2001 4326 6295 002 43266295 002 4326 6295 002 ...

Page 2: ...Unisys e ction Source Capture Network Document Processor Installation and Operation Guide UNISYS 2001 Unisys Corporation All rights reserved Printed in USA July 2001 4326 6295 002 ...

Page 3: ...Correspondence regarding this publication can be e mailed to doc unisys com FCC Statement The statement below is included in this document to comply with a Federal Communications Commission FCC regulation The FCC is an agency of the United States government thus the statement below applies to computing equipment installed in the United States of America Unisys is taking appropriate steps to be in ...

Page 4: ...in 2 4 Overview of Hardware Installation 2 4 Installing the Source NDP Unit 2 6 Uninstalling a Source NDP Unit 2 11 Preparing a Source NDP Unit for Shipping 2 13 Section 3 Source NDP Operation and Document Processing Normal Operation 3 1 Powering the Unit On and Off 3 2 Start Stop Button 3 3 Using the Start Stop Button to Process Documents 3 3 Using the Start Stop Button to Clear the Track 3 4 Sta...

Page 5: ...eparator Cover 5 6 Loop Cover 5 7 Removable Track Wall 5 7 PC Card 5 10 Pocket Flexures 5 12 Inkjet Print Cartridge 5 13 Removing the Inkjet Print Cartridge 5 13 Replacing the Inkjet Print Cartridge 5 15 Replacing the Ink Dabber 5 18 Nudge and Feed Tires and Rollers 5 19 Separator Tire and Holder 5 22 Rotating the Separator 5 22 Removing and Replacing the Separator Tire and Holder 5 24 Section 6 R...

Page 6: ...ents 4326 6295 002 v Appendix A Source NDP Specifications Appendix B Document Specifications Appendix C Supplies and Replacement Items Starter Kits C 1 Supplies and Replacement Items C 2 Glossary 1 Index 1 ...

Page 7: ...Contents vi 4326 6295 002 ...

Page 8: ...m checks giros and other documents It performs a full range of document processing functions which include reading MICR and OCR characters capturing black and white or gray scale images endorsing and document sorting Designed for an office environment the Source NDP captures information at the point of sale receipt or transaction and is easy to install and operate Figure 1 1 shows the Source NDP F...

Page 9: ...tender 7 Power On Off Switch rear of unit 15 Check Limiters 8 Inkjet Print Cartridge 16 Short Check Limiter Storage 9 Status Lights 17 Pocket Flexures 10 Separator 18 Release Levers for Track Wall 11 Nudge and Feed Rollers 19 PC Card not shown 12 Start Stop Button Consumable and replacement items are available from Unisys Direct Refer to Appendix C Figure 1 2 Source NDP Components ...

Page 10: ...ng removing and replacing components and recovering from problems Operators and site supervisors are the intended audiences for this guide The Unisys e ction Source Capture Network Document Processor Reference Card is shipped with the unit Source NDP documents are available from the Unisys Bookstore You can also place orders through your local marketing representative or distributor The Installati...

Page 11: ...ocal Unisys office to resolve questions about shipped items A set of frequently asked questions FAQs and answers is included on the Source NDP CD ROM For the most up to date FAQs and other support questions contact Unisys InfoAdvisor at http www infoadvisor com For more information about Source NDP products contact Unisys Payment Systems at http www unisys com marketplace products psd For support ...

Page 12: ...ation Source NDP Manager software installation and connecting the Source NDP unit to a PC or LAN is described in electronic documents included on the Source NDP CD ROM This section describes the following Source NDP installation tasks that are intended for an operator Checking shipped Source NDP items Selecting a place for the Source NDP unit Installing the Source NDP unit Save the shipping carton...

Page 13: ...d for some systems 4 Inkjet print cartridge shipping container is shown 5 PC card 6 Check limiters preinstalled short check limiters are available from Unisys Direct 7 AC power cord 8 External power supply automatically senses 50 or 60 cycle power with attached DC power cable 9 Source NDP Track Clearing Card Source NDP Operation Reference Card stored in document holder in base of machine 10 Source...

Page 14: ...an be placed next to a teller between tellers or in another convenient location A local PC workstation is required for Source NDP operation only if the site has determined that the Source NDP unit will not be connected to a LAN A Source NDP is designed to require minimum space for operation However it is important to allow clearance around the unit as follows Allow clearance at the front of the un...

Page 15: ... program Before you begin processing documents follow the instructions in Section 3 of this guide to adjust the check limiters and set up the endorser Overview of Hardware Installation Follow the steps in Figure 2 2 to install the Source NDP unit For detailed instructions refer to Installing the Source NDP Unit later in this section Caution Attach the power cord to the Source NDP unit and plug the...

Page 16: ...all the ferrite bead in its nylon case on the cable attached to the PC Card 6 Connect the cable from the LAN or PC to the PC Card 7 Insert the PC Card into slot at the back of the Source NDP unit 8 Install the Inkjet print cartridge in the holder under the top right cover A Connect the LAN cable or direct connect crossover cable to the LAN card in the host PC This task is normally done by the pers...

Page 17: ...ure the Power On Off switch shown in Figure 2 3 is in the Off O is depressed position Figure 2 3 Power On Off Switch 2 Connect the DC power cable attached to the power supply to the rear of the document processor The round 8 pin plug fits only one way into the unit Refer to Figure 2 4 Figure 2 4 Connecting the DC Power Cable ...

Page 18: ...e power supply as shown in Figure 2 5 Figure 2 5 Connecting the AC Power Cord to the Power Supply 4 Plug the male end of AC power cord into the AC power source wall outlet Refer to Figure 2 6 Note If there is power you will hear the fan in the power supply Figure 2 6 Plugging in the Power Cord ...

Page 19: ... Cable to the PC Card 6 Install the ferrite bead in its nylon case which is shipped with the Source NDP unit as follows Note Some systems do not require a ferrite bead in which case it is not shipped with the system a Open the nylon case enclosing the ferrite bead b Place the case over the cable attached to the PC Card as shown in Figure 2 8 Figure 2 8 Installing the Ferrite Bead ...

Page 20: ...he nylon case closed The position of the ferrite bead on the cable is shown in Figure 2 9 Figure 2 9 Position of the Ferrite Bead 7 Insert the PC Card into the slot at the rear of the Source NDP as shown in Figure 2 10 Figure 2 10 Inserting the PC Card ...

Page 21: ...Inkjet Print Cartridge in Section 5 a Remove an Inkjet print cartridge from its packaging box and container Follow the instructions enclosed in the box to prime the cartridge Note The Inkjet print cartridge is packaged in a separate box included in the Source NDP shipping carton b Remove the top right cover as shown in Figure 5 3 c Follow the instructions Replacing the Inkjet Print Cartridge in Se...

Page 22: ...pping in the event the unit needs servicing or repair 1 Make sure the Power On Off switch shown in Figure 2 11 is in the Off O is depressed position Figure 2 11 Power On Off Switch 2 Disconnect the DC power cable attached to the power supply from the rear of the document processor Refer to Figure 2 12 Figure 2 12 Disconnecting the DC Power Cable ...

Page 23: ...n PC Card in Section 5 to remove the card as shown in Figure 2 13 Figure 2 13 Removing the PC Card 4 Follow the instructions in Removing the Inkjet Print Cartridge in Section 5 to remove the cartridge as shown in Figure 2 14 Figure 2 14 Removing an Inkjet Print Cartridge ...

Page 24: ...r shipment as shown in Figure 2 15 Do not return the power supply and cord PC Card and cable any consumable replacement or cleaning supply items or documentation 2 Include a Return Material Authorization RMA for new units and in service units outside the U S Also include a Return Item Report RIR 3 Seal the box with packing tape and affix a return mailing label and postage 4 Include customs forms i...

Page 25: ...Source NDP Installation 2 14 4326 6295 002 Figure 2 15 Packing the Source NDP for Shipping ...

Page 26: ... clean Refer to Section 4 Source NDP Cleaning Replacing the Inkjet print cartridge and ink dabber is described in Section 5 Normal Operation During normal operation you can expect the unit to behave as follows Documents flow smoothly through the track The image light in the tower flashes as document images are captured Endorsements are printed on documents as controlled by the application Document...

Page 27: ...r to Section 6 if a problem occurs Press O on the power switch to power off the unit When the unit is powered on status light activity monitors the following start up sequence 1 The Ready indicator middle indicator blinks yellow while a connection to the host PC is established This normally takes 30 to 40 seconds 2 The Ready indicator blinks green while the unit waits for a response from the appli...

Page 28: ... Stop Button with the Cover in Place Figure 3 3 shows pressing the Start Stop button with the cover removed The cover is off during cleaning and some recovery tasks Figure 3 3 Pressing the Start Stop Button with the Cover Removed Using the Start Stop Button to Process Documents Press and quickly release the Start Stop button to start or stop processing documents when the Ready status light is soli...

Page 29: ... audible messages to indicate status Figure 3 4 Status Lights The sequence of lights you normally see when powering on the Source NDP unit is described in Powering the Unit On and Off earlier in this section During normal operation the Ready light remains solid green while documents are flowing It blinks green if documents stop which may occur if the application is slow in processing information o...

Page 30: ... the back of the unit For long delays have your site administrator confirm that the Source NDP manager program is running on the host PC Solid Yellow A processing problem such as a jam double document or skewed document has occurred Documents may be outside of specifications in Appendix B Holes in a document may cause a too short condition Follow the steps in Recovering from Processing Problems in...

Page 31: ... you work you may have to remove jammed documents or recover from other problem conditions Section 6 describes reprocessing documents and recovering from problems Refer to documentation provided with the application program to recover from application problems Setting Up the Source NDP Unit An application must be started before you begin processing documents If it is your job to start the applicat...

Page 32: ...heck Limiters Use long check limiters when the longest documents are longer than the pocket There is one long check limiter for the left pocket and another for the right pocket Adjust the limiters to accommodate the longest documents Refer to Figure 3 6 Figure 3 6 Adjusting Long Check Limiters ...

Page 33: ...efer to Removing the Inkjet Print Cartridge and Replacing the Inkjet Print Cartridge in Section 5 a Visually inspect the bladder in the ink cartridge to see how much ink is in the cartridge Usually a collapsed bladder indicates that the ink cartridge is almost empty and needs to be replaced soon The shaded bladder in Figure 3 7 indicates that the ink cartridge is probably full Figure 3 7 Checking ...

Page 34: ...ement Height Preparing Documents for Processing It is very important to properly prepare documents for processing Otherwise Source NDP performance will be less than satisfactory Follow the steps in this section to prepare documents The Source NDP is designed to process normal business documents and giros and excels at handling mixed sized documents Refer to Appendix B for document specifications R...

Page 35: ...eck documents by inspecting them for acceptable size and condition a Smooth out creases folds and curls in documents Also smooth out dog ear corners as shown in Figure 3 9 Figure 3 9 Smoothing Out Dog Ears b Remove rubber bands paper clips staples and other foreign objects as shown in Figure 3 10 Figure 3 10 Removing Foreign Objects ...

Page 36: ...Refer to Figure 3 11 Figure 3 11 Removing Other Non Document Items d Repair torn or damaged documents or place them in a carrier envelope Do not use tape to repair areas with code line or encoded amount information Use a carrier envelope in these cases Refer to Figure 3 12 Figure 3 12 Using a Carrier Envelope for a Torn or Damaged Document ...

Page 37: ...gh the deck as shown in Figure 3 13 to ensure all documents are in the same orientation Figure 3 13 Checking Document Orientation 3 Repeatedly tap the bottom edge of documents on a hard flat surface as shown in Figure 3 14 Bottom edges must be nearly perfectly aligned for satisfactory feeding Figure 3 14 Aligning Bottom Edges ...

Page 38: ...ligning Leading Edges Feeding Documents You may feed documents one at a time or in batches It is very important that you properly prepare documents for feeding and ensure that edges are aligned Otherwise documents may be skewed when feeding This results in missed MICR code lines skewed images and frequent feed errors Note The failure to align document edges is the most common error causing documen...

Page 39: ... once again as shown in Figure 3 16 to check that edges are aligned Figure 3 16 Fanning Documents to Check Alignment Before Feeding 3 Check the alignment of bottom edges once more to ensure that edges are aligned as shown in Figure 3 17 Figure 3 17 Checking the Alignment of Bottom Edges ...

Page 40: ...the feeder flag as shown in Figure 3 18 Figure 3 18 Orienting Documents for Feeding 5 Pull back the feeder flag to insert the documents in the feeder bay Refer to Figure 3 19 Note Do not overfill the feeder bay Documents should drop easily into the feeder bay Otherwise feed errors will occur Figure 3 19 Positioning Documents in the Feeder Bay ...

Page 41: ...nts for Feeding 7 Ensure that documents are in the proper position for feeding with leading edges A against the end of the feeder bay and bottom edges B touching the feeder floor along the entire length of the documents Refer to Figure 3 21 Figure 3 21 Alignment of Document Edges for Feeding 8 Wait for the Ready status light to turn solid green After a track stop it remains solid yellow until you ...

Page 42: ...them after processing For best results follow these practices Remove documents when a pocket is nearly full Jams occur when pockets are too full Occasionally check that endorsements are clearly printed Be sure that short or long check limiters are installed based on the length of the longest processed documents Check limiters help to minimize pocketing problems Occasionally check with your supervi...

Page 43: ...Source NDP Operation and Document Processing 3 18 4326 6295 002 ...

Page 44: ...e is exceeded Refer to Nudge and Feed Tires and Rollers and Separator Tire and Holder in Section 5 Cleaning Supplies You will need the following items to perform cleaning refer to Appendix C to order Microduster 75 0202 905 Source NDP Cleaning Swabs 75 2094 904 Source NDP Cleaning Card 75 2093 906 Image Glass Microfilmer Mirror Cleaning Pads 75 1804 907 Cautions Do not expose items presaturated wi...

Page 45: ...cation of components for cleaning Legend 1 Reflective sensor 6 Idler roller not accessible 2 Idler roller in track 4 sets of rollers 7 Separator 3 Idler roller in removable track wall 8 Feed roller 4 Image glass 9 Nudge roller 5 Drive roller 6 rollers Figure 4 1 Location of Components for Cleaning ...

Page 46: ...mage glass with an image glass cleaning pad presaturated with isopropyl alcohol Refer to Figure 4 2 Figure 4 2 Cleaning the Image Glass 4 Replace the removable track wall 5 Replace the top left cover Cleaning the Source NDP Unit Weekly Perform weekly cleaning to ensure that the Source NDP unit is in good operating condition Refer to Figure 4 1 for the location of components for cleaning A summary ...

Page 47: ...t nudge and feed rollers separator and reflective sensor Both sides of the tower blowing dust from one side of the tower is shown in Figure 4 3 This is important for removing dust from otherwise inaccessible rollers Areas exposed by the removed track wall Pocket areas Ridges on the inner side of the removable track wall Figure 4 3 Blowing Dust and Paper Fragments from the Tack 3 Wipe the surface o...

Page 48: ... with the cleaning swab as shown in Figure 4 5 The sensor is in the track wall near the bottom of the track Note The other sensors in the unit compensate automatically for dirt and dust These sensors do not require cleaning Figure 4 5 Cleaning the Feeder Sensor 5 Power on the Source NDP unit and wait for the Ready indicator to turn solid green ...

Page 49: ...Figure 4 1 a Make a note of which side of the separator faces the track The sides are labeled with one two or three dots as shown in Figure 4 6 Figure 4 6 Separator Markings b Remove the separator as shown in Figure 4 7 to gain access to components for cleaning Figure 4 7 Removing the Separator ...

Page 50: ...n Figure 4 8 Figure 4 8 Cleaning the Drive Rollers b Hold down the Start Stop button to start the feed motor and clean all accessible brown idler rollers in the track item 2 in Figure 4 1 as shown in Figure 4 9 Note Access to the idler rollers in the image tower area is difficult Thus it is important to blow dust with the air duster in step 2 This action helps to clean the inaccessible rollers Fig...

Page 51: ...o clean track components as follows Note The procedure for using the cleaning card may result in feed errors reported for some applications These errors can be ignored a Remove the card from its package as shown in Figure 4 10 Figure 4 10 Removing a Source NDP Cleaning Card from Its Package b Place the card in the feeder and push it past the separator until it stops against the first idler roller ...

Page 52: ...tioned past the separator Figure 4 11 hold down the Start Stop button Figure 4 12 and let go of the card The card travels through the track to a pocket and cleans track components as it passes Figure 4 12 Accessing the Start Stop Button with Covers Removed 12 Replace all Source NDP covers as described in Section 5 After cleaning the document processor process several test documents to ensure that ...

Page 53: ...the Ready indicator to turn solid green 6 Remove the separator Observe which side faces the track wall as indicated by the dots on the top of the assembly 7 Hold down the Start Stop button to start the feed motor and use cleaning swabs to Clean the six large black drive rollers Clean the small brown idler rollers and two sets of feeder rollers 8 Use cleaning swabs to clean the three sets of roller...

Page 54: ...tasks Unit covers Removable track wall It also describes how to remove and replace the following document processor components that are worn or broken or must otherwise be replaced PC Card Pocket flexures Inkjet print cartridge and dabber Nudge and feed tires and rollers Separator tire and holder Appendix C provides information for ordering replacement items from Unisys Direct ...

Page 55: ... the location of these covers Replacement covers are available from Unisys Direct Caution Be sure the document processor is connected to an AC power source before removing the covers Otherwise electrostatic discharge may damage the unit Top Left Cover The top left cover is located on the pocket side of the unit To remove grasp on either side and pull up on the cover Refer to Figure 5 1 Figure 5 1 ...

Page 56: ...m edge of the cover with the holes in the base Align the pin on the top of the tower with the hole in the cover as shown in Figure 5 2 Push the cover down into position Note For proper operation ensure that the pin on the top of the tower fits into the hole in the underside of the cover Figure 5 2 Replacing the Top Left Cover ...

Page 57: ... 6295 002 Top Right Cover The top right cover is located on the feeder side of the unit To remove grasp on either side and pull up on the cover Do not grasp or pull up on the tower part of the cover Refer to Figure 5 3 Figure 5 3 Removing the Top Right Cover ...

Page 58: ...m edge of the cover with the holes in the base Align the pin on the top of the tower with the hole in the cover as shown in Figure 5 4 Push the cover down into position Note For proper operation ensure that the pin on the top of the tower fits into the hole inside the top of the cover Figure 5 4 Replacing the Top Right Cover ...

Page 59: ...eder To remove grasp and pull up on the cover as shown in Figure 5 5 Replace by reversing the motion Figure 5 5 Pocket Entry Cover Separator Cover The separator cover fits over the separator and is located near the track entrance of the feeder To remove grasp and pull up on the cover as shown in Figure 5 6 Replace by reversing the motion Figure 5 6 Separator Cover ...

Page 60: ...You will need to remove the removable track wall to clean the image glass and to sometimes clear the track Figure 1 2 shows the location of the track wall and release levers Replacement track walls are available from Unisys Direct Cautions Be sure the document processor is connected to an AC power source before removing the covers Otherwise electrostatic discharge may damage the unit Remove the re...

Page 61: ...elease lever 90 degrees as shown in Figure 5 8 This releases the track wall from the base of the unit Figure 5 8 Releasing the Release Levers for the Removable Track Wall 3 Pull the left end of the wall toward you and lift straight up to remove the wall as shown in Figure 5 9 Figure 5 9 Removing the Removable Track Wall ...

Page 62: ...cks into place Refer to Figure 5 10 Note When the wall is properly seated the two projections on the bottom of the wall fit into the holes in the base of the unit Also the pins on the bottom of each of the three release levers fit into the base Figure 5 10 Seating the Removable Track Wall 6 Push down and turn 90 degrees to tighten the left most right most and middle release levers in that order 7 ...

Page 63: ...e available from Unisys Direct Caution Be sure the document processor is connected to an AC power source Otherwise electrostatic discharge may damage the unit Follow these steps to remove and replace the PC Card which is located in a slot at the back of the unit 1 Press the release button beside the PC Card as shown in Figure 5 11 Figure 5 11 PC Card Release Button 2 Remove the card from the slot ...

Page 64: ...the following the reverse of the previous steps a Connect the cable from the LAN or PC to the PC Card b If required ensure the ferrite bead in its nylon case is installed on the LAN cable near the PC card as shown in Figure 5 14 This is required for protection against electromagnetic interference Figure 5 14 Installing the Ferrite Bead c Push the card into the slot at the rear of the unit until it...

Page 65: ...he pocket entry and separator covers Figures 5 5 and 5 6 2 Grasp the pocket flexure and pull up to remove it from the end of the pocket wall Refer to Figure 5 15 Figure 5 15 Removing a Pocket Flexure 3 Replace a pocket flexure by sliding it over the end of the pocket wall as shown in Figure 5 16 Push it down as far as it will go Note A slot near the end of flexure fits over a spine in the track wa...

Page 66: ...nits you may need to install the Inkjet print cartridge that is shipped with the unit Removing the Inkjet Print Cartridge Remove the Inkjet print cartridge as follows Caution Be sure the document processor is connected to an AC power source before removing the covers Otherwise electrostatic discharge may damage the unit 1 Remove the top right unit cover Refer to Figure 5 3 2 Make a note of the pos...

Page 67: ...295 002 4 Release the blue retaining clip by pulling it back and off the cartridge as shown in Figure 5 18 Figure 5 18 Inkjet Print Cartridge Retaining Clip 5 Pull up to remove the cartridge as shown in Figure 5 19 Figure 5 19 Removing the Inkjet Print Cartridge ...

Page 68: ...hat the bottom edge of the cartridge does not catch on or scrape the electrical contact in the holder Hold the cartridge level during removal and replacement Ensure the cartridge is level and fully seated in the holder before closing the blue latch 1 Remove an Inkjet print cartridge from its shipping container Follow the instructions enclosed with the cartridge to prime the cartridge 2 Pull back t...

Page 69: ...gure 5 21 The electrical contact strip can be damaged by allowing the cartridge to touch it when installing Figure 5 21 Cartridge and Electrical Contact Edges 4 Move the cartridge into position above the holder as shown in Figure 5 22 Align the two pins on the cartridge with the slots in the holder and press the cartridge forward and down into place Figure 5 22 Inserting an Inkjet Print Cartridge ...

Page 70: ...idge holder in one of three notched positions top middle and bottom as shown in Figure 5 24 Otherwise sprayed ink may miss documents The cartridge holder clicks into a notched position when it is properly positioned Note If replacing the cartridge readjust the Inkjet print cartridge so that it clicks into its former endorsement position bottom middle or top Figure 5 24 Positioning the Inkjet Cartr...

Page 71: ...t need to replace the dabber every time the ink cartridge is replaced However you should check the condition of the dabber at that time Replacing only the dabber felt can be messy but can offer potential cost savings Dabbers are available as preinstalled in holders for convenient replacement Replace the dabber or dabber and holder as follows 1 Pull up to remove the holder with the felt dabber from...

Page 72: ...the rollers There is a clutch in each roller which may become worn Normal expected tire life is 250 000 documents The number of documents processed is logged by a document counter in the Source NDP unit and is accessed from the host PC For a document count ask your site administrator Replacement kits with nudge feed and separator tires only are available from Unisys Direct item number 75 0306 904 ...

Page 73: ...igure 5 27 Note It may be helpful to pull back on the feeder flag or the blue separator knob when removing the nudge or feed roller Figure 5 27 Removing the Nudge or Feed Roller 4 If replacing only the tire remove the old tire and push the new tire in place onto the roller Refer to Figure 5 28 Figure 5 28 Nudge or Feed Roller and Tire ...

Page 74: ...ler in hand and rotate the blue cap clockwise in the direction of the arrow until it stops to prepare for reinstallation Refer to Figure 5 30 Figure 5 30 Preparing to Reinstall the Nudge or Feed Roller 7 Push the roller down over the shaft until it stops You may have to rotate it while sliding it over the shaft The roller slides over the shaft a distance of approximately 2 cm less than one inch 8 ...

Page 75: ...s of double document feeds noticeably increase Replace the separator tire at the end of its expected life Normal expected tire life is 250 000 documents Replacement kits with nudge feed and separator tires only are available from Unisys Direct item number 75 0306 904 Unisys Direct also has replacement kits with tires mounted and ready to install item number 75 0307 902 Rotating the Separator Follo...

Page 76: ... Tire and Holder 4 Turn the separator assembly so that a new tire surface is towards the track For example if tire sides 1 and 2 have been used turn the separator so that side 3 is towards the track 5 Reinstall separator tire and holder by positioning the hole in the bottom of the holder over the spindle Gently push the holder down over the spindle until it stops 6 Replace the separator cover ...

Page 77: ...have been used 1 Remove the separator cover Refer to Figure 5 6 2 Remove the holder and tire by grasping the triangular blue cap and pulling up as shown in Figure 5 33 Figure 5 33 Separator Tire and Holder 3 Do one of the following Replace just the tire a Remove the old tire from the holder b Slip a new tire on the holder so that the red dot on the tire is up as shown in Figure 5 34 When installed...

Page 78: ...er by positioning the hole in the bottom of the holder over the spindle Gently push the assembly down over the spindle until it clicks Replace the tire preinstalled on its holder a Check that the tire is properly seated so that the edge of the tire meets the step molded into the holder b Turn the new separator tire and holder so that side 1 indicated by a single raised dot on top of the blue handl...

Page 79: ...Removal and Replacement of Source NDP Components 5 26 4326 6295 002 ...

Page 80: ...owever you may need to refer to other documentation to recover from problems related to the application program that runs at the host PC You will likely need assistance from your supervisor or site administrator for application problems Detailed troubleshooting procedures for use by a supervisor or site administrator are in electronic documents on the Source NDP CD ROM Also on this CD ROM are freq...

Page 81: ...of your supervisor or site administrator Recovering from Processing Problems A jam or other processing problem is indicated when the Ready light is solid yellow Follow these steps to recover from a processing problem 1 Notice the position of stopped documents Documents that are past the image tower and partially or completely in a pocket may need to be reprocessed Follow the instructions for the a...

Page 82: ...the steps in Recovering from Processing Problems earlier in this section 1 Remove jammed documents by grasping and pulling straight up with some force Do not pull documents backwards 2 Inspect the track for obstructions such as pieces of paper paper clips or staples 3 Attempt to remove obstructions using the Source NDP Track Clearing Card a Remove the Track Clearing Card from its storage location ...

Page 83: ...el in the track Refer to Figure 6 2 Figure 6 2 Positioning the Source NDP Track Clearing Card d Hold down the Start Stop button as shown in Figure 6 3 to move the Track Clearing Card through the track until it reaches a pocket The card catches and pushes forward bits of paper and other objects such as paper clips and staples Figure 6 3 Holding the Start Stop Button to Clear the Track ...

Page 84: ...d to its place of storage in the base of the Source NDP unit as shown in Figure 6 1 7 When ready to continue processing documents go to step 3 in Recovering from Processing Problems earlier in this section Problem Identification and Recovery Use the Condition Cause and Correction Table in this section to identify possible problems and attempt to recover The information in the table assumes that a ...

Page 85: ... The Power indicator light should turn green Resume operation if the problem is resolved Otherwise continue with Step 4 4 Hold down the Start Stop button and listen for the track motor If the track motor starts the indicator light needs replacing Notify your supervisor 5 If the machine is still without power request assistance The Ready indicator does not light after the Source NDP unit has been p...

Page 86: ...t resolved follow the actions for Ready indicator is blinking yellow 3 Tell your system administrator about problems that persist The Ready indicator is blinking yellow A blinking yellow indicator during power up is normal and means that the unit is connecting to the host PC No action is required unless the condition continues for more than one minute During processing a blinking yellow Ready indi...

Page 87: ... a network problem The Ready indicator is solid yellow A processing problem has occurred The Ready indicator remains solid yellow until the problem is cleared and document processing is restarted To recover follow the procedures in Recovering from Processing Problems earlier in this section Processing problems may include document problems machine problems or application errors Examples of problem...

Page 88: ...exceeded and replace these components as described in Section 5 The Ready indicator is blinking red There is a problem with the server or network Follow these steps 1 Power the Source NDP unit off 2 Make sure the PC Card is plugged into the card slot in the back of the Source NDP unit 3 Power the Source NDP unit back on Resume operation if the problem is resolved Otherwise request assistance The R...

Page 89: ... the Source NDP has an endorser Look for the endorser cartridge or the slide into which the cartridge fits under the top right cover The style number visible on the identification plate underneath the unit can be used to identify units that are equipped with the endorser option Correct for missing or poor quality endorsements 1 Make sure that the endorser is in one of the three height positions Th...

Page 90: ...housing clicks into place If this does not correct the problem request assistance Horizontal streaks appear on both the front and rear of images Follow the cleaning procedure in Section 4 for cleaning the image glass The unit is noisy or vibrates during operation Ensure that the unit is on a solid flat surface If the problem is not resolved request assistance The unit has an odor Report the proble...

Page 91: ...Recovery from Problem Conditions 6 12 4326 6295 002 ...

Page 92: ...30 documents per minute for 6 inch documents Front and Rear Image Capture Front and rear image compression selected through application 240 dots per inch CCITT Group 4 black and white 120 dots per inch JPEG 256 gray level Image renditions with 114 mm 4 5 inches of vertical image view Automatic Document Feeder Capacity for 100 documents Detection of double document feeds Output Pockets Sorting to p...

Page 93: ...on Network Connection 10 BaseT Ethernet TCP IP Up to five Source NDPs on a single Common API Source NDP Manager PC 90Mhz Pentium for supporting single Source NDP units 266Mhz Pentium II for supporting five Source NDP units PCMCIA Type II slot for NE2000 native mode compatible 5V 16 bit PC Card Optional Features Rear Ink Jet Endorser Three operator manually adjustable heights 10 characters per inch...

Page 94: ...p button for operator controlled track clearing Source NDP Track Clearing Card for removing staples and small items from the track Operator removable track wall Power External power supply voltage for 100 to 240 VAC at 50 60 Hz and 130 watts Internal Diagnostics Self diagnosis at power up Certifications CE UL CSA TÜ V VCCI FCC ...

Page 95: ...Source NDP Specifications A 4 4326 6295 002 ...

Page 96: ...ght paper 75 g m2 20 lb 90 g m2 24 lb Weight card stock 155 g m2 90 lb Follow these steps to ensure that documents are in good condition for best machine processing performance Repair tears and holes with thin adhesive or scotch tape Smooth out creases folds curls and dog eared corners Remove rubber bands staples and paper clips Remove stubs and adding machine tapes Place damaged documents in carr...

Page 97: ...Document Specifications B 2 4326 6295 002 ...

Page 98: ...ource NDP Starter Kits cleaning supplies consumable supplies and replacement items are available from Unisys Direct Order kit number 75 0316 903 Each kit is custom built with your selection of the following items Inkjet Print Cartridges package of 10 Source NDP Ink Dabbers in Holders package of 10 Source NDP Feeder Roller Kit Unisys Microduster Disposables package of 4 Unisys Image Glass Microfilm...

Page 99: ...alcohol package of 80 75 1804 907 4 packages Unisys Microduster Disposables package of 4 75 0202 905 1 package Source NDP Track Clearing Cards package of 5 75 2096 909 1 package Consumable Supplies Inkjet Print Cartridges package of 10 Replace the Inkjet print cartridge when it is empty Each cartridge prints approximately 660 000 characters This is enough ink to endorse approximately 48 000 docume...

Page 100: ...duled or as needed replacement Worn tires result in excessive feed errors Expected tire life is 250 000 documents Rollers only need replacement if clutch wear causes document feed problems Order the Source NDP Feeder Tire Kit 75 0306 904 for tires only and not rollers 75 0307 902 2 kits Source NDP Pocket Flexures package of 2 Normal expected flexure life is 250 000 documents 75 2098 905 2 packages...

Page 101: ...ds Order by contacting your Unisys representative or local sales office Specify Unisys style number B25 LC A Unisys representative will assist you in determining the correct type of plug for your country Return shipping cartons Shipping cartons include packing material for returning Source NDP units 75 0313 900 ...

Page 102: ... optically read characters encoded on the front of a document Common API Unisys open system software architecture an application programming interface used for running networked document processors and common applications It provides the means to connect document processors in a networked environment Consultative Committee on International Telephone and Telegraph CCITT The committee that defines s...

Page 103: ...automatically move documents into the track for processing H host PC A PC connected either directly or by means of a LAN to a Source NDP document processor A host PC is required for Source NDP operation The Source NDP Manager and application programs run on the host PC I image The process of creating a digital representation of an entire document for subsequent display or processing or the actual ...

Page 104: ...mmunication cables and equipment for passing digital information within a relatively small area such as a building M magnetic ink character recognition MICR An imprint on checks or a descriptor of a machine component that reads the imprint which is composed of magnetic ink characters in special typefaces and dimensions MICR See magnetic ink character recognition N Networked Document Processor NDP ...

Page 105: ...sed of visible characters in one of a predefined character set or font P PC See personal computer personal computer PC A desktop computer having a design that is compatible with the Intel family of microprocessors See also host PC R reader A component that produces an electronic representation of the data encoded onto a document for subsequent display or processing ...

Page 106: ...y cover 5 6 Separator cover 5 6 Top left cover 5 2 Top right cover 5 4 D DC power cable installing 2 6 Document preparation for processing 3 9 Document processing How to 3 6 Document specifications B 1 Documents not pocketed correctly 6 10 E Endorsement Missing or are of poor quality 6 10 Out of the desired zone 6 11 Endorsement quality checking 3 17 Endorser adjusting the height 3 9 F Feed roller...

Page 107: ... replacement 5 12 Pocket limiters Adjusting 3 6 Installing 2 10 Ordering C 3 Power indicator not illuminated 6 6 Power On Off switch 3 2 Power supply ordering C 4 Preparing documents for processing 3 9 Problem recovery 6 2 Processing documents Steps 3 6 Processing problems recovering from 6 2 Processing set up 3 6 R Readers types of 1 3 Ready indicator Blinking green 6 7 Blinking red 6 9 Blinking ...

Page 108: ...rformance B 1 Overview 1 1 Processing documents 3 6 Shipped items 2 2 SourceNDP Startup Kits contents and ordering 1 3 C 1 SourceNDP Track Clearing Card See Track clearing card C 2 Specifications Documents and giros B 1 Paper B 1 Start Stop button Location 3 3 Using for clearing the track 3 4 Using for processing documents 3 3 Status lights 3 4 Swabs ordering C 2 T Track Clearing Card Ordering C 2...

Page 109: ...Index Index 4 4326 6295 002 ...

Page 110: ... ...

Page 111: ... 43266295 002 4 3 2 6 6 2 9 5 0 0 2 ...

Reviews: