Uninet DTF 100 User Manual Download Page 19


pg. 19


Weekly to Do 

After a good week of printing, it is extremely important to set a couple minutes aside to be able to 

perform the weekly maintenance. There are two components that need attention, one being the 

capping station while the other is the wiper blade.  


Both the capping station and wiper blade are located under where the printhead carriage sits when 

idle. To unlock the printhead so you can freely move it, follow the steps below. 
 

1.


Power printer off. 

2.


Open blue lid so that the printhead carriage can be observed. 

3.


Power printer on; while doing the initialization the printhead carriage move from its home 

on location on the right-hand side to the left-hand side.  

4.


When the carriage moves, quickly remove the power cable from the printer. Gently push the 

printhead carriage all the way to the left-hand side so that you have the most amount of 

workspace.  


Now that the printhead carriage is moved and the necessary parts are accessible, the steps below 

explain how to clean them. 

You will need: Clean foam swabs, Cleaning Solution (blue liquid), Capping Solution (pink liquid) and 

a syringe with the thin tip.  
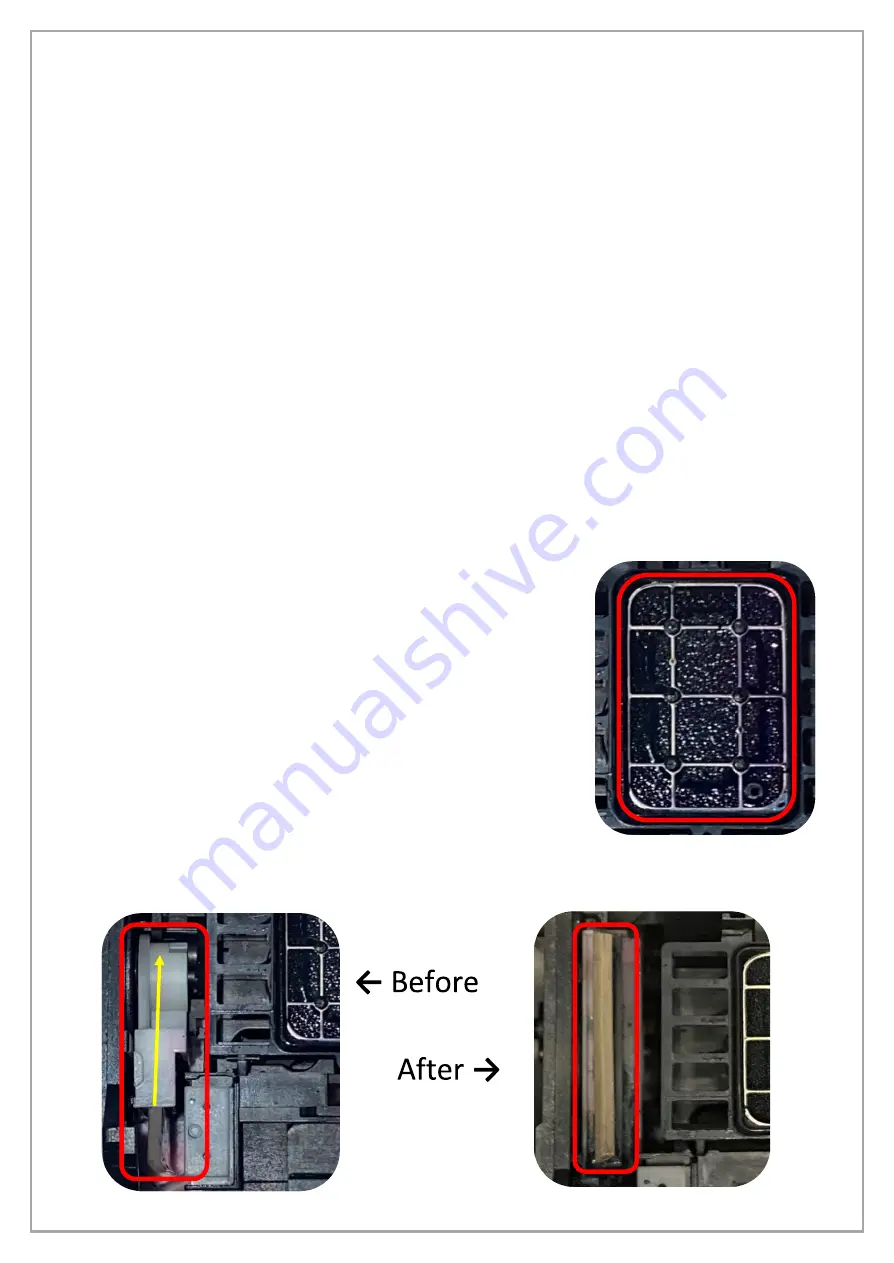
 

1.


Dip a clean swab into the blue Cleaning Solution, using this 

remove any ink or build-up from the outer rubber edges on 

the capping station.  

2.


Next, take the syringe with the thin tip attached and add 

10-15 drops of the pink Capping Solution to the sponge in 

the capping station in the middle.  

3.


To access the wiper blade, it first needs to be flipped 

upward. This can be done using a tool such as a flat-head 

screwdriver. Gently push forward on the white plastic that 

the rubber wiper blade is attached to, this will cause the 

mechanism to pop upward revealing the rubber wiper 

blade. 

4.


Once popped up, using a clean foam swab and blue Cleaning Solution remove any ink or 

build-up from the rubber blade. After it’s clean, simply pop it downward again.  


S

P

O

N

G


Summary of Contents for DTF 100

Page 1: ...pg 1 UNINET DTF 100 USER MANUAL Date Version Language 12 08 2022 2 0 English...

Page 2: ...READ THIS FIRST 10 DISCLAIMER 10 PLACEMENT OF PRINTER 11 INSTALLING THE PRINTER 11 MATERIALS 12 BUTTONS 12 PRINTING PLATFORM 12 BEFORE TURNING ON PRINTER 13 FIRST TIME START UP 13 DRIVER INSTALLATION...

Page 3: ...MPORTANT FOR PROPER INSTALLATION OPERATION MAINTENANCE AND SAFETY CONCERNING THE USE OF YOUR SYSTEM IT IS RECOMMENDED THAT ALL THE STAFF THAT WORK WITH AND OR WHO ARE RESPONSIBLE FOR THE USE AND MAINT...

Page 4: ...lls or strange noises around the machine immediately unplug the machine at the power supply and call for service Periodically unplug the machine and use a dry cloth to wipe off any dust or dirt collec...

Page 5: ...touch the electrical contacts on a Print Head or cartridges after printing The metal parts may be very hot and could cause burns Do not throw ink tanks and cartridges into fire Do not attempt to disa...

Page 6: ...fety the product must not be used until the fault is cleared During operation and maintenance wear personal protective equipment as instructed and follow all safety instructions according to the regul...

Page 7: ...parts such as print heads cartridges ink wiper dumpers pipes pumps and caps RESPONSIBILITY The total liability of UNINET cannot in any case exceed the value of the defective damaged or not delivered...

Page 8: ...ir should be performed by trained personnel as recommended by UNINET tampering improper use repairs and or action taken by anyone not authorized by UNINET void the warranty CAUTIONS ON USING THE MANUA...

Page 9: ...e company UNINET assumes no responsibility For any personal injury and property damage environmental and or operating arising from incomplete or non compliance with operating and maintenance instructi...

Page 10: ...ALLING THE PRINTER UNPACKING Open the box that contains the printer parts and accessories With the assistance of a second person gently remove the different parts from the box following the instructio...

Page 11: ...t illuminates orange Ink Button Indicates any issues related to your ink via a blinking orange light Head cleanings can be initiated by holding the Ink Button down until the Printhead carriage moves T...

Page 12: ...wait for the green light to light up 3 You will see that the orange light above the Ink Button will be blinking simply hold it down until the printer begins making sound This will initiate a dry head...

Page 13: ...s from Epson must be declined The next window to appear will ask what language you would like to set once the desired language is selected click OK to continue to the next window One of the last windo...

Page 14: ...a time to avoid ink contamination When you have completed filling an ink tank securely plug it closed before continuing to the next color Each ink tank should be filled at least 50 ink levels can be o...

Page 15: ...st and click the button labelled Charge When the charge is initiated a green indicator will move from the left side of the program window to the right this is how you will tell the progress of the act...

Page 16: ...is matte simply scratch a small spot on a corner of both sides the print side will have residue come off 4 The film is to be placed all the way to the right hand side there will be a stationary guide...

Page 17: ...cleared by powering the printer off then back on using the power button If you choose to cancel a print and stop the printer follow these steps 1 Power the printer off 2 Delete any jobs in the softwar...

Page 18: ...nd hold the Ink Drop button until you hear the printer begin to make sounds This initiates a head cleaning without using any software This can take several minutes to complete 2 Using the WIC Reset Ut...

Page 19: ...the most amount of workspace Now that the printhead carriage is moved and the necessary parts are accessible the steps below explain how to clean them You will need Clean foam swabs Cleaning Solution...

Page 20: ...e check or a channel is not working then a head cleaning or printhead flush is needed Problem Prints appear split or blurry Solution This can occur when printing on media with an irregular surface Dis...

Reviews: