TurboLock TL88 8
3.2 Main Installation
Step 1.
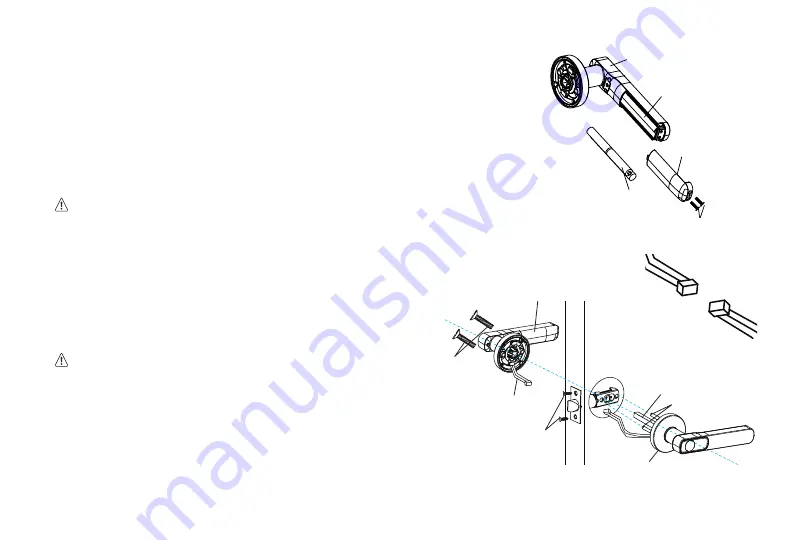
Remove the 2x inside screws at the bottom of battery compartment to remove the
cover. Add 4 x AAA batteries to the battery compartment then re-install the cover
it
(Fig. 5).
Step 2.
Start with the outside knob. Feed the cable through a waterproof rubber seal and
the round hole in the door. Thread the two pegs through the smaller, round holes
in the latch. If needed, have someone hold the door itself or hold the outside knob
flat against the front of the door
(Figs. 6 and 7).
• Do NOT force the cable’s connector end through any part of the lock.
Damaging the connector will make the lock unusable.
• It’s highly recommended to leave the door open during installation.
Step 3.
Gently connect the two cables and feed them into the round hole in the door
(Figs. 6).
Step 4.
Align the inside knob on the back of the door making
sure to thread the latch pin through the square opening.
Use 2x mounting screws to fasten the outside knob and
inside knob to the door. Make sure both screws are
tightened
(Fig. 7).
Before inserting the latch pin, make sure the label
“FACE UP“ is facing up when inserting it into the
square opening.
Step 5.
The lock should now be ready to use. It’s highly
recommended to use the authorized fingerprint and the
app to test the lock to make sure it works before closing
the door. See Section 6 for information on the fingerprint
setting and the information on the app.
Inside Knob
2 x Inside Screws
4 x AAA Batteries
Battery Compartment
Cover
(Fig. 5)
(Fig. 6)
(Fig. 7)
Outside Knob
Latch Pin (Label face
up)
2 x Pegs
Door
Inside Knob
2 x Mounting
Screws
2 x Wood
Screws
Power Cable
with Connector


