TRENDnet TEW-716BRG User Manual Download Page 13


© Copyright 2012 TRENDnet. All Rights Reserved. 


TRENDnet User’s Guide


TEW-716BRG 

12


PBC (Software/Virtual Push Button) 

Basic Settings > Wireless >WPS Setup 
 

In addition to the hardware push button located physically on your router, the router 

management page also has push button which is a software or virtual push button you 

can click to activate WPS on your router. 
 
1. Log into your router management page (see “

Access your router management page

” 

on page 18). 

2. Click on 

Basic Settings, Wireless

, and click on 

WPS Setup 

in the bottom. 

3. To add a wireless device to your network, simply the push the WPS button on the 

wireless device (consult wireless device’s User’s Guide for length of time), you are 

connecting, then in your router management page next to 

Config Method, 

select 

Push Button

, click 

Trigger

 to start WPS authentication. 


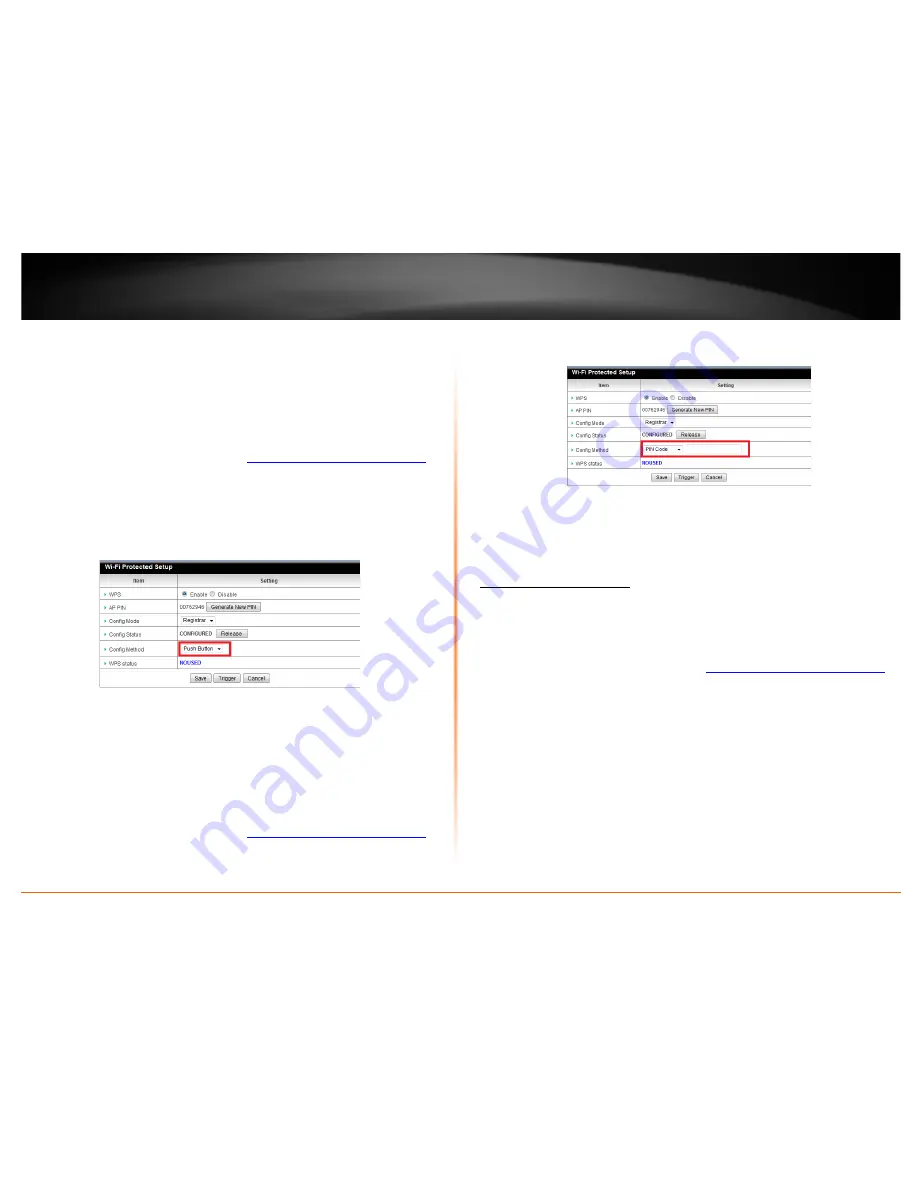
PIN (Personal Identification Number) 

Wireless >WiFi Protected Setup 
 

If your wireless device has WPS PIN (typically an 8-digit code printed on the wireless 

device product label or located in the wireless device wireless software utility), you can 

use this method. 
 
1. Log into your router management page (see “

Access your router management page

” 

on page 18). 

2. Click on 

Basic Settings, Wireless

, and click on 

WPS Setup 

in the bottom. 

3. Next to 

Config Method 

select 

PIN Code

, enter the WPS PIN of the wireless device you 

are connecting and click 

Trigger


Note: 

You may need to initiate the WPS PIN on your wireless device first when using this 

method. Refer to your wireless device documentation for details on the operation of 

WPS. 


Basic wireless settings 

Basic Setting > Wireless 
 

This section outlines available management options under the Basic Wireless sub tab.  

 
1. Log into your router management page (see “

Access your router management page

” 

on page 18). 

2. Click on 

Basic Settings

 and click on 

Wireless

3. To save changes to this section, click 

Apply

 when finished. 

Summary of Contents for TEW-716BRG

Page 1: ...Copyright 2012 TRENDnet All Rights Reserved TRENDnet User s Guide Table of Contents i...

Page 2: ...your router login password 18 Set your router date and time 18 Manually configure your Internet connection 19 Change your router IP address 20 Set up the DHCP server on your router 20 Set up DHCP res...

Page 3: ...devices connected to your router 32 View NAT activity of your router 32 Configure your router log 33 Enable SNMP on your router 34 Add static routes to your router 34 Enable dynamic routing on your ro...

Page 4: ...hang the TEW 716BRG on the back of a laptop screen while working The TEW 716BRG makes it easy to share a single Internet connection while at the airport job site carpooling or even while on vacation U...

Page 5: ...ns Actual data throughput and coverage will vary depending on interference network traffic building materials and other conditions Product Hardware Features Bottom View Power Port Connect the included...

Page 6: ...This LED indicator will be blinking green rapidly while data is transmitted or received by your wireless clients or wireless network devices connected to your router Hanging Clip Remove the hanging cl...

Page 7: ...d connections How to set up a home network 1 For a network that includes Internet access you ll need Computers devices with an Ethernet port also called network port or wireless networking capabilitie...

Page 8: ...the power switch of the TEW 716BRG to the On position and verify that the LEDs are turned on 5 Connect your computer wirelessly to the TEW 716BRG The default SSID Wireless Network Name of the TEW 716...

Page 9: ...to have the router automatically detect your 3G WAN settings Click Next to continue 10 Enter the Network ID SSID you would like to assign to the router 11 Select the wireless security settings you wo...

Page 10: ...yption type however are limited to 54Mbps WPA Auto This setting provides the router with the ability to detect wireless devices using either WPA or WPA2 encryption Your wireless network will automatic...

Page 11: ...th 64 bit or 128 bit Note It is recommended to use 128 bit because it is more secure to use a key that consists of more characters Key 1 4 o This is where you enter the password or key needed for a co...

Page 12: ...ur wireless devices to your network Push Button Configuration PBC method o RECOMMENDED Hardware Push Button method with an external button located physically on your router and on your client device o...

Page 13: ...Identification Number Wireless WiFi Protected Setup If your wireless device has WPS PIN typically an 8 digit code printed on the wireless device product label or located in the wireless device wireles...

Page 14: ...ill broadcast uncheck Auto then click the drop down list and select the desired Channel for wireless communication The goal is to select the Channel that is least used by neighboring wireless networks...

Page 15: ...nything that generates RF noise such as microwaves radios and baby monitors If possible upgrade wireless network interfaces such as wireless cards in computers from older wireless standards to 802 11n...

Page 16: ...Query Check if you want to log the action when someone accesses the specific URLs Privilege IP Address Range Setting a group of hosts and privilege these hosts to access network without restriction D...

Page 17: ...is recommended that these settings remain set to default unless you are knowledgeable about the effects of changing the firewall rule configuration It is possible to have undesirable functionality fr...

Page 18: ...Inbound Filter at the bottom of the outbound packet filter page Next to Inbound Packet Filter check the Enable option to enable inbound filtering Select Allow all to pass except those match the follow...

Page 19: ...your preferred language Enter the default user name and password and then click Login Default Password admin Change your router login password Basic Setting Change Password 1 Log into your router mana...

Page 20: ...connection Basic Setting Network Setup 1 Log into your router management page see Access your router management page on page 18 2 Click on Basic Setting and click on Network Setup 3 In the WAN Type d...

Page 21: ...need to access your router management page using your new router IP address to access the router management page e g Instead of using the default http 192 168 10 1 using your new router IP address wi...

Page 22: ...pecial applications also called port triggering see Special Applications on page 25 1 Log into your router management page see Access your router management page on page 18 2 Click on Basic Setting cl...

Page 23: ...the Internet A ping is network communication test to check if an device with IP address is alive or exists on the network By disabling this feature you can conceal your router s IP address and existen...

Page 24: ...Security Setting and click on Miscellaneous 3 Select Enable and click Save to apply the settings Remote IP Range It is recommended to leave this setting as to allow remote access from anywhere on the...

Page 25: ...Using this feature is more secure compared to using DMZ see DMZ on page 23 in which DMZ forwards all ports instead of only specific ports used by an application An example would be forwarding a port...

Page 26: ...st on a specific port or range of ports or trigger port port range from a device on your network and once a request is detected by your router the router will forward a single port or multiple ports o...

Page 27: ...ice on destination on the Internet Port range to use 1 65535 Note You will need to specify the ports to apply QoS QoS Priority Choose from three priority queues to apply High Normal and Low Enable Che...

Page 28: ...d during the time period specified in the schedule and deactivated during the time period not specified Router Maintenance Monitoring Reset your router to factory defaults Toolbox Reset to Default You...

Page 29: ...ed settings would be lost and would require you to manually reconfigure all of your router settings instead of simply restoring from a backed up router configuration file To backup your router configu...

Page 30: ...the Reset button during the upgrade If you are upgrade the firmware using a laptop computer ensure that the laptop is connected to a power source or ensure that the battery is fully charged Disable s...

Page 31: ...Status Device Information You may want to check the system information of your router such as WAN Internet connectivity wireless and wired network settings router MAC address and firmware version 1 Lo...

Page 32: ...router Statistics Information Octets Displays the amount of octets has passed through the router Unicast packets Displays the total amount of unicast packets that has gone through the router Multicas...

Page 33: ...reless device has been connected and the MAC address of each wireless device View NAT activity of your router Status NAT Status You may want to check the wireless devices connected to your router 1 Lo...

Page 34: ...ote If you would like to discard the changes click Undo before you click Save Clicking View Log will bring you to log page Configuration Toolbox System Information See the View your router log section...

Page 35: ...have SNMP write access IP 1 4 Enter up to four IP addresses of external SNMP servers e g 192 168 10 250 SNMP Version Select the correct SNMP version to match the SNMP version of your external SNMP ser...

Page 36: ...r local networks through other routers If other routers support dynamic routing such as RIP Routing Information Protocol you can enable this feature on your router to automatically learn the required...

Page 37: ...ding Rules Virtual Server Special AP Miscellaneous o DMZ o UPnP Security Setting Status Packet Filter Domain Filter URL Blocking MAC Control Miscellaneous o Administrator Time Out o Remote Administrat...

Page 38: ...g Based on IEEE 802 11n technology USB USB 2 0 USB 1 1 USB Port 1 x USB 2 0 port for 3G USB adapter Internet 1 x USB 2 0 mini Type B power port WAN Connection Type USB 3G Compatible Mobile Networks UM...

Page 39: ...n click Obtain an IP address automatically and click OK Note If you are experiencing difficulties please contact your computer or operating system manufacturer for assistance Q I am not sure what type...

Page 40: ...ote If you are experiencing difficulties please contact your computer or operating system manufacturer for assistance How to configure your network settings to obtain an IP address automatically or us...

Page 41: ...network settings can be used as general guidelines however it is strongly recommended that you consult your computer or operating system manufacturer directly for assistance on the proper procedure fo...

Page 42: ...tax and other fees WARRANTIES EXCLUSIVE IF THE TRENDNET PRODUCT DOES NOT OPERATE AS WARRANTED ABOVE THE CUSTOMER S SOLE REMEDY SHALL BE AT TRENDNET S OPTION REPAIR OR REPLACE THE FOREGOING WARRANTIES...

Page 43: ......

Reviews: