56
1. AUDIO SYSTEM OPERATION
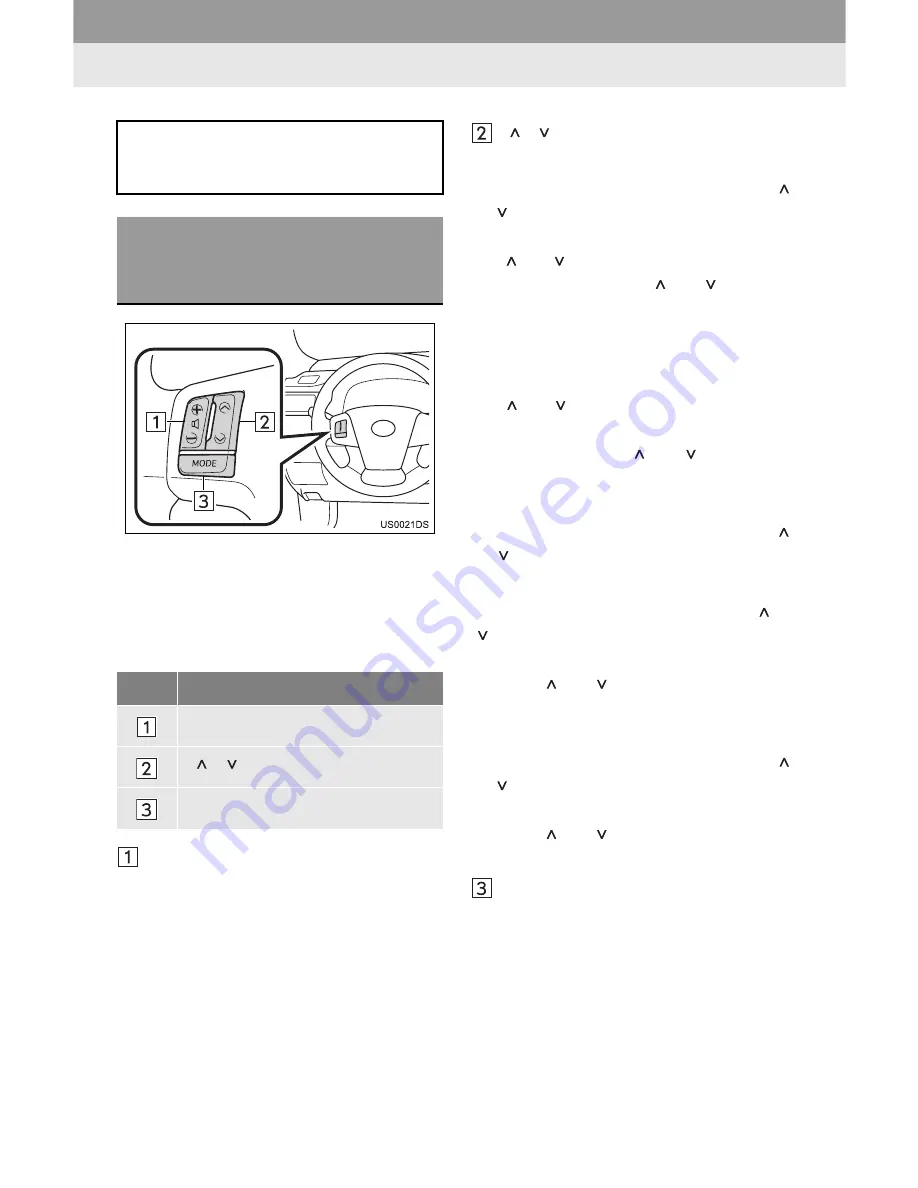
11. STEERING SWITCHES
”
The design and switch position may differ
depending on the vehicle. For details, see
the Pictorial index of the vehicle
“Owner’s
Manual”
.
”
Details of the specific switches, controls,
and features are described below.
Volume control switch
”
Press the
“+”
side to increase the volume.
The volume continues to increase while
the switch is being pressed.
”
Press the
“-”
side to decrease the vol-
ume. The volume continues to decrease
while the switch is being pressed.
“ ” “ ” switch
w
Radio
To select a preset station
: Press the
“ ”
or “ ”
switch.
To seek a radio station
: Press and hold
the
“ ” or “ ”
switch until you hear a beep.
If you press either the
“ ” or “ ”
switch in
seek mode, the seek mode will be can-
celled.
w
CD player
To select a desired track or file
: Press
the
“ ” or “ ”
switch.
To select a desired folder (MP3/WMA)
:
Press and hold the
“ ” or “ ”
switch until
you hear a beep.
w
iPod
To select a desired song
: Press the “ ”
or “ ” switch.
w
USB memory
To select a desired file
: Press the
“ ” or
“ ”
switch.
To select a desired folder
: Press and
hold the
“ ” or “ ”
switch until you hear a
beep.
w
Bluetooth
®
audio player
To select a desired track
:
Press the
“ ”
or “ ”
switch.
To select a desired album
: Press and
hold the
“ ” or “ ”
switch until you hear a
beep.
“MODE”
switch
”
Press the
“MODE”
switch to select an
audio mode. Each press changes the
mode sequentially if the desired mode is
ready to use.
”
To turn the audio system on, press the
“MODE”
switch.
”
Press and hold the
“MODE”
switch until
you hear a beep and the music will pause
or be muted. By the same operation, it is
released.
Some parts of the audio system can be
adjusted with the switches on the
steering wheel.
STEERING SWITCHES (WITH
TWO DIRECTION STEERING
SWITCH)
No.
Switch
Volume control switch
“ ” “ ”
switch
“MODE” switch
Summary of Contents for Display Audio system
Page 4: ...iv 1 BASIC INFORMATION BEFORE OPERATION ...
Page 7: ...4 ...
Page 64: ...66 1 AUDIO SYSTEM OPERATION ...
Page 86: ...90 1 VEHICLE INFORMATION ...
Page 113: ...118 1 SETUP OPERATION ...
Page 120: ...126 1 REAR VIEW MONITOR SYSTEM ...
Page 124: ...5 1 BASIC INFORMATION BEFORE OPERATION ...
Page 184: ...71 6 NAVIGATION SYSTEM INFORMATION 2 APPLICATION Map ...
Page 185: ...72 6 NAVIGATION SYSTEM INFORMATION ...
Page 208: ...96 2 ENTUNE SERVICE ...
Page 209: ...97 2 ENTUNE SERVICE 3 APPLICATION THE OTHERS ...
Page 293: ...184 3 SHORT MESSAGE FUNCTION ...
Page 301: ...194 1 VEHICLE INFORMATION ...
Page 318: ...212 1 SETUP OPERATION ...
Page 325: ...220 1 REAR VIEW MONITOR SYSTEM ...
Page 332: ...1 2 3 4 5 6 7 7 ...
Page 350: ...25 Pictorial index Luggage compartment Back window P 80 ...
Page 568: ...245 2 5 Driving information 2 When driving ...
Page 634: ...313 3 3 Using the Bluetooth audio system 3 Interior and exterior features Microphone ...
Page 653: ...332 3 4 Using the hands free phone system for cellular phone Microphone ...
Page 782: ...462 4 3 Do it yourself maintenance Access Cab models ...
Page 814: ...494 4 3 Do it yourself maintenance ...
Page 865: ...546 5 2 Steps to take in an emergency ...
Page 866: ...5 When trouble arises 547 5 2 Steps to take in an emergency ...
Page 907: ...588 6 2 Customization ...
Page 910: ...592 ...
Page 912: ...594 ...
Page 913: ...595 7 For owners ...
Page 914: ...596 ...
Page 915: ...597 7 For owners ...
Page 916: ...598 ...
Page 917: ...599 7 For owners ...
Page 918: ...600 ...
Page 919: ...601 7 For owners 590 ...
Page 920: ...602 ...
Page 921: ...603 7 For owners ...
Page 928: ...610 ...
Page 942: ...625 What to do if Instrument cluster Center panel ...
Page 944: ...627 Memo ...


