44
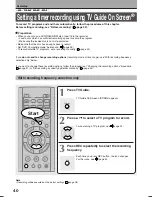
Deleting a recording
2 ways are available.
On LISTINGS
1) Press TV Guide.
2) Select a TV program you have set to record
(icon displayed).
3) Press Menu.
“Episode Options” appears.
4) Press / to select “delete recording”, then
press ENTER.
5) Read the message, and press / to select
“yes” (if you want to delete), then press ENTER
to exit.
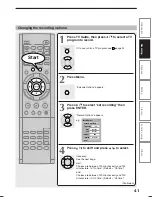
On SCHEDULE
1) Press TV Guide.
2) Press / to select “SCHEDULE”.
3) Press / to select a TV program you have set
to record.
4) Press Menu.
“Episode Options” appears.
5) Press / to select “delete recording”, then
press ENTER.
6) Read the message, and press / to select
“yes” (if you want to delete), then press ENTER
to exit.
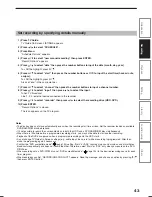
Correcting a recording
1) Press TV Guide.
2) Press / to select “SCHEDULE”.
3) Press / to select a TV program you have set
to record.
4) Press Menu.
“Episode Options” appears.
5) Press / to select “edit recording”, then
press ENTER.
“Record Options” appears.
6) Change the selections.
7) Press / to select “schedule recording”, then
press ENTER.
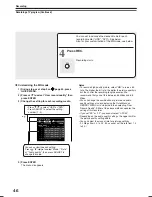
To stop a scheduled recording
1) Press TV Guide.
2) Press / / / to select the TV program
currently being recorded.
3) Press REC repeatedly until the recording icon
disappears.
Turning the power off automatically after
completing a scheduled recording
1) While executing a scheduled recording, press
QUICK MENU.
Quick Menu appears.
2) Press / to select “Auto power off” then
press ENTER.
Keeping the power on even after the scheduled
recording finished
If the recorder turns itself on to execute a scheduled
recording, it will turn itself off after finishing the
recording. You can restrict this and keep the recorder
powered on.
1) While executing a scheduled recording, press
QUICK MENU.
2) Press / to select “Continuous power on”
then press ENTER.
Setting a timer recording using TV Guide On Screen
®
(Continued)
Recording
RD-XS35SU/SC_Ope_E_p031-048
06.1.17, 7:23 PM
44
Summary of Contents for RD-XS35SC
Page 58: ......
Page 82: ......
Page 130: ......
Page 140: ......
Page 169: ...169 Others Function setup Library Editing Playback Recording Introduction Memo ...
Page 197: ...RD XS35SU SC_Inst_E_p19 28 06 2 13 4 33 PM 28 ...
Page 223: ...54 RD XS35SU SC_Inst_E_p48 56 06 2 13 4 34 PM 54 ...
Page 224: ...55 Introduction Connections Basic setup Memo RD XS35SU SC_Inst_E_p48 56 06 2 13 4 34 PM 55 ...
Page 225: ...Printed in China Printed on 70 Recycled Paper RD XS35SU SC_Inst_E_p48 56 06 2 13 4 34 PM 56 ...


