background image

90

Notes

• This recorder supports a limited number of chapters on a

disc. If exceeded, a message appears. In this event,
reduce the number of chapters by merging chapters. (
page 91)

• “EDIT MENU Chapter Editing” can also be viewed by

selecting “Chapter Editing” from “EDIT MENU Main
Menu”.

• To exit “EDIT MENU Main Menu”, press EDIT MENU

button.

• Making chapters in a title (Original) does not affect the

related titles (Playlist).

• There may be a small difference between a location you

marked and a chapter division actually played.

• Pausing a recording automatically creates a chapter

division.

• During relay recording (

 page 56), a chapter division is

automatically created at the start point of relay record.

• If you create chapters in a title which is stored in the HDD

and copy the title to a DVD-R/RW, the chapter divisions
may shift.

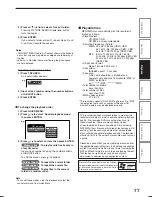
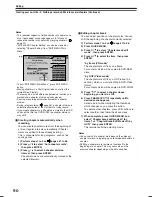
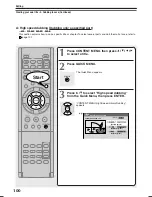
Creating chapters automatically when
recording

You can create chapter marks from the beginning of
a title at regular intervals automatically. (Chapter
marks are added to those already existing.)
This is convenient for long programs, such as live
sports games.

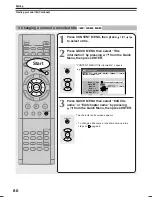
1) Perform steps 1 to 4 on 

 pages 87 to 88.

2) Press   /   to select “Auto chapter create”,

then press ENTER.

3) Press   /   to select a chapter division

interval, then press ENTER.

Chapter divisions are automatically marked at the
selected intervals.

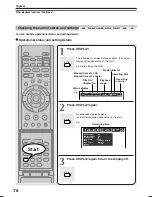
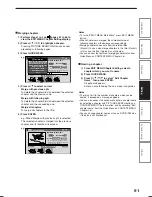
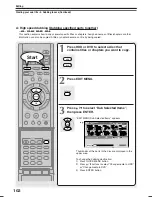
Editing chapter break

You can adjust positions of chapter marks. You can
shift the beginning of a chapter currently selected.

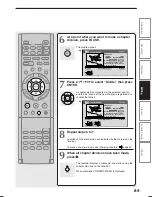
1) Perform steps 1 to 5 on 

 page 87 to 88.

2) Press QUICK MENU.

3) Press   /   to select “Chapter break edit

mode”, then press ENTER.

4) Press   /   to select the item, then press

ENTER.

“by frame (VR mode)”

The chapter mark shifts by one frame.
For contents which will be copied to DVD-RAM
discs.

“by GOP (Video mode)”

The chapter mark shifts by a GOP (about 0.5
second), which is a unit of editing in DVD-Video
format.
For contents which will be copied to DVD-R/RW.

5) Press   /   to select a chapter whose

beginning you want to shift.

6) Press FRAME (II  /  II) repeatedly until a

desired scene appears.

Select a point while monitoring the thumbnail,
which changes as you press the button.
To operate other chapters, press   /   buttons to
select another, then follow the above steps.

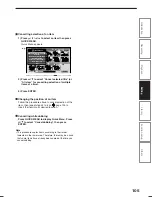
7) When complete, press QUICK MENU, and

select “Chapter break edit mode off (by
frame)” or “Chapter Break Edit Mode off (by
GOP)” then press ENTER.

The recorder exits the adjusting mode.

Notes

• You cannot shift a chapter mark beyond the adjacent

chapter marks or a logical gap on recorded data within a
chapter.

• Shifting a chapter mark restores a thumbnail to the

beginning of a chapter. This may occur also on the
previous chapter depending on the data condition.

1

1

5

4

3

2

Main Menu

Chapter Editing

Chapters can be divided on frame
basis.  Chapters can be merged and
assigned names.

Title

Merge

Divide

Source

Edit Functions

Dub Selected Items

Rate Conv. Items

Combine ORG Title

DVD-Video Creation

Del Selected Items

DVD-Video Finalizing

Playlist Editing

Chapter Editing

DV Recording

HDD

e.g.

EDIT

MENU

Creating your own title – 2: Dividing a recorded title into several chapters (Continued)

Editing

RD-XS35SU/SC_Ope_E_p083-091

06.1.17, 7:24 PM

90

Summary of Contents for RD-XS35SC

Page 1: ...DER RD XS35SU RD XS35SC H Printed in China Printed on 70 Recycled Paper HDD DVDVIDEO RECORDER RD XS35SU RD XS35SC 2006 Toshiba Corporation PM0025866010 P000453940 OWNER S MANUAL Read INSTALLATION GUIDE first OPERATIONS GUIDE DIGITAL VIDEO Others RD XS35SU SC_Ope_E_p001 170 06 1 18 1 53 PM 1 ...

Page 2: ...Deleting multiple specified parts 55 Others 56 To protect recorded content 56 Relay recording 56 Technical Information 56 Playback Playing recorded contents CONTENT MENU 60 Playing at various speeds 62 Playing a DVD video disc 66 Other playback functions 68 Pausing a TV broadcast to resume later Pause TV 68 Playing a TV program currently being recorded Chase Play 69 Zooming a picture 70 Watching a...

Page 3: ...of Library data 136 Checking remaining space 139 Viewing a number and space of a disc 139 Viewing remaining space 139 Function setup Customizing the function settings 142 DVD player settings 146 Picture Audio settings 149 Display settings 151 Operational settings 152 DVD recorder operation 153 Management settings 155 Others Before calling service personnel 160 Output sound conversion table 162 Err...

Page 4: ...n Introduction Caution for safety Read SAFETY PRECAUTIONS IMPORTANT SAFETY INSTRUCTIONS Precautions and all other sections of the INSTALLATION GUIDE that came with this product prior to reading this OPERATIONS GUIDE ...

Page 5: ...may be necessary to delete some or all of the programs on the HDD Playback Restrictions This owner s manual explains the basic instructions for this recorder Some DVD video discs are produced in a manner that allows specific or limited operation during playback As such the recorder may not respond to all operating commands This is not a defect in the recorder Please refer to the notes on compatibl...

Page 6: ...D RAM discs comply with the global standard DVD VR Video Recording format and are optimized for recording of TV programs You can rewrite repeatedly without deterioration of an image quality erase unnecessary parts divide a chapter or specify playback area by frame Its cartridge is suitable for a longer term storage and family use and its large capacity of 9 4 GB allows more recording space DVD R R...

Page 7: ...l not be allowed by the recorder Disc Mark Specification Remarks CD R CD RW VIDEO CD 12cm 43 4 in 8cm 31 4 in Color system NTSC Version 1 1 and 2 0 Audio CD 12cm 43 4 in CD DA audio CD format Depending on the disc status playback may not be possible 12cm 43 4 in 8cm 31 4 in DIGITAL VIDEO Toshiba is not liable for any damage or loss caused directly or indirectly by the malfunction of this recorder ...

Page 8: ...ones are recommended In order to record highly detailed data make sure the disc is clean DVD RAM discs with cartridges are easier to handle in this regard Do not open the cartridge shutter The disc may not play or may not be recorded or edited once it becomes dirty There are two types of DVD RAM cartridges removable TYPE 2 4 and not removable TYPE 1 It is recommended you do not remove the disc eve...

Page 9: ...ction of the TV On DVD R discs Standards DVD R for General Ver 2 0 discs can be used for recording and playback Discs compatible with the following recording speeds can also be used Ver 2 0 2X Ver 2 0 4X Ver 2 0 8X Ver 2 0 16X Select discs labeled for video for recording 120 min etc Recording conditions Images for which copying is prohibited or restricted copy once or copy prohibited cannot be rec...

Page 10: ... may cause warping Choosing a disc Continued Structure of disc contents Normally DVD video discs are divided into titles and the titles are subdivided into chapters VIDEO CDs audio CDs are divided into tracks Title Divided contents of a DVD video disc Roughly corresponds to a story title in short stories Chapter Divided contents of a title This corresponds to a chapter in a story Track Divided con...

Page 11: ... recorded contents to use the disc repeatedly Initialize the disc Yes Yes If the disc has been executed DVD Video finalizing process first cancel the process then delete contents Yes If the disc has been executed DVD Video finalizing process first cancel the process then delete contents Yes Yes After you execute DVD Video finalizing process on a recorded disc you cannot name a title or create a th...

Page 12: ...he HDD y DVD button DVD indicator page 45 66 Press this to operate a disc inside the disc tray u Disc tray page 20 Loads a disc into the disc drive The above illustration displays the front panel with the cover open See the following page on how to open or close the cover i Front panel display page 18 o OPEN CLOSE button page 20 Opens and closes the disc tray 0 Remote sensor page 18 in INSTALLATIO...

Page 13: ...tion setup Introduction Others To open or close the cover on the front panel Put your finger on the left edge of the cover and pull it down to open Note Do not place a heavy object on the cover while it is open Doing so may damage the recorder ...

Page 14: ... a cable set top box While the recorder is turned off the TV Guide On Screen system changes channels on your cable box via the G LINK cable to download free program listings for your area You are also able to control your cable set top box using the recorder s remote control after you connect the G LINK cable and go through the TV Guide On Screen setup q Power cord page 21 in INSTALLATION GUIDE w ...

Page 15: ...15 Recording Playback Editing Library Function setup Introduction Others o OUTPUT jacks page 21 23 24 26 in INSTALLATION GUIDE Outputs video and audio signals to a connected TV or amplifier ...

Page 16: ...x to parts and controls Continued Introduction Remote control 1 2 3 4 5 6 7 8 9 10 11 12 13 14 34 35 37 36 39 41 43 44 46 48 50 52 45 47 49 51 40 42 38 27 32 31 30 29 33 26 28 25 24 23 22 21 20 18 19 17 15 16 ...

Page 17: ...ton page 45 66 INSTANT SKIP button page 61 INSTANT REPLAY button page 61 CONTENT MENU button page 60 TV Guide button page 23 40 SKIP button page 62 PICTURE SEARCH button page 62 ENTER button page 23 24 60 142 PLAY button page 66 127 STOP button page 50 61 111 QUICK MENU button page 46 92 button page 123 TOP MENU button page 66 MENU button 1 RETURN button 2 TV CODE button page 44 in INSTALLATION GU...

Page 18: ...Illuminates when an audio CD is loaded y DVD RAM indicator Illuminates when a DVD RAM disc is loaded 1 3 4 5 8 9 6 7 10 2 15 17 11 12 14 13 16 u DVD RW R indicator Illuminates when a DVD RW R disc is loaded i CHP Chapter indicator Illuminates when a chapter number is displayed o SAP indicator Illuminates when receiving a SAP broadcast 0 Angle icon page 67 Illuminates when playing a scene recorded ...

Page 19: ...l title number and time The display may not change depending on the disc or recording conditions 4 TITLE indicator Illuminates when a title number is displayed 5 TRK Track indicator Illuminates when a track number is displayed 6 Channel indicator Displays the current channel or other numbers such as a title number track number bit rate or input selection 7 Multi display Displays the current time e...

Page 20: ... this recorder After turning the power on the recorder will output TV channel signals to the connected TV also in the stop mode You can select a desired channel by pressing the CH Page or the number buttons Loading a disc Check disc compatibility beforehand page 6 7 and use a proper playable disc Caution Keep your fingers well clear of the disc tray Neglecting this may cause serious personal injur...

Page 21: ...uch a case executing an initialization of the disc using the formatting function of the recorder may refresh it However all contents stored on the disc will be completely erased by this initialization process This recorder may indicate alert messages with some DVD RAM discs right after insertion If such a disc is used for playback or recording on other equipment all data in the disc may be damaged...

Page 22: ... the disc some of these may not appear Playback Pause Stop Fast forward Fast reverse Forward skip Reverse skip Forward slow motion Reverse slow motion Forward frame by frame playback Reverse frame by frame playback Recording Recording pause When title playback is completed Instant skip Instant replay Chapter division Forward skip by 1 20 Reverse skip by 1 20 The number of the mark varies according...

Page 23: ...he LISTINGS service contains a list of up to 8 days of TV programs including today To view a TV program Press to select a TV program and press ENTER To view information of a TV program Press to select a TV program and press Info To close the Info Box press Info twice To access options e g recording reminder etc See the next page You also have access to the following services besides the LISTINGS s...

Page 24: ... the option to select lock or unlock You can access a TV program advertised in a panel ad While the panel ad is highlighted press ENTER If the TV program is airing now you would tune to it A panel menu appears if the program is in the future Services and options For more details press Info while navigating through the various options and services SEARCH If you select this service and press ENTER c...

Page 25: ...tter on the left of the cursor DEL erases a letter on the right of the cursor SPACE inserts a space on the left of the cursor CLR erases all letters view as sort by Press to select group Titles of recorded TV programs are listed list Displays a detailed list of every recorded program Press to select title Listed in alphabetical order date Listed by date and time with most recent date and time firs...

Page 26: ...a reminder manually See below e g schedule reminder date start end channel input auto tune TV frequency Your selections below are entered and this menu is closed Press the number buttons to input the date month day year To shift the highlight press Press the number buttons or to input the time hour minute am pm To shift the highlight press Press the number buttons to input a channel number Press t...

Page 27: ...ault options then press ENTER 2 Press to select General defaults then press Menu General Defaults appears Grid Options cancel done go back to Setup Air service on tune channel channel position 1 8 channel service tune channel position Press to select on or off on the channel is always displayed off the channel is never displayed auto hide the channel hides automatically Press to select the signal ...

Page 28: ...en press Menu Remind Defaults appears Remind Defaults cancel done go to Service Bar 2 min early when yes auto tune TV e g auto tune TV when Press to select whether the channel is automatically tuned to the channel you have selected Press to select the time you want the reminder to appear 3 When complete press to select done then press ENTER Note on watching TV with TV Guide On Screen If you leave ...

Page 29: ... full of the screen You can change playback speed See page 62 3 To stop press STOP A current channel broadcast appears TV xxxch accompanies Pressing REC button starts recording On recording see page 32 ENTER PLAY STOP EASY NAVI HDD DVD 005 2006 03 24 07 00am TV 18 TV 12ch Original 00 54 30 00 10 15 HDD Play Time Time Slip TR TV Viewing Delete Title Finalize R RW Format RAM RW Dubbing Setup TV Guid...

Page 30: ...us 2 Press to select an item then press ENTER To exit Quick Menu Press QUICK MENU again Alternatively Select Exit with then press ENTER To exit the EASY NAVI Press EASY NAVI again Note For a disc other than the specified one the finder cannot be operated To play the disc exit the EASY NAVI then press the PLAY button or select the Play Contents function e g Quick Menu Title information Restart titl...

Page 31: ... DVD video disc VIDEO CD Audio CD For CD containing JPEG or MP3 WMA files see page 74 76 Most instructions are based on remote control operation unless otherwise noted You can use the buttons on the remote control and those on the main unit as well when they have the same function If copy protection signal is detected during recording on this recorder the recording automatically pauses and a messa...

Page 32: ... RAM disc Confirm disc compatibility and prepare an available DVD RAM disc to record on page 6 8 Some discs may need to be formatted for use on this recorder A message will appear asking you to execute disc formatting Follow the procedure displayed on screen to format the DVD RAM disc compatible with this recorder Some DVD RAM discs formatted on a PC may not be usable Note This recorder records on...

Page 33: ... unit is executing the final recording process writing managing information Operations other than changing channels cannot be done until this icon disappears The time for executing this process differs depending on the recording time or capacity of the disc Note that all recording content may be deleted if the unit is disconnected from a wall outlet or a power failure occurs during recording If a ...

Page 34: ...ore recording Continued Recording Be sure to read this section prior to using a DVD RAM RW disc on this recorder for the first time For DVD R initializing is not necessary Initializing a DVD RAM RW disc Logical format A disc should be initialized in the following cases The recorder may display a message to request you to do so e g When you use a DVD RAM RW disc on this recorder for the first time ...

Page 35: ...The disc which has errors during writing because of dirt on the disc and cannot be further recorded or cannot initialize normally You need to start physical formatting from the first step again when you use a failed disc Physical formatting does not work if the disc contains a lot of voids beyond the limitation of this recorder If an error occurs in physical formatting ERR 01 appears in the front ...

Page 36: ...cursor to the language selection area by pressing buttons Then press buttons to select a language then press ENTER button Title information MENU CONTENT 003 Chapter English Spanish French German Italian etc Input 1 2 3 4 5 6 7 8 9 Select Return Save Caps Lock Space All Clear BkSp Direct 0 9 Cursor CLEAR CLEAR INSTANT SKIP INSTANT SKIP DELETE DELETE 1 2 3 4 5 6 7 8 0 9 q w e r t y u i p o a s d f g...

Page 37: ...before the cursor Select BkSp by pressing buttons then press ENTER button Alternatively press DELETE button 1 Press button to select an input mode 2 Press buttons to select a character then press ENTER button The selected character is input on the cursor 3 Repeat steps 1 and 2 to enter characters 4 When finished press button to save the characters The characters you entered appears Notes You can e...

Page 38: ... 2 1 2 2 You can repeatedly record delete the contents Playing discs recorded on this recorder with other DVD players Some DVD players may not play these discs Available disc DVD R disc Ver 2 0 Once you record on a DVD R disc you cannot delete or rewrite the contents in DVD Video mode Video mode DVD RW disc Ver 1 1 1 2 Finalizing a DVD R RW disc You can see the contents recorded on a DVD R RW disc...

Page 39: ...o CHP Create This is the setting to divide a title into some chapters It is convenient to skip scenes Off Chapter dividing is not available 5 min 10 min 15 min 20 min Select an interval for chapter dividing Note When the number of chapters reaches a limit chapters are not divided anymore The limit number of chapters is dependent on conditions of a DVD R RW disc 1 Press SETUP SETUP menu appears 2 S...

Page 40: ...der Load a disc which has sufficient remaining space to record the program Make sure the loaded disc is not write protected Make sure that the disc has enough space to record Set DVD Compatible mode beforehand page 39 To record satellite TV programs set a recording manually page 43 If you do not need to change recording options recording mode or time range see With recording frequency selection on...

Page 41: ...set recording then press ENTER Record Options appears e g 4 Press to shift and press to select frequency See the next page start Choices are between 120 minutes early and 120 minutes late to On time Default On time end Choices are between 120 minutes early and 120 minutes late to On time Default On time Continued Start Record Options cancel schedule recording once frequency On time start end HDD r...

Page 42: ...n Meaning Keeps infomation without executing until the frequency is changed For a program on the same channel and at the same start time For a program on the same channel and at the same start time of Monday through Friday For new manual recording and new manual reminder only For a program on the same channel and at the same start time on the selected day of the week Reminder Once Regularly Daily ...

Page 43: ...he icon appears on the TV program Notes The disc tray does not close automatically even when the recording start time arrives Set the recorder loaded an available DVD RAM R RW disc beforehand It it not possible to record the same contents onto both the HDD and a DVD RAM R RW disc simultaneously When there is little time before a programmed recording starts you may not be able to start another reco...

Page 44: ...ons appears 5 Press to select edit recording then press ENTER Record Options appears 6 Change the selections 7 Press to select schedule recording then press ENTER To stop a scheduled recording 1 Press TV Guide 2 Press to select the TV program currently being recorded 3 Press REC repeatedly until the recording icon disappears Turning the power off automatically after completing a scheduled recordin...

Page 45: ...ecording modes 2 modes SP LP with fixed picture and sound quality and 1 MN for your customizing e g When a single sided 4 7GB DVD RAM is used Continued Preparation When you record on a DVD RAM R RW disc load it into the recorder Load a disc which has sufficient space available to record the program Make sure the loaded disc is not write protected If you record on a DVD R RW disc set DVD compatible...

Page 46: ...D or DVD Press ADJUST to select the setting number 1 5 You can customize each setting Press to select Mode Rate or Audio quality then press ADJUST to change the value Notes To record a high quality picture select MN to raise a bit rate The higher the bit rate the better the picture quality is but the shorter the recording length becomes We recommend that you set this between 6 0 Mbps and 6 8 Mbps ...

Page 47: ... to Main or SAP the unit records the same sounds on both the left and right channels when receiving monaural sound When receiving the multi channel sound the selected sound Main or SAP is recorded on both the left and right channels Depending on the disc contents pressing REC button may take a longer time to start recording When a starting time of a programmed recording comes a recording in execut...

Page 48: ...mming dubbing title chapter naming title thumbnail setting etc This function is not available during the 10 minutes overlapped portion of the relay recording page 56 Depending on the data condition playback may pause During a dubbing job this function is not available When recording contents which will be copied to a DVD R RW disc later on Before recording set DVD compatible mode page 154 to On Ea...

Page 49: ...RW discs cannot record contents with copy restriction signal embedded copy protected or copy once contents DVD RAM discs can record copy once contents Some satellite programs via a connected tuner may contain both 4 3 pictures and 16 9 pictures DVD R RW discs cannot record such contents under the restriction of the DVD Video standard To record these programs use the HDD or DVD RAM discs Depending ...

Page 50: ...rear panel L 2 To record pictures from equipment connected to the INPUT2 jacks on the front panel L 3 To record pictures from equipment connected to the INPUT3 jacks on the rear panel L U To record pictures currently played page 110 2 Press HDD or DVD to select a recording media HDD To record on the HDD DVD To record on a DVD RAM R RW disc 3 Press REC of this recorder to start recording 4 Start pl...

Page 51: ... equipment during recording on this recorder Operations such as pausing resuming fast forwarding CUE and fast reversing REVIEW etc may produce noises which may be detected as copy protection signals Therefore first start playback on the source equipment to confirm that the desired source can be played properly and then start recording on this recorder Do not operate the source equipment during rec...

Page 52: ...to the DV IN terminal is turned on Recording DV IN terminal Start EDIT MENU ENTER ENTER A A A B B DV Recording Option Setting EDIT MENU e g Next Change DV Chapter Create Off By Date By Scene DV Audio Input User record quality Stereo1 L2 R2 Stereo2 L2 R2 DVD Video CHP Create Off 5min 10min 15min 20min 4 6 D M1 SP Main Menu Source Edit Functions Dub Selected Items Rate Conv Items Combine ORG Title D...

Page 53: ...pears 6 Play a connected DV format digital video camera and pause the playback at a desired scene 7 Press to select Rec then press ENTER Recording starts To pause the recording select Pause by buttons then press ENTER button To stop the recording select Stop Save by buttons then press ENTER button ENTER ENTER ENTER A A A B B DV Recording Return End Full Display EDIT MENU e g Recording Media DVD F ...

Page 54: ...ideo camera such as a PC Depending on the connected DV format digital video camera the display at step 5 may not show Manufacturer or Equipment If the DV IN terminal is connected to more than one DV format digital video camera DV recording may not work properly For proper functioning of DV recording connect only one device to the DV IN terminal DV recording is not compatible with Relay recording D...

Page 55: ...e chapter affects all the corresponding playlist title chapters Deleting all chapters in a title erases the title itself Titles and chapters which contain still pictures cannot be deleted On a DVD R RW disc deleting is not possible if the disc is finalized page 122 Chapters in a DVD R RW disc cannot be deleted On a DVD RW disc only the last title recorded can restore the disc capacity by being del...

Page 56: ...RW depends on the bit rate Mbps amount of data transmitted per second which can be varied in MPEG2 Moving Picture Experts Group2 compression technology As an example when you pour water into a bucket from a faucet the faster the water flows the sooner the bucket is filled with water On the other hand the slower the water flows the more slowly the bucket is filled A DVD RAM R RW is so to speak like...

Page 57: ...nd The standard differenciates D M1 and D M2 in data volume to use D M1 and D M2 are applied the digital recording technology for consumer products of Dolby Laboratories Dolby Digital 192 kbps is set for D M1 and Dolby Digital 384 kbps for D M2 L PCM Linear PCM Sound recording format like Dolby Digital However sounds are converted into digital signals and recorded as they are without compression T...

Page 58: ......

Page 59: ...Playback Play your favorite contents Playing recorded contents CONTENT MENU Playing a DVD video disc Other playback functions ...

Page 60: ...vely To turn off CONTENT MENU press CONTENT MENU button Absence of operations for longer than about 15 minutes also turns off CONTENT MENU The mark is displayed in every thumbnail when HDD RAM title play page 152 is set to Title resume When set to Serial playback it is displayed in a thumbnail last operated You can change a thumbnail picture See page 126 You cannot display CONTENT MENU for DVD R R...

Page 61: ...ending on the structure of a disc some operations may be limited Depending on playback conditions some operations may not work Erasing content 1 On CONTENT MENU select an unnecessary title chapter 2 Press QUICK MENU A Quick Menu appears 3 Press to select Title delete 4 Press ENTER The confirmation message appears 5 Press to select Yes or No then press ENTER again HDD Original 2004 06 08 07 00 am T...

Page 62: ...isc or a DVD R RW disc you can locate chapters only in the current title if DVD title stop page 148 is set to On To access chapters in other titles set to Off However in this instance even though you press SKIP button to go back to the previous title playback will not start from the last chapter of the title but from the first chapter SK I P Viewing still pictures Playing a disc that contains stil...

Page 63: ...t tab is set to PROTECT page 8 Playing the digest Skip Search This feature repeats playback of about 5 seconds and skip of 1 minute from the beginning to the end of a recorded title so that you can view the digest of it 1 Perform steps 1 and 2 on page 60 and select a title that you want to view the digest 2 Press QUICK MENU Quick Menu is displayed 3 Press to select Special playback mode then press...

Page 64: ...uick Menu appears 2 Press to select Special playback mode then press ENTER e g 3 Press to select Play all ORG titles then press ENTER e g Playback starts from the beginning of title 1 Notes To stop Play all ORG titles press STOP button twice However do this when you are playing a title recorded in the HDD or a DVD RAM disc while recording page 48 will stop the recording Alternatively press QUICK M...

Page 65: ...04 06 12 09 00 pm TV 3 0 52 40 Original 2004 07 12 11 00 pm TV 4 0 30 08 HDD e g Quick Menu Title information Create thumbnail High speed dubbing Rate conversion dubbing Chapter function Edit functon Special playback mode Save captured images Disc information Display changeover Specific page jump Title delete Exit Arrange Sort by genre Sort by original Sort by playlist Jumping to a specified page ...

Page 66: ...your TV when viewing DVD video discs Notes The instructions above describe basic procedures which may vary depending on the contents of a DVD video disc If different instructions appear on the TV screen follow those instructions If you display the top menu during playback and press TOP MENU button again without selecting any title the recorder may resume playback from the point where you first pre...

Page 67: ...subtitles automatically Depending on the scene subtitles may not appear immediately after you set the subtitle function to on Some DVD video discs will allow you to change subtitle languages and turn subtitles on or off only via the disc menu Selecting the camera angle If the scene was recorded with multiple angles you can easily change the camera angle of the scene you are watching 1 Press ANGLE ...

Page 68: ...verse Slow motion Press SLOW button Forward reverse frame by frame play First press PAUSE button then press FRAME button To resume normal playback press PLAY button You can play in fast forward to within 10 seconds prior to the current broadcast 3 Press TIMESLIP to exit this mode The recorder stops storing the broadcast on the HDD A message appears and asks you whether you will save the stored dat...

Page 69: ...ress PLAY button You can play in fast forward to within 10 seconds prior to the current broadcast 4 Press TIMESLIP to exit The current broadcast returns Notes Time slip recording playback stops when the capacity of a disc is filled up You can play a location where the recorder stopped the recording The time slip recording playback cannot begin if the disc has no remaining space The playback pictur...

Page 70: ...ZOOM DVD VIDEO VCD DVD R DVD RW HDD DVD RAM Watching a TV broadcast in the sub window P in P playback During playback you can watch a TV broadcast in the sub window P in P Picture in Picture 1 During playback press P in P A sub window program on the air or on the recording appears 2 Press to select the position of the sub window You can shift the sub window in following 4 directions is the moving ...

Page 71: ...s chapters and tracks are numbered By entering these numbers you can access a desired section 1 Press T SEARCH e g 2 Press to select a section title or chapter you want to locate e g 3 Press the number buttons to enter a number of the section e g To enter 25 press 2 then press 5 4 Press ENTER Notes Pressing CLEAR button resets the numbers To clear the display press T SEARCH button several times de...

Page 72: ...in DVD VIDEO DVD R Language name sound recording system No of channels e g VCD Stereo Stereo L Stereo R Back to Stereo The display turns off if you do not operate for more than 3 seconds If you press buttons to select Output you can select the audio output setting page 150 by using ADJUST buttons Sounds in playback You can play SAP and or stereo broadcasts with this recorder Refer to steps 1 and 2...

Page 73: ...Mono Mono Stereo Stereo L R Stereo Mono Mono Mono Stereo On Stereo SAP SAP SAP Stereo Mono SAP SAP SAP Stereo Stereo L R Stereo Mono Mono Mono Stereo This will be Stereo when a recording is made with L PCM selected Notes Some discs allow you to change audio selections only via the disc menu If this is the case press MENU button and choose the appropriate language from the selections on the disc me...

Page 74: ...n CONTENT MENU Picture List page 75 to operate DVD OPEN CLOSE To stop playback slide show Press STOP If you press PLAY button after pressing STOP button playback will start from the photo you stopped at To pause playback slide show Press PAUSE To resume press PAUSE button again or press PLAY button To skip photos During playback press SKIP button repeatedly To skip forward To skip backward To rota...

Page 75: ...cs CD ROM CD R CD RW is not recommendable CD physical format Mode 1 Mode 2 XA Form 1 File system ISO9660 Level 1 2 or Joliet File name A file name should be in alphabet and numerals only and must incorporate JPG extension e g JPG Total number of folders Less than 256 Total number of files Less than 1000 Some files may not display their own entire image depending on the size Some discs may not perm...

Page 76: ... backward Selecting a track in the disc 2 ways are available On CONTENT MENU Audio List 1 Press CONTENT MENU button CONTENT MENU Audio List appears Notes WMA tracks copy protected cannot be played The DIGITAL AUDIO OUT BITSTREAM PCM jack outputs MP3 WMA sounds in the linear PCM format regardless of the current Audio out select page 150 selection You cannot change the playback speed of MP3 WMA play...

Page 77: ...n from the applicable copyright owners to download copyrighted content including music files in any format including the MP3 and WMA formats prior to the downloading thereof Toshiba has no right to grant and does not grant permission to download any copyrighted content Microsoft Windows Media and the Windows Logo are trademarks or registered trademarks of Microsoft Corporation in both the United S...

Page 78: ...tatus and settings You can confirm operational status and setting details DISPLAY DISPLAY Title No Chapter No Status display Mode indicator Elapsed time of a title Elapsed time of a chapter Playback mode Operating disc Receiving channel e g DISPLAY DVD VIDEO VCD CD DVD R DVD RW HDD DVD RAM 002 3 00 10 29 00 05 15 0005 Stereo Title repeat HDD Title Chapter Virtual surround DNR Recording Picture Qua...

Page 79: ...Total playing time of a current title In the case of a VIDEO CD or audio CD it shows the total playing time of the disc Elapsed recording time per 30 minutes Recording end time if it comes within 30 minutes Elapsed time Locator Shows the current location TIME BAR Changing the location of the time bar While the time bar is displayed press The time bar shifts up and down Turning off the time bar Pre...

Page 80: ...eat the entire disc Repeat all PL titles To repeat all playlist titles in a disc Cancel repeat in Repeat playback mode To resume normal playback Playback of the HDD or a DVD RAM disc stops Notes Some discs may not permit repeat operation You cannot use the repeat playback function in conjunction with the random playback function If you press STOP button during repeat playback this operation is can...

Page 81: ...CT 24 T CT 05 T CT 15 T CT 25 T CT 06 T CT 16 T CT 26 T CT 07 T CT 17 T CT 27 T CT 08 T CT 18 T CT 28 T CT 09 T CT 19 T CT 29 T CT 10 T CT 20 T CT 30 T CT 2 Press to select the next box then perform step 1 To select another chapter in the same title you do not need to select the title number Repeat these steps if necessary You can program up to 30 selections into memory 3 Press ENTER Memory playba...

Page 82: ......

Page 83: ... You can create your own movie from your assembled scenes Save your favorite videos in DVD discs Creating your own title Creating a DVD Video using DVD R RW DVD Video finalizing process Other editing functions ...

Page 84: ...he original title or the playlist For example make a playlist and copy it to a DVD RAM Then delete original titles on the HDD It can save time and effort and retain continuity in the HDD space However when moving a copy once program from the HDD to a DVD RAM disc delete unnecessary chapters from original titles For details page 98 Running All HDD titles delete regularly prevents fragmentation from...

Page 85: ...al title Playlist editing Collect your favorite chapters to make them as one title Playlist If an original title is deleted a playlist will be also deleted because playlists are fictitious titles e g Making a playlist by collecting scenes of cats from title 1 The world of cats and dogs Title 1 Title 2 Title 3 Title 4 Title 5 Title 6 Playlist Editing A fictitious playlist title that is different fr...

Page 86: ...chapter name by pressing from the Quick Menu then press ENTER The character entry screen appears To change a title name or chapter name see the steps on page 36 Start QUICK MENU ENTER Title information MENU CONTENT 2 06 32 3 3 12 Su 10 00 pm 2006 03 12 10 00pm TV 3 2006 CH Title 006 0 04 15 Media Documentary Culture General Quality Rate Audio 0001 Chapter Original XP Mode LP 2 2 D M1 Off DVD Mode ...

Page 87: ...ng Fast reverse Fast forward Slow motion You cannot divide a title of a DVD R RW disc into chapters It is possible to create chapters in a DVD R RW disc by pressing CHP DIVIDE button while recording at the desired points or by selecting an option that inserts chapter marks automatically while recording at regular intervals page 154 Precise method If you want to modify the chapter division or want ...

Page 88: ...ast scenes are played ENTER ENTER PLAY 00 54 30 00 00 00 03F 00 00 00 4 3 B Chapter Editing Original Aspect Ratio Location To create new chapter select desired start point via remote To set press enter Divide Title 004 Chapter 0001 HDD EDIT MENU Fishing Guide e g HDD Original 2004 06 08 07 00 am TV 4 Title List Page MENU CONTENT 1 2 0 53 45 Original 2006 03 24 11 00 pm TV 6 0 29 50 Original 2006 0...

Page 89: ...erging chapters page 91 9 When all chapter divisions have been made press The recorder displays a message and starts saving the chapter divisions on the time bar When complete CONTENT MENU is displayed PAUSE ENTER 00 54 30 00 00 21 24F 00 00 00 4 3 B Chapter Editing Original Aspect Ratio Location To create new chapter select desired start point via remote To set press enter Divide Title 004 Chapte...

Page 90: ...ected 1 Perform steps 1 to 5 on page 87 to 88 2 Press QUICK MENU 3 Press to select Chapter break edit mode then press ENTER 4 Press to select the item then press ENTER by frame VR mode The chapter mark shifts by one frame For contents which will be copied to DVD RAM discs by GOP Video mode The chapter mark shifts by a GOP about 0 5 second which is a unit of editing in DVD Video format For contents...

Page 91: ...lso from Quick Menu on CONTENT MENU Chapter List Naming a chapter 1 From EDIT MENU Chapter Editing select a chapter which you want to name 2 Press QUICK MENU 3 Press to select Edit Chapter Name then press ENTER A keyboard appears Enter a name following the on screen icon guides Notes There is a limit to the number of chapters which can be named If exceeded a message appears You can also access the...

Page 92: ...le information Create thumbnail High speed dubbing Rate conversion dubbing Chapter function Edit functon Special playback mode Save captured images Disc information Display changeover Specific page jump Title delete Exit HDD Original 2004 06 08 07 00 am TV 4 Title List Page MENU CONTENT 1 2 0 53 45 Original 2004 06 24 11 00 pm TV 6 0 29 50 Original 2006 04 07 07 00 am TV 8 0 54 30 Original 2006 04...

Page 93: ...ss ENTER A cursor appears indicating the point where the selected item will be inserted Continued Cursor ENTER ENTER ENTER A B Source Title Object Title Original PlayList Start Title Entire Time HDD EDIT MENU e g Playlist Editing A A A B B Source Title Object Title Original PlayList Start Title Entire Time HDD EDIT MENU e g Playlist Editing A A A B B Source Title Object Title Original PlayList Sta...

Page 94: ...use if a gap between the content is played There may be a small difference between the chapter boundary and the actual playback picture A title or chapter which is being edited cannot be selected as an item You cannot add a title of still pictures or a title or a chapter which contains both still and moving pictures to a playlist By copying dubbing a Playlist a title Original of the same contents ...

Page 95: ... From CONTENT MENU select a playlist to correct 2 Press QUICK MENU 3 Press to select Playlist re editing and then press ENTER EDIT MENU Playlist editing appears Follow the procedure from steps 5 on page 93 add or delete parts as necessary Note You cannot edit a title Playlist of still pictures or a title Playlist which contains both still and moving pictures Using a part in a Playlist also in anot...

Page 96: ... of the week to make a Playlist 4 Press ENTER Notes Only titles Original can be sorted The maximum number of sorted titles on a DVD RAM disc is 99 If you modify the recording start time or date of one of the recorded serials the title will not be sorted out Contrarily any program can be sorted if its channel recording start time and date are modified as the same as others Playlist Mon Fri can sort...

Page 97: ... a DVD R RW in the DVD Video format or when a DVD RAM disc was recorded with the other equipment which is not compatible with this recorder s recording format and you want to copy it to a DVD R RW Set DVD compatible mode to Main or SAP Rate conversion dubbing of several parts You can select titles and chapters and change the data size and copy them all at once Use this function when you unify the ...

Page 98: ... which you have executed Move The recorder cannot copy move the following discs DVD VIDEO VIDEO CD Audio CD CD R CD RW If you cannot copy move for some other reason such as insufficient disc capacity etc a message will appear on screen In such a case follow the instructions in the message Depending on the content associated information such as data management may not be copied moved You cannot cop...

Page 99: ...ed if a timer program recording starts While recording and dubbing are in progress at the same time CONTENT MENU and LIBRARY MENU will not appear Playing a recorded title while recording another on the same disc page 48 is not possible while dubbing HDD DVD HDD HDD HDD HDD DVD DVD DVD HDD DVD DVD Playback Available Not available Not available Available Recording Available Not available Not availab...

Page 100: ...title 2 Press QUICK MENU The Quick Menu appears 3 Press to select High speed dubbing from the Quick Menu then press ENTER CONTENT MENU High Speed Library Dubbing appears DVD R DVD RW HDD DVD RAM 2006 03 30 09 00pm TV 4 High Speed Library Dubbing MENU CONTENT 0 52 40 Original Saves Original Deletes Original Move Saves Original Same Disc Copy e g Start QUICK MENU ENTER Creating your own title 4 Dubb...

Page 101: ...o power off 3 Press ENTER button Notes A title or a chapter becomes a title by being copied Same Disc job using a DVD RAM disc will take a longer time Same Disc is not available on DVD R RW Move is not available between the HDD and DVD R RW Some parts in DVD R RW may be divided if dubbed For a copy once permitted content only moving from the HDD to a DVD RAM disc is available Executing this will d...

Page 102: ...ess EDIT MENU 3 Press to select Dub Selected Items then press ENTER EDIT MENU Dub Selected Items appears Thumbnails of the parts in the disc are displayed in the upper area To change the dubbing destination 1 Press QUICK MENU button 2 Press buttons to select Change media to HDD or Change media to DVD 3 Press ENTER button DVD R DVD RW HDD DVD RAM HDD EDIT MENU ENTER A A A B Dub Selected Items Title...

Page 103: ...rea destination media 6 Press to select a location to place the selected part then press ENTER If there are no parts in the lower area leave the cursor to the left and press ENTER button The selected part is inserted into the location of the cursor Continued A B Title Original HDD EDIT MENU e g Dub To DVD Dub Selected Items Source will be Title ENTER A B Title Original Start Capacity HDD EDIT MENU...

Page 104: ...them If you do not want to leave the items on the original disc delete them in the procedure for Deleting recorded contents page 55 To confirm the contents of an item first select the item by using buttons and press QUICK MENU button to display Quick Menu Press buttons to select Preview or Title information then press ENTER button Each part when selected shows its name at the bottom of the menu fo...

Page 105: ...peat steps 4 to 6 on page 103 to insert the item into its desired location Cancelling while dubbing Press QUICK MENU to display Quick Menu Press to select Cancel dubbing then press ENTER Note This procedure copies items according to their order indicated in the lower area Therefore there may be a case that some items have already been copied at the time you cancel dubbing A A A B B Dub Selected It...

Page 106: ...Rate conversion dubbing can be performed in two different ways part by part or multiple parts in one time To dub multiple parts in one time the same rate is applied to all parts You cannot set a different rate to each part 1 Press HDD or DVD to select a disc containing the parts that you want to dub 2 Press CONTENT MENU then press to select a title 3 Press QUICK MENU Quick Menu appears 4 Press to ...

Page 107: ...sired setting Auto rate selection The recorder automatically selects the highest possible rate calculating from current unoccupied volume on the disc This operation does not insure full recording of any length program or whole use of unoccupied volume 7 Press ENTER Copying starts To confirm the job progress press TIME BAR button to display the time bar The time bar cannot be copied When copying is...

Page 108: ...s recorded on the destination media as a title You can cancel selection of an individual part 1 Press buttons to select an item then press QUICK MENU button Quick Menu appears 2 Press buttons to select Cancel selected title or All clear for cancelling selection of multiple items at a time 3 Press ENTER button Rate Conversion Dubbing for multiple parts EDIT MENU ENTER A B Rate Conv Items Title Orig...

Page 109: ...sc a DVD RAM disc to the HDD the positions of chapter marks copied on the DVD RAM disc the HDD may be slightly different in frame from the original positions In Rate conversion dubbing from the HDD to a DVD R RW disc the positions of chapter marks copied on the DVD R RW disc may be slightly different by the GOP Groups Of Pictures from the original positions In Rate conversion dubbing from a DVD R ...

Page 110: ...ration Make sure that the destination disc has adequate available remaining space When you want to copy to the HDD load a disc you want to play Example To copy from a DVD RAM disc to the HDD 1 Press INPUT SELECT or CH Page repeatedly to select LineU A black screen appears 2 Press HDD 3 Press REC Recording starts 4 Press DVD 5 Start playing Line U Stereo DVD R DVD RW HDD DVD RAM INPUT SELECT CH Pag...

Page 111: ... dubbing may cause slight deterioration in picture and sound quality of contents Screen menus such as CONTENT MENU or EDIT MENU cannot be recorded by Line U dubbing Line U dubbing cannot be set as programme recording When doing this procedure programmed recording must not be initiated If you display TV Guide On Screen playback is automatically canceled When setting the input to Line U audio output...

Page 112: ...ts if the disc contains too little contents or too many quality and picture settings etc If a start time of a programmed recording comes during this procedure the recording is made onto the HDD However while making a menu theme the recording is not executed Also programmed recordings to DVD media with Off setting of Relay recording page 155 are not executed If a programmed recording starts during ...

Page 113: ... chapter you want then press button To return to the title display press button again Continued EDIT MENU ENTER ENTER A A A B B DVD Video Create Selected Items Sourece Title Original Next HDD EDIT MENU e g Creating Media DVD Capacity A A A B DVD Video Create Selected Items Sourece Title Original Next HDD EDIT MENU e g Creating Media DVD Capacity 1 1 5 4 3 2 Main Menu Chapter Editing Chapters can b...

Page 114: ...o cancel selected parts see page 120 To change the title chapter name or thumbnail before selecting 1 Select the part that you want to change and press QUICK MENU button 2 Press the buttons to select Edit title name or Modify title thumbnail to change the title or Edit chapter name or Modify chapter thumbnail to change the chapter and press ENTER button 3 Use the entry screen to change the title o...

Page 115: ...he information you are going to write Press button to select Edit Name and press ENTER button to go to the character entry screen The number of characters is limited for the disc name you can enter If you selected None for Menu Create at step 8 select Writing on the bottom right corner and press ENTER button Skip to step 14 Continued ENTER A A A B B DVD Video Creation Option Settings EDIT MENU e g...

Page 116: ...e Menu Select EDIT MENU e g DO NOT MR SATO PLEASE JOIN US TO CREATE MANUALS LEAVE HERE DO NOT LEAVE HERE DO NOT LEAVE HERE DO NOT LEAVE HERE DO NOT LEAVE HERE DO NOT LEAVE HERE DO NOT LEAVE HERE DO NOT LEAVE HERE DO NOT LEAVE HERE DO NOT LEAVE HERE DO NOT LEAVE HERE DO NOT LEAVE HERE DO NOT LEAVE HERE DO NOT LEAVE HERE DO NOT LEAVE HERE DO NOT LEAVE HERE DO NOT LEAVE HERE DO NOT LEAVE HERE DO NOT ...

Page 117: ...e recorder When copying is completed a finalizing process follows This enables the disc to be played on a DVD video player When the process is completed a message Create another DVD Video now appears except when Auto power off see below is set If you select Yes you can make one more DVD R RW of the same content If you select No you can complete creating the DVD Video You can set the recorder to tu...

Page 118: ...d is including a 16 9 picture shape scene the DVD creation of the content may fail In this case set Set Aspect Ratio to 4 3 fixed on the menu Option Settings Even if the title is recorded with DVD compatible mode set to Main or SAP using a recorder other than this may cause failure when recording to a DVD R RW disc If the DVD Video creating fails to be completed most of the discs cannot be used ag...

Page 119: ... Loading 2006 03 30 05 09pm CH 3 Title 002 Chapter 0004 HDD EDIT MENU T001 00 00 23 e g Quick Menu Enter DVD Video menu name Delete name Delete all menus Exit To delete a captured image Press to select an image to delete then press QUICK MENU Press to select Delete menu then press ENTER Follow the message to operate To delete all captured images select Delete all menus Selecting color options on m...

Page 120: ...ill become unusable in most cases Canceling is not always possible A A A B B DVD Video Create Selected Items Sourece Title Original Next HDD EDIT MENU e g Creating Media DVD Capacity Quick Menu Cancel selected title Preview Preview all selected items Title information Clear all selected items Auto power off Exit To improve legibility of characters on menus Press to set Back ground color to On Then...

Page 121: ... select Cancel selected title and press ENTER button If you do not do this and continue the copying process an error may occur and the disc will be rendered useless Playing a created DVD Video You can play the DVD R RW in the same manner as you would play a DVD video disc See page 66 If you want to correct the contents of a DVD RW after the DVD Video creation procedure Cancel the finalization of t...

Page 122: ...VD R 1 Press EDIT MENU EDIT MENU Main Menu appears 2 Press to select DVD Video Finalizing 3 Press ENTER A display of option settings appears EDIT MENU ENTER ENTER A A A B B DVD Video Finalize Option Settings EDIT MENU e g Next Return Menu Create Title Chapter Title Chapter None Writing Test None Parts Test All Test Set Aspect Ratio Original 4 3 fixed 16 9 fixed Start Play Menu Title 1 After play o...

Page 123: ...rect color page 119 by pressing button Continued ENTER ENTER ENTER ENTER A B DVD Video Finalize Title Menu Select EDIT MENU e g DO NOT MR SATO PLEASE JOIN US TO CREATE MANUALS LEAVE HERE DO NOT LEAVE HERE DO NOT LEAVE HERE DO NOT LEAVE HERE DO NOT LEAVE HERE DO NOT LEAVE HERE DO NOT LEAVE HERE DO NOT LEAVE HERE DO NOT LEAVE HERE DO NOT LEAVE HERE DO NOT LEAVE HERE DO NOT LEAVE HERE DO NOT LEAVE HE...

Page 124: ...o select Return then press ENTER button you can go to the preview of the selected title menu To return to the preview of chapter menu press buttons to select a number next to Chapter Menu then press ENTER button 9 Press ENTER on EDIT MENU DVD Video Finalize Chapter Menu Select display and select Yes by then press ENTER A message appears to ask you if you want the power to turn off automatically or...

Page 125: ...If a start time of a programmed recording comes during a finalizing process the recording is made onto the HDD However while making a menu the recording is not executed Also when Relay recording is set to Off the recording will not start To cancel the finalize process DVD RW You can cancel the DVD Video finalizing process executed to a DVD RW disc so that the disc can be recordable again 1 During ...

Page 126: ...ONTENT 1 2 0 53 45 Original 2006 04 07 07 00 am TV 8 0 54 30 Original 2006 04 08 09 00 pm TV 10 0 51 28 Original 2004 06 12 09 00 pm TV 3 0 52 40 Original 2004 07 12 11 00 pm TV 4 0 30 08 HDD Original 2006 03 24 11 00 pm TV 6 0 29 50 e g Quick Menu Title information Create thumbnail High speed dubbing Rate conversion dubbing Chapter function Edit functon Special playback mode Save captured images ...

Page 127: ...NTENT MENU Title 002 Chapter 0001 e g Original HDD 2006 03 24 07 00 am TV 4 Title List Page MENU CONTENT 1 2 0 53 45 Original 2006 04 07 07 00 am TV 8 0 54 30 2006 04 08 09 00 pm TV 10 0 51 28 Original 2006 03 29 09 00 pm TV 3 0 52 40 2006 04 07 11 00 pm TV 4 0 30 08 HDD Original 2006 03 24 11 00 pm TV 6 0 29 50 e g Notes There may be a small difference between a thumbnail made on the Create Thumb...

Page 128: ...U Combine ORG Title appears 4 Press to select the first title to merge Press PICTURE SEARCH button to move to the previous or next page 5 Press ENTER The cursor appears in the lower area of the screen the title to merge to Cursor EDIT MENU ENTER ENTER ENTER A B Combine ORG Title Title Object HDD Original HDD EDIT MENU e g For so rce only 2 titles original A A A B B Object HDD Start combining Title...

Page 129: ...R button 8 Press to select Start combining and press ENTER then select Yes and press ENTER The combining process starts Notes You cannot stop the combining process after it has started You cannot combine titles if their length will exceed 9 hours You cannot combine a protected title or a title containing still pictures The title name of the first title is given to the title after combining The sec...

Page 130: ......

Page 131: ...Library To facilitate your collecting Using Library data Searching for a desired title Viewing Library data Checking remaining space ...

Page 132: ...ot display all characters of a registered name of a disc 1 Press LIBRARY LIBRARY MENU Title Summary All Titles appears 2 Press QUICK MENU Quick Menu appears 3 Press to select an item then press ENTER For details on each item see from the next page LIBRARY QUICK MENU ENTER HDD DVD RAM Title Summary All Titles MENU LIBRARY 1 2 HDD 2006 03 19 07 00pm 7 00 pm 11 00 pm 7 00 pm 9 00 pm 11 00 5 2006 03 1...

Page 133: ...HDD 2004 06 20 07 00pm 7 00 pm 11 00 pm 7 00 pm 9 00 pm 11 00 pm 9 00 pm 9 00 pm 9 00 pm 10 27 pm 5 2004 6 20 HDD 2004 06 19 11 00pm 4 2004 6 19 HDD 2004 06 18 07 00pm 3 2004 6 18 HDD 2004 06 17 09 00pm 3 2004 6 17 HDD 2006 03 12 11 00pm 2 2004 6 13 HDD 2006 03 12 09 00pm 4 2004 6 13 HDD 2006 03 10 09 00pm 2004 6 11 HDD 2006 03 8 09 00pm L1 2006 03 8 Su Sa Fr Th Su Su Fr We Tu HDD 2006 03 8 10 27p...

Page 134: ...6 03 8 10 27pm L2 2006 03 7 L1 etc e g 2 49 pm 3 21 Tu No Date Day Time CH Genre Title Name Specific Disc No Jump Disc No 0 0 1 Title Summary All Titles MENU LIBRARY 1 2 HDD 2006 06 19 07 00pm 7 00 pm 11 00 pm 7 00 pm 9 00 pm 11 00 pm 9 00 pm 9 00 pm 9 00 pm 10 27 pm 5 2006 03 19 HDD 2006 03 18 11 00pm 4 2006 03 18 HDD 2006 03 17 07 00pm 3 2006 03 17 HDD 2004 03 16 09 00pm 3 2006 03 16 HDD 2004 03...

Page 135: ...icon appear Note When you change settings of a DVD RAM disc load the DVD RAM disc Viewing disc information Disc information 1 From Quick Menu select Disc information by then press ENTER You can view information about the loaded disc To change the number or name of the DVD RAM disc 1 Press to select Edit Disc Number or Edit Disc Name then press ENTER button 2 Following the procedure on page 36 ente...

Page 136: ...s ENTER To cancel select No All title information is registered Notes To use title information in a DVD RAM disc recorded on another device as the Library data of the recorder be sure to follow the procedure of Registering a disc manually to add saved data to the Library system This information cannot be added automatically If you record content on a DVD RAM disc on the recorder and edit the conte...

Page 137: ...2 is erased To cancel select No Deleting all the Library information only Use this feature when you want to rearrange the whole Library information from the beginning 1 Press LIBRARY 2 Press QUICK MENU 3 Press to select Library management and press ENTER 4 Press to select Delete All DVD RAM information or Delete all library information Delete all DVD RAM information Deletes all Library information...

Page 138: ...the Library database 2 Press LIBRARY 3 Press QUICK MENU 4 Press to select Library management then press ENTER 5 Press to select Re inst all backup then press ENTER 6 Press to select Yes then press ENTER To cancel select No Note Do not use a DVD RAM disc which contains Library Management data registered to another recorder for backup data storage Library Management format may vary depending on the ...

Page 139: ...he specified title Checking remaining space You can check the remaining space of each disc prior to recording Library HDD DVD RAM Viewing remaining space DVD space remaining 1 From the Quick Menu select DVD space remaining by then press ENTER You can view the recording titles and the estimated space remaining per disc Note You can rearrange the list by selecting Arrange Narrowing or Jump from Quic...

Page 140: ......

Page 141: ...Function setup You can change the default settings to customize performance to your preference Customizing the function settings ...

Page 142: ...ext page e g When Display settings is selected 3 Press to select a desired item then press ENTER 4 Refer to the explanations on pages beginning from 146 to change the selection by or other buttons then press ENTER To select another item in the same group repeat steps 3 to 4 To shift to another group press O button then repeat steps 2 to 4 5 Press SETUP The setup display disappears and the setting ...

Page 143: ...50 Details To select a preferred language for disc menus To select a preferred language for the sound track To select a preferred language for subtitles To turn on or off a function that makes faint sounds easier to hear even if you lower the volume during late hour playback To turn on or off the vocal output during DVD KARAOKE disc playback To turn the parental lock function on or off To turn on ...

Page 144: ... pictures To turn on or off the start up screen setting that makes the background picture appear automatically when turning on the power To turn the screen saver on or off To select a display status when no video signals are present To select where you turn on or off closed caption To turn on or off the confirmation beeper announcing when each remote command is received To select whether or not a ...

Page 145: ...ters are to be automatically created at a specified interval for DVD R recording To activate or deactivate the 3D digital noise reduction To activate or deactivate the 3D digital filter to execute Y C Brightness Color separation To turn on or off a function that will automatically switch recording from a DVD RAM disc to the HDD when there is less than 10 minutes of space available on the DVD RAM d...

Page 146: ...ther language choice After pressing ENTER button follow steps 1 4 below 1 Obtain the language code of the preferred language from Language code list page 165 2 Select the first character by pressing buttons or ADJUST button 3 Press buttons to shift Select second character by pressing buttons or ADJUST button 4 Press ENTER button Note Some DVD video discs may not include your preset language In thi...

Page 147: ...ailable only for a DVD KARAOKE disc recorded in Dolby Digital Multi Channel format If you want to enjoy KARAOKE function connect an amplifier or other such device to this recorder DVD parental lock DVD VIDEO DVD video discs equipped with the Parental Lock function have a predetermined limitation level The limitation level or limitation method may differ depending on the disc For example the whole ...

Page 148: ...ect level 7 discs exceeding level 8 are locked and cannot be played back When US is selected its limitation level corresponds to the following settings Level 7 NC 17 Level 3 PG Level 6 R Level 1 G Level 4 PG13 To change the limitation level of Parental Lock function Follow step 1 3 above To change the password 1 Press STOP button 4 times after selecting On and Off in order and then press ENTER but...

Page 149: ...el OFF 1 2 3 After adjusting the items press ENTER button Progressive conversion DVD VIDEO VCD DVD R DVD RW HDD DVD RAM There are two types of source content in pictures recorded in DVD video discs film content pictures recorded from films at 24 frames per second and video content video signals recorded at 30 frames per second Make this selection according to the type of content being viewed Auto ...

Page 150: ...lt in Dolby Digital DTS or MPEG1 decoder is connected to this recorder When you play a disc recorded in Dolby Digital DTS or MPEG1 format digital audio signal is output Customizing the function settings Continued Function setup Analog 2ch Select this when a TV or other audio device is connected to this recorder via the ANALOG output connectors PCM Select this when a 2ch digital stereo amplifier is...

Page 151: ...15 minutes In time slip mode the playback pause is released If this function is set to On the recorder if freezes may return to the normal by leaving it for about 15 minutes or longer Off Deactivates the screen protector function On Activates the screen protector function Note Toshiba does not guarantee that this function protects the TV screen by all means Background Selects a screen color when r...

Page 152: ...3 WMA files take priority over JPEG files Note If this selection does not correspond to disc contents the recorder will take a longer time to start playback of the disc Operational settings Operation beep DVD VIDEO VCD CD DVD R DVD RW HDD DVD RAM Turn on or off a confirmation beeper announcing when a command is received Off Turns off the beep sound On Turns on the beep sound Note You cannot turn o...

Page 153: ... cannot set the rate from 1 0 to 2 0 SETUP e g HDD DVD Custom setting Setting Total recording time approx 71min with 4 7 GB unused Manual 6 6 Mode Rate Audio quality Manual 1 2 3 4 5 Setting 1 L PCM D M1 SP LP Manual Manual 6 6 4 6 2 2 6 0 3 2 SP 4 6 D M1 L PCM D M1 D M2 D M1 User record quality Picture record mode DVD R DVD RW HDD DVD RAM Adjusts problems with the brightness of video signals of T...

Page 154: ...ion In normal conditions select this Note Refer to the Notes in the above Rec DNR Aspect ratio Video mode DVD RW DVD R To set the aspect ratio when recording onto a DVD R RW disc 4 3 Fixes the aspect ratio at 4 3 16 9 Fixes the aspect ratio at 16 9 Note When the bit rate on User record quality is set to 1 0 Mbps and 1 4 Mbps pictures are recorded in 4 3 aspect ratio even if 16 9 is selected DVD co...

Page 155: ...ted Management settings Genre setting DVD R DVD RW HDD DVD RAM This registers a frequently used genre name onto the menu Genre names registered here are displayed in the Genre on Quick Menu 1 Press buttons to select a position in the Current genre list you want to change then press ENTER button A list of genres appears You can turn the pages using button 2 Press buttons to select a genre then pres...

Page 156: ...brary will be erased if disc is formatted Proceed Format e g HDD auto stop HDD Off Turns off the HDD auto stop mode On Turns the HDD drive off after recorder is idle for approximately 5 minutes When PLAY or REC button is pressed for the HDD while the HDD drive is turned off it takes a little longer time to play or record All HDD titles delete HDD This deletes all the titles on the HDD Only the rec...

Page 157: ... ADJUST buttons To change the date buttons can also be used in addition to ADJUST buttons 2 After setting all the items press ENTER 3 Press to select Yes then press ENTER Note If the clock is set with TV Guide On Screen this setting is not available Guide and Clock reset To correct the clock of the recorder This option includes the TV Guide On Screen resetting process followed by power off of the ...

Page 158: ...n settings Continued Function setup Mode SP LP MN Manual Setting of picture and sound quality for recording Audio quality D M1 D M2 L PCM DVD Yes Yes Yes HDD Yes Yes Yes DVD Yes Yes Yes HDD Yes Yes Yes DVD No No Yes HDD No No Yes ...

Page 159: ...Others Before calling service personnel Output sound conversion table Error codes on the display window Recording duration Language code list Specification ...

Page 160: ...ealer for adjustment Playback A DVD or CD does not play The format of the recorded data does not correspond to this recorder or the region number is neither 1 nor ALL Check the disc A defective or dirty disc is inside Change the disc The HDD mode is selected Press DVD button The HDD does not play The DVD mode is selected Press HDD button During playback picture noise appears Picture noise may appe...

Page 161: ...ed off overnight Check the connection and setup TV Guide On Screen again Listings are not provided for satellite services If you are using a cable box Ensure the G LINK cable is connected and its IR transmitter the G LINK wand is placed correctly in front of the cable box See page 25 INSTALLATION GUIDE Leave the cable box turned on all of the time and turn off the recorder when not in use or overn...

Page 162: ...z 20 bit 48 kHz 24 bit 48 kHz 16 bit 44 1 kHz 16 bit 44 1 kHz 16 bit Noise 48 kHz 20 bit 48 kHz 16 bit 48 kHz 20 bit 48 kHz 16 bit 48 kHz 16 bit Linear PCM 48 kHz 16 bit 48 kHz 20 bit 48 kHz 24 bit 96 kHz 16 bit 96 kHz 20 bit 96 kHz 24 bit Bitstream Analog 2ch PCM DVD video disc above does not include DVD R RW discs recorded on this recorder Do not select a connection or setting indicated as Noise...

Page 163: ...1A Different sound quality modes detected in the same part ERR 1B Invalid control information detected ERR 1C Parts created in other recorder ERR 1D Parts created with DVD compatible mode Off detected ERR 1E Invalid parts detected ERR 1F Unexpected error detected ERR 2E Menu encode error detected ERR 2F Overflow of the menu size detected ERR 30 Exceeded maximum number of menus detected ERR 31 Reco...

Page 164: ... 28 21 58 25 19 24 27 18 48 53 26 24 44 23 18 27 50 23 8 1 3 12 28 50 18 51 29 11 58 48 41 38 38 40 45 53 2 14 246 192 142 131 122 114 107 101 96 91 86 82 78 75 72 69 66 64 62 60 58 56 54 52 51 49 48 47 46 44 43 42 41 40 39 38 38 37 36 44 54 25 48 40 42 43 32 01 04 36 34 53 30 25 34 56 29 13 06 07 16 32 54 22 55 32 14 01 51 44 41 40 42 47 55 04 16 30 136 118 97 92 87 83 79 76 73 70 67 65 62 60 58 ...

Page 165: ...NA NE NO OC OM OR PA PL PS PT QU RM RN RO RU RW SA SD SG SH SI SK SL SM SN SO SQ SR SS ST SU SV SW TA TE TG TH TI TK TL TN TO TR TS TT TW UK UR UZ VI VO WO XH YO ZU Guarani Gujarati Hausa Hindi Croatian Hungarian Armenian Interlingua Interlingue Inupiak Indonesian Icelandic Hebrew Yiddish Javanese Georgian Kazakh Greenlandic Cambodian Kannada Kashmiri Kurdish Kirghiz Latin Lingala Laotian Lithuani...

Page 166: ...86Vp p 75Ω 1 at rear COMPONENT output Y PB PR Y output green 1 0Vp p 75Ω Sync signal negative Pin jack x 1 system PB PR output blue red 0 7Vp p 75Ω Pin jack x 1 system each AUDIO input 2 0V rms 22kΩ or above pin jack L R x 3 systems 2 at rear 1 in front AUDIO output 2 0V rms 2 2kΩ or below pin jack L R x 1 system 1 at rear DIGITAL AUDIO OUTPUT BITSTREAM PCM OPTICAL terminal Optical connector x 1 s...

Page 167: ...ultaneous use of this DAV Product and connected equipment or to units that have been modified or had the serial number removed altered defaced or rendered illegible Limited Ninety 90 Day Warranty on Labor TACP warrants this DAV Product and its parts against defects in materials or workmanship for a period of ninety 90 days after the date of original retail purchase DURING THIS PERIOD TACP WILL AT ...

Page 168: ...HE FOREGOING WARRANTY IS EXCLUSIVE AND IN LIEU OF ALL OTHER WARRANTIES GUARANTEES AGREEMENTS AND SIMILAR OBLIGATIONS OF TACP WITH RESPECT TO THE REPAIR OR REPLACEMENT OF ANY PARTS IN NO EVENT SHALL TACP BE LIABLE FOR CONSEQUENTIAL OR INCIDENTAL DAMAGES INCLUDING BUT NOT LIMITED TO LOST PROFITS BUSINESS INTERRUPTION OR MODIFICATION OR ERASURE OF RECORDED DATA CAUSED BY USE MISUSE OR INABILITY TO US...

Page 169: ...169 Others Function setup Library Editing Playback Recording Introduction Memo ...

Page 170: ...LATION GUIDE Read this booklet first Introduction Connections Basic setup PM0025865010 HDD DVDVIDEO RECORDER RD XS35SU RD XS35SC 2006 Toshiba Corporation DIGITAL VIDEO P000453930 H RD XS35SU SC_Inst_E_p01 06 2 13 4 33 PM 1 ...

Page 171: ... beam do not try to open the enclosure Visible and invisible laser radiation when open and interlocks defeated DO NOT STARE INTO BEAM FCC NOTICE This equipment has been tested and found to comply with the limits for a Class B digital device pursuant to part 15 of the FCC Rule These limits are designed to provide reasonable protection against harmful interference in a residential installation This ...

Page 172: ...are for use by qualified service personnel only To reduce the risk of electric shock do not perform any servicing other than that contained in the operating instructions unless you are qualified to do so In the spaces provided below record the Model and Serial No located on the rear panel of your recorder Model No Serial No Retain this information for future reference Location of the required labe...

Page 173: ...sult an electrician for replacement of the obsolete outlet 10 Protect the power cord from being walked on or pinched particularly at plugs convenience receptacles and the point where they exit from the apparatus 11 Only use attachments accessories specified by the manufacturer 12 Use only with the cart stand tripod bracket or table specified by the manufacturer or sold with the apparatus When a ca...

Page 174: ... produce heat 20 Do not cover the ventilating holes for the inside cooling fan 21 Do not use a cracked deformed or repaired disc These discs are easily broken and may cause serious personal injury and apparatus malfunction 22 If the apparatus should smoke or smell immediately disconnect the power cord from the wall outlet Wait until the smoke or smell stops then ask your dealer for a check and rep...

Page 175: ... in contact with the recorder for a long time They will leave marks on the finish The top and rear panels of the recorder may become warm after a long period of use This is not a malfunction When not in use For usual absence Be sure to remove the disc from the recorder and turn off the power Prolonged absence Unplug the recorder from a wall outlet Notes on locating Place the recorder on a level su...

Page 176: ...while the unit is turned on Do not disconnect the power plug from the wall outlet or break the power supply to the unit during recording or playing Before disconnecting the power plug be sure to press the power button and make sure the unit ends the finishing process and power turns off standby mode If the power plug is disconnected or power supply is disrupted while the unit is recording all reco...

Page 177: ... a place where the cold wind from the air conditioner directly hits the unit In summer when you use the unit in a hot and humid place just after you move the unit from an air conditioned room When you use the unit in a humid place Do not use the unit when moisture condensation may occur If you use the unit in such a situation it may damage discs and internal parts Connect the power cord of the uni...

Page 178: ...ed Content is not copyright protected Can be recorded Can be recorded Recording permitted once Can be recorded Cannot be recorded HDD Hard Disc Drive Program Recording Copy HDD HDD HDD HDD Recording prohibited Recording prohibited Cannot be recorded Cannot be recorded HDD Content that can be recorded once can only move from the HDD to a DVD RAM disc The original one is deleted after moving to a DV...

Page 179: ...e recorder page 27 Set up the TV Guide On Screen interactive program guide page 32 Your recorder is ready Read the separate volume OPERATIONS GUIDE Read carefully SAFETY PRECAUTIONS IMPORTANT SAFETY INSTRUCTIONS and Precautions pages 2 to 9 Check the supplied accessories See right Accessories Remote control Batteries AAA x 2 Coaxial cable Video Audio cable G LINK cable Owner s manual INSTALLATION ...

Page 180: ...this product Introduction Playback Restrictions This owner s manual explains the basic instructions for this recorder Some DVD video discs are produced in a manner that allows specific or limited operation during playback As such the recorder may not respond to all operating commands This is not a defect in the recorder Please refer to the notes on compatible discs later in this Introduction and t...

Page 181: ...le DVD players DVD RW discs which are rewritable can be used as well DVD R and DVD RW may not be the best suited format for recording TV programs Because of the way the discs are formatted it may not be possible to edit or divide the program as you may prefer to record secondary languages or programs that are copy protected in a way that allows only one copy NOTE Copy once protected programs gener...

Page 182: ... 31 4 in Region number 1 or ALL Color system NTSC The region number of this DVD recorder is 1 If region numbers corresponding to a specific playable area are printed on your DVD video disc and you do not find 1 or ALL or the disc is encoded to permit playback only in regions other than Region 1 disc playback will not be allowed by the recorder Disc Mark Specification Remarks CD R CD RW VIDEO CD 12...

Page 183: ...cord highly detailed data make sure the disc is clean DVD RAM discs with cartridges are easier to handle in this regard Do not open the cartridge shutter The disc may not play or may not be recorded or edited once it becomes dirty There are two types of DVD RAM cartridges removable TYPE 2 4 and not removable TYPE 1 It is recommended you do not remove the disc even when you can Refer to the instruc...

Page 184: ...mple Pictures are recorded in the standard picture shape 4 3 aspect ratio Pictures are recorded in the letter box picture shape 4 3 aspect ratio with horizontal black bars in the top and bottom of pictures Pictures are recorded in the 16 9 wide picture shape TVs with 4 3 aspect ratio will display them in the letter box style Pictures are recorded in the 16 9 wide picture shape TVs with 4 3 aspect ...

Page 185: ...ontinued Structure of disc contents Normally DVD video discs are divided into titles and the titles are subdivided into chapters VIDEO CDs audio CDs are divided into tracks Title Divided contents of a DVD video disc Roughly corresponds to a story title in short stories Chapter Divided contents of a title This corresponds to a chapter in a story Track Divided contents of a VIDEO CD or an audio CD E...

Page 186: ...omponent video inputs 26 Connecting to an audio system 27 Basic setup Starting up the recorder 30 A TV Guide On Screen setup 32 Setting up TV Guide On Screen 33 B Language setting 39 C Satellite set top box setting 40 D Output sound setting 44 E TV shape setting 46 F Remote control settings 48 Operating a TV with the remote control of this recorder 48 Operating the second and third TOSHIBA HDD DVD...

Page 187: ...rt batteries AAA size Make sure to match the and on the batteries to the marks inside the battery compartment 3 Close the cover Caution Never throw batteries into a fire Notes Be sure to use AAA size batteries Batteries should always be disposed of with the environment in mind Always dispose of batteries in accordance with applicable laws and regulations If the remote control does not operate corr...

Page 188: ...nputs Connecting to an audio system Connection procedure When you connect a TV equipped with audio video inputs Perform steps 1 2 and 3 When you connect an audio system Perform steps 1 2 3 and 4 Connecting an antenna and TV page 20 Connecting an antenna and TV page 20 Connecting to a TV equipped with audio video inputs page 21 Connecting to an audio system page 27 AV amplifier 1 3 2 4 RD XS35SU SC...

Page 189: ...able supplied To antenna input e g For connecting to a cable box or a satellite system see page 22 to 25 Note This connection ensures broadcast signals to be passed through to your TV Unlike a VCR you cannot assign channel 3 or 4 to playback from this recorder The antenna input only passes through the broadcast signals to your TV Therefore to playback video from this recorder you must connect it t...

Page 190: ...playback picture may be distorted due to copy protection To OUTPUT VIDEO To OUTPUT S VIDEO Video audio cable supplied If the TV has an S video input connect the recorder with an S video cable When using an S video cable do not connect the yellow video cable yellow white red red white To video inputs yellow To audio input To S video input 3 Connect to a TV equiped with audio video inputs Connect as...

Page 191: ...hile watching another scrambled or unscrambled You will need to set TV channel to the output channel of the cable box to record an unscrambled channel while watching a scrambled channel select a desired cable channel via the cable box This set up will allow you to record any channels through the cable box You will need to select a desired cable channel via the cable box while the recorder is turne...

Page 192: ...ngs the TV Guide On Screen system needs to be able to change channels on your cable box when the recorder is not in use Please connect the supplied G LINK cable to the G LINK jack of the recorder After you connect the G LINK cable you will be able to control your cable box using the recorder s remote control page 25 Cable box IN RD XS35SU SC_Inst_E_p19 28 06 2 13 4 33 PM 23 ...

Page 193: ...al of the satellite receiver 3 Connect the RF OUT TO TV terminal on the recorder and the antenna input connector of the TV When the satellite system has audio video outputs 1 Connect a satellite antenna to the satellite system 2 Connect the INPUT3 VIDEO L R jacks on the recorder and the audio video output jacks of the satellite system 3 Connect the OUTPUT VIDEO L R jacks on the recorder and the au...

Page 194: ... the satellite box and the recorder 1 Connect the plug of the supplied G LINK cable to the G LINK jack on the recorder 2 Place the transmitter near the cable satellite box connected to the recorder After connecting make the necessary settings page 32 When you use the recorder for the first time also make the settings Notes Do not connect an accessory other than the supplied G LINK cable to the G L...

Page 195: ...ate listening level Otherwise the speakers and your hearing may be damaged by sudden high volume sound Turn off the amplifier before you connect or disconnect the recorder s power cord If you leave the amplifier power on the speakers may be damaged Consumers should note that not all high definition television sets are fully compatible with this product and may cause artifacts to be displayed in th...

Page 196: ...sconnect the recorder s power cord If you leave the amplifier power on the speakers may be damaged Caution When you are connecting via the DIGITAL AUDIO OUTPUT BITSTREAM PCM jack an AV decoder that does not have Dolby Digital Digital Theater Systems DTS or MPEG2 decoding function be sure to set Audio out select to PCM from the on screen displays page 39 Otherwise high volume sound may damage your ...

Page 197: ...RD XS35SU SC_Inst_E_p19 28 06 2 13 4 33 PM 28 ...

Page 198: ...the recorder A TV Guide On Screen setup Setting up TV Guide On Screen B Language setting C Satellite set top box setting D Output sound setting E TV shape setting F Remote control settings Operating a TV with the remote control of this recorder Operating the second and third TOSHIBA HDD DVD video recorders with the remote control of this recorder RD XS35SU SC_Inst_E_p29 43 06 2 13 4 33 PM 29 ...

Page 199: ...for the first time the Welcome screen will be displayed after the Loading icon has disappeared See A TV Guide On Screen setup page 32 While displaying WAIT on the front panel do not operate the recorder or unplug the power cord Otherwise this may result in malfunction of the recorder Basic setup Starting up the recorder Loading e g ON STANDBY button ON STANDBY indicator ON STANDBY button Please no...

Page 200: ...s automatically in a few seconds OK message No OK Yes message Message 2 selections No selection message message OK 1 selection Set e g e g e g e g Turning the power off Press ON STANDBY button from the remote control or on the front panel of the recorder The Unloading icon appears on the right corner of the top of the screen and the ON STANDBY indicator turns red Then the power turns off Note If t...

Page 201: ...ons on page 33 1 Press TV Guide 2 Press to select SETUP 3 Press to select Change system settings then press ENTER 4 Press to select No repeat setup process then press ENTER Start TV Guide ENTER ENTER ENTER FOR SATELLITE USERS The TV Guide System is NOT compatible with satellite DBS systems Please select the option Don t remind me again in the Initial TV Guide Setup Screen shown in step 1 on page 3...

Page 202: ...ns to enable your TV Guide On Screen system now Or press the GUIDE Key on your DVD Recorder remote at any time What would you like to do now Using your DVD Recorder remote move up or down to highlight your answer Press Enter to choose Reminder Set up TV Guide On Screen now Remind me to set it up later Don t remind me again To supply your DVD Recorder with correct program listings the TV Guide On S...

Page 203: ...istings the TV Guide On Screen system needs to know the town or city where your DVD Recorder is installed Please enter the 5 digit ZIP code where your DVD Recorder is located STEP 1 Identifying Your Location To supply your DVD Recorder with correct program listings the TV Guide On Screen system needs to know if your DVD Recorder receives its signal from a cable service Do you have cable service co...

Page 204: ...You may have to look at the back of your DVD Recorder if you are unsure as an incorrect selection will result in a blue or snowy screen while watching TV Please indicate which DVD Recorder input the cable box is plugged into STEP 2 Configuring for Cable TUNER Line 1 To operate properly with your cable box the TV Guide On Screen system needs to know the channel your DVD Recorder is on when using th...

Page 205: ...lease consult your cable provider What brand of cable box is connected to this DVD Recorder STEP 2 Configuring for Cable Not listed Archer Cable Cinema Cabletenna The TV Guide On Screen will conduct a series of tests to find the correct code to control your cable box Follow steps A and B below STEP 2 Configuring for Cable A Please tune your cable box to channel 02 B Make sure to leave your cable b...

Page 206: ... supply your DVD Recorder with correct program listings the TV Guide On Screen system needs to know if you have attached an antenna to your DVD Recorder to receive over the air stations Do you have an antenna connected to your DVD Recorder STEP 3 Configuring for Antenna Yes No ENTER ENTER You have entered the following TV Guide On Screen system settings If any setting is marked INCOMPLETE you will...

Page 207: ...order should be turned OFF overnight 2 To view program listings press the GUIDE key on your DVD Recorder remote 3 You must redo TV Guide On Screen system setup if you Move your DVD Recorder to a new ZIP or postal code Cancel cable service or change cable boxes To enter the TV Guide On Screen system setup press the GUIDE key then go to the Menu Bar and highlight Setup Helpful information A TV Guide...

Page 208: ...plays in French ENTER SETUP Start e g SETUP Set Select Exit SETUP Return Guide and Clock reset Set Top Box setting Time Date setting Initial settings Language English ENTER ENTER B Language setting is complete Go to C Satellite set top box setting page 40 Note This setting is not available for TV Guide On Screen displays Refer to the guide on the bottom on each GUI for further programming related ...

Page 209: ...DSS set top box If you selected Yes at step 5 on page 34 you do not need to do this setting Skip to D Output sound setting page 44 You have indicated that you have cable service Now the TV Guide On Screen system needs some additional information Is a cable box connected to this DVD Recorder STEP 2 Configuring for Cable Yes No Set Top Box setting DBS Line3 Off 0 0 0 Input IR control Brand type On 3...

Page 210: ...nnels of the satellite set top box Be sure to make the G LINK connection page 25 6 Press then press the number buttons to enter the 3 digits of a brand code of your satellite set top box obtained from the list page 43 e g If you connect a TOSHIBA satellite set top box 7 Press then press ADJUST or to set ENTER code to On or Off Confirm whether the connected satellite set top box requires ENTER inpu...

Page 211: ...remote control If not shift the G LINK wand of the G LINK cable or try another brand code C Satellite set top box setting is complete Go to D Output sound setting page 44 Notes This setting will be reset to default if you redo the TV Guide On Screen setup and select Yes at the cable selection step 5 page 34 The recorder can control satellite set top box of 3 digit channel selection only If the cha...

Page 212: ...hes 091 099 102 105 Magnavox 094 095 Optimus 094 095 Panasonic 096 Philips 091 099 102 105 Primestar 092 100 ProScan 097 103 RCA 097 103 Samsung 097 103 Sony 098 Toshiba 090 Uniden 094 095 Zenith 101 Brands Codes Note Some models of satellite set top box may not be controlled with this recorder RD XS35SU SC_Inst_E_p29 43 06 2 13 4 33 PM 43 ...

Page 213: ... picture select Custom picture setting Off Virtual surround Off SAP Standard Output Black level Normal Picture Audio settings Play DNR Pause Still Auto Auto Progressive conversion Bitstream Audio out select SETUP e g Custom picture select Custom picture setting Off Virtual surround Off SAP Standard Output Black level Normal Picture Audio settings Pause Still Auto Play DNR Auto Progressive conversi...

Page 214: ...olby Digital DTS MPEG1 and MPEG2 recording system Analog 2ch Select when connected to a TV or audio system via the analog audio jacks pages 21 26 PCM Select when connected to a 2 channel digital stereo system page 27 The recorder outputs sounds in the PCM 2ch format when you play a disc recorded on the Dolby Digital MPEG1 and MPEG2 recording system 5 Once the proper setting is selected press ENTER...

Page 215: ... the aspect ratio of your TV SETUP e g Transparency Startup screen On On screen display 25 25 On Display settings TV shape 4 3LB Background On Blue Screen protector TV Closed caption SETUP e g Transparency Startup screen On On screen display 25 25 On Display settings TV shape 4 3LB Background On Blue Screen protector 4 3LB 16 9 wide 16 9 shrink 4 3 normal TV Closed caption Start RD XS35SU SC_Inst_...

Page 216: ...n a 4 3 aspect ratio image has been elongated to 16 9 wide picture size use this setting Masking bars to the right and left appears 5 When the proper setting is selected press ENTER The submenu disappears To exit the setting menu press SETUP button Notes Actual picture shape may depend on signal types of broadcasts or input sources or settings on the connected TV Refer to the owner s manual of you...

Page 217: ... The brand code is memorized Operating your TV with the remote control Point the remote control to your TV after you have entered the brand code Operate your TV with the buttons below 1 2 3 4 5 6 7 8 9 0 ON STANDBY To turn on and off the TV TV VIDEO To change the video input CH To select the TV channel VOLUME To adjust the volume TV CODE TV CODE 0 7 0 1 PLAY STOP PAUSE REC Exit Info Menu TV Guide ...

Page 218: ... 2491 Memorex 0081 0431 0501 0621 2491 MGA 0051 0251 0261 0371 0501 0621 0661 0761 Mitsubishi 0051 0251 0261 0281 0371 0491 0501 0621 0661 0761 2231 2241 MTC 0051 0501 0621 0851 NAD 0001 0311 0411 0621 1061 Optonica 0541 1101 Panasonic 2301 0631 0711 0741 1271 1351 1401 1501 1701 1791 1801 2111 2151 Philco 0051 0161 0271 0291 0361 0421 0501 0551 0621 0631 0661 0711 Philips 0051 0161 0271 0321 0361...

Page 219: ...to select IR code then press ENTER 4 Press to select DR 2 example then press ENTER The submenu disappears Press ENTER button and the IR code you selected is activated Operation may not be possible temporarily until you set the corresponding mode of the remote control Proceed to the next setting ENTER ENTER SETUP ENTER SETUP e g Instant skip interval On Completion beep 30 10 35 sec sec sec 3 sec Op...

Page 220: ...ears on the display of the front panel When the batteries of the remote control are replaced or when the time indicator of the front panel flashes check the remote control modes of both the recorder and the remote control and re program it if necessary When using with DR 1 mode When using with DR 2 mode When using with DR 3 mode EASY NAVI 2 D R 1 D R 2 D R 3 D R 1 1 EASY NAVI EASY NAVI EASY NAVI 2...

Page 221: ...purposes have a limited warranty for all parts and labor which warranty begins on the date of original retail purchase and ends on the date that is ninety 90 days thereafter Owner s Manual and Product Registration Card Read this owner s manual thoroughly before operating this DAV Product Complete and mail the enclosed product registration card or register your DAV Product on line at www tacp toshi...

Page 222: ...REGOING WARRANTY IS EXCLUSIVE AND IN LIEU OF ALL OTHER WARRANTIES GUARANTEES AGREEMENTS AND SIMILAR OBLIGATIONS OF TACP WITH RESPECT TO THE REPAIR OR REPLACEMENT OF ANY PARTS IN NO EVENT SHALL TACP BE LIABLE FOR CONSEQUENTIAL OR INCIDENTAL DAMAGES INCLUDING BUT NOT LIMITED TO LOST PROFITS BUSINESS INTERRUPTION OR MODIFICATION OR ERASURE OF RECORDED DATA CAUSED BY USE MISUSE OR INABILITY TO USE THI...

Page 223: ...54 RD XS35SU SC_Inst_E_p48 56 06 2 13 4 34 PM 54 ...

Page 224: ...55 Introduction Connections Basic setup Memo RD XS35SU SC_Inst_E_p48 56 06 2 13 4 34 PM 55 ...

Page 225: ...Printed in China Printed on 70 Recycled Paper RD XS35SU SC_Inst_E_p48 56 06 2 13 4 34 PM 56 ...

Reviews: