


4 Replacement Procedures
Error! Style not defined. Error! Style not defined.
4.20
CPU
Removing the CPU
CAUTION:
When removing the CPU, keep the following in mind:
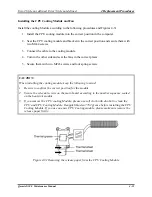
The CPU can become very hot during operation. Be sure to let it cool down before starting
repair work.
Remove the CPU according to the following procedures and Figures 4-32, 4-33 and 4-34.
1.
Unlock the CPU by rotating the cam on the CPU socket to the left with a flat-blade
screwdriver (in the order shown in the figure below).
2.
Remove the CPU.
Figure
4-32 Removing the CPU
Qosmio X300 Maintenance Manual
4-52
Summary of Contents for Qosmio X300 Series
Page 1: ...Toshiba Personal Computer Qosmio X300 Maintenance Manual TOSHIBA CORPORATION CONFIDENTIAL ...
Page 10: ...Chapter 1 Hardware Overview ...
Page 11: ...1 Hardware Overview Qosmio X300 Maintenance Manual 1 ii ...
Page 31: ...Chapter 2 Troubleshooting Procedures 2 ...
Page 32: ......
Page 99: ...3 Tests and Diagnostics 1 Chapter 3 Tests and Diagnostics ...
Page 104: ...3 Tests and Diagnostics 6 ...
Page 115: ...3 Tests and Diagnostics Japan keyboard UK keyboard 17 ...
Page 128: ...3 Tests and Diagnostics If the picture shows as below it means he HDD function is NG 30 ...
Page 136: ...3 Tests and Diagnostics You can press ESC to exit test after test pass 38 ...
Page 137: ...Chapter 4 Replacement Procedures ...
Page 138: ...4 Replacement Procedures Qosmio X300 Maintenance Manual 4 ii ...
Page 144: ...4 Replacement Procedures Qosmio X300 Maintenance Manual 4 viii ...


