


4 Replacement Procedures
Error! Style not defined. Error! Style not defined.
4.15
Power Switch
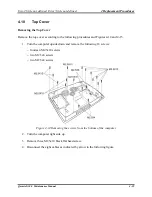
Removing the power switch
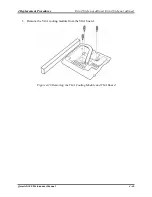
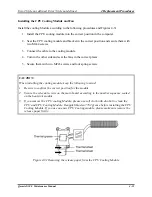
Remove the power switch according to the following procedures and Figure 4-22.
1.
Release one power switch flat cable from the wire guide.
2.
Remove one M2.5x4 screw from the power board.
3.
Separate the power board from the top cover.
Figure
4-22 Removing the power switch board
Installing the power switch board
Install the power switch according to the following procedures and Figure 4-22.
1.
Seat the power switch board in the correct place on top cover.
2.
Secure the board with one M2.5x4 screw.
3.
Put the power switch board flat cable in the wire guide.
Qosmio X300 Maintenance Manual
4-40
Summary of Contents for Qosmio X300 Series
Page 1: ...Toshiba Personal Computer Qosmio X300 Maintenance Manual TOSHIBA CORPORATION CONFIDENTIAL ...
Page 10: ...Chapter 1 Hardware Overview ...
Page 11: ...1 Hardware Overview Qosmio X300 Maintenance Manual 1 ii ...
Page 31: ...Chapter 2 Troubleshooting Procedures 2 ...
Page 32: ......
Page 99: ...3 Tests and Diagnostics 1 Chapter 3 Tests and Diagnostics ...
Page 104: ...3 Tests and Diagnostics 6 ...
Page 115: ...3 Tests and Diagnostics Japan keyboard UK keyboard 17 ...
Page 128: ...3 Tests and Diagnostics If the picture shows as below it means he HDD function is NG 30 ...
Page 136: ...3 Tests and Diagnostics You can press ESC to exit test after test pass 38 ...
Page 137: ...Chapter 4 Replacement Procedures ...
Page 138: ...4 Replacement Procedures Qosmio X300 Maintenance Manual 4 ii ...
Page 144: ...4 Replacement Procedures Qosmio X300 Maintenance Manual 4 viii ...


