


4 Replacement Procedures
Qosmio X300 Maintenance Manual
4-vii
Figure 4-31
Removing the release paper from the CPU Cooling Module ...................... 4-51
Figure 4-32
Removing the CPU ...................................................................................... 4-52
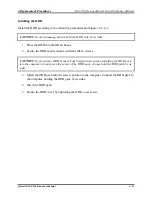
Figure 4-33
Installing the CPU........................................................................................ 4-53
Figure 4-34
Securing the CPU......................................................................................... 4-54
Figure 4-35
Removing Sub-speakers and Sub-woofer.................................................... 4-55
Figure 4-36
Removing Bluetooth, Wi-Fi Switch, and Touch Pad LED Board ............... 4-56
Figure 4-37
Removing Bridge Media and FM Radio modules ....................................... 4-57
Figure 4-38
Removing the display mask ......................................................................... 4-58
Figure 4-39
Removing the FL Inverter board ................................................................. 4-60
Figure 4-40
Removing the CCD board and MIC ............................................................ 4-61
Figure 4-41
Removing the 17.1-inch LCD module and screws ...................................... 4-63
Figure 4-42
Removing the cable...................................................................................... 4-63
Summary of Contents for Qosmio X300 Series
Page 1: ...Toshiba Personal Computer Qosmio X300 Maintenance Manual TOSHIBA CORPORATION CONFIDENTIAL ...
Page 10: ...Chapter 1 Hardware Overview ...
Page 11: ...1 Hardware Overview Qosmio X300 Maintenance Manual 1 ii ...
Page 31: ...Chapter 2 Troubleshooting Procedures 2 ...
Page 32: ......
Page 99: ...3 Tests and Diagnostics 1 Chapter 3 Tests and Diagnostics ...
Page 104: ...3 Tests and Diagnostics 6 ...
Page 115: ...3 Tests and Diagnostics Japan keyboard UK keyboard 17 ...
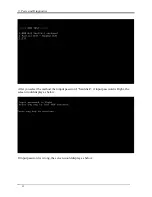
Page 128: ...3 Tests and Diagnostics If the picture shows as below it means he HDD function is NG 30 ...
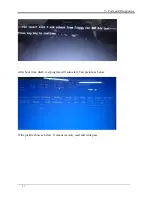
Page 136: ...3 Tests and Diagnostics You can press ESC to exit test after test pass 38 ...
Page 137: ...Chapter 4 Replacement Procedures ...
Page 138: ...4 Replacement Procedures Qosmio X300 Maintenance Manual 4 ii ...
Page 144: ...4 Replacement Procedures Qosmio X300 Maintenance Manual 4 viii ...


