background image

168    INDEX

Summary of Contents for e-STUDIO 207L

Page 1: ...MULTIFUNCTIONAL DIGITAL SYSTEMS Copying Guide ...

Page 2: ... 2014 TOSHIBA TEC CORPORATION All rights reserved Under the copyright laws this manual cannot be reproduced in any form without prior written permission of TTEC ...

Page 3: ...e is replaced with the series name as shown below The e STUDIO507 Series provide the scanning and printing function as an option However this optional scanning printing function is already installed in some models Indicates a potentially hazardous situation which if not avoided could result in death serious injury or serious damage or fire in the equipment or surrounding objects Indicates a potent...

Page 4: ...therefore R is not added to these sizes Screens Screens on this manual may differ from the actual ones depending on how the equipment is used such as the status of the installed options The illustration screens used in this manual are for paper in the A B format If you use paper in the LT format the display or the order of buttons in the illustrations may differ from that of your equipment Tradema...

Page 5: ... making other copies 32 Proof copy 33 Selecting exit tray 35 Bypass Copying 36 Bypass copying on standard size paper 37 Bypass copying on non standard size paper 46 Chapter 3 BASIC COPY MODES Before Using Copying Functions 52 Default settings 52 Confirming the set functions 52 Clearing the set functions 53 Restrictions on function combinations 53 Paper Selection 54 Automatic Paper Selection APS 54...

Page 6: ...ft 93 Creating top bottom margin or left right margin 93 Creating bookbinding margin 95 Edge Erase 96 Book Center Erase 97 Dual Page 99 2IN1 4IN1 101 Magazine Sort Mode 103 Image Editing 105 Trimming Masking 105 Mirror image Negative Positive reversal 108 XY Zoom 109 Cover Sheet 110 Sheet Insertion 112 Time Stamp 115 Page Number 116 Job Build 117 Image Direction 120 Book Tablet 121 ADF SADF 122 Om...

Page 7: ...nging private group data 143 Changing template data 144 Deleting Groups or Templates 146 Deleting private groups 146 Deleting templates 147 Chapter 7 CONFIRMING JOB STATUS Confirming Copy Job Status 150 Confirming jobs in progress or ones in waiting 150 Confirming copy job history 155 Confirming drawers 156 Confirming amount of toner remaining 157 Chapter 8 OTHER INFORMATION Continuous Copying Spe...

Page 8: ...6 CONTENTS ...

Page 9: ...h as the composition of the BASIC menu for the copying functions and how to place copy paper BASIC Menu for the Copier Function 8 Placing Paper 11 Acceptable copy paper 11 Placing paper in drawers 13 Registering paper size 16 Setting paper type 17 Placing paper in the Large Capacity Feeder optional 19 ...

Page 10: ...omatic paper selection button P 54 This is for changing the mode to automatic paper selection 6 ZOOM button P 60 This is for changing the reproduction ratio of images 7 2 SIDED button P 82 This is for selecting simplex duplex copying e g 1 2 sided 2 2 sided 8 FINISHING button P 66 This is for selecting a sorting mode When this equipment is managed with the user management function and department m...

Page 11: ...PY button P 33 This is for making a proof copy to check an image before making a large amount of copies 13 Density adjustment buttons P 59 These are for adjusting the density level of images 14 Number of copy sets 15 Number of remaining copy sets 16 Help button This is for viewing the explanation of each function or the buttons on the touch panel 17 TEMPLATE button P 131 This is for the template f...

Page 12: ...r When you want to use a particular drawer press the corresponding button The amount of paper remaining in each drawer is displayed as follows Use it as a rough guide since the detection of the remaining paper may vary depending on the paper type Approx 100 sheets of plain paper recommended by TOSHIBA 4 BYPASS FEED button P 36 When this button is pressed with paper set in the bypass tray it will b...

Page 13: ...1 28 lb Bond 450 sheets Large Capacity Feeder optional Plain paper 64 80 g m2 17 20 lb Bond 2360 sheets 64 g m2 17 lb Bond 2000 sheets 80 g m2 20 lb Bond A4 equipment for the A B format LT equipment for the LT format THICK 1 81 105 g m2 21 28 lb Bond 1660 sheets Bypass tray Plain paper 64 80 g m2 17 20 lb Bond 100 sheets A B format A3 A4 A4 R A5 R A6 R B4 B5 B5 R FOLIO LT format LD LG LT LT R ST R...

Page 14: ... K format is a Chinese standard size Abbreviations for paper sizes LT Letter LD Ledger LG Legal ST Statement COMP Computer SQ Square Unacceptable copy paper Do not use the types of paper shown below This could cause a paper misfeed Damp paper Folded paper Curled or creased paper Paper whose surface is extremely smooth or rough Do not use the types of paper shown below This could cause an equipment...

Page 15: ...the height of the stacked paper does not exceed the line indicated inside of the side guides P 11 Acceptable copy paper Fan and jog the stack of paper well before you place it in a drawer or the sheets may not be separated before being fed Be careful not to cut your fingers when fanning Place paper with its copy side up The copy side may be noted on its wrapping paper 4 Move the end guide to the t...

Page 16: ...e P 16 Registering paper size P 17 Setting paper type If you want to change the setting for displaying this menu ask your administrator If you press YES the procedure is completed 6 Confirm that there is no extra gap between the paper and the side or end guides If the gap between the paper and the side or end guides is too big this would result in paper misfeeding Gap between the paper and the sid...

Page 17: ...BEFORE USING EQUIPMENT Placing Paper 15 1 BEFORE USING EQUIPMENT 10 Select the size and type of the paper placed in the drawer on the touch panel 1 Select the paper size 2 Select the paper type 3 Press OK ...

Page 18: ...the size to this equipment 2 Press the USER tab on the touch panel to display the user setting menu and then press DRAWER 3 Select the paper size on the touch panel 1 Select the drawer in which you placed paper 2 Select the paper size 3 Press OK 4 Press CLOSE on the touch panel or the USER FUNCTIONS button on the control panel 1 Press the USER FUNCTIONS button on the control panel ...

Page 19: ... Equipment status indication area Acceptable paper types are as follows Thickness Attribute 1 Fax transmission and reception is available only when the Fax Unit optional is installed 2 When lists are printed paper set as FAX is used For printing lists refer to the MFP Management Guide 3 When ROTATE SORT is turned ON for RX printing in the FAX menu FAX cannot be set for attribute For how to set RX ...

Page 20: ... on the touch panel to display the user setting menu and then press DRAWER 3 Press PAPER TYPE 4 Select the paper type 1 Select the drawer in which you placed paper 2 Select the paper type 3 Press OK 5 Press OK 1 Press the USER FUNCTIONS button on the control panel ...

Page 21: ...dicated inside the side guides P 11 Acceptable copy paper The copy side may be noted on its wrapping paper Be careful not to cut your fingers when fanning the paper When placing paper be sure that the center lever is not open See the label attached in the drawer of the Large Capacity Feeder 1 Pull out the drawer of the Large Capacity Feeder carefully until it comes to a stop Be careful not to touc...

Page 22: ...ded appears You can pull out the Large Capacity Feeder and add paper to the left tray without stopping copying This is useful when you wish to make a large amount of copies quickly 3 Push the drawer of the Large Capacity Feeder straight into this equipment carefully When the paper on the right tray has run out that on the left tray will be automatically shifted to the right tray Do not slam the dr...

Page 23: ...ginal glass 23 Book type originals 24 Using the RADF Reversing Automatic Document Feeder optional 25 Making Copies 28 Basic copying procedure 28 Scanning the next original during copying 31 Interrupting copying and making other copies 32 Proof copy 33 Selecting exit tray 35 Bypass Copying 36 Bypass copying on standard size paper 37 Bypass copying on non standard size paper 46 ...

Page 24: ...ting K format is a standard paper size in China Do not place any heavy objects 4 kg 9 lb or over on the original glass and do not press on it with force Be sure to place ST size or A5 size originals in a landscape direction when using the RADF optional A maximum of 1000 sheets can be scanned per 1 copy job or up until the embedded memory becomes full Forgery prevention function This equipment has ...

Page 25: ...he Original Cover optional or the RADF optional Raise it 60 degrees or more so that the size of the original can be detected correctly 3 Lower the Original Cover optional or the RADF optional carefully When it is being closed the scanner lamp flashes to detect the original size 2 Place the original with its face down on the original glass and align it with the left rear corner of the glass When yo...

Page 26: ...he RADF optional forcibly when the original is very thick There will be no problem in copying even if it is not fully lowered Do not look directly at the original glass because intensive light may escape during copying 2 Open the desired page of the original and place it with its face down Align it with the left rear corner of the original glass When you make 2 sided copies from book type original...

Page 27: ...stapled originals 6 Originals with holes or tears 7 Damp originals 8 OHP films or tracing paper 9 Coated paper with wax etc Use the types of originals 10 and 11 shown below with extra care 10 Originals which resist sliding with the fingers or surface treated originals The sheets of such originals may not be separated 11 Folded or curled originals They should be fully smoothed out before being used...

Page 28: ...l while the data of this set are being scanned When this scanning is finished place the next set of the originals and press the START button on the control panel If you press CONTINUE just before the originals finish being scanned this button may not work 2 Place the originals with their face up and align the side guides to the original length Originals up to 100 sheets 35 to 80 g m2 9 3 to 20 lb ...

Page 29: ...122 ADF SADF 3 If there is another original insert it in the same way 4 After all the originals are pulled in press JOB FINISH If you want to stop copying press JOB CANCEL 1 Align the side guides to the original length 2 Insert the original with its face up and straight along the side guides The original is automatically pulled in and then the menu of step 3 will be displayed on the touch panel Be...

Page 30: ...ptional 2 Place the original s For the types and sizes of originals and how to place them see the following pages P 22 Acceptable originals P 25 Using the RADF Reversing Automatic Document Feeder optional P 23 Placing originals on the original glass P 24 Book type originals 3 Key in the desired number of copies if you want more than one copy Press the CLEAR button on the control panel to delete th...

Page 31: ...splayed on the upper part of the menu for when the originals are scanned through the RADF and for when scanning is performed through the original glass 6 Place the next original and then press the START button on the control panel or NEXT COPY on the touch panel Scanning starts When SADF single feed mode is set to the document feeder an original is fed automatically when it is placed on the RADF o...

Page 32: ...he touch panel or the START button on the control panel to restart When you press JOB CANCEL the scanned data will be deleted and any waiting jobs will be performed Even if you do not press JOB CANCEL the scanned data will be deleted by means of the automatic function clear 1 Press the STOP button on the control panel Copying or scanning stops ...

Page 33: ...of 1000 sheets can be scanned per 1 copy job or up until the embedded memory becomes full Confirming auto jobs You can confirm which jobs are in waiting on the touch panel or cancel them as required For details see the following page P 150 Confirming Copy Job Status Canceling jobs being scanned Press the STOP button on the control panel to stop a job while originals are being scanned When you pres...

Page 34: ...cannot be changed to a non copying one such as e Filing scanning printing or fax To change the mode first press the INTERRUPT button to clear the interrupt copying 2 Replace the original with a new one 3 Select other copy modes as required and then press the START button on the control panel 4 Press the INTERRUPT button again after the interrupt copying has finished Ready to resume job 1 appears a...

Page 35: ...s and copy modes 4 Press PROOF COPY on the touch panel PROOF COPY is set Press START button to copy appears for approx 2 seconds If NON SORT NON STAPLE or GROUP is selected as a finishing mode the mode will be changed to SORT automatically 5 Press the START button on the control panel Scanning starts 1 set of copies will be printed out 6 Change the number of copy sets and copy modes as required af...

Page 36: ...not change the number of copies in step 6 above the number of copies printed out will be one fewer than that previously set because you have already copied one as a proof copy However if the number of copies you previously set was 1 another set of copies will be printed out besides the proof copy ...

Page 37: ...Exit tray selection is set at automatic selection by default Changing the exit tray The exit tray currently selected is displayed on the equipment status indication area To change the exit tray press EXIT TRAY Every time you press this the display changes from the exit tray of the equipment each exit tray of the finisher and Inner Tray and automatic selection in this order Current exit tray Exit t...

Page 38: ...he automatic magnification selection AMS For details see the following page P 162 Copying Function Combination Matrix If you place the originals on the RADF for bypass copying and do not set the paper size the originals will be copied upside down Be sure to set the paper size when you wish to do bypass copying Open the bypass tray for bypass copying If the paper is large pull out the paper holder ...

Page 39: ...period of time Bypass copying on standard size paper Copying on A3 A4 B4 and B5 size paper in equipment other than for North America LD LT LG and ST R size paper in equipment for North America 1 Place the original s Be sure to place the paper so that the gaps between the side guides A in the figure on the right become 0 5 mm or less 0 02 on one side or 1 0 mm or less 0 04 on both sides in total Ho...

Page 40: ...d If the paper is curled turn the curled face down as indicated in the figure 4 Select the same size button under COPY as that of the paper you placed on the bypass tray The paper size is now set If the paper size is not selected in this step copying may be slowed down 5 Press PAPER TYPE on the touch panel if the paper type of the paper you placed on the bypass tray is other than plain paper 3 Ali...

Page 41: ...type you can confirm it with the icons displayed on the equipment status indication area as shown below Automatic 2 sided copying can be applied to plain paper and THICK 1 For OHP films TRANSPARENCY only 1 sided copying can be performed For envelopes only 1 sided copying can be performed on its front side 7 After setting the paper size and type press OK The menu returns to the BASIC menu Paper typ...

Page 42: ...required and then press the START button on the control panel When you copy on sheets of OHP film remove the copied OHP film one sheet at a time as they exit onto the receiving tray If the sheets of OHP film pile up they may get curled and may not be projected properly ...

Page 43: ... equipment other than for North America LD LT LG and ST R size paper in equipment for North America P 37 2 Press SIZE SETTING on the touch panel 3 Press the button of the same size as the paper you placed on the bypass tray The selected size will be registered as an OTHER size 4 Press OTHER under COPY The paper size is now set to the one registered as OTHER size If the paper size is not selected i...

Page 44: ...nificant image trouble When you select a paper type you can confirm it with the icons displayed on the equipment status indication area For details see the table in step 6 in Copying on A3 A4 B4 and B5 size paper in equipment other than for North America LD LT LG and ST R size paper in equipment for North America P 37 7 After setting the paper size and paper type press OK The menu returns to the B...

Page 45: ...ge to the equipment 1 Badly curled wrinkled or folded envelopes 2 Extremely thick or thin envelopes 3 Wet or damp envelopes 4 Torn envelopes 5 Envelopes which include the contents 6 Non standard size envelopes ones with a special shape 7 Envelopes with eyelets or windows 8 Envelopes sealed with adhesive paste or tape 9 Partly opened or perforated envelopes 10 Envelopes with special coating on the ...

Page 46: ...rs on the envelope 3 Move the paper holding lever toward the outside Place the envelope with its face down on the bypass tray Place the envelope with its flap side at the front Do not make a copy on the back of the envelope This may cause a paper misfeed or soil the copy paper or the inside of the equipment 4 Align the side guides to the length of the envelope while holding the tab Move the paper ...

Page 47: ... on the bypass tray The paper type is automatically set to ENVELOPE 8 Select other copy modes as required and then press the START button on the control panel Copying starts When the Finisher MJ 1107 optional or the Saddle Stitch Finisher MJ 1108 MJ 1033 optional is installed the envelope exits to the exit tray of the equipment When the Inner Finisher MJ 1032N optional is installed the envelope ex...

Page 48: ...ing Do not push paper into the entrance of the bypass feeder This could cause a paper misfeed If the paper is curled turn the curled face down as indicated in the figure You can use non standard size paper within the sizes shown on the right 2 Move the paper holding lever toward the outside Place paper with its copy side down on the bypass tray 3 Align the side guides to the paper length while hol...

Page 49: ...ress Length and key in the value 100 mm to 297 mm 3 94 to 11 69 2 Press Width and key in the value 148 mm to 432 mm 5 83 to 17 01 3 Press OK To call up the dimension data registered previously press the desired button from MEMORY 1 to MEMORY 4 and then press OK Length and width are indicated as shown on the right Width Length ...

Page 50: ...48 Bypass Copying To register dimension data into the memory see the following page P 49 Registering non standard size in the memory 6 Select other copy modes as required and then press the START button on the control panel ...

Page 51: ...llow the same procedure noted in steps 1 to 4 in Bypass copying on non standard size paper P 46 2 Register dimensions 1 Select a desired memory number 2 Press Length and key in the value 100 mm to 297 mm 3 94 to 11 69 3 Press Width and key in the value 148 mm to 432 mm 5 83 to 17 01 4 Press MEMORY 3 Press OK ...

Page 52: ......

Page 53: ...s in one operation 56 Setting Original Modes 58 Density Adjustment 59 Enlargement and Reduction Copying 60 Automatic Magnification Selection AMS 60 Specifying both the original size and the copy paper size separately 62 Specifying reproduction ratio manually 64 Selecting Finishing Mode 66 Finishing modes and optional finishing devices 66 Sort Group mode 71 Rotate sort mode 72 Staple sort mode 73 M...

Page 54: ...fault settings are changeable For details refer to the MFP Management Guide Confirming the set functions If you press SETTINGS on the touch panel the menu shown below is displayed On this menu you can view the functions that are currently set Item Default setting Reproduction ratio 100 Copy quantity 1 Paper selection Automatic Paper Selection APS Simplex Duplex 1 sided original 1 sided copy Densit...

Page 55: ...g setting menu Clearing all settings changed When you press the FUNCTION CLEAR button on the control panel all the function changes will be cleared Even if you do not do so the changes will be cleared if the equipment is left idle for 45 sec default setting For how to change this period refer to the MFP Management Guide Restrictions on function combinations Several copy functions can be used toget...

Page 56: ...at Automatic Paper Selection The paper selection mode is set at Automatic Paper Selection by default Even if the direction of the paper placed in the selected drawer differs from that of the original this equipment rotates the data of the original by 90 degrees to make copies as long as their sizes are the same This works on A4 B5 or LT paper only For example when an A4 original is placed in a por...

Page 57: ...nals with dark borders Non standard size originals e g newspapers magazines When paper of the size you want to use is not in any drawer place it in a drawer or on the bypass tray P 13 Placing paper in drawers P 36 Bypass Copying 1 Place paper in the drawer s When using bypass copying be sure to set the paper size 2 Place the original s 3 Press the drawer button corresponding to the desired paper s...

Page 58: ...han North America A3 A4 A4 R B4 B5 FOLIO 1 Place paper in the drawer s The bypass tray cannot be used Use the drawers 2 Adjust the side guides to the widest original and then align the originals against the side guide on the front side When copying originals of different widths the copied image of the smaller one may be skewed because it does not touch the side guide on the rear side 3 Press ZOOM ...

Page 59: ... A4 portrait B5 portrait or LT portrait to A3 landscape B4 landscape LD landscape or LG landscape In this case place A4 B5 or LT originals in a landscape direction Before you use Automatic Paper Selection be sure that all paper sizes corresponding to the original sizes have been placed in the drawers 6 Select other copy modes as required and then press the START button on the control panel If Chan...

Page 60: ...e optimal image quality by selecting the following modes for your original TEXT PHOTO Originals with text and photographs mixed TEXT Originals with text or text and line art only PHOTO Originals with photographs 1 Press ORIGINAL MODE on the touch panel 2 Select the original mode and then press OK ...

Page 61: ... the density level of the copied image to the optimal one Alternatively you can manually adjust it to the desired level Adjusting automatically automatic density adjustment Press AUTO on the touch panel The automatic density adjustment is set by default at installation Adjusting manually Press either or to select the desired density level ...

Page 62: ...r one touch zoom buttons on the touch panel The available range of reproduction ratio differs depending on whether the original is placed on the original glass or on the RADF Reversing Automatic Document Feeder optional Original glass 25 to 400 RADF 25 to 200 Automatic Magnification Selection AMS Specify the copy paper size in advance so that this equipment will detect the original size and automa...

Page 63: ...to register see the following page P 63 Registering paper sizes to OTHER size Paper sizes can also be registered by pressing the desired drawer button of the equipment status indication area on the BASIC menu 4 Place the original s If the original is placed on the original glass the reproduction ratio is set when the original is placed If the original is placed on the RADF optional the reproductio...

Page 64: ...r the original size and copy paper size you need to register the size as OTHER Once you register this size it will be specified every time you press OTHER on the touch panel North America LD LG LT ST Other than North America A3 A4 B4 B5 For how to register see the following page P 63 Registering paper sizes to OTHER size Paper sizes can also be registered by pressing the desired drawer button of t...

Page 65: ...egister the size as OTHER following the procedures below Once you register this size it will be specified every time you press OTHER on the touch panel North America LD LG LT ST Other than North America A3 A4 B4 B5 You can register only standard sizes as OTHER and cannot register any non standard sizes 1 Press SIZE SETTING on the touch panel 2 Select the desired size The selected size will be regi...

Page 66: ...h panel 4 Press the buttons below to select the desired reproduction ratio UP and DOWN buttons The reproduction ratio changes by 1 every time either of them is pressed When you hold either down the ratio goes up or down automatically One touch zoom buttons Select the desired ratio from 400 200 100 50 and 25 When the RADF optional is used the maximum ratio available is 200 ...

Page 67: ...size it will be specified every time you press OTHER on the touch panel North America LD LG LT ST Other than North America A3 A4 B4 B5 For how to register see the following page P 63 Registering paper sizes to OTHER size Paper sizes can also be registered by pressing the desired drawer button of the equipment status indication area on the BASIC menu 6 Select other copy modes as required and then p...

Page 68: ...or MJ 5004N for e STUDIO207L 257 307 Offset Tray MJ 5005 for e STUDIO207L 257 307 Job Separator MJ 5006 for e STUDIO357 457 507 The Inner Tray cannot be installed if the Inner Finisher MJ 1032N is installed Finishing mode Description Non sort Non staple Copies exit without being sorted or stapled Sort P 71 Copies exit in the same page order as the originals one set after another Group P 71 Copies ...

Page 69: ...azine sort Yes Yes Yes Yes Yes Yes Center fold Yes Yes Saddle stitch Yes Yes Magazine sort center fold Yes Yes Magazine sort saddle stitch Yes Yes Hole punch Yes Yes Yes Manual staple Yes Yes Yes Yes Finishing mode Devices MJ 1033 MJ 6008 MJ 1033 MJ 5004N MJ 5005 MJ 5006 No device Non sort Non staple Yes Yes Yes Yes Yes Yes Sort Yes Yes Yes Yes Yes Yes Group Yes Yes Yes Yes Yes Yes Rotate sort Yes...

Page 70: ...tray 5 Saddle stitch tray 6 Stopper 7 Front cover 8 Hole Punch Unit MJ 6104 9 Stapling control section Using the tray holder Open the tray holder when the length of the paper in the exit direction is longer than that of the upper receiving tray The holder prevents output paper from falling Return it to its original position after use For consistent paper exiting make sure you return the tray holde...

Page 71: ...part of the Inner Tray optional MJ 1032N 1 Upper cover 2 Receiving tray 3 Sub tray 4 Hole Punch Unit MJ 6007 5 Front cover MJ 1033 1 Upper cover 2 Tray 3 Sub tray 4 Saddle stitch tray 5 Front cover 6 Hole Punch Unit MJ 6008 MJ 5004N 1 Tray 2 Paper stopper 2 3 1 5 4 6 3 1 2 5 4 2 1 ...

Page 72: ...3 BASIC COPY MODES 70 Selecting Finishing Mode MJ 5005 1 Tray MJ 5006 1 Tray 1 1 ...

Page 73: ...t mode Group mode When you use large size paper such as A3 B4 LD and LG pull out the sub tray in advance so that the copied paper will not fall off and will be sorted neatly 1 Place paper in the drawer s 2 Place the original s When you place originals on the RADF Reversing Automatic Document Feeder optional the display of the sorting mode button will change to SORT 3 Press FINISHING on the touch p...

Page 74: ...rait direction and place the other in another drawer in a landscape direction before you start copying A4 B5 and LT sized paper placed on the drawer or bypass tray can be used The rotate sort mode is not available when Automatic Paper Selection is selected 1 Place paper in the drawer s Place one stack of paper in one drawer in a portrait direction and place the other in another drawer in a landsca...

Page 75: ...ies in different sizes cannot be stapled If the lengths of the copies are the same they can be stapled 1 Place paper in the drawer s When using bypass copying be sure to set the paper size 2 Place the original s 3 Press FINISHING on the touch panel 4 Select the desired stapling position from FRONT STAPLE DOUBLE STAPLE or REAR STAPLE and then press OK 5 Select other copy modes as required and then ...

Page 76: ... In this case the number of sheets available includes the 2 cover sheets For the maximum number of sheets loadable on the tray refer to the Quick Start Guide Paper size Paper weight 64 80 g m2 17 20 lb Bond 81 90 g m2 21 24 lb Bond 91 105 g m2 25 28 lb Bond A4 B5 LT 50 sheets 30 sheets 30 sheets A3 A4 R B4 FOLIO LD LG LT R COMP 30 sheets 15 sheets 15 sheets Paper size Paper weight 64 80 g m2 17 20...

Page 77: ...itch Finisher you can also have the copied booklet folded at its center Center fold and stapled Saddle stitch Center folding can be selected only when the Saddle Stitch Finisher MJ 1108 optional is installed Magazine sort mode Center fold mode Saddle stitch mode Magazine sort center fold mode Magazine sort saddle stitch mode 11 2 9 4 7 6 12 3 2 1 5 8 3 10 1 12 7 6 5 8 3 10 1 12 7 6 7 6 12 3 2 1 7 ...

Page 78: ...et 5 sets 16 20 sheets set 6 sets 11 15 sheets set 8 sets 6 10 sheets set 12 sets Less than 5 sheets set 25 sets Paper size Paper weight 1 Maximum number of sheets available for saddle stitching 2 Maximum number of sets loadable on the saddle stitch tray A3 A4 R B4 LD LT R LG 64 80 g m2 17 20 lb Bond 15 sheets 11 15 sheets 25 sets 10 sets if cover sheets are added 6 10 sheets 30 sets 15 sets if co...

Page 79: ...according to the illustration on the previous page When placing the originals on the original glass place them in the following order Magazine sort Magazine sort center fold Magazine sort saddle stitch Place the first page of the original first Center fold Saddle stitch For example if the total number of pages is 12 place pages 1 and 12 together and then pages 2 and 11 10 and 3 4 and 9 8 and 5 and...

Page 80: ... punch copied paper when the Hole Punch Unit optional is installed on the Finisher Paper whose size is any of A3 A4 A4 R B4 B5 B5 R FOLIO LD LG LT LT R ST R and COMP and whose weight is 64 to 209 g m2 17 lb Bond to 110 lb Index MJ 6104 and 64 to 128 g m2 17 to 34 lb Bond MJ 6007 MJ 6008 is available Special paper such as OHP film or sticker labels is not applicable 1 Place paper in the drawer s Wh...

Page 81: ...DES Selecting Finishing Mode 79 3 BASIC COPY MODES 3 Press FINISHING on the touch panel 4 Select HOLE PUNCH and then press OK 5 Select other copy modes as required and then press the START button on the control panel ...

Page 82: ...ipment enters into the manual staple mode 2 Press the stapling position switching button to switch the staple position front or rear Paper size Paper weight 64 80 g m2 17 20 lb Bond 81 90 g m2 21 24 lb Bond 91 105 g m2 25 28 lb Bond A4 B5 LT 50 sheets 50 sheets 30 sheets A3 A4 R B4 FOLIO LD LG LT R COMP 30 sheets 30 sheets 15 sheets 3 Place paper on the lower receiving tray of the Finisher optiona...

Page 83: ...ished Then remove the stapled paper Be sure that your hands are away from the paper while stapling is in progress Finishing the manual staple mode Remove the stapled paper from the lower receiving tray and then press the stapling button The shutter of the paper exit area closes This means that manual stapling is finished If no operation is performed for approx 15 seconds the manual staple mode wil...

Page 84: ... is useful when you want to save the paper or when you want to copy a book type original maintaining the same page order 1 sided original 1 sided copy P 83 2 sided original 1 sided copy P 83 1 sided original 2 sided copy P 84 2 sided original 2 sided copy P 84 Book type original 2 sided copy P 85 Use plain paper or THICK 1 for duplex copying 12 15 13 13 12 13 15 13 ...

Page 85: ...r will exit in the proper direction P 120 Image Direction 1 Place paper in the drawer s When using bypass copying be sure to set the paper size 2 Place the original s 3 Press 2 SIDED on the touch panel 4 Select the desired mode and then press OK 1 1 SIMPLEX 1 sided original to 1 sided copy 2 1 SPLIT 2 sided original to 1 sided copy 5 Select other copy modes as required and then press the START but...

Page 86: ...tion P 120 Image Direction 1 Place paper in the drawer s When using bypass copying be sure to set the paper size 2 Place the original s 3 Press 2 SIDED on the touch panel 4 Select the desired mode and then press OK 1 2 DUPLEX 1 sided original to 2 sided copy 2 2 DUPLEX 2 sided original to 2 sided copy 5 Select other copy modes as required and then press the START button on the control panel When p...

Page 87: ...alog as in the same page order A4 B5 and LT sizes are applicable 1 Place paper in the drawer s When using bypass copying be sure to set the paper size 2 Press 2 SIDED on the touch panel 3 Select Book 2 4 Select the book copying type Example If pages 2 to 6 of a book which opens to the left are to be copied select LEFT LEFT 5 Press OK The menu returns to the BASIC menu 2 3 6 7 ...

Page 88: ...ould injure you 9 Press the START button on the control panel Once the pages are scanned set the next ones on the original glass Repeat this step until all the desired pages have been scanned If the last page is a single page press COPY FINAL PAGE on the touch panel and then press the START button on the control panel to start scanning The scanned pages will be copied 10 When all the pages have be...

Page 89: ...i only The data stored with this function are suited for printing but not for being imported as an image into your PC To obtain the optimal image quality for importing it is recommended to store the data with the Scan to File function of this equipment The network administrator must make settings for Copy File in advance For details refer to the TopAccess Guide It is recommended to back up the dat...

Page 90: ...ailing characters in a file name maximum 74 may be deleted depending on the type of letters used FILE FORMAT Select the file format in which the data are stored from PDF TIFF or XPS MULTI SINGLE These are for selecting whether the data are stored as a multiple page file or a single page file If you select MULTI all the scanned data will be stored as one file If you select SINGLE a folder is create...

Page 91: ...ta are to be stored For example if the data should be transferred to an FTP folder ftp 10 10 70 101 user01 scan enter user01 scan LOGIN USER NAME Press this to enter a user name to login to the FTP server Enter this as required PASSWORD Press this to enter a password to login to the FTP server Enter this as required COMMAND PORT Press this to key in a command port number for executing commands Nor...

Page 92: ...ou select NetWare IPX enter either the server name of NetWare server or Tree Context if NDS is useable When you select NetWare IP enter the IP address of NetWare server NETWORK PATH Press this to enter a network path to a NetWare server folder where the data are to be stored For example if the data should be transferred to a folder sys scan of NetWare server enter sys scan LOGIN USER NAME Press th...

Page 93: ...n 93 Creating bookbinding margin 95 Edge Erase 96 Book Center Erase 97 Dual Page 99 2IN1 4IN1 101 Magazine Sort Mode 103 Image Editing 105 Trimming Masking 105 Mirror image Negative Positive reversal 108 XY Zoom 109 Cover Sheet 110 Sheet Insertion 112 Time Stamp 115 Page Number 116 Job Build 117 Image Direction 120 Book Tablet 121 ADF SADF 122 Omit Blank Page 123 Outside Erase 124 ...

Page 94: ... 92 Displaying EDIT Menu Displaying EDIT Menu You can display the EDIT menu by pressing the EDIT tab on the touch panel when you want to use various editing functions The EDIT menu has 2 pages To switch the pages press or ...

Page 95: ...unction you can easily make a binding margin when you copy a book type original on both sides of the paper You can make a binding margin in the combinations as follows Top bottom margin and left right margin Top bottom margin and bookbinding margin Creating top bottom margin or left right margin 1 Place paper in the drawer s When using bypass copying be sure to set the paper size 2 Place the origi...

Page 96: ...inding margin width on the back side using 0 mm 0 and 100 mm 3 94 Only the width on the back side will be adjusted 3 Press OK Note that a left right binding margin will be created on the opposite side on the back side of paper in duplex copying For example when a binding margin is created on the right of the front side of the paper it will be created on the left of the back side 6 Press OK 7 Selec...

Page 97: ... original on both sides of the paper P 85 Making a 2 sided copy from a book type original 1 Press IMAGE SHIFT on the EDIT menu 2 Press BOOK 3 Adjust the width of the binding margin 1 Press either 0 mm 0 or 30 mm 1 18 2 Press OK 4 Press OK Select the Book type original 2 sided copy mode as well P 85 Making a 2 sided copy from a book type original ...

Page 98: ...nd clear if the edge of the original is dirty or torn Only standard size originals are applicable 1 Place paper in the drawer s When using bypass copying be sure to set the paper size 2 Place the original s 3 Press EDGE ERASE on the EDIT menu 4 Adjust the width of the part to be erased 1 Press either 2 mm 0 08 or 50 mm 1 97 2 Press OK 5 Select other copy modes as required and then press the START ...

Page 99: ...like part appears on it This function is called book center erase It is useful when you copy book type originals 1 Place paper in the drawer s When using bypass copying be sure to set the paper size 2 Select the drawer for the desired paper size 3 Press BOOK CENTER ERASE on the EDIT menu Book center erase set No setting ...

Page 100: ...cts 4 kg 9 lb or over on the original glass and do not press on it with force Breaking the glass could injure you 6 Select other copy modes as required and then press the START button on the control panel 5 Place the original on the original glass Place the original with its bottom toward you aligning its center with the yellow indicator under the original glass ...

Page 101: ...original on the original glass Only A4 B5 and LT sizes are applicable 1 Place paper in the drawer s 2 Press DUAL PAGE on the EDIT menu 3 Press 1 SIDE or 2 SIDE 1 SIDE Copying the 2 facing pages of the original to only 1 side of 2 separate sheets of paper 2 SIDE Copying the 2 facing pages of the original to 2 sides of 1 sheet of paper 4 Select other copy modes as required You can select image shift...

Page 102: ...g of the opened pages is finished open the next pages and place them Repeat this procedure until all the desired pages have been scanned If the last page is a single page press COPY FINAL PAGE on the touch panel and then press the START button on the control panel to start scanning The scanned pages will be copied 8 When all the pages have been scanned press FINISHED The scanned pages will be copi...

Page 103: ... them This function is called 2IN1 or 4IN1 If you use this function together with duplex copying you can make a total of 8 images on 1 sheet of paper The illustrations below show how you can arrange the images 2IN1 4IN1 2IN1 duplex copying a side 1 b side 2 4IN1 duplex copying a side 1 b side 2 a a b b a b ...

Page 104: ... 4 on 1 page select 4IN1 2 Select the duplex mode 3 Press OK 5 Select other copy modes as required and then press the START button on the control panel When the originals are placed on the RADF optional scanning and copying start When they are placed on the original glass follow steps 6 and 7 6 Place the next original and then press NEXT COPY on the touch panel or the START button on the control p...

Page 105: ...ing page P 75 Magazine sort Center fold Saddle stitch 1 Place paper in the drawer s Sizes are available as follows Magazine sort saddle stitch A3 A4 R B4 LD LG LT R 2 Select the paper size Drawer P 54 Automatic Paper Selection APS Bypass tray P 36 Bypass Copying 3 Place the original s 4 Press MAGAZINE SORT on the EDIT menu When placing portrait originals in a landscape direction as shown on the ri...

Page 106: ...ess STAPLE ON If not required press STAPLE OFF 2 Press either 2 mm 0 08 or 30 mm 1 18 to adjust the binding margin width 3 Press OK For the maximum number of sheets available for saddle stitching see the following page P 75 Magazine sort Center fold Saddle stitch 6 Select other copy modes as required and then press the START button on the control panel ...

Page 107: ... page Trimming Masking You can select the desired area of an original and copy only the selected area trimming You can also mask the desired area of an original and copy only the unmasked area masking On both functions you can select up to 4 areas on 1 original The selected area should be in a rectangle Only standard size originals are applicable Note that the entire image of the selected area may...

Page 108: ...eft corner against that of the original glass so that the original will be aligned with the original scales 5 Read the following 4 values to specify the area using the left and top scales on the original glass X1 From the top left to the left edge of the selected area X2 From the top left to the right edge of the selected area Y1 From the top left to the upper edge of the selected area Y2 From the...

Page 109: ...pecify more than one area press AREA 1 to AREA 4 to switch the area and then key in the values correspondingly 3 Press OK after you have specified all the areas 8 Select other copy modes as required and then press the START button on the control panel 7 Place the original again on the original glass with its face down Place it with its bottom toward you Align its top left corner against that of th...

Page 110: ... white of a page negative positive reversal 1 Place paper in the drawer s When using bypass copying be sure to set the paper size 2 Place the original s 3 Press EDITING on the EDIT menu 4 Select MIRROR or NEG POS and then press OK 5 Select other copy modes as required and then press the START button on the control panel Mirror image Negative Positive reversal ...

Page 111: ...ge is 25 to 200 1 Place paper in the drawer s When using bypass copying be sure to set the paper size 2 Place the original s 3 Press XY ZOOM on the EDIT menu 4 Set the reproduction ratio in both vertical and horizontal directions 1 Press X and then press either 25 or 400 for a horizontal direction 2 Press Y and then press either 25 or 400 for a vertical direction 3 Press OK 5 Select other copy mod...

Page 112: ...ness P 17 Setting paper type When placing paper on the bypass tray be sure to set the paper size and thickness P 36 Bypass Copying Place the paper for cover sheets of the same size as normal paper in the same direction 2 Place the normal paper in the drawer s 3 Place the original s When placing them on the original glass they must be placed from the first page 4 Press COVER SHEET on the EDIT menu ...

Page 113: ... of the same size and direction as that for the cover sheets in advance 7 Select other copy modes as required and then press the START button on the control panel When the originals are placed on the RADF optional scanning and copying start When they are placed on the original glass follow steps 8 and 9 8 Place the next original and then press NEXT COPY on the touch panel or the START button on th...

Page 114: ...sheets The paper for the insertion sheets must be placed in a different paper source than normal paper When placing paper in a drawer for sheet insertion be sure to select INSERT 1 or INSERT 2 as a paper type and also set the paper size and thickness P 17 Setting paper type When placing paper on the bypass tray be sure to set the paper size and thickness P 36 Bypass Copying Place the paper for ins...

Page 115: ... more than one page 3 Press OK after you have keyed in the page numbers If you selected COPIED in step 5 the selected page will be replaced with a copied insertion sheet If you selected BLANK a blank insertion sheet will be inserted before the selected page Up to 50 pages in total can be selected for INSERT SOURCE 1 and INSERT SOURCE 2 7 Press the BASIC tab to display the BASIC menu Then select th...

Page 116: ...ing start When they are placed on the original glass follow steps 9 and 10 9 Place the next original and then press NEXT COPY on the touch panel or the START button on the control panel Scanning of the next original starts Repeat this procedure until the scanning of all the originals is finished 10 When the scanning of all the originals is finished press JOB FINISH on the touch panel Copying start...

Page 117: ...on the EDIT menu 4 Select the direction and position of the time stamp 1 Select the direction SHORT EDGE or LONG EDGE 2 Select the position UPPER or LOWER 3 Press OK 5 Select other copy modes as required and then press the START button on the control panel MM DD YYYY 14 54 MM DD YYYY 14 54 Printed at the bottom of a portrait copy Printed at the top of a landscape copy ...

Page 118: ...HORT EDGE or LONG EDGE 2 Select the position TOP LEFT TOP CENTER etc 3 If you want to specify the page number to start with press and go to step 5 Otherwise press OK and go to step 6 5 Specify the page number you want to start with 1 Key in the page number 2 Press OK 6 Select other copy modes as required and then press the START button on the control panel 3 2 1 3 2 1 Printed at the bottom center ...

Page 119: ...the table below before setting job build 1 Press JOB BUILD on the EDIT menu Settings not available Settings applied for all jobs Settings changeable for each job Automatic Paper Selection BOOK 2 Book type original 2 sided copy Editing XY zoom Cover sheet Sheet insertion Magazine sort Magazine sort saddle stitch Magazine sort center fold 2IN1 4IN1 e Filing File Mixed size originals Copy paper size ...

Page 120: ...want to use a particular drawer select it Press SETTINGS on the touch panel to confirm the current settings If you want to change the settings press the FUNCTION CLEAR button on the control panel and then restart the procedure from step 1 4 Press the START button on the control panel Scanning starts When the scanning of all the originals is finished the message below appears 5 Place the next stack...

Page 121: ...d 119 4 EDITING FUNCTIONS 6 When the scanning of all the originals is finished change the number of copy sets as required Then press JOB FINISH on the touch panel Copying starts If any storing function is set that will also start ...

Page 122: ...ed pages exit in a different direction alternately With this function you can make them all exit in the same direction 1 sided portrait original placed in a landscape direction 2 sided copy 2 sided open to left portrait original 1 sided copy 1 Place paper in the drawer s 2 Place the original s 3 Set duplex copying setting P 82 Duplex Copying 4 Press IMAGE DIRECTION on the EDIT menu 5 Press OK Imag...

Page 123: ...iginals to 2 sided copies you can choose tablet or book copy To make 2 sided originals to 2 sided copies you can switch book originals to tablet copies and vice versa 1 Place paper in the drawer s 2 Place the original s 3 Press BOOK TABLET on the EDIT menu 4 Press OK Book tablet is now set 5 Select other copy modes as required and then press the START button on the control panel ...

Page 124: ...n the single feed mode SADF is set place originals one sheet at a time If you place more than one original the copied image may be skewed or the originals may misfeed 1 Place paper in the drawer s 2 Press ADF SADF on the EDIT menu 3 Press OK The feeding mode is now set at single feed mode 4 Select other copy modes as required 5 Place the original s on the RADF optional one sheet at a time The orig...

Page 125: ...s to 2 sided copy while this function is enabled the front and back sides of the originals and the copies will not be matched The sensitivity to detect blank pages can be changed For details refer to the MFP Management Guide 1 Place paper in the drawer s When using bypass copying be sure to set the paper size 2 Place the original s 3 Press OMIT BLANK PAGE on the EDIT menu 4 Press OK Omit blank pag...

Page 126: ...bled Adjust the density level manually Originals with an intricate outer shape e g an original with cut out parts on its edge may not be copied properly because this function may not detect the border between the original and areas not belonging to the original 1 Place paper in the drawer s When using bypass copying be sure to set the paper size 2 Select the drawer for the desired paper size 3 Pre...

Page 127: ...py modes as required and then press the START button on the control panel 5 Place the original on the original glass When placing the original be sure that the Original Cover optional or the RADF optional is fully raised If not this function may not properly be able to detect the border between the original and areas not belonging to it Do not directly look at the original glass during copying sin...

Page 128: ......

Page 129: ...5 IMAGE ADJUSTMENT This chapter describes the image adjustment functions of this equipment Displaying IMAGE Menu 128 Using Image Adjustment Functions 129 Background adjustment 129 Sharpness 130 ...

Page 130: ...5 IMAGE ADJUSTMENT 128 Displaying IMAGE Menu Displaying IMAGE Menu You can display the IMAGE menu by pressing the IMAGE tab on the touch panel when you want to use various image adjustment functions ...

Page 131: ...ed original becoming visible on its front side This mode cannot be used with the automatic density adjustment function P 59 Density Adjustment 1 Press BACKGROUND ADJUSTMENT in the IMAGE menu 2 Press LIGHT or DARK to adjust the density and then press OK Canceling background adjustment Move the indicator to the middle and then press OK Press RESET and then OK Front Back Not adjusted Adjusted to have...

Page 132: ...GE menu 2 Press SOFT or SHARP to adjust the sharpness and then press OK When the sharpness level is adjusted to the SOFT side the moire fringes on the printed photos etc are softened If it is adjusted to the SHARP side the letters and fine lines become sharper Canceling sharpness adjustment Move the indicator to the middle and then press OK Press RESET and then OK ...

Page 133: ...g Templates 135 Registering templates into the public template group 135 Creating a new private group 138 Registering templates into a private group 140 Recalling Templates 141 Changing Data 143 Changing private group data 143 Changing template data 144 Deleting Groups or Templates 146 Deleting private groups 146 Deleting templates 147 ...

Page 134: ...iminating the need to perform complicated settings every time Templates can be used in copying scanning and sending a fax Fax functions are available only when the Fax Unit optional is installed Displaying template menu You can display the template menu by pressing TEMPLATE on the touch panel when you want to register or recall templates YYYY MM DD 1 YYYY MM DD 1 YYYY MM DD 1 YYYY MM DD 1 ...

Page 135: ...t side and then the back of the 2 sided original press JOB FINISH to start copying 2IN1 4IN1 2IN1 Simplex Duplex 2 2 DUPLEX Staple FRONT STAPLE 2 Original size Mixed size Paper selection Automatic Paper Selection Staple FRONT STAPLE 2 Original size Mixed size Paper selection Automatic Magnification Selection Paper source 1st drawer Staple FRONT STAPLE 2 Button Function 1 Original 1 sided Color mod...

Page 136: ...red in the e Filing box public box 3 Button Function 1 Original mode TEXT PHOTO Simplex Duplex 1 1 SIMPLEX Storing method Stored in the e Filing box public box No copying Original mode TEXT PHOTO Simplex Duplex 2 1 SPLIT Storing method Stored in the e Filing box public box No copying Original mode TEXT PHOTO Simplex Duplex 1 2 DUPLEX Storing method Stored in the e Filing box public box Copying per...

Page 137: ...c template group Private group You can create up to 200 private groups These are useful for each department section or user Up to 60 templates can be registered per group You can set a password to restrict the use of the registered templates Useful Templates are registered under the group 001 by default Registering templates into the public template group 1 Set all the required functions Example E...

Page 138: ...ton and NAME 2 appears below Be sure to enter at least one of them When you press either of them the on screen keyboard appears Enter within 11 characters USER NAME Enter the name of the template owner as required When you press it the on screen keyboard appears Enter within 30 characters PASSWORD Key in a password here if you want to require a password to recall the template When you press it the...

Page 139: ...ant it to start until you press the START button on the control panel Even when the automatic start function is enabled you need to enter the user name and password when recalling the template in the following cases For details of the User Authentication for Scan to E mail and the user management function ask your administrator When the User Authentication for Scan to E mail is enabled and the use...

Page 140: ...3 Enter the necessary information about the group NAME Enter the name of the group When you press it the on screen keyboard appears Enter within 20 characters Be sure to enter it USER NAME Enter the name of the group owner as required When you press it the on screen keyboard appears Enter within 30 characters PASSWORD Key in a password here if you want to require a password to view the group or re...

Page 141: ... The characters keyed in appear as asterisks 2 Press RETYPE PASSWORD and then key in the password again 3 Press OK The symbols below cannot be used in passwords When you have entered all the necessary items press OK The new group is now registered and the menu moves to the one for registering templates 4 Press the FUNCTION CLEAR button on the control panel The menu returns to the BASIC menu ...

Page 142: ...oup 1 Press the REGISTRATION tab 2 Select the desired group by pressing its button or keying in its group number 3 digits 3 Press OPEN To switch the menu Press or 4 Key in the password for the selected group If no password is set go to step 5 1 Press PASSWORD and then enter the password with the buttons on the touch panel or the digital keys on the control panel 2 Press OK 5 Register a template fo...

Page 143: ... Place paper in the drawer s 2 Place the original s 3 Press TEMPLATE on the touch panel The template menu appears 4 Press the button for the group to which the desired template is registered You can also select the group by keying in its group number 3 digits To switch the menu Press or 5 Key in the password when you have selected the private group If no password is set go to step 6 1 Press PASSWO...

Page 144: ...f the functions set in the template 7 Key in the password for the selected template If no password is set go to step 8 1 Press PASSWORD and then enter the password with the buttons on the touch panel or the digital keys on the control panel 2 Press OK 8 Confirm that Updated the template setting is displayed on the touch panel The message is displayed for approx 3 seconds 9 Select other copy modes ...

Page 145: ...ide Changing private group data 1 In the template menu select the desired group 1 Press the REGISTRATION tab 2 Select the desired group by pressing its button or keying in its group number 3 digits 3 Press EDIT To switch the menu Press or 2 Key in the password for the selected group If no password is set go to step 3 1 Press PASSWORD and then enter the password with the buttons on the touch panel ...

Page 146: ... switch the menu Press or 2 Enter the password as follows and then press OK When the public template group is selected Press PASSWORD and then enter the Admin Password 6 to 64 characters with the buttons on the touch panel or the digital keys on the control panel When a private group is selected Press PASSWORD and then enter the password up to 20 characters with the buttons on the touch panel or t...

Page 147: ... switch the menu Press or 4 Key in the password for the selected template If no password is set go to step 5 1 Press PASSWORD and then enter the password with the buttons on the touch panel or the digital keys on the control panel 2 Press OK 5 Change the data following step 7 on P 135 Registering templates into the public template group ...

Page 148: ...roups 1 In the template menu select the desired private group 1 Press the REGISTRATION tab 2 Select the desired group by pressing its button or keying in its group number 3 digits 3 Press DELETE To switch the menu Press or 2 Key in the password for the selected group If no password is set go to step 3 1 Press PASSWORD and then enter the password with the buttons on the touch panel or the digital k...

Page 149: ...ress OPEN To switch the menu Press or 2 Enter the password as follows and then press OK When the public template group is selected Press PASSWORD and then enter the Admin Password 6 to 64 characters with the buttons on the touch panel or the digital keys on the control panel When a private group is selected Press PASSWORD and then enter the password up to 20 characters with the buttons on the touc...

Page 150: ... template 2 Press DELETE To switch the menu Press or 4 Key in the password for the selected template If no password is set go to step 5 1 Press PASSWORD and then enter the password with the buttons on the touch panel or the digital keys on the control panel 2 Press OK 5 Press DELETE The template is now deleted ...

Page 151: ...w to confirm the processing status and the history of copy jobs performed Confirming Copy Job Status 150 Confirming jobs in progress or ones in waiting 150 Confirming copy job history 155 Confirming drawers 156 Confirming amount of toner remaining 157 ...

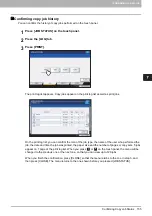
Page 152: ...t However if the user has an administrator privilege all copy jobs in waiting can be deleted paused or their order changed and the entire job history is displayed on the print log list Confirming jobs in progress or ones in waiting You can confirm the jobs in progress or the ones in waiting on the touch panel To view them press JOB STATUS on the touch panel The print job list appears Press the JOB...

Page 153: ...s You can delete jobs that you no longer need to print 1 Select the desired job on the print job list and then press DELETE You can select more than one job 2 Press DELETE The job is now deleted You cannot use the print job list to delete fax Internet Fax jobs and E mail reception print jobs ...

Page 154: ...s is Wait can be held in the queue Pausing Select the desired job on the print job list and then press PAUSE The job is now paused The paused job is not printed even when its turn comes Printing of the next job starts Resuming the paused job Select the desired job and then press RESUME ...

Page 155: ... can change the order of the jobs in waiting by moving them within the list You can only move jobs from and to those whose status is Wait 1 Select the desired job on the print job list and then press MOVE 2 Select the position that you want the job to move to It will come under the selected job ...

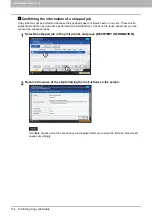
Page 156: ...be suspended and the next job will be performed Job Skip function Check on the touch panel how you can recover the suspended jobs 1 Select the skipped job in the print job list and press RECOVERY INFORMATION 2 Resolve the cause of the skip following the instructions on the screen If multiple causes exist the second cause is displayed after you resolve the first one Resolve all causes accordingly ...

Page 157: ... print log list you can confirm the icon of the job type the name of the user who performed the job the date and time the job was printed the paper size and the number of pages or copy sets 5 jobs appear on 1 page of the print log list When you press or on the touch panel the menu will be changed to the previous one or the next one so that you can view up to 120 jobs When you finish the confirmati...

Page 158: ...e button for the drawer from which the paper is fed is highlighted Press CLOSE when you finish the confirmation The menu returns to the one shown before you pressed JOB STATUS When the paper in the drawer has run out during printing JOB STATUS on the touch panel blinks In this case press JOB STATUS so that the menu for displaying the printing status will appear and the button for the drawer whose ...

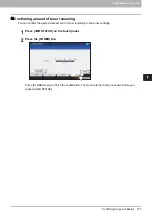
Page 159: ...firming amount of toner remaining You can confirm the approximate amount of toner remaining in the toner cartridge 1 Press JOB STATUS on the touch panel 2 Press the TONER tab Press CLOSE when you finish the confirmation The menu returns to the one shown before you pressed JOB STATUS ...

Page 160: ......

Page 161: ...8 OTHER INFORMATION Continuous Copying Speed 160 Copying Function Combination Matrix 162 Combination matrix 1 2 162 Combination matrix 2 2 163 ...

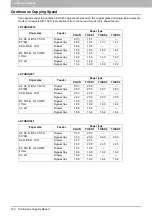
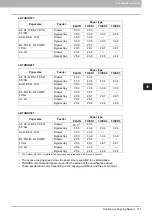
Page 162: ...8 14 5 Bypass tray 14 8 14 5 14 5 14 5 A3 LD Drawer 13 2 12 9 Bypass tray 13 2 12 9 12 9 12 9 Paper size Feeder Paper type PLAIN THICK1 THICK2 THICK3 A4 A5 R B5 LT ST R 8 5 SQ Drawer 25 3 25 3 Bypass tray 25 3 25 3 25 3 25 3 A4 R B5 R LT R Drawer 23 3 22 5 Bypass tray 23 3 22 5 22 5 22 5 B4 FOLIO LG COMP 13 LG Drawer 19 5 19 0 Bypass tray 19 5 19 0 19 0 19 0 A3 LD Drawer 16 8 16 4 Bypass tray 16 8...

Page 163: ... tray 35 0 33 9 33 9 33 9 B4 FOLIO LG COMP 13 LG Drawer 29 5 28 7 Bypass tray 29 5 28 7 28 7 28 7 A3 LD Drawer 25 4 24 8 Bypass tray 25 4 24 8 24 8 24 8 Paper size Feeder Paper type PLAIN THICK1 THICK2 THICK3 A4 A5 R B5 LT ST R 8 5 SQ Drawer 45 3 43 4 Bypass tray 45 3 43 4 43 4 43 4 A4 R B5 R LT R Drawer 35 0 33 9 Bypass tray 35 0 33 9 33 9 33 9 B4 FOLIO LG COMP 13 LG Drawer 29 5 28 7 Bypass tray ...

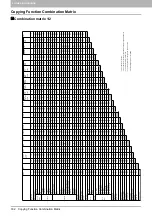
Page 164: ... Yes Yes Yes No No No No No Rotate sort Yes Yes Yes Yes Yes Yes Yes Yes Yes 4 Yes Yes No No No No No No No No No Yes Yes Yes Yes 3 3 Yes Yes Yes Yes Yes No Yes 4 Yes Yes Yes Yes Yes Yes Yes Yes Yes Yes Yes Yes Yes Yes Yes Yes Yes Yes Yes No Yes Yes Yes Yes Yes Yes Yes Yes Yes Yes Yes Yes Yes Yes Yes Yes No No No Yes Yes Yes Yes Yes Yes Yes No Yes 4 Yes Yes No No No No No No No No Yes No Yes No No ...

Page 165: ... Yes 1 1 Yes 1 Yes Yes Yes Yes 1 No No No No No No Yes No No No No Yes Yes Yes Yes No Yes Yes Yes Yes Yes Yes Yes Yes Yes Yes Yes Yes Yes Yes Yes Yes Yes Yes Yes Yes Yes Yes Yes Yes Yes Yes Yes No No Yes Yes Yes Yes Yes Yes Yes Yes Yes Yes Yes Yes Yes Yes Yes Yes Yes Yes Yes Yes No Yes Yes Yes Yes Yes Yes Yes Yes Yes Yes Yes Yes Yes Yes Yes Yes Yes Yes Yes Yes 3 Yes Yes Yes Yes 3 Yes 3 3 3 3 Yes Y...

Page 166: ......

Page 167: ...atrix 162 Copying functions before using copying functions 52 clearing the set functions 53 confirming the set functions 52 COVER SHEET 110 D Date and time 9 Default settings 52 Density adjustment 52 59 Density adjustment buttons 9 Department management function 8 Drawer buttons 10 Drawers acceptable copy paper 11 buttons 10 confirming current status 156 placing paper 13 DUAL PAGE 99 Duplex copyin...

Page 168: ...6 80 Message indication area 8 N NetWare IP 90 NetWare IPX 90 Non sort Non staple 66 Number of copies 9 28 Number of remaining copy sets 9 O Offset Tray 66 OHP film 11 36 39 40 OMIT BLANK PAGE 123 Original glass 23 ORIGINAL MODE 9 58 Original mode original mode 52 58 PHOTO 58 TEXT 58 TEXT PHOTO 58 Original stopper 26 Originals acceptable originals 22 forgery prevention function 22 mixed size origi...

Page 169: ...sing Automatic Document Feeder 26 27 Simplex duplex setting 52 Single feed mode 27 SMB 89 Sort 66 71 Staple sort 66 73 Stapling control section 80 START button 29 Sticker labels 11 36 STOP button 30 STORAGE 9 T TEMPLATE 9 132 Template menu 132 Templates changing data 143 144 deleting 146 147 recalling 141 registering 135 140 templates 132 useful templates 133 TEXT 58 TEXT PHOTO 58 Thick paper 11 T...

Page 170: ...168 INDEX ...

Page 171: ...DP 2072 2572 3072 3572 4572 5072 OME14002500 ...

Page 172: ...1 11 1 OSAKI SHINAGAWA KU TOKYO 141 8562 JAPAN MULTIFUNCTIONAL DIGITAL SYSTEMS Copying Guide 2014 TOSHIBA TEC CORPORATION All rights reserved R140120O6700 TTEC Ver00 F 2014 03 ...

Reviews: