


35
•
Depending on the specifi cation of the PC you are
playing the DVD-Video on, and the DVD’s title, some
scenes may be skipped, or you may not be able to
pause during multi-angle scenes.
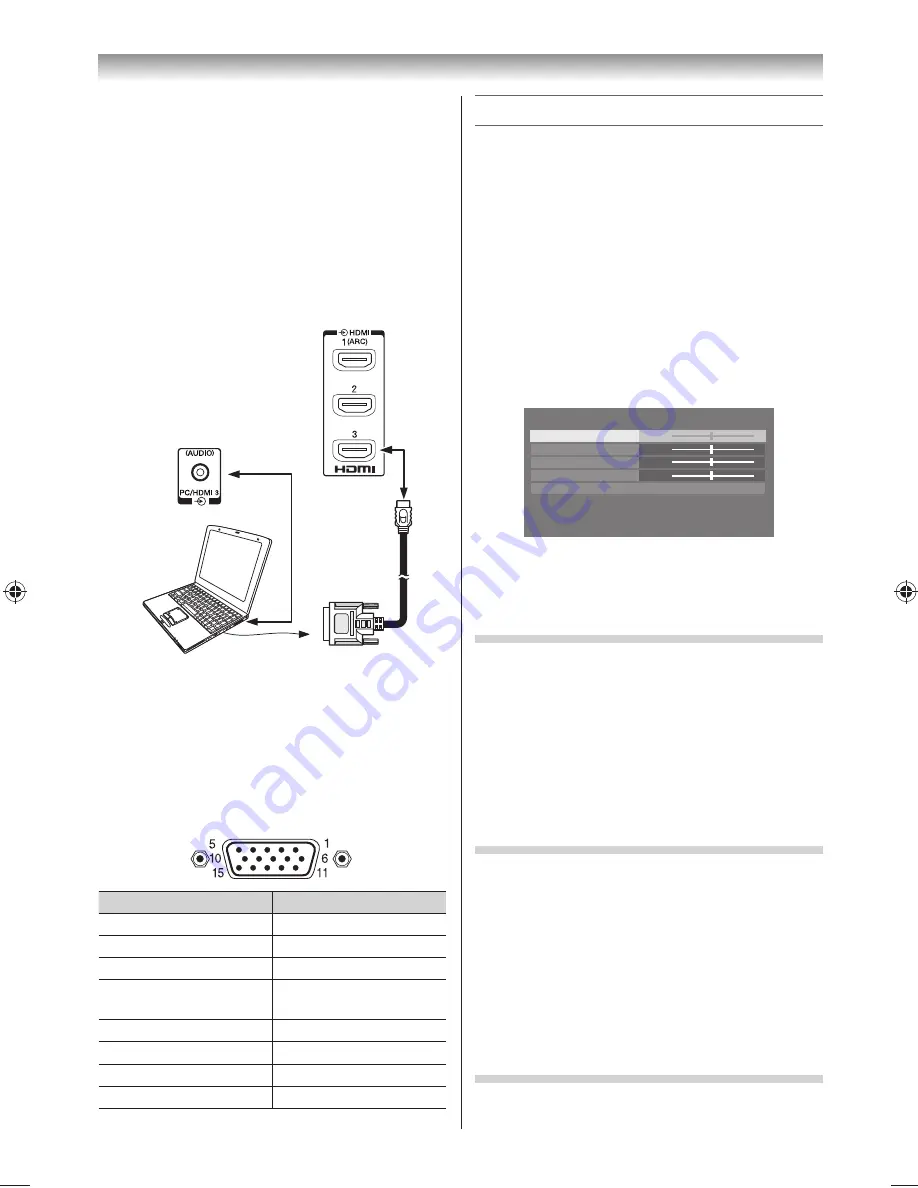
To connect a PC to the HDMI terminal on the TV:
When connecting a PC to the HDMI terminal on the
TV, use an HDMI-to DVI adapter cable and analogue
audio cables.
If connecting a PC with an HDMI terminal, use an
HDMI cable (type A connector). Separate analogue
audio cables are not necessary.
Computer
Audio cable for
PC-to-TV
connection
TV back view
Notes:
•
The edges of the images may be hidden.
•
If connecting a certain PC model that signal is
particular, the PC signal may not be detected
correctly.
Signal names for mini D-sub 15 pin connector
Pin assignment for RGB/PC terminal
Pin No.
Signal name
Pin No.
Signal name
1
R
9
+5VDC
2
G
10
Ground
3
B
11
NC
4
NC (not
connected)
12
SDA
5
Ground
13
H-sync
6
Ground
14
V-sync
7
Ground
15
SCL
8
Ground
Connecting your TV
Using the PC Settings
•
First press
o
until the video input mode list
appears on the screen, then press
or
and
OK
in order to select the PC input mode (
-
page 29).
•
This function may not be available for some signal
or if no signal is received.
•
The optimum points of the
Clock Phase
and
Sampling Clock
adjustments may be
incomprehensible according to the input signals.
Adjusting the picture position
1
From the
Display Settings
in the
PREFERENCES
menu, press
or
to select
PC Settings
.
2
Press
OK
to display the
PC Settings
menu.
PC Settings
Horizontal Position
Vertical Position
Clock Phase
Sampling Clock
Reset
0
0
0
0
3
Press
or
to select an option you want to
adjust. Press
or
to adjust the settings as
required.
Adjusting the Clock Phase of the picture
If the
Clock Phase
, which synchronize the PC signal
and LCD display, is not optimized, the picture will
blur.
This function enables you to adjust
Clock Phase
and display a clear picture.
1
From the
PC Settings
menu, press
or
to
select
Clock Phase
.
2
Press
or
to obtain a clear picture.
Adjusting the Sampling Clock
If the
Sampling Clock
does not match with the dot
clock frequency of the PC, blurred picture detail will
occur, or screen width will change, or drift patterns
in vertical lines may be apparent.
This function enables you to adjust it and optimize
the picture.
1
From the
PC Settings
menu, press
or
to
select
Sampling Clock
.
2
Press
or
to optimize the picture.
Resetting the PC Settings
The
Reset
function adjusts the
PC Settings
to the
factory settings.
324046PX200̲Series̲En.indd 35
2012/06/04 13:21:51
Summary of Contents for 32PX200 series
Page 59: ......