


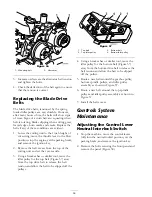


Figure 42
1. Air cleaner cover
5. Air cleaner indicator
2. Gasket
6. Air cleaner latch
3. Filter
7. Rubber outlet valve
4. Air cleaner body
•
Be sure the cover is seated correctly and seals
with the air cleaner body.
Servicing the Air Cleaner
1. Pull the latch outward and rotate the air cleaner
cover counter-clockwise (Figure 42).
2. Remove the cover from the air cleaner body
(Figure 42).
3. Before removing the filter, use low pressure
air (40 psi, clean and dry) to help remove
large accumulations of debris packed between
outside of primary filter and the canister.
This cleaning process prevents debris from
migrating into the intake when the primary
filter is removed.
Important:
Avoid using high pressure
air which could force dirt through the filter
into the intake tract.
4. Remove and replace the primary filter
(Figure 42).
Important:
Do not clean the used
element to avoid damage to the filter
media.
5. Inspect the new filter for shipping damage,
checking the sealing end of the filter and the
body.
Important:
Do not use a damaged
element.
6. Ensure that the foam gasket is in place in
the cover and that it is not torn or damaged
(Figure 42). If it is damaged, replace it.
7. Insert the new filter by applying pressure to
the outer rim of the element to seat it in the
canister.
Important:
Do not apply pressure to the
flexible center of the filter.
8. Clean the dirt ejection port located in the
removable cover, as follows:
A. Remove the rubber outlet valve from the
cover (Figure 42).
B. Clean the cavity.
C. Replace the outlet valve.
9. Install the cover orienting the rubber outlet
valve in a downward position—between
approximately 5:00 to 7:00 when viewed from
the end.
10. Reset the indicator (Figure 42) if showing red.
Servicing the Engine Oil
Checking the Engine Oil Level
The engine is shipped with oil in the crankcase;
however, the oil level must be checked before and
after the engine is first started. Check oil level
before each day’s operation or each time machine
is used.
The crankcase capacity is approximately 4 qt.
(3.8 l) with the filter. Use high-quality engine oil
that meets the following specifications:
•
API Classification Level Required: CH-4, CI-4
or higher.
•
Preferred oil: SAE 15W-40 (above 0°F (-17°C)
•
Alternate oil: SAE 10W-30 or 5W-30 (all
temperatures)
Note:
Toro Premium Engine oil is available
from your distributor in either 15W-40 or 10W-30
viscosity. See the parts catalog for part numbers.
1. Park the machine on a level surface, lower the
mower deck, move the throttle lever to the
Slow position, stop the engine, and remove the
key from the ignition switch. Open the hood.
2. Remove the dipstick (Figure 43), wipe it clean,
and install the dipstick. Remove the dipstick
and check the oil level.
47
Summary of Contents for Groundsmaster 7200 Series
Page 9: ...Slope Chart 9 ...
Page 44: ...Figure 39 44 ...
Page 70: ...Schematics Electrical Schematic Rev A 70 ...
Page 71: ...Hydraulic Schematic Rev A 71 ...


