


Product Overview
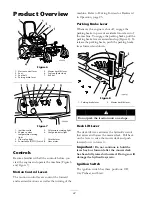
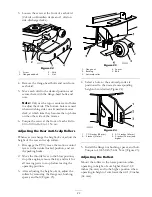
Figure 6
1. Motion control lever
5. Mower deck lift lever
2. Seat
6. Fuel cap (both sides)
3. Seat belt
7. Roll bar
4. Parking brake lever
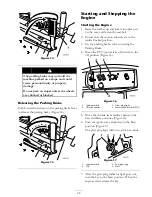
Figure 7
1. Ignition switch
5. Oil pressure warning light
2. Engine coolant
temperature warning
light
6. Charge indicator light
3. Glow plug light
7. Throttle lever
4. Power take off (PTO) Switch 8. Hour meter
Controls
Become familiar with all the controls before you
start the engine and operate the machine (Figure 6
and Figure 7).
Motion Control Levers
The motion control levers control the forward
and rearward motions as well as the turning of the
machine. Refer to Driving Forward or Backward
in Operation, page 25.
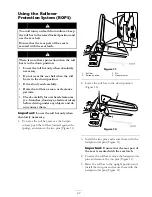
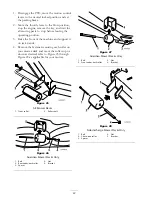
Parking Brake Lever
Whenever the engine is shut off, engage the
parking brake to prevent accidental movement of
the machine. To engage the parking brake, pull the
parking brake lever rearward and up (Figure 8). To
release the parking brake, push the parking brake
lever forward and down.
Figure 8
1. Parking brake lever
2. Mower deck lift lever
Do not park the traction unit on a slope.
Deck Lift Lever
The deck lift lever activates the hydraulic circuit
that raises and lowers the mower deck. Pull back
on the lever to raise the mower deck and push
forward on it to lower it.
Important:
Do not continue to hold the
lever back or forward after the mower deck
has been fully raised or lowered. Doing so will
damage the hydraulic system.
Ignition Switch
The ignition switch has three positions: Off,
On/Preheat, and Start.
22
Summary of Contents for Groundsmaster 7200 Series
Page 9: ...Slope Chart 9 ...
Page 44: ...Figure 39 44 ...
Page 70: ...Schematics Electrical Schematic Rev A 70 ...
Page 71: ...Hydraulic Schematic Rev A 71 ...


