background image

GB

4

TV

DVD


Languages and countries

:

the list of languages

and countries depends on the model.

Decoder

:

If you have connected a decoder to the AV 1

socket, after the initial set-up you should display the Manual
installation menu and confirm the 

Decoder 

option. Refer to

page 5.

Missing channels

:

channels are searched for according to the

country selected, refer to the Manual set-up chapter to set up
channels that have not been found.
For cable networks, if some channels have not been found, select

Other 

instead of the country and re-start an 

Auto update

.

Subsequent set-ups

:

display the 

INSTALLATION SUMMARY

(see

page 6) and choose 

Auto update 

or 

Auto installation 

as

appropriate. Then follow the instructions at the foot of the screen.

• 

Auto update 

enables you to set up channels just on-air or add

to your set-up if some channels are missing or wrongly
set up.

Auto installation 

is used for setting up after the initial set-

up (e.g. after moving house).
It deletes all channels previously memorised. To set up a new
channel, it is better to use 

Auto update 

or 

Manual

installation

.

Programme organisation

: at the Initial set-up,

your TV/DVD searched for channels, giving them a number
and name according to the country chosen. The
PROGRAMME  ORGANISATION menu enables you to
alter these settings. You are able to name channels whose
name has not been found, change the sequence of channels
and delete channels that are duplicated or of poor quality.
Follow the instructions at the foot of the screen. Identify
channels with the help of a TV programme guide.

• Organising your channels

: select the 

Select program.

line.

Look for the channel that you want to assign the number 1 to with
the 

pr +

,

pr - 

or 

keys, using the channel logos to help you.

The number already assigned appears on the 

Select program.

line. Select the 

Swap with PR 

line, key in 

01 

and press 

ok

.The

channel goes to first position: the two channels are switched.
Continue for the other channels.

• Deleting a channel

: select the 

Select program.

line and

scroll your channels with the 

pr + 

and 

pr - 

or keys.When

you get to a channel to be deleted, select 

Delete program.

, and

press 

ok

.

• Changing the name

: select the 

Change pr. name 

line and

choose the character to be altered with the 

keys. Scroll the

alphabet with the 

and 

keys.The name will be changed when

you change line or leave the menu.

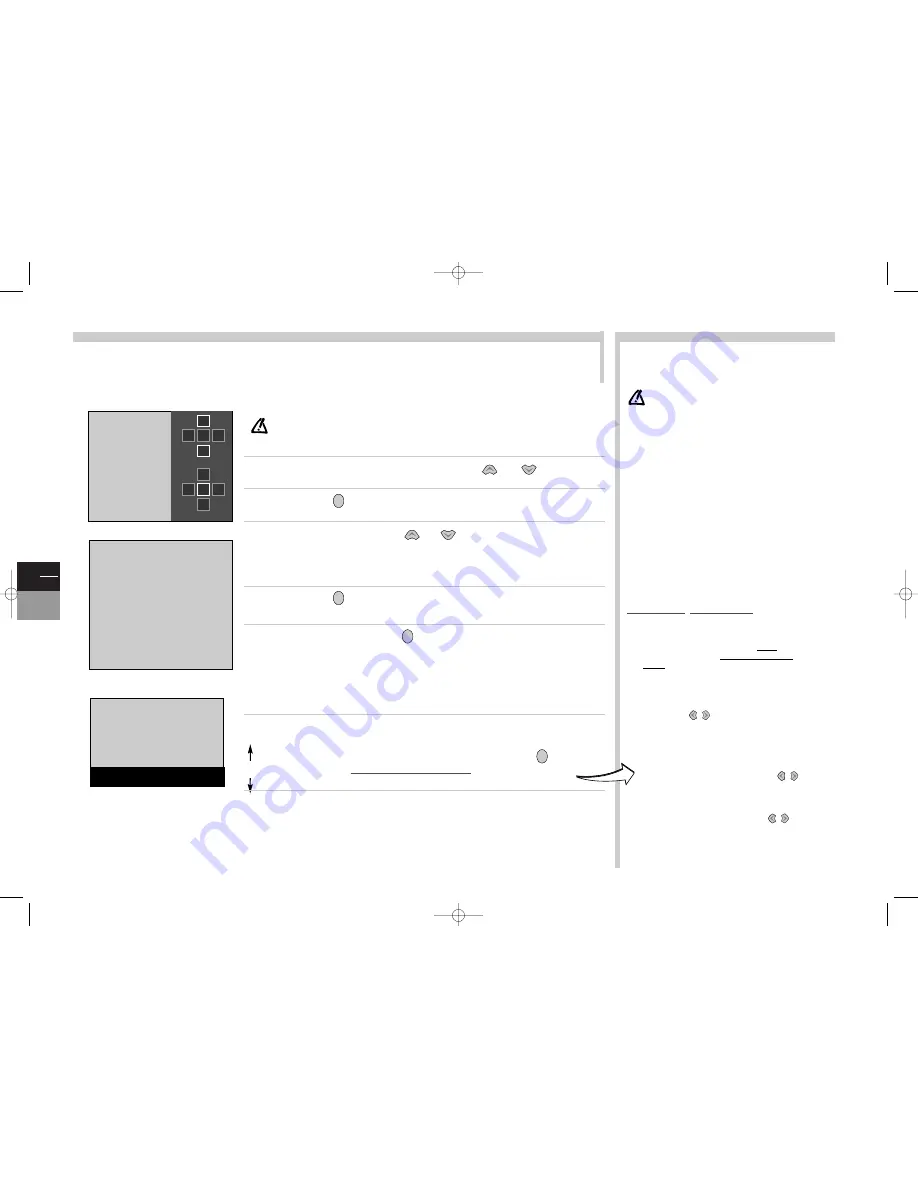
The TV/DVD you just bought must be configured to receive the channels of your area. The first set-up allows you to adjust the
settings required for the search and storage of all the channels you can receive. The first set-up also enables you to choose the
language which will be used for TV menus, as well as for DVD menus, dialogues and subtitles. Power the TV/DVD set with the On/Off
switch 

located at the front and scrupulously follow the steps 1 to 7 of this page.

More info...

Initial set-up

Choose the language from the menus with the 

or 

keys.

Confirm with 

. A list of countries appears.

Choose the country with the 

or 

keys.

This is the country you are in, or the country whose channels you want to receive if you live near its
borders.

Confirm with 

. A welcoming message appears.

Start auto set-up by pressing 

.

The menu that appears tells you how set-up is progressing. 

Wait for the end of set-up message

before leaving the menu

, otherwise the channels will not all be memorised. Depending on the

number of channels you want to receive, auto set-up can take up to 10 minutes.

According to the country you chose in step 3, the TV/DVD will scan
channels in a pre-set order. If you want to alter this list, to name or re-name
your channels or delete channels memorised twice, press 

and follow

the instructions in 

Programme organisation

.

If you do not want to reorganise your channels, leave the menu with the

exit 

key and refer to everyday use on page 6.

ok

ok

ok

ok

When your TV/DVD is first switched on, the language choice menu
appears (1). If it does not appear, put the TV/DVD into stand-by by
pressing the 

B

B

key on the remote control unit. Press the pr - key for

several seconds until the menu appears.

or 

The language chosen during step 1 is automatically selected for the DVD part. Nonetheless, you may
customise the DVD part (menus, dialogues, or subtitles language - on-screen display - rating limit): see
pages 15 to 17.

2

1

3

4

5

6

7

1

COUNTRY SELECTION

R e t u r n

B

B

U n i t e d   K i n g d o m

E i r e

F r a n c e

G e r m a n y

I t a l y

S p a i n

P o r t u g a l

H o l l a n d

B e l g i u m   a n d   L u x e m b o u r g

S w i t z e r l a n d

A u s t r i a

… …

O t h e r

B

B

English

Français

Deutsch

Italiano

Español

Português

Nederlands

Svenska

Dansk

Norsk

……

……

2

5

B

B

B

B

OK

BB

BB

B

B

B

B

OK

BB

BB

SEARCHING

AUTO INSTALLATION

•••••••••••••••••••••

03 STATIONS FOUND

Auto programming your TV set.

Please wait. To cancel press EXIT.

c17-GB-7L  9/10/00  9:46  Page 4

Summary of Contents for ICC17

Page 1: ...references TV Remote control 6 Everyday use 7 Selecting and scrolling channels Selecting connected equipment AV Adjusting volume and cutting off the sound Zoom Displaying information Locking theTV DVD set Turning theTV DVD set off List of channels Time Stereo Nicam Virtual Dolby sound 8 Teletext 9 The pages of this publication are printed on recycled paper This manual applies to several TV DVD mod...

Page 2: ... an electric shock or touch the laser beam Do not place your eyes close to the opening of the disc tray or any other opening to look inside the player THOMSON multimedia is not liable if the TV DVD is used other than in accordance with this manual Care Clean the screen with a glass care cleaner and the rest of the set with a soft cloth and neutral detergent Regularly dust the vents at the back and...

Page 3: ...te receiver etc UK SOCKET Please respect the environment and prevailing regulations Before you dispose of batteries or accumulators ask your dealer whether they are subject to special recycling and if he accepts to take them back 1 3 2 INSERTINGTHE BATTERIES Put the batteries in the remote control unit Connect the TV DVD to a mains socket Connect the outside aerial or cable network to the g socket...

Page 4: ...l be changed when you change line or leave the menu The TV DVD you just bought must be configured to receive the channels of your area The first set up allows you to adjust the settings required for the search and storage of all the channels you can receive The first set up also enables you to choose the language which will be used forTV menus as well as for DVD menus dialogues and subtitles Power...

Page 5: ...ountry is important for the correct display ofTeletext screens in the corresponding language Auto volume level check the box if you want to keep the same sound level on all channels AV1 name AV2 name AV3 name give a name to the socket according to the equipment that you are connecting to it Choose the character to be altered with the or keys Using the 1 or 2 keys display the character you want Pro...

Page 6: ...ion To control other equipment see page 20 To switch from TV to DVD mode or from DVD to TV mode IMPORTANT If the batteries of your remote control are exhausted you can use the keys on the front of the unit they have the same functions as those of the remote control tv dvd vcr tv dvd sat hifi Programmes To switch from one programme to another Choose a programme by entering its number For the 2 figu...

Page 7: ...o and from stand by switching theTV DVD on standby is performed with the key B on the remote control This key allows you to switch off your TV DVD with the remote control The status on standby is signalled by the red indicator lamp on the front side of theTV DVD set To switch on yourTV DVD set again press any of the remote control number keys or the ok key When you control the TV DVD with the remo...

Page 8: ...nd the type of sound Select the line then choose the type of sound you want The Magic and Virtual Dolby modes are only available if the sound is of a stereo type Surround effect this line only appears if DolbyVirtual is selected on the Sound mode line Select the line and adjust the surround effect Balance L R select the line then balance the sound between the Left and Right speakers Sound preset c...

Page 9: ... no Teletext on the channel that you are watching Index to call up the Index page select 100 with the or keys and confirm with ok Display a page by keying in the three figures of its page number e g 170 After a moment the page appears Refer to the following or previous pages with the Scrolling pages some information takes up several pages They scroll on screen as they are received To stop them scr...

Page 10: ...e or keys Options Memo Wake up etc are suggested for you on the last line of the menu Select them with the or keys Memorise to be alerted while you are watching one programme that another programme is starting select the Memo option with the or keys Choose the programme to be memorised with the or keys Confirm with the ok key The REVIEW screen appears Check your settings Alarm call to program the ...

Page 11: ... to set up the device menus and disc languages sound outputs display modes to choose the play mode or lock the device The info menu will enable you during play to display information about the disc and to access some special play functions The info menu is deactivated when the disc is stopped To access it press the PLAY key to put the disc in playback then press the title key This menu is availabl...

Page 12: ...everal times STOP to stop playing a disc to stop it completely and restart from the beginning press twice PAUSE for a pause a still frame or an image by image selection PLA Y FWD ST OP REV PAUSE DVD functions Sound Adjusts the audio volume This function is activated on the TV DVD set whatever the position of the function selector hi fi position excepted Mutes or cancels muting DVD navigation If yo...

Page 13: ...On some DVDs and Video CDs this function allows you to enlarge the image during a playback at normal speed or during a pause The zoom in will be 1 5 or 2 or 4 times the normal size for DVDs and twice the normal size forVideo CDs When you press on this remote control key the image centre is enlarged When the image is sufficiently enlarged you can navigate from one zone to the next with the keys on ...

Page 14: ... as to optimally use the length of the segment see the next step and to leave a minimum length of non recorded tape on the cassette Program the tracks are sorted according to the programming list order of the menu Edit Program Choose the length of the segment with keys or You can record several segments and switch from one to the other select the or key and press ok To start reading the segments s...

Page 15: ...l audio multichannel signals Dolby Digital AC 3 is a sound compression technique elaborated by Dolby Laboratories for digital audio multichannel signals The Dolby Digital system enables any audio channel configuration from a stereo sound 2 channels up to the digital surround sound 5 1 If you have a Dolby Surround Pro Logic amplifier decoder you may fully enjoy its Pro Logic system either with titl...

Page 16: ...then press ok Choose the language with keys or and press ok to confirm If the chosen language is available it will automatically be selected when you display the sub titles see page 19 If it is not the subtitle language indicated on the disc will be selected If you choose the automatic option the preferred language used for sub titles will be the one you chose for the dialogues see above Because o...

Page 17: ...estriction level is determined by the disc publisher Select the Ratings Limits line then press ok to confirm Choose the country whose rating standards comply with your requirements select Counrty and press ok to confirm Select the country with keys or and press ok to confirm Choose the limit select Rated Titles and press ok to confirm Select the level with keys or and press ok to confirm All the u...

Page 18: ...epeat info with keys Choose an option with keys To repeat a sequence between two points A and B choose the option repeat A B then follow the given instructions to enter both points To stop repeating the playback select the Repeat info and choose the stop option press twice on the STOP key access the disc menu by pressing the disc menu key REPEAT PLAY The repeat principle is a loop reading between ...

Page 19: ...ys then choose a Standard Random Program mode with keys The Progr mode is only available if a list has been drawn in Edit Program Play Mode menu of the main menu see page 14 To read the first 10 seconds of each track select the Introscan info with keys then press ok to confirm Audio channel Video CD Select the Audio Channel info with keys then choose an option stereo sound left hand side channel r...

Page 20: ...me level Choose a radio station by entering the number To switch from one programme to another vcr tv dvd sat hifi vcr tv dvd sat hifi tv menu ok exit 2 3 6 5 4 7 8 9 1 0 pr pr vcr tv dvd sat hifi tv menu ok exit 2 3 6 5 4 7 8 9 1 0 pr pr 2 3 6 5 4 7 8 9 1 0 pr pr av To program the remote control unit 1 According to the model of remote control unit press on the vcr key or slide the switch in the p...

Page 21: ... is a camcorder Connection of a video recorder see diagram at the end of the leaflet inside the cover If you connect a video recorder to the aerial socket you will have to search and memorise the video recorder modulator channel Switch the video recorder on insert a recorded cassette to be read and search for images see Chapter Completing set up on page 5 To copy a cassette Connect the recording V...

Page 22: ... AV3 name CAMC Programme for l 01 reference time 13 15 28 09 99 Select a station from which you want to get the reference time COUNTRY SELECTION Return B B United Kingdom Eire France Deutschland Italia España Portugal Nederland Belgique Luxembourg Schweiz Österreich Sverige Danmark Norge Other PICTURE Return Picture preset Film Brightness Colour Contrast Sharpness Contrast expand Faible Tone Neutr...

Page 23: ... Portugues Nederlands Info Displays Angle indicator Scene Again Text Dolby Digital DTS ok ok ok ok ok 4x3 Letterbox 4x3 standard 16x9 Wide screen 16X9 Play Play mode Lock Display Sound Languages Glossary TV Image On Screen Displays Play Play mode Lock Display Sound Languages Glossary Lock Player Unlock Player Change Password Ratings Limits System Test On DTS Play Play mode Lock Display Sound Langu...

Reviews: