17
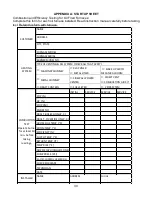
the limits of appendix C with no measurable CO is desirable. The
maximum acceptable CO reading is about 50 PPM. If the CO reading
is too high, open the burner air shutter, or air band, slightly to permit
more combustion air to the flame. Recheck the CO level and adjust as
required.
8. Draft – Draft measurements should be taken through the overfire port
and in the vent connector, not more than 12 inches away from the
furnace outlet. A 5/16 in. hex washer head bolt plugs the overfire port
in the burner mounting plate. Remove the bolt and insert a suitable
draft measurement gage.
9. Flue Gas Temperature – The flue gas temperature will vary depending
on heat input rate, air temperature rise across the heat exchanger, and
air flowrate through the furnace. To prevent excessive water vapor
condensation from the flue gases, the gross flue gas temperature
should not fall below 330ºF. In addition, if the gross flue gas
temperature exceeds 650ºF, the heating efficiency of the furnace will
be reduced.
10. Cycle the furnace several times to verify the burner lights off and shuts
down smoothly without excessive noise or smoke production.
Supply/Return Airflow and Air Temperature (PSC)
The supply/return airflow shall be set to obtain an air temperature rise, across the
furnace, in the range of 51º to 81ºF. Since the flow resistance of each duct
system is slightly different, the airflow (fan speed) may have to be changed in the
field to achieve a satisfactory temperature rise.
The blower (fan) speed is adjusted by changing the fan motor winding energized
by the control system. The furnace is set on the med-low fan speed, “ML”, at the
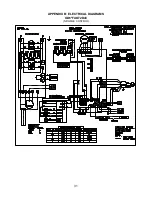
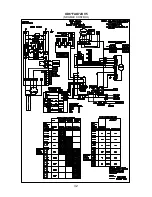
factory; refer to furnace wiring diagram, Appendix B. To adjust the fan speed,
follow this procedure.
a. Turn off all electrical power to the furnace at the disconnecting switch.
b. Remove the blower compartment access door on the
counterflow/horizontal furnace.
c. The “Heat” tab is the connection for the heating speed activation thru the
fan board. If a change in heating speed is desired simply pull the wire
from the heat tab and replace it with the desired motor speed wire. The
Black (High) is connected to the “cool” tab for A/C speed operation. If a
lower speed is desired for A/C, the speed is changed the same way. A
tab marked “Low” is populated with a lower fan speed for continuous fan
operation thru the “G” circuit of your T-stat. Unused blower speeds are
connected to the “unused motor leads” tabs at bottom right of fan board.
d. Replace the blower compartment access door on the
counterflow/horizontal unit.
e. Restore electrical power to the furnace at the disconnecting switch.
Summary of Contents for OD6FA072D48
Page 32: ...31 APPENDIX B ELECTRICAL DIAGRAMS OD6 FAO72D48 NRGMAX CONTROL...
Page 33: ...32 OD6 FAO72DV5 NRGMAX CONTROL...
Page 34: ...33 OD6 FAO72D48 UT CONTROL...
Page 35: ...34 OD6 FAO72DV5 UT CONTROL...
Page 37: ...36 APPENDIX D REPLACEMENT PARTS OD6FA072D48 OD6FA072DV4...
Page 38: ...37...
Page 39: ...38 OD6RA072D48 OD6RA072DV4...
Page 40: ...39...
Page 41: ...40...
Page 42: ...41...
Page 43: ...42...


