background image

MODUS PLUS – 

Wireless weather station

21

20

MODUS PLUS – 

Wireless weather station

7.1 Manual setting of the clock, calendar and day-of-week language

• Press the MODE/ENTER button for 2 seconds in normal mode to enter the setting

mode.

• 24 Hr starts flashing.
• Press the 

/CH or 

/UNIT button to choose 12 HR (PM appears on the display

after 12h) or 24 HR system. 

• Confirm with the MODE/ENTER button.
• The setting sequence is shown as follows: Hours, minutes, year, month/ day

sequence (American version) or day/month (European version), month, date, the
language for the weekday. Press the 

/UNIT or 

/CH button to adjust it.

• Day-of-week language: English (E), German (G), French (F), Spanish (S) and Italian

(I).

• Press the MODE/ENTER button again to return to normal mode.
• When the DCF reception is activated, the manually set clock will be overwritten by

a successfully reception of the DCF time. 

7.2 Recall of time, weekday, alarm time and date

• Press the MODE/ENTER button in normal mode to change the display between:

Time with seconds

Time with weekday

1. Alarm time

2. Alarm time

Date 

7.3 Setting of the alarm

• Press the MODE/ENTER button in normal mode, until the flashing 1 for the first

alarm time appears. 

• 0:00 or the last adjusted alarm time appears. 
• You can now adjust the first alarm time. 
• Press and hold MODE/ENTER button. 
• The hour digit is flashing. Press the 

/CH or 

/UNIT button to adjust hours.

• The alarm symbol appears on the display. 
• Press the MODE/ENTER button again and you can adjust the minutes with the

/UNIT or 

/CH button. 

• Confirm the settings with the MODE/ENTER button.
• The alarm for the first alarm time is activated.
• Press the MODE/ENTER button again. 
• 2 for the second alarm time is flashing. 
• 0:00 or the last adjusted alarm time appears. 
• Set the alarm time for the second alarm in the same way. 

7.4 Activate/turn off the different alarm times

• To activate or deactivate the alarm function press the ALARM button in the setting

mode. 

• In normal mode appears or disappears the corresponding symbol 

+

or no alarm symbol appears. 

• When the alarm time is reached, the alarm will ring. The backlight turns on for a

short time.

• If the alarm is not stopped, the increasing alarm will automatically turn off after 

2 minutes and will be reactivated at the same time. 

• When the alarm rings, press the SNOOZE button and the snooze function is activat-

ed.

• The backlight turns on for a short time.
• The corresponding alarm symbol flashes. 
• The alarm will be interrupted for 5 minutes. 
• When the snooze function is activated, a button operation is not possible. You can

only activate the backlight by pressing the SNOOZE button. 

• Press the ALARM button to stop the snooze function.

7.5 Maximum and minimum values 

• Press once the MAX/MIN button.
• The maximum values 

for outdoor and indoor will appear. 

• Press the MAX/MIN button again. 
• The minimum values 

for outdoor and indoor will appear. 

• Press and hold MAX/MIN button in the respective mode to clear the recorded val-

ues. 

• The actual values appear on the display. 

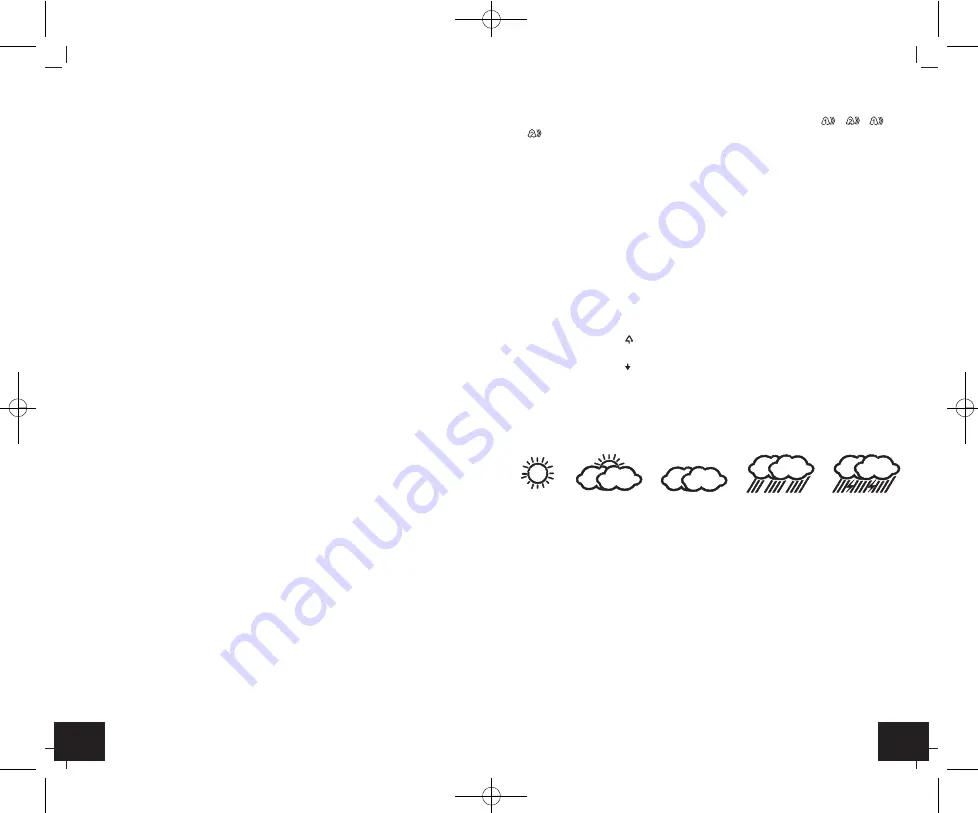
7.6 Weather forecast symbols

• There are 5 different weather symbols:

• The weather forecast relates to a range of 12 to 24 hours and indicates only a gen-

eral weather trend. For example, if the current weather is cloudy and the rain icon is
displayed, it does not mean the product is faulty because it is not raining. It simply
means that the air pressure has dropped and the weather is expected to get worse
but not necessarily rainy. The accuracy is about 70 %.

• The sun symbol also appears at night if there is a starry night. 

7.7 Temperature indication

• Press the 

/UNIT button to select temperature display in °C (Celsius) or °F

(Fahrenheit) as the temperature unit.

7.8 Weather trend pointer

• The trend pointer displayed on the LCD indicates if the atmospheric pressure is

increasing, decreasing or steady.

Sunny

Partly Cloudy

Rainy

Strong

cloudy

rain

TFA_No. 35.1122_Anl_12_21  19.12.2021  11:48 Uhr  Seite 11

Summary of Contents for 35.1122

Page 1: ...el n mero de art culo en nuestra p gina web Declaraci n UE de conformidad Por la presente TFA Dostmann declara que el tipo de equipo radioel ctrico 35 1122 es con forme con la Directiva 2014 53 UE El...

Page 2: ...3 2 Fig 1 Fig 2 A 1 A 2 C 1 C 3 A 4 A 7 A 6 A 10 A 13 A 14 B 1 B 2 C 2 B 3 B 4 B 5 A 3 A 5 A 9 A 8 A 11 A 12 A 16 A 15 B 6 TFA_No 35 1122_Anl_12_21 19 12 2021 11 48 Uhr Seite 2...

Page 3: ...ensender Bedienungsanleitung 3 Einsatzbereich und alle Vorteile Ihres neuen Ger tes Au entemperatur und Luftfeuchtigkeit ber kabellosen Au ensender 868 MHz Reichweite ca 75 m Freifeld Erweiterbar auf...

Page 4: ...atur und luftfeuchtigkeit A 12 Minimum Symbol A 13 Batteriesymbol f r Basisstation A 14 Empfangssymbol f r Funkuhr A 15 Uhrzeit mit Sekunden A 16 Weckalarmsymbole B Tasten auf der Wetterstation Fig 1...

Page 5: ...n meisten F llen m glich Ein einziger Empfang pro Tag gen gt um die Genauig keit zu gew hrleisten und Abweichungen unter 1 Sekunde zu halten 7 Bedienung W hrend des aktiven Empfangs der Au enwerte ode...

Page 6: ...nd an Ist es zum Beispiel im Moment wolkig und es wird Regen angezeigt deutet dies nicht auf eine Fehlfunktion des Ger tes hin sondern gibt an dass der Luftdruck gesunken und eine Wetterver schlechter...

Page 7: ...ie Ihre Ger te an einem trockenen Platz auf 8 1 Batteriewechsel Wechseln Sie die Batterien wenn auf der Wetterstation das Batteriesymbol neben der Uhrzeit erscheint Sind die Batterien des Au ensenders...

Page 8: ...ufl sung 0 1 C 0 2 F Luftfeuchtigkeit 20 rH 99 rH Arbeitsbereich 20 C 60 C 4 F 140 F Reichweite ca 75 m Freifeld bertragungsfrequenz 868 MHz Maximale Sendeleistung 25 mW bertragungszeitraum 120 Sekund...

Page 9: ...ctions Unauthorised repairs modifications or changes to the product are prohibited Caution Risk of injury Keep these devices and the batteries out of reach of children Small parts can be swallowed by...

Page 10: ...eception is very good No DCF reception To activate the DCF reception press the ALARM button for 2 seconds The recep tion signal symbol flashes Press the ALARM button again to stop scanning DCF time si...

Page 11: ...ate or deactivate the alarm function press the ALARM button in the setting mode In normal mode appears or disappears the corresponding symbol or no alarm symbol appears When the alarm time is reached...

Page 12: ...tation can be placed onto any flat surface or wall mounted at the respective location by the hanging hole at the back of the unit Avoid the vicinity of any interfering field like computer moni tors or...

Page 13: ...ional or local regulations in order to protect the environment The symbols for the contained heavy metals are Cd cadmium Hg mercury Pb lead 11 Specifications Base station Measuring range indoor Temper...

Page 14: ...r vous m me Attention Danger de blessure Placez vos appareils et les piles hors de la port e des enfants Les petites pi ces peuvent tre aval es par les enfants de moins de trois ans Les piles contienn...

Page 15: ...n e ext rieure n est retransmise Il y a 3 symboles de r ceptions diff rentes R ception active R ception tr s bonne Aucune r ception de DCF Pour activer la r ception DCF appuyez sur la touche ALARM pen...

Page 16: ...l affichage Vous pouvez alors changer la premi re heure d alarme Maintenez la touche MODE ENTER appuy e L indicateur de l heure commence clignoter R gler l heure l aide de la touche CH ou UNIT Le sym...

Page 17: ...trois fois pour canal 3 Maintenez la touche CH de la station de base appuy e pendant deux secondes et activez manuellement la r ception Le num ro de canal clignote sur l cran Le symbole de r ception e...

Page 18: ...rechargeables qui ne sont pas install es de fa on permanente et jetez les s par ment Cet appareil est conforme aux normes de l UE relatives au traitement des d chets lectriques et lectroniques WEEE L...

Page 19: ...guendo le istruzioni per l uso eviterete anche di danneggiare il prodotto e di pregiudicare a causa di un utilizzo scorretto i diritti di consumatore che vi spettano per legge Decliniamo ogni responsa...

Page 20: ...a e umidit interna A 12 Simbolo valore minimo A 13 Simbolo di batteria bassa per stazione base A 14 Simbolo di ricezione dell orologio radio controllato A 15 Orologio con secondi A 16 Simboli per segn...

Page 21: ...i casi Una singola ricezione giornaliera sufficiente a garantire la precisione e a mantenere la deviazione al di sotto di un secondo 7 Uso Durante la ricezione attiva di valori esterni o del tempo non...

Page 22: ...isualizzazione della temperatura Con il tasto UNIT possibile scegliere fra la visualizzazione della temperatura in gradi C gradi Celsius o F gradi Fahrenheit 7 8 Freccia della tendenza meteorologica L...

Page 23: ...Problema Risoluzione del problema Nessuna indicazione Inserite le batterie con le polarit giuste sulla stazione base Cambiare le batterie Nessuna ricezione del tras Nessun trasmettitore installato me...

Page 24: ...t werken Lees de gebruiksaanwijzing aandachtig door Zo raakt u vertrouwd met uw nieuw apparaat en leert u alle functies en onderdelen kennen komt u belangrijke details te weten met het oog op het in b...

Page 25: ...en A 11 Binnentemperatuur en luchtvochtigheid A 12 Minimumsymbool A 13 Batterijsymbool voor de basisapparaat A 14 DCF ontvangstsymbool A 15 Tijd met seconden A 16 Symbool voor het wekalarm B Toetsen o...

Page 26: ...vol doende om de tijdsafwijking beneden 1 seconde te houden 7 Bediening Tijdens de actieve ontvangst van buitenwaarden en van de tijd is een belangrijke operatie niet mogelijk Gebruik de UNIT of CH t...

Page 27: ...t echter niet per se om regen hoeft te gaan De precisie is ongeveer 70 Het zonnetje wordt ook s nachts als symbool weergegeven als er sprake is van een kraakheldere nacht 7 7 Weergave van de temperatu...

Page 28: ...nieuwe batterijen voorzien en de handmatige zenderzoeker starten 9 Storingswijzer Probleem Oplossing Geen weergave op Batterijen in de juiste poolrichting plaatsen het basisapparaat Vervang de batteri...

Page 29: ...niet inclusief Wij bevelen alkalinebatterijen Afmetingen behuizing 53 x 26 x 105 mm Gewicht 50 g alleen het apparaat Deze gebruiksaanwijzing of gedeelten eruit mogen alleen met toestemming van TFA Do...

Page 30: ...ciones No est permitido realizar reparaciones transformaciones o modificaciones por cuenta propia en el dispositivo Precauci n Riesgo de lesiones Mantenga los dispositivos y las pilas fuera del alcanc...

Page 31: ...n de la hora radiocontrolada no se transfieren ninguno de los datos meteorol gicos Hay 3 s mbolos diferentes de recepci n de la se al de radio la recepci n est activa la recepci n est muy bien ningun...

Page 32: ...la tecla MODE ENTER La alarma para la primera alarma est activada Pulse la tecla MODE ENTER otra vez 2 parpadeara la segunda alarma 0 00 o la ltima regulaci n de la hora de alarma aparece en la panta...

Page 33: ...e un emisor con la tecla CH puede cambiar entre los canales Tambi n puede ajustar un cambio de canal autom tico Pulse la tecla CH tres veces hasta que aparece en la pantalla el s mbolo c rculo para el...

Page 34: ...os de aparatos el ctricos y electr nicos WEEE No deseche este producto junto con la basura dom stica El usuario est obligado a llevar el dispositivo usado a un punto de recogida de aparatos el ctricos...

Reviews: