background image

5.3

Front Panel Display Basics

The front panel display provides a quick and easy way to view the RamSan-810’s status. It shows
system warnings and failures.

The RamSan-810’s front panel allows you to:

ˆ

Inspect the state of the system.

ˆ

Change the method of IP address assignment.

ˆ

Reboot/Shutdown the system.

The following four buttons are located to the left of the display and are used to make selections:

(M)enu:

This button has two functions. On any of the status or performance displays, pressing

this button launches the RamSan-810 Main Menu. It is also used as an escape function.
Once the menu is open, pressing it returns the user to the prior screen.

(S)elect:

When a menu item is on the display, pressing this button will either execute that menu

option or proceed to the next layer in the menu.

^

:

This button scrolls up through the menu. It is also used to cancel certain commands as

indicated on the display. If the menu is not selected, this button is disabled.

_

:

This button scrolls down through the menu. It is also used to confirm certain commands as

indicated on the display. If the menu is not selected, this button is disabled.

You can scan through the first level of options on the RamSan-810 by pressing the

Menu

key.

ˆ

Selecting “

System Info

” displays information about

your RamSan-810.

Main Menu

System Info

ˆ

Selecting “

System Status

” allows you to view the

system informational, warning, and/or error mes-
sages.

These are the same messages which scroll

across the status screen.

Main Menu

System Status

RamSan-810 User’s Manual

- 11 -

Texas Memory Systems, Inc.

Summary of Contents for RamSan-710

Page 1: ...TEXAS MEMORY SYSTEMS INC RamSan 810 User s Manual Version 5 4 2 ...

Page 2: ...t belong to the companies that own them No part of this work may be reproduced or used in any form or by any means graphic electronic or mechanical including photocopying recording taping or information storage and retrieval systems without permission of the copyright owner RamSan 810 User s Manual i Texas Memory Systems Inc ...

Page 3: ...0 5 3 Front Panel Display Basics 11 5 4 Controlling System Power with the Front Panel Display 13 5 5 Network Configuration with the Front Panel Display 15 5 6 Configuring a Static IP Address 17 5 7 Configuring DHCP 19 5 8 Additional System Management Options 21 5 9 Web Monitor Basics 22 5 10 Date and time setup with the Web monitor 25 5 11 Network Configuration with the Web Monitor 26 5 12 Managin...

Page 4: ... Access Protocol 54 6 8 Terawatch 56 6 9 Log Lun 57 7 System Maintenance 57 7 1 Power Supplies 58 7 2 Fans 59 7 3 Batteries 62 8 End User License Agreement 66 8 1 GNU General Public License 66 8 2 OpenSSL License 73 8 3 Other copyrighted works 76 9 Troubleshooting 78 9 1 System Event Log 78 9 2 System Report 78 9 3 Contacting Texas Memory Systems Inc 78 RamSan 810 User s Manual iii Texas Memory Sy...

Page 5: ...1 Preface Document Overview This document provides operating procedures for the RamSan 810 running firmware version 5 4 2 RamSan 810 User s Manual 1 Texas Memory Systems Inc ...

Page 6: ...reasing the data transfer rate This is achieved with the use of better connectors rugged more data pins and a simple transfer protocol 2 1 2 Easy Installation and Configuration The RamSan 810 is easy to install on a SAN or directly attached to a server Most system level parameters can be set from the front panel including the management IP address Once the IP is set then most configurations and mo...

Page 7: ...ent Basic management operations including manual shutdown and alerts are available from the front panel screen Full monitoring and configuration capabilities are available over any browser via a password protected Java applet as well as through a command line interface over telnet or SSH The RamSan 810 is fully SNMP v2c compatible and can provide notification of system events via email RamSan 810 ...

Page 8: ...isted 1 Examine the external chassis for any damage that might have occurred during shipping 2 Inspect the interface plate for any screws that might have loosened during shipping 3 Inspect the front panel display for damage 4 Report any meaningful damage to Texas Memory Systems Inc Figure 1 RamSan 810 Front RamSan 810 User s Manual 4 Texas Memory Systems Inc ...

Page 9: ...ate disk SSD system is a 1U rack mountable system Texas Memory Systems Inc ships the system with the slides and equipment needed to install it into a standard 19 rack Figure 2 RamSan 810 Back RamSan 810 User s Manual 5 Texas Memory Systems Inc ...

Page 10: ...nor bug fixes Troubleshooting Tip If you encounter any problems with the HBA the first step in the debugging process is verifying that you are using the latest driver and firmware The speed of the server and network interface ultimately limit the RamSan 810 s capabilities A few different components can affect the maximum performance of the RamSan 810 including FC IB interfaces Host Bus Adapters PC...

Page 11: ...ever provide different PCI buses with different speeds and placing the HBA on a different PCI bus can improve performance Texas Memory Systems Inc recommends giving each 8 Gb 2 port HBA at least an entire PCIX bus or a PCI Express PCIe slot 4 1 4 CPU At a certain point CPU performance can limit data transfer rates Determine whether the server s CPU resources are the limiting factor in performance ...

Page 12: ...ght respectively The FC ports on the system are capable of connecting to Point to Point N Port Arbitrated Loop NL port or Switched Fabric F Port topologies at 2 Gb 4 Gb or 8 Gb speeds Although Figure 3 only shows FC controller cards an IB controller card can occupy any of the same slots as the FC controller cards The IB controller card has two x4 IB ports A and B on the top and bottom respectively...

Page 13: ...y It contains redundant power supplies that are hot swappable Using the AC power cords provided connect each power module to a power source Install the socket outlet in an easily accessible location near the equipment As a best practice connect each of the RamSan 810 power cords to separate circuits Figure 5 RamSan 810 Power Supply 5 Getting Started This chapter will guide you through setting up y...

Page 14: ...inlet lies on the right side of each power module Though the RamSan 810 will operate when only one power supply is connected this is not recommended 5 2 System Initialization The front panel display shows the boot process current state Once the power is connected the system turns on automatically and the front panel display begins the power on sequence The following happens automatically Once AC p...

Page 15: ... is on the display pressing this button will either execute that menu option or proceed to the next layer in the menu This button scrolls up through the menu It is also used to cancel certain commands as indicated on the display If the menu is not selected this button is disabled _ This button scrolls down through the menu It is also used to confirm certain commands as indicated on the display If ...

Page 16: ...amSan 810 Main Menu LED Config Selecting Display Logo displays the Texas Mem ory Systems Inc logo on the front panel display This option becomes Disable Logo once it has been set Main Menu Display Logo Selecting Restart reboots your RamSan 810 See Section 5 4 2 for more information Main Menu Restart Selecting Poweroff turns off your RamSan 810 See Section 5 4 1 for more information Main Menu Power...

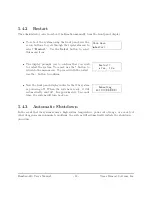
Page 17: ...le through the top level menu to select Poweroff Use the Select button to select this menu item Main Menu Poweroff The display prompts you to confirm that you wish to Poweroff To cancel the shutdown use the button to return to the main menu To proceed with the shutdown use the _ button to confirm the system power off Poweroff _ Yes No Now the front panel display indicates that the system is poweri...

Page 18: ... to return to the main menu To proceed with the restart use the _ button to confirm Restart _ Yes No Now the front panel display indicates that the system is powering off When the system is ready it will automatically shut off In approximately 9 seconds time the system will turn back on Rebooting 60 5 4 3 Automatic Shutdown In the event that the system senses a high system temperature power out of...

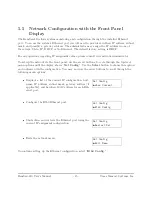
Page 19: ...tons to cycle through the top level menu options until the display shows Net Config Use the Select button to choose this option and continue with the configuration You may now use the arrow buttons to scroll through the following menu options Displays a list of the current IP configuration host name IP address subnet mask gateway address if applicable and hardware MAC address for each Eth ernet po...

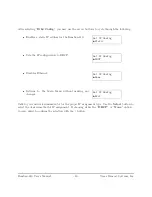
Page 20: ...g DHCP Disables Ethernet Set IP Config None Returns to the Main Menu without making any changes Set IP Config Exit Talk to your network administrator for the proper IP assignment type Use the Select button to select the desired method of IP assignment If choosing either the DHCP or None option you are asked to confirm the selection with the _ button RamSan 810 User s Manual 16 Texas Memory Systems...

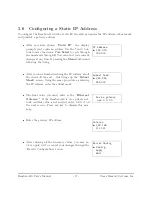
Page 21: ...tering the IP address scroll the cursor off the end this brings up the Subnet Mask screen Using the same procedure as entering the IP address enter the subnet mask Subnet Mask 255 255 255 000 The final value you must enter is the Ethernet Gateway If the RamSan 810 is on a private net work and this value is not needed enter 0 0 0 0 on the next screen Press any key to dismiss this mes sage For no ga...

Page 22: ... then applied and the network is automatically restarted Assign Static IP to eth0 _ Y N You should see the network restarting Net Restart o o o o o o o The final screen displays the assigned IP address New IP 192 168 111 101 RamSan 810 User s Manual 18 Texas Memory Systems Inc ...

Page 23: ...ddress will be at the bottom of this section and will be displayed as 6 octets Use this value to configure your DHCP server MAC Address a2 78 90 f7 01 88 Re enter the Net Config menu then Eth0 Con fig menu and select DHCP Set IP Config DHCP The next screen commits the changes and automati cally restarts the network Use DHCP for eth0 _ Yes No You should witness the network restarting Net Restart o ...

Page 24: ...Net option from the Net Config menu instead of re selecting the same IP configuration RamSan 810 User s Manual 20 Texas Memory Systems Inc ...

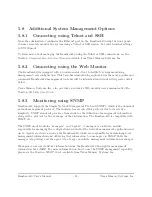
Page 25: ...RamSan 810 supports the Simple Network Management Protocol SNMP which is the dominant network management protocol The industry has accepted this protocol due to its relative simplicity SNMP standards provide a framework for the definition of management information along with a protocol for the exchange of that information The RamSan 810 is compatible with SNMP v2c The SNMP model contains managers ...

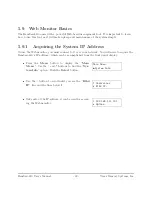
Page 26: ...ll need to acquire the RamSan 810 s IP address which can be accomplished from the front panel display Press the Menu button to display the Main Menu Use the _ and buttons to find the Sys tem Info option Push the Select button Main Menu System Info Use the _ button to scroll until you see the Eth0 IP line and the lines below it Controller _ Eth0 IP Take note of the IP address it can be used for acc...

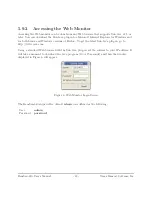
Page 27: ...x To get the latest Sun Java plug in go to http www java com Using a standard Web browser with the Sun Java plug in set the address to your IP address It will take a moment to download the Java program 10 or 15 seconds and then the window displayed in Figure 6 will appear Figure 6 Web Monitor Login Screen The RamSan 810 ships with a default admin user defined as the following User admin Password p...

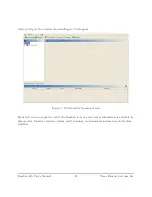
Page 28: ... Monitor Opening Screen From here you can expand or select the RamSan icon A great deal of information is available in this monitor firmware versions system event warnings environmental information and system statistics RamSan 810 User s Manual 24 Texas Memory Systems Inc ...

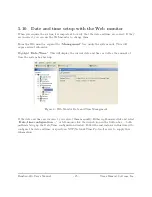
Page 29: ...current date and time as well as the amount of time the system has been up Figure 8 Web Monitor Date and Time Management If the date and time are incorrect you can set them manually Either right mouse click and select Date time configuration or left mouse click the wrench icon in the button bar both methods bring up the Date Time configuration window Follow the instructions in this wizard to confi...

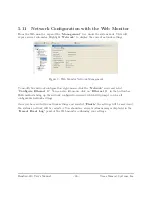
Page 30: ...ode and select Configure Ethernet 0 You can also left mouse click on Ethernet 0 in the button bar Both methods bring up the network configuration wizard which will prompt you for all configurable network settings Once you have edited the network settings and selected Finish the settings will be saved and the system s network will be restarted You should see several system messages displayed in the...

Page 31: ... The low privileged user is User user Password password 5 12 2 Changing Passwords You should configure the security on the RamSan 810 to suit your needs At a minimum you should change the high privileged user password to prevent accidental mishaps To configure users using the Web monitor expand the Management tree under the system node This will expose several sub nodes Highlight Users This displa...

Page 32: ...t Click Next to confirm the change and then click the Finish button when finished 5 12 3 Adding Users You can add new users by selecting the Add button in the Users pane Doing so will bring up the Add User window shown in Figure 12 Figure 12 Web Monitor Add User You can add high privileged users by assigning the new user to the admins group You can give the new user low privileges by assigning the...

Page 33: ...e the RamSan 810 is mirrored or preferred read mirrored to other storage Warning If maintenance is performed that requires the replacement of a flash card in the RamSan 810 all of the data will need to be restored from a backup after the maintenance 5 13 2 JBOF This Storage Mode automatically creates one Logical Unit for each Flashcard present in the RamSan 810 The administrator can then assign Ac...

Page 34: ...hen later in a maintenance window the failed card is replaced and the newly installed card becomes the new Active Spare Please note that the Flashcards are not hot swappable In this storage mode there are still a few components that are not protected by Active Spare so there is a risk of an unrecoverable component failure If a deployment requires no single point of failure mirrored RamSan 810s usi...

Page 35: ...s the RamSan 810 supports Section 5 13 and choose the most appropriate mode before creating Logical Units You can create an LU from the Logical Units tree node by right clicking and selecting Create or by clicking on the Create button on the Logical Units panel This is shown in Figure 13 Figure 13 Web Monitor Logical Unit A wizard will open to guide you through the Logical Unit creation process Af...

Page 36: ... layer to the host By default it is enabled For most environments this should be set Report uncorrected media errors to the SCSI host This controls whether any internal uncorrected errors are reported over the SCSI layer to the host By default it is enabled Enable ACA Support This enables Auto Contingent Allegiance ACA support for the Logical Unit Some host systems such as AIX require this in orde...

Page 37: ... specify which ports are allowed to communicate with each Logical Unit Logical Units will be displayed with a warning state notifying the administrator that a Logical Unit was created and has not been presented to any hosts until an access policy has been defined shown in Figure 15 Figure 15 Web Monitor Logical Unit with No Access Policy RamSan 810 User s Manual 33 Texas Memory Systems Inc ...

Page 38: ...ick the Next button to continue to the Modify Access Policies screen shown in Figure 16 Figure 16 Web Monitor Access Policies Wizard The left hand tree titled Available shows a tree of all controller ports in the system with each port s available access policies underneath The right hand tree titled Assigned shows the policies currently in use for each port in the system If there are potential con...

Page 39: ...Clicking this button will move the policy from the Available tree to the Assigned tree When a new policy is added to the Assigned tree its text color is green To remove an Access Policy select the desired policy node from the Assigned tree and click the button The policy will be removed from the Assigned tree and added to the Available tree When an in use policy is deleted from the Assigned tree i...

Page 40: ...fications If policy modifications are only policy additions click the Confirm check box and click Finish to exit the wizard and commit the policy changes If there are policy removals you will instead be required to enter the login password to finish the wizard and commit the modifications as shown in Figure 18 RamSan 810 User s Manual 36 Texas Memory Systems Inc ...

Page 41: ...event log This log keeps track of all events that occurred within the system If you are having trouble with your system be sure to open the system event log and check this information Figure 19 Web Monitor Logs The log events displayed in Figure 19 are not indicative of a shipped system RamSan 810 User s Manual 37 Texas Memory Systems Inc ...

Page 42: ...her information including a copy of the system event log A System Report should always be on hand when diagnosing problems with Texas Memory Systems Inc s customer support To access the System Report from the Web monitor right mouse click the Logs item in the system s tree and select System Report Figure 20 Figure 20 Web Monitor Log Options RamSan 810 User s Manual 38 Texas Memory Systems Inc ...

Page 43: ...ng the System Event Log To clear the system event log right mouse click the Logs node and select Clear Event Log Figure 20 alternatively left mouse click the Clear Event Log button in the button bar RamSan 810 User s Manual 39 Texas Memory Systems Inc ...

Page 44: ... To update the firmware either right mouse click and select Firmware update or left mouse click the Update button in the button bar Both methods bring up the patch file selector window Warning Patching the RamSan 810 is a delicate process If the patch is interrupted the system can become unusable and may have to be sent back to the factory for repair If your system s patch is interrupted immediate...

Page 45: ...nal step of the wizard will upload the patch onto the system You will need to power cycle your RamSan 810 to apply and activate the new patch An uploaded firmware patch may be canceled before the system is restarted To cancel a patch click the Cancel Patch button and confirm that you wish to cancel the currently uploaded patch Figure 24 Web Monitor Cancel Firmware Update RamSan 810 User s Manual 4...

Page 46: ... Event Log at the bottom of the Web monitor Figure 25 Figure 25 Web Monitor Task Information 6 System Licenses The RamSan enables access to advanced features if you provide a valid license key for the feature You may add or remove a system license by selecting the Management node in the tree and clicking the Licenses button This opens a configuration window where a license can be removed or added ...

Page 47: ...San currently supports the following license only features JBOF Storage Mode Active Spare Storage Mode Mail Service Statistic Log Configuration Restore Logical Unit Masking LDAP Terawatch Log Lun RamSan 810 User s Manual 43 Texas Memory Systems Inc ...

Page 48: ...tifications and the ability to e mail the System Report directly to Texas Memory Systems Inc for support You may configure the Mail Service settings by selecting the Management node in the tree and clicking the Mail node which displays an overview panel Clicking the Configure button opens the configuration wizard This wizard allows enabling available features setting the SMTP server and entering t...

Page 49: ...28 Mail Service Features The SMTP server may be set manually or found automatically from DHCP by setting the server value to default Up to five e mail targets may be specified to receive any e mails sent by the service Figure 29 Mail Service Configuration RamSan 810 User s Manual 45 Texas Memory Systems Inc ...

Page 50: ... report by clicking the System Report button The Email System Report button opens the dialog shown in Figure 30 Figure 30 E mail System Report Fill out the From and Comment fields then click OK to send the System Report This will take a few seconds to complete while the report is generated Click Cancel to close the dialog without sending a report RamSan 810 User s Manual 46 Texas Memory Systems In...

Page 51: ...ently logged list Figure 31 Statistics History Panel 6 4 1 Viewing Statistics Logs To view a single or multiple statistics histories select the statistic s in the Currently Logged Stats table control click to select multiple statistics then click the Save View action This will open a dialog window displaying a graph of the statistic s daily history showing the time in the x axis and the statistic ...

Page 52: ...awn for a statistic is an average line of periodic samples The variance of these samples is represented by a lighter shaded polygon of the same color Use the Variance check box to turn on or off drawing the variance Use the Save button to save the graph image as a JPEG or a CSV file Comma Separated Values RamSan 810 User s Manual 48 Texas Memory Systems Inc ...

Page 53: ...o list boxes The top box lists system components Selecting a component from this list generates a list of its statistics in the lower box similar to the statistics graph configuration dialog To add a statistic to the logged list select a component and statistic pair and click the center Add button The new statistic should appear at the bottom of the logged statistics list To remove a statistic sel...

Page 54: ...king the Save Configuration button on the Management tree node Figure 34 This allows you to select a file to save the configuration Remember the file name and location as it will be needed to restore the configuration at a later time You can restore a configuration by clicking Restore Configuration Figure 34 on the system you would like to restore the configuration to and choosing the previously s...

Page 55: ...e is installed access to specific hosts can be created through either the Command Line Interface by specifying the host s World Wide Port Name WWPN as the optional host ID argument or through the web management interface s Access Policy Wizard With LU Masking available the wizard will show the WWPNs of connected hosts in its Available policy tree see Figure 35 The wizard also gives the ability to ...

Page 56: ... 36 which requires the host s WWPN in the Host ID text box and the alias name in the Alias text box Figure 36 New Alias Dialog Click Add to finish and save the alias The aliased host will now be listed in the Access Policies tree for each controller Figure 37 shows an example alias called myHost for WWPN 00 11 22 33 44 55 66 77 Figure 37 Access Wizard With Aliased Policies RamSan 810 User s Manual...

Page 57: ...he Remove button deletes the currently selected alias To change an alias name select the alias in the table and click the Re alias button to enable the Alias table cell for editing When changes are complete press the Enter key to leave edit mode and save the changes to the table Click OK to exit the dialog RamSan 810 User s Manual 53 Texas Memory Systems Inc ...

Page 58: ...se DN This is the distinguished name of the search base Port Optional This is the port that will be used to connect to the LDAP server Leaving this defaulted will use port 389 for TLS or no encryption and port 636 for SSL encryption If you use a different port make sure to specify it in this field Bind DN Optional This is the distinguished name that will be used for binding to the LDAP server If l...

Page 59: ...Figure 39 Enable LDAP Figure 40 Modifying LDAP Settings RamSan 810 User s Manual 55 Texas Memory Systems Inc ...

Page 60: ...r other systems on the network To set options for this action open the Preferences window by clicking Preferences in the Options menu Select the Discovery tab and set the desired options Figure 41 Add System and Discover Buttons The web management interface also provides a way to view statistics connect or patch multiple systems simultaneously These actions are available under the Options menu Fig...

Page 61: ...gure 43 Create Logical Unit with Log Lun 7 System Maintenance Texas Memory Systems Inc designed the RamSan 810 to be easily maintainable You can hot swap the power supplies which means that you can remove and replace these components while the system is running Electro Static Discharge Warning Please take full E S D precautions if it is necessary at any time to come into contact with any circuit b...

Page 62: ... follow the following steps when removing and replacing the power modules Disconnect the power cord from the power supply Wait 15 seconds Remove the power module that needs to be replaced from the RamSan 810 chassis by pressing the release switch and pulling squarely on the power supply handle DO NOT REACH INSIDE THE PROTECTIVE ENCLOSURE AFTER REMOVING THE POWER SUPPLY Insert the replacement power...

Page 63: ...nv Fan 8 speed is below normal levels 6122 82 RPM scrolls across the top display row If a fan completely stops working an error is reported on the front panel display The error line SystemEnv Fan 8 speed is critically low 0 00 RPM scrolls across the top display row Warning Fix or replace failed fans as soon as possible If too many fans fail the system temperatures may rise past an acceptable range...

Page 64: ...formation on failing or failed fans Once your system is displayed in the Web monitor select Environmental Fans This will display a list of all fans Please see Figure 44 for a fan failure example To fix a fan turn off your system and remove the lid RamSan 810 User s Manual 60 Texas Memory Systems Inc ...

Page 65: ...e find the failed fan There is a good chance that hair or dust has collected on the fan and all it needs is to be cleaned Blowing compressed air into the axle of the fan can clear obstruction or debris If the fan cannot be cleaned or repaired the entire cage must be replaced RamSan 810 User s Manual 61 Texas Memory Systems Inc ...

Page 66: ... The RamSan 810 is shipped with the batteries connected These batteries should stay connected at all times even when the RamSan 810 is not in use If directed by support to remove reconnect the batteries follow the steps below For long term storage advice please contact support Unfasten the red straps and connect the heavy red battery connector to the appropriate red connector from the board for ea...

Page 67: ...Plug the white connector from each battery into the battery board Refasten the red straps for each battery Figure 48 Power Connector Unplugged RamSan 810 User s Manual 63 Texas Memory Systems Inc ...

Page 68: ...he electrical current supplied from the batteries will be enough to handle a sudden power loss If the battery voltage is out of specification or the the monthly battery test fails warnings will be reported If they degrade and are unusable errors are reported The batteries are redundant so data is not at RamSan 810 User s Manual 64 Texas Memory Systems Inc ...

Page 69: ...risk in the event of a power failure however replacing the failed battery quickly is recommended RamSan 810 User s Manual 65 Texas Memory Systems Inc ...

Page 70: ...blic License GNU GENERAL PUBLIC LICENSE Version 2 June 1991 Copyright C 1989 1991 Free Software Foundation Inc 51 Franklin Street Fifth Floor Boston MA 02110 1301 USA Everyone is permitted to copy and distribute verbatim copies of this license document but changing it is not allowed Preamble The licenses for most software are designed to take away your freedom to share and change it By contrast th...

Page 71: ...anty for this free software If the software is modified by someone else and passed on we want its recipients to know that what they have is not the original so that any problems introduced by others will not reflect on the original authors reputations Finally any free program is threatened constantly by software patents We wish to avoid the danger that redistributors of a free program will individ...

Page 72: ... of this License along with the Program You may charge a fee for the physical act of transferring a copy and you may at your option offer warranty protection in exchange for a fee 2 You may modify your copy or copies of the Program or any portion of it thus forming a work based on the Program and copy and distribute such modifications or work under the terms of Section 1 above provided that you al...

Page 73: ...n of derivative or collective works based on the Program In addition mere aggregation of another work not based on the Program with the Program or with a work based on the Program on a volume of a storage or distribution medium does not bring the other work under the scope of this License 3 You may copy and distribute the Program or a work based on it under Section 2 in object code or executable f...

Page 74: ...py the source along with the object code 4 You may not copy modify sublicense or distribute the Program except as expressly provided under this License Any attempt otherwise to copy modify sublicense or distribute the Program is void and will automatically terminate your rights under this License However parties who have received copies or rights from you under this License will not have their lic...

Page 75: ...ntended to apply and the section as a whole is intended to apply in other circumstances It is not the purpose of this section to induce you to infringe any patents or other property right claims or to contest validity of any such claims this section has the sole purpose of protecting the integrity of the free software distribution system which is implemented by public license practices Many people...

Page 76: ...als of preserving the free status of all derivatives of our free software and of promoting the sharing and reuse of software generally NO WARRANTY 11 BECAUSE THE PROGRAM IS LICENSED FREE OF CHARGE THERE IS NO WARRANTY FOR THE PROGRAM TO THE EXTENT PERMITTED BY APPLICABLE LAW EXCEPT WHEN OTHERWISE STATED IN WRITING THE COPYRIGHT HOLDERS AND OR OTHER PARTIES PROVIDE THE PROGRAM AS IS WITHOUT WARRANT...

Page 77: ...out modification are permitted provided that the following conditions are met 1 Redistributions of source code must retain the above copyright notice this list of conditions and the following disclaimer 2 Redistributions in binary form must reproduce the above copyright notice this list of conditions and the following disclaimer in the documentation and or other materials provided with the distrib...

Page 78: ...NG BUT NOT LIMITED TO PROCUREMENT OF SUBSTITUTE GOODS OR SERVICES LOSS OF USE DATA OR PROFITS OR BUSINESS INTERRUPTION HOWEVER CAUSED AND ON ANY THEORY OF LIABILITY WHETHER IN CONTRACT STRICT LIABILITY OR TORT INCLUDING NEGLIGENCE OR OTHERWISE ARISING IN ANY WAY OUT OF THE USE OF THIS SOFTWARE EVEN IF ADVISED OF THE POSSIBILITY OF SUCH DAMAGE This product includes cryptographic software written by...

Page 79: ...ll advertising materials mentioning features or use of this software must display the following acknowledgement This product includes cryptographic software written by Eric Young eay cryptsoft com The word cryptographic can be left out if the rouines from the library being used are not cryptographic related 4 If you include any Windows specific code or a derivative thereof from the apps directory ...

Page 80: ...f California All Rights Reserved Copyright c 2001 2003 Networks Associates Technology Inc All rights reserved Portions of this code are copyright c 2001 2003 Cambridge Broadband Ltd All rights reserved Copyright 2003 Sun Microsystems Inc 4150 Network Circle Santa Clara California 95054 U S A All rights reserved Copyright c 2003 2005 Sparta Inc All rights reserved Copyright c 2004 Cisco Inc and Inf...

Page 81: ...E LIABLE FOR ANY DIRECT INDIRECT INCIDENTAL SPECIAL EXEMPLARY OR CONSEQUENTIAL DAMAGES INCLUDING BUT NOT LIMITED TO PROCUREMENT OF SUBSTITUTE GOODS OR SERVICES LOSS OF USE DATA OR PROFITS OR BUSINESS INTERRUPTION HOWEVER CAUSED AND ON ANY THEORY OF LIABILITY WHETHER IN CONTRACT STRICT LIABILITY OR TORT INCLUDING NEGLIGENCE OR OTHERWISE ARISING IN ANY WAY OUT OF THE USE OF THIS SOFTWARE EVEN IF ADV...

Page 82: ...m Event Log The system event log made available via the Web monitor will provide more detailed information Please see Section 5 15 1 for more information on how to access the log All errors persist that is they are permanently logged until the problem has been solved and the log has been cleared 9 2 System Report The System Report provides a snapshot of all current configuration settings statistic...

Reviews: