MAINTENANCE
186 MM159 (6–94)
3Ć20
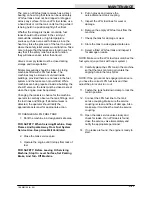
9. Loosen the reverse idler sheave bolt and
slide the idler sheave to the rear to tighten
the belt; slide the sheave forward to loosen
the belt.
NOTE: The belts should be loose enough so that
when the machine is pushed forward while in
neutral, the large sheave on the differential will
turn, but the belts remain stationary. This will
make the machine easier to push and will reduce
current draw.
10. Tighten the idler sheave bolt.
11. Pull the clutch handle to recheck the position
of the clutch plate bolt. Repeat as necessary
to adjust belt tension.
12. Check steering effort. After repairing or
replacing drive system parts, effort may
increase due to poor alignment. To correct,
do the following:
A. Loosen the bearing flanges as well as
the split coupling bolts.
B. Snug one split coupling bolt.
C. Align the propelling belts. Check for
clearance between the differential and
the locking collar.
NOTE: Minimum clearance between differential
and sheave is 0.010 in (0.3 mm).
D. While holding belt alignment, pull the
shaft away from the differential.
E. Tighten the center (early style only) and
left bearing flanges. Check for hard
rotation of shaft.
F. Tighten the center (early style only) and
left bearing collars.
G. Pull the short differential shaft away
from differential to spread the
differential gears.
H. Tighten the right side bearing flange.
Rap on bearing before tightening.
I. Tighten the right bearing collar.
J. Check for free spinning of differential.
Loosen the center and right bearing
flanges if it is not spinning freely. Rap
and retighten.
K. Align and tighten sprockets. Chains
must be slack to minimize steering
effort.
13. Replace the right side panel and bumper,
and engine access cover.
TO REPLACE PROPELLING BELTS
1. Stop the engine and set the machine
parking brake.
FOR SAFETY: Before Leaving Or Servicing
Machine; Stop On Level Surface, Set Parking
Brake, And Turn Off Machine.
2. Remove the right side bumper and cover,
debris hopper, and engine access cover.
3. Loosen the belt idler sheave bolts.
4. Slip the propelling belts off the idler sheaves.
5. Lift the filter cover.
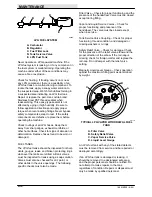
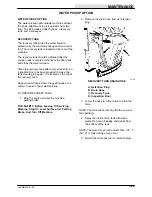
6. Remove the differential coupling.
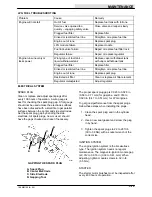
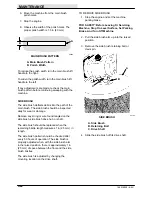
A
B
03147
COUPLING (EARLY STYLE SHOWN)
A. Coupling
B. Flange Bolts
7. Slide the old belt out through the coupling
opening.
8. Slide the new belt through the coupling
opening.
Summary of Contents for 186
Page 1: ...186 MM159 Rev 05 12 95 Operator Manual ...
Page 10: ...SPECIFICATIONS 186 MM159 6 94 1Ć2 ...
Page 14: ...OPERATION 186 MM159 6 94 2Ć2 ...
Page 84: ...MAINTENANCE 186 MM159 6 94 3Ć48 ...
Page 86: ...APPENDIX 186 MM159 6 94 4Ć2 ...
Page 88: ...APPENDIX 186 MM159 6 94 4Ć4 ...

