background image


86


Phaser 780 Color Printer


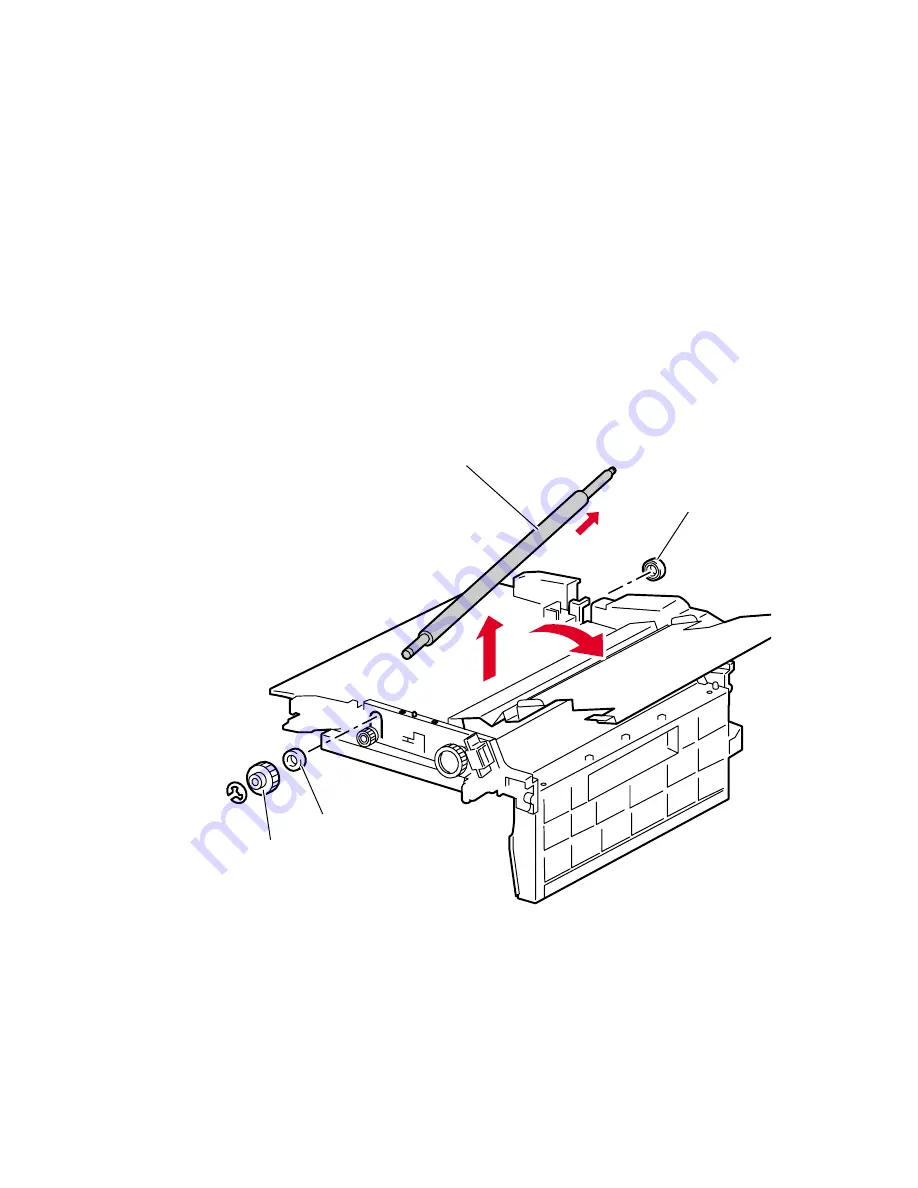
Feeder metal registration roller


1.


Remove the feeder registration clutch as described in “Feeder 
registration chute” on page 83.


2.


Remove the registration brake clutch as described in “Registration 
brake clutch” on page 85.


3.


Remove the E-ring securing the out gear at the front end of the metal 
registration roller.  Remove the gear. 


4.


Remove the rear bearing from the metal registration roller.


5.


Slide the metal registration roller to the rear, slide the front of the roller 
out of the front bearing, and remove the roller from the main paper 
feeder.

Reverse these steps to install the feeder metal registration roller.  


Removing the metal registration roller

Metal registration roller

Rear bearing

Front bearing

Out gear

780-5-41

Summary of Contents for Phaser 780 Color

Page 1: ... personnel only To avoid personal injury do not perform any servicing other than that contained in operating instructions unless you are qualified to do so This printing September 1999 063 3041 01 P H A S E R 7 8 0 C O L O R L A S E R P R I N T E R Service Quick Reference Guide ...

Page 2: ...ed trademarks of Tektronix Inc TekColor PhaserShare PhaserMatch PhaserLink Finepoint and PhaserPrint are trademarks of Tektronix Inc RealSUPPORTSM and TekColor CareSM are service marks of Tektronix Inc Other marks are trademarks or registered trademarks of the companies with which they are associated October 1998 First Printing December 1998 Changed pages 2 3 15 72 78 92 93 105 108 109 111 113 114...

Page 3: ...witch does not de energize the printer You must remove the power cord to disconnect the printer from the mains Keep the power cord accessible for removal in case of an emergency Safety instructions Read all installation instructions carefully before you plug the product into a power source Terms on CAUTION A personal injury hazard exists that may not be product apparent For example a panel may cov...

Page 4: ...e caution Refer to the manual s for information Laser use caution Refer to the manual s for information WARNING If the product loses the ground connection usage of knobs and controls and other conductive parts can cause an electrical shock Electrical product may be hazardous if misused ...

Page 5: ...ion This product is certified under IEC 825 as a Class 1 Laser Product 9008 78 DANGER Invisible laser radiation when open and interlock defeated AVOID DIRECT EXPOSURE TO BEAM CAUTION Invisible laser radiation when open and interlocks defeated AVOID DIRECT EXPOSURE TO BEAM VORSICHT Unsichtbare Laserstrahlung wenn Abdeckung geöffnet und Sicherheitsverriegelung überbrückt NICH DEM STRAHL AUSSETZEN AT...

Page 6: ......

Page 7: ... engine only test print 42 Printing and print quality problems 43 Initial checks and actions 43 Light undertone prints 44 Blank prints 45 Monochrome prints 46 Black prints 47 One color is faded 47 Missing band in direction of paper travel 48 Missing bands in parallel to the leading edge 49 Streaks in direction of paper travel 51 Streaks parallel with the leading edge 52 Banding 53 Edge of print is...

Page 8: ...h printing problems 66 Image never prints 66 Image prints in black and white 66 Image is rotated 90 degrees 67 Windows printing problems 67 Image never prints 67 Blue color on the screen is printing too purple 67 Printing from Windows 3 1 produces the message Problem writing device LPT1 Cancel or Retry 68 Workstation printing problems 68 Image never prints 68 Running built in diagnostics 69 Adjust...

Page 9: ...eloper assembly 99 Developer clutch 101 Developer tie plate 102 Toner developer dispense motor 104 Carousel assembly 105 Carousel motor 107 Carousel motor board 108 Carousel sensor 109 Laser unit 110 Erase lamp rail assembly 112 Erase lamp 114 Process drive unit 115 Waste auger assembly 117 Accumulator belt assembly 119 Accumulator belt cleaner assembly 121 Second bias transfer roller assembly 122...

Page 10: ...x Phaser 780 Color Printer FRU List 137 Supplies and accessories 176 Test Prints 179 Wiring Diagrams 185 ...

Page 11: ...ing the feeder pre registration roller 90 Removing the paper pick turn roller 91 Removing the paper feed drive gear train 92 Removing the paper feed motor 93 Removing the multi purpose tray roller assembly 94 Removing the multi purpose tray pick rollers 96 Removing the auto density calibration sensor 98 Removing a developer assembly 100 Removing the developer clutch 101 Removing the developer tie ...

Page 12: ...60 Paper exit FRUs 162 Drive FRUs 164 Electronic rear FRUs 166 Electronics front FRUs 168 Image processor FRUs 170 Optional lower feeder cabinet FRUs 172 Optional Feeder FRUs 174 Print engine wiring diagram 185 Map 1 Wiring routing at the top and front of the printer 193 Map 2 Wire routing around the engine control board 194 Map 3 Wiring routing around the image processor board 195 Map 4 Wiring ro...

Page 13: ...ze switch board feed solenoid no paper sensor low paper sensor 209 Wiring 10 Engine control board paper feeder 210 Wiring 11 Engine control board paper feeder multi purpose tray 211 Wiring 12 Engine control board top exit sensor media exit switch full stack sensor fuser fan 212 Wiring 13 Engine control board image processor board front panel image processor fan 213 Wiring 14 Lower Tray Assembly ma...

Page 14: ...Us 145 Paper feeder cover FRUs 147 Paper feeder FRUs 149 Imaging FRUs 151 Developer FRUs 153 Carousel FRUs 155 Accumulator belt assembly FRUs 157 Fuser assembly FRUs 159 Paper exit FRUs 161 Paper exit FRUs 163 Drive FRUs 165 Electronic rear FRUs 167 Electronic front FRUs 169 Image processor FRUs 171 Optional lower feeder cabinet FRUs 173 Optional feeder FRUs 175 Supplies and accessories 176 Plug J...

Page 15: ...to verify operation troubleshoot repair adjust and maintain a Tektronix Phaser 780 Color Printer To ensure complete understanding of the product we recommend participation in Phaser 780 service training if available The Phaser 780 printer shown with optional LowerTray Assembly 3041 01 ...

Page 16: ... 780 P Plus features 192 Mbytes of RAM and supports the same features as the GN printer In addition the Plus version Phaser 780 supports image pipelining for greater throughput a print collation mode and a check print before proceeding with job mode The plus printer also feature a SCSI compatible interface to connect to an external hard disk drive for additional font storage The hard disk drive is...

Page 17: ...will be reported With more memory the printer gains the capabilities of printing at higher resolutions printing without having to use image compression which trades off less installed RAM for longer image processing time and dual frame buffers for printing one image while processing a second image which gives greater printing throughput With additional RAM memory the printer s capabilities increas...

Page 18: ...umber 16 Mbyte Samsung KMM366S203BT 32 Mbyte Samsung KMM366S403BT 64 Mbyte Samsung KMM366S824AT 128 Mbyte Samsung KMM366S1623AT 32 Mbyte Smart Module SM564043574N6AA 64 Mbyte Smart Module SM564088574N6AA 32 Mbyte NEC MC 454AD645F A10B 64 Mbyte NEC MC 454CB645FA A10B 128 Mbyte NEC MC 4516CD645FZ A10B 16 Mbyte Micron Tech MT8LSDT264AG 66CL2 32 Mbyte Micron Tech MT16LSDT264AG 10BC4 32 Mbyte Micron Te...

Page 19: ...s Internal features of the print engine Laser unit Paper feeder Multi purpose tray Imaging unit Carousel assembly Fuser Accumulator belt cleaner Accumulator belt assembly Second bias transfer roller Media tray 1 3041 02 Developer assemblies ...

Page 20: ...6 Phaser 780 Color Printer Circuit boards of the print engine Low Voltage Power Supply LVPS High Voltage board Carousel motor board Network card Engine control board Image processor board 3041 04 ...

Page 21: ...ce Guide 7 Motors of the print engine 3041 03 Toner dispense motor Image processor fan Fuser fan Paper feed motor Process motor Paper feed drive gear train Carousel motor Developer fan Process drive assembly ...

Page 22: ...ont cover switch Full stack sensor Auto density calibration sensor Top cover switch Right front cover switch Exit door sensor Exit sensor Used toner cartridge sensor Carousel sensor Registration sensor Waste cartridge full sensor Waste cartridge sensor Low paper sensor Paper empty sensor Paper size sensor Accumulator belt home sensor Toner cartridge presence sensor Fuser temperature sensor ...

Page 23: ...ds and clutches on the print engine Registration clutch Pre Registration clutch Registration brake clutch Multi purpose tray clutch Multi purpose pick up solenoid Second bias transfer roller solenoid Developer clutch 3041 06 ...

Page 24: ...0 Phaser 780 Color Printer The image processor Features of the image processor board RAM DIMMS Font DIMM Postscript code ROM DIMM Network card SCSI riser card NVRAM Boot ROM Real Time Clock NVRAM 3041 07 ...

Page 25: ...h as Out of paper Paper Jam and Toner Low The interactive menu can only be entered while the printer is idle and ready The interactive menu has two modes review and modify Customers can review and modify certain NVRAM I O ports and peripheral parameters Buttons Button 6 the left most button is an Exit key used to cancel an operation while in the interactive menu The functions of the remainder of t...

Page 26: ... This is Option P1 LocalTalk connector This is Option P3 Unshielded Twisted Pair 10baseT and shielded Twisted Pair DB 9 Token Ring connectors This is Option P4 Network card LEDs The Ethernet network card has four LED indicators TX indicator yellow blinks while data is transmitted to the host The LED is off while no data is being sent Twisted Pair 100baseT and ThinNet 100base2 RX indicator green bl...

Page 27: ...e card is set for 16 MBPS When both LEDs blink a network card failure has occurred The following figure illustrates the rear panel of the printer Printer rear panel with the optional Ethernet card 3041 08 SCSI port Parallel port 10 base T ethernet port Slot for network card IDE hard drive Ethernet card LocalTalk card Token Ring card Internal hard drive 100 Mbs 10 100Base TX 10Base2 TP LINK TX RX P...

Page 28: ...ns of lower tray feeder Dimension Value Height 41 4 cm 16 3 in Width 56 cm 22 in Depth 56 cm 22 in Weight 23 5 kg 52 lbs Table 3 Printer clearances Dimension Value Top 40 0 cm 15 7 in Left 50 3 cm 20 in Right 55 1 cm 21 5 in Front 83 5 cm 33 in Rear 15 0 cm 6 in Bottom No obstructions underneath that could block cooling vents Mounting surface flatness Front feet less than 5 mm above or below rear ...

Page 29: ...ur color 2 pages per minute Monochrome 8 pages per minute Transparency 1 page per minute Minimum margins 5 mm 0 2 in on all sides except for Tabloid Plus 13 x 19 in media which has a bottom margin of 25 mm 1 in Usable papers sizes Paper Envelope 3 5x5 5 minimum size US 10 8 5x11 Letter Euro Standard 8 5x14 Legal A4 11x17 Tabloid C4 12x18 Tabloid Extra C5 13x19 Tabloid Plus C6 A3 C65 A4 A5 B4 B5 Av...

Page 30: ...oC 41 to 90oF 20 to40oC 4 to 104oF 20 to40oC 4 to 104oF Humidly Operating Non operating Storage 15 to 85 relative humidity 5 to 85 relative humidity 5 to 85 relative humidity Altitude Operating Non operating 0 to 3000 m 9900 ft at 25oC 0 to 15000 m 50 000 ft Vibration Operating Non operating Shock non operating Will withstand 0 5G excitation 5 to 100 Hz 3 axes for up to 50 minutes with no impairme...

Page 31: ...Voltage Flicker EN61000 4 2 1993 ESD EN61000 4 4 1993 Fast Burst Transients EN61000 4 5 1993 Line Surge EN61000 4 11 1993 Voltage Dips and Interruptions ENV50140 1993 Radiated RF Immunity Energy Star certification After 1 hour period of inactivity the printer enters an standby mode as required by Energy Star The wait time is a user definable parameter via the front panel or by using PhaserLink Ene...

Page 32: ...18 Phaser 780 Color Printer ...

Page 33: ...The engine control board detected that the printer image density was unusually low and attempts to raise the density have failed Note If the top cover is removed light can leak into the printer and cause a auto density calibration sensor error 1 Power cycle the printer 2 Inspect the toner cartridges 3 Inspect the four developer housings Each magnetic roller should be evenly coated with toner Repla...

Page 34: ...ity calibration sensor for contamination from toner Replace the sensor if necessary 5 Inspect and reseat the auto density calibration sensor Ensure the senor s solenoid activated cleaning blade is in place and moves freely 6 Test the auto density calibration sensor If bad replace the auto density calibration sensor 7 Replace the engine control board 8 Inspect the four developer housings Each magne...

Page 35: ...etected that the carousel home sensor did not actuate within six seconds after the start of the carousel motor 1 Power cycle the printer 2 Manually rotate the carousel assembly several revolutions 3 Check for contamination that may cause binding 4 Test the carousel home sensor Replace if needed 5 Replace the carousel motor 6 Replace the engine control board PCDC Error Error 22 There is a problem w...

Page 36: ...s turned on 1 Open the fuser door and ensure the fuser connectors are properly seated 2 Close the fuser and power cycle the printer Check that the fuser heats up 3 Check for line voltage at P J 71 pins 1 and 2 If no voltage is present replace the power supply 4 Replace the fuser 5 Replace the engine control board Fuser Temperature Error Error 41 There is a problem with the fuser heat rod control T...

Page 37: ...ady temperature during the specified time 1 Open the fuser door and ensure the fuser connectors are properly seated 2 Close the fuser and power cycle the printer Check that the fuser heats up 3 Check for line voltage at P J 71 pins 1 and 2 If no voltage is present replace the power supply 4 Replace the fuser 5 Replace the engine control board Fuser Temperature Error 44 The thermistor sensor indica...

Page 38: ... board detected a used CRUM 1 Reseat the imaging unit 2 Power cycle the printer 3 Replace the imaging unit 4 Replace the engine control board Imaging Unit ID Error Error 70 There is a CRU Memory problem The engine control board detected that the memory initial value of the installed imaging unit is wrong 1 Reseat the imaging unit 2 Power cycle the printer 3 Replace the imaging unit 4 Replace the e...

Page 39: ...r Error 75 There is a CRU Memory problem The engine control board could not communicate with the CRUM 1 Power cycle the printer 2 Replace the imaging unit with a new cartridge 3 Replace the engine control board Engine Board Error Error 76 The engine control board detected a corrupted NVRAM during power on self test 1 Power cycle the printer 2 Replace the NVRAM chip 3 Replace the engine control boa...

Page 40: ...e 2 Power cycle the printer 3 Ensure the fuser connectors are properly seated 4 Test the fuser using internal diagnostics 5 Replace the engine control board Waste Cartridge Full The waste cartridge is full The engine control board detected that the waste cartridge sensor was on for 1250 print cycles 1 Replace the waste cartridge 2 Test the waste cartridge full sensor using internal diagnostics 3 I...

Page 41: ...sensor 4 Replace the engine control board Replace Yellow Toner Cartridge Yellow image density is too low The engine control board detected that the auto density calibration sensor reads the yellow patch density as being below specification and that the reading is either slow to raise or does not raise after the printer attempts to increase density 1 Replace the yellow toner cartridge 2 Test the to...

Page 42: ... order to raise the image density to normal 1 Replace the cyan toner cartridge 2 Test the dispense motor 3 Test the auto density calibration Replace it if necessary 4 Replace the engine control board Magenta Toner Low The magenta toner cartridge is low on toner The engine control board switched on the Dispense Motor for more than 800 seconds in order to raise the image density to normal 1 Replace ...

Page 43: ...ace the engine control board Media Low in Tray 1 The engine control board detected that the Tray 1 Low Paper Sensor is actuated 1 Add paper to tray 1 2 Check for a damaged or missing sensor actuator 3 Replace the tray 1 low sensor 4 Replace the engine control board Load Media in Multi purpose Tray The multi purpose tray is out of paper The engine control board detected that the long multi purpose ...

Page 44: ...ray s paper empty sensor 3 Replace the lower feeder circuit board 4 Replace the lower feeder assembly 5 Replace the engine control board Load Media in Tray 1 Tray 1 is out of paper The engine control board detected that the paper empty sensor in tray 1 is actuated 1 Load paper into Tray 1 2 Test the tray s paper empty sensor 3 Replace the lower feeder circuit board 4 Replace the engine control boa...

Page 45: ...as in standby 1 Clear jammed paper from the printer 2 Test the fuser exit sensor 3 Replace the engine control board Clear Jam At C D There is problem near the fuser exit sensor The engine control board detected that the fuser exit sensor did not actuate within the specified time after the fuser entrance sensor was actuated 1 Clear jammed paper from the printer 2 Test the fuser exit sensor 3 Inspec...

Page 46: ... 3 Test the paper tray size sensors 4 Replace the paper tray size sensor board 5 Replace the engine control board Install Black Toner Cartridge The black toner cartridge is either not installed or not installed correctly The engine control board did not receive a signal from the cartridge sensor when the carousel frame moved the black developer housing into position 1 Reseat the black toner cartri...

Page 47: ...resence sensor 4 Replace the engine control board Install Waste Cartridge The waste toner box is not installed The engine control board detected that the waste toner box sensor was deactuated 1 Reseat waste cartridge 2 Power cycle the printer 3 Test the waste toner sensor 4 Check the sensor wiring 5 Replace the sensor 6 Replace the engine control board Install Tray 1 The engine control board did n...

Page 48: ...tions Replace the paper size sensor assembly 4 Replace the engine control board Install Imaging Unit The imaging unit is either not installed or not installed correctly The engine control board did receive a signal from the customer replaceable unit memory 1 Reseat the imaging unit 2 Inspect the CRUM connector fordamageorcontamination Clean or replace if necessary 3 Replace the imaging unit 4 Repl...

Page 49: ... is nearing end of life The engine control board detected that the accumulator belt cleaner processed 100 000 sheets of paper 1 Use diagnostics to verify the print count 2 Replace the accumulator belt cleaner 3 Replace the engine control board Printer Maintenance Required The accumulator cleaner belt has reached end of life The engine control board detected that the accumulator belt cleaner has pr...

Page 50: ... that the fuser processed 237 500 images or the toner dispense motor has accumulated more than 67 036 x 100ms of running time 1 Replace the fuser 2 Replace the engine control board Replace the imaging unit The imaging unit has reached end of life The engine control board detected that the imaging unit has printed 110 000 images 1 Replace the imaging unit 2 Check the CRUM connector fordamageorconta...

Page 51: ...feeder assembly 2 Inspect the mating connectors of the paper feeder 3 Replace the paper feed harness 4 Replace the paper feeder 5 Replace the engine control board Close Front Cover The engine control board detected that the front cover interlock switch is deactuated 1 Close the front cover 2 Inspect the cover s switch actuators Replace the cover if damaged 3 Test for 24 VDC at Pins P32 8 and 3 You...

Page 52: ...d that the full stack sensor is actuated for more than 12 seconds 1 Remove the prints from output tray 2 Inspect for damage the output tray full sensor Replace if necessary 3 Replace the engine control board Error code and message Description Corrective action ...

Page 53: ...lies voltage to the fuser to bring it up to standby temperature 7 The process motor energizes and then a 1 4 second later the paper feed motor is energized 8 The print engine powers on the carousel motor and checks the presence of the four toner developer assemblies 9 The print engine verifies proper operation of the image process components The auto density calibration sensor checks the density l...

Page 54: ...e the low voltage power supply a Check for 24VDC between P32 3 on the low voltage power supply and frame ground Replace the low voltage power supply Check for 24VDC between P32 8 and frame ground If voltage is at pin 3 but not at pin 8 check the front cover fuser and paper feeder interlock switches Is there 24VDC between P32 11 and frame ground If not replace the power supply Check for a short in ...

Page 55: ... Printer will not power up on page 40 2 Run print engine test prints which print independently of the image processor to determine if the image processor is the problem Refer to Making a print engine only test print on page 42 3 Low voltage power supply loading check a Run 50 test prints from the image processor s built in test prints b Measure the voltage between P33 3 on the low voltage power su...

Page 56: ... and multi purpose feeder The printer sends the test prints to the face down output tray The printer generates test prints until you stop the test 6 Switch off printer main power to stop generating test prints 7 Move the S930 switch 4 to the off open position Using the print engine board To generate a test print without the image processor installed 1 Turn off the printer 2 Remove the image proces...

Page 57: ...the printer located away from water outlets steamers electric heaters volatile gases open flames and strong radio frequency sources 7 Is the printer shielded from the direct rays of the sun 8 Does the printer have adequate clearances on all sides for proper ventilations 9 Is the printer installed on a level stable surface 10 Is the correct paper stock being used in the printer 11 Is the customer u...

Page 58: ... fuser Inspect the image on the sheet of paper before it reaches the fuser rollers Is the image density normal before it reached the fuser rollers If no go to Step 4 If yes go to Step 7 4 Remove the imaging unit 5 Inspect the test print image on the accumulator belt Does the image appear completely transferred to the accumulator belt If yes replace the second bias transfer roller If not replace th...

Page 59: ...before the sheet of paper enters the fuser 5 Remove the imaging unit 6 Inspect the image on the drum Is there an image visible on the drum If not make an engine only test print If a test print is printed replace the image processor board If not replace the imaging unit 7 Generate a test print Is the test print blank If yes replace the high voltage power supply 8 Inspect the image on the surface of...

Page 60: ...lade may be in constant contact with the accumulator belt scraping off each layer of color toner soon after it is transferred 2 Inspect the cleaner cam guides and holders located at the front and back of the fuser assembly Are the cleaner cam holders seated properly If not reseat them as necessary 3 Manually actuate the cleaner cam solenoid and rotate the fuser input gear to cycle the cleaner cam ...

Page 61: ...e image processor board 5 Generate a test print and open the front door just before the sheet of paper enters the fuser 6 Remove the imaging unit 7 Inspect the image on the drum Is there a developed test print image visible on the drum If no replace the imaging unit 8 Generate a test print Is the test print black Replace the high voltage power supply One color is faded Toner cartridge is depleted ...

Page 62: ...not go to Step 7 3 Remove the imaging unit Inspect the empty cavity for a scrap of paper or a toner blotch that could be blocking the laser window 4 Generate a test print and open the front cover just before the sheet of paper enters the fuser 5 Remove the imaging unit 6 Inspect the image on the drum Is there a normal test print image without any vertical band deletions visible on the drum If yes ...

Page 63: ...e areas of the image that are extremely light or are missing entirely These missing areas form wide bands that run across the page parallel with the leading edge of the print perpendicular with the direction of paper travel B size print shown The printer displays no error code Note A size prints are processed through the printer with the short edge of the print parallel to the direction of the pap...

Page 64: ...a test print and open the front cover just as the sheet of paper exits the fuser 9 Inspect the image on the sheet of paper just after the paper exits the fuser Is there a normal test print image on the sheet of paper before entering the fuser but the image has visible horizontal band deletions after it exits the fuser If yes replace the fuser roll cartridge 10 Make another test print If the proble...

Page 65: ...ervice Print 4 and open the front cover just before the sheet of paper enters the fuser 4 Remove the imaging unit 5 Inspect the image on the drum Is there a normal test print image without any streaks visible on the drum If yes go to Step 6 If not replace the imaging unit 6 Inspect the image on the surface of the accumulator belt Is there a normal test print image without any streaks visible on th...

Page 66: ...int 1 Do the streaks appear in all colors If not go to Step 8 2 Print Service Print 4 and open the front cover just before the sheet of paper enters the fuser 3 Remove the imaging unit 4 Inspect the image on the drum Is there a normal test print image without any horizontal streaks visible on the drum If yes go to Step 4 If not replace the imaging unit 5 Inspect the image on the surface of the acc...

Page 67: ...and appears every 364 mm from the leading edge of a B size print or occasionally on A size print reseat the imaging unit and print again If the problem persists perform the procedure Adjusting for impulse banding on page 74 2 If a dark band appears at a 1 3 to 1 7 mm pitch throughout solid fills replace the process drive assembly 3 Dark bands appearing randomly in solid fills at pitches such as 44...

Page 68: ...e the imaging unit 6 Inspect the image on the surface of the accumulator belt Is there a normal test print image without any spot deletions visible on the surface of the accumulator belt If no replace the accumulator belt 7 Inspect the image on the sheet of paper just before the paper enter the fuser Is there a normal test print image without any spot deletions If no replace the second bias transf...

Page 69: ...lling from the magnetic brush Clean the dirty developer assembly If the problem reoccurs replace the faulty developer assembly 6 Inspect the fuser Is the fuser free of toner Clean the fuser if necessary by processing 10 sheets of B size paper though it 7 Remove and inspect the accumulator belt cleaner assembly Is the accumulator belt cleaner assembly clean and with no obvious toner leakage If not ...

Page 70: ... the problem will disappear 4 A defect every 58 mm 2 5 in or less is related to the feed or exit rollers Residual image or ghosting There are faint ghostly images appearing on the page The images may be either from a previous page or from the page currently being printed The printer displays no error code 1 Was the customer printing numerous copies of the same image Avoid printing numerous copies ...

Page 71: ...he fuser Background contamination There is toner contamination on all or most of the page The contamination appears as a very light gray dusting The printer displays no error code 1 Print Service Print 2 and open the front cover just before the sheet of paper enters the fuser 2 Remove the imaging unit Inspect the image on the drum Is there a normal test print image without background contamination...

Page 72: ...place the engine control board Toner on back of print There is toner on the back of the printed sheet of paper 1 Clean the printer interior 2 Inspect the paper that is loaded in the paper trays Is the paper clean and free of toner 3 Generate a test print and open the front cover just before the sheet of paper reaches the second bias transfer roller about one second after the registration solenoid ...

Page 73: ... a mottled appearance 1 Ensure good quality laser paper is being used 2 Check the media settings at the printer driver and at the front panel default settings for media size and type 3 Does mottling occur on only one color If yes remove the top cover and inspect the magnetic rollers of the affected color s developer assembly Ensure there is no buildup Replace the developer if necessary 4 Print Ser...

Page 74: ... 4 in from the mylar registration guide If correctly registered test the registration clutch Clean the registration rollers If not test the pick solenoid of the tray being used Replace if needed 4 Replace the paper feeder 5 Replace the engine control board Color layer not correctly registered The four color images are not registered correctly and do not form a clean four color image on the page Th...

Page 75: ...occur near the oil roll cartridge end of life or with printers running excessively high daily print volumes If the customer is consistently running a high volume of prints per day they should user the high capacity fuser roll cartridge 1 An oil stain may occur on first print after the printer has been idle for an extended period If the problem persists on sucessive prints replace the oil roll cart...

Page 76: ...the problem reoccurs replace the faulty developer assembly 4 Inspect the fuser Is the fuser free of toner Clean the fuser if necessary 5 Remove and inspect the accumulator belt cleaner assembly Is the accumulator belt cleaner assembly clean and with no obvious toner leakage If not clean or replace the accumulator belt cleaner assembly if necessary 6 With the accumulator belt cleaner assembly remov...

Page 77: ...er feeder out of the printer and inspect the position of the sheet of paper Is the sheet of paper parallel to the edges of the paper feeder If not replace the turn roller assembly 5 Generate a test print and slide the fuser out of the printer just as the sheet of paper is moving through the registration rollers Carefully slide the paper feeder out of the printer and inspect the position of the she...

Page 78: ...out of the assembly and into the printer 4 Inspect the paper feeder for debris or broken components 5 Generate a test print and open the front cover just as the sheet of paper is moving through the registration rollers about 1 second after you hear paper feeding start 6 Carefully slide the paper feeder out of the printer and inspect the sheet of paper Is the sheet of paper undamaged as it leaves t...

Page 79: ...If no go to Step 10 7 Remove the lower feeder rear cover 8 Measure the voltage between P J133 B5 and frame ground on the lower feeder circuit board Is there 5VDC between P J133 B5 and frame ground on the lower feeder circuit board If not verify that 5 VDC on P33 10 the low voltage power supply 9 Measure the voltage between P J133 B1 and frame ground and between P J133 B2 and frame ground on the lo...

Page 80: ...the Chooser or the print dialog switch background printing to off Try printing the job again 4 Ensure that the printer can print by printing an internal front panel test print 5 Enable the Error Handler through the front panel and try printing the job again If an error page is printed after printing the job again call the Customer Support Hotline for further assistance Please have the error page i...

Page 81: ...e never prints Printer acts as if it is receiving data but nothing comes out of printer or the printer goes back to Ready mode with out printing image 1 Under the printer s setup options set RETRY 850 2 Try printing from the printer driver 3 Try printing from another application 4 Try printing to another printer 5 Try printing from another computer 6 Try printing an internal front panel test print...

Page 82: ...e MODE command in DOS 2 Start Windows 3 Select the Control Panel from the Main menu 4 Select Printers 5 Select the appropriate printer and click on Connect 6 Uncheck the Fast Printing Direct to Port box Workstation printing problems Image never prints Printer acts as if it is receiving data but nothing comes out of the printer or the printer goes back to Ready mode without printing an image For se...

Page 83: ...t and Select Help Mode You can enter a Help mode at the top level by pressing Prev or Nest until Help Mode On Off is displayed Once you select Help mode and H is displayed on the lower right corner of the display With help mode enabled once you select a test information about the test is displayed in the top line of the display Buttons 3 and 4 are relabeled as Quit and More Pressing More displays ...

Page 84: ...ensor Paper Feeder Interlock MPT Long Paper Sense MPT Paper Sensor MPT Edge Sensor Registration Sensor Oil Roller Switch New Oil Roller Switch Fuser Interlock Switch Fuser Entry Sensor Fuser Exit Sensor Front Cover Interlock Lower Feeder Interlock Tray 1 Present Indicates Missing or Size of media selection Tray 2 Present Tray 3 Present Tray 4 Present Table 1 Diagnostic tests Test Sub tests Detail ...

Page 85: ... clicks of sensor wiper solenoid Motors Solenoids Process Motor Slow Fast Paper Feed Motor On Off Laser Motor On Off Toner Dispense Motor One Time Lower Feeder Motor On Off MPT Feed Clutch MPT Pick Solenoid MPT Pre Registration Clutch MPT Registration Clutch Developer Clutch Second Bias Transfer Clutch Oil Roller Solenoid Belt Cleaner Solenoid Tray 2 Pick Solenoid Tray 3 Pick Solenoid Tray 4 Pick ...

Page 86: ... the values to the engine control board NVRAM The Save function must be performed prior to replacing the engine control board Perform the Restore function after the replacement Restore Life Count Drum Unit Life Yellow Toner Life Magenta Toner Life Black Toner Life Cyan Toner Life Printer Life Bias Transfer Roller Life Belt Cleaner Life Fuser Oil Life Fuser Unit Life Reset Fuser Life Perform the ap...

Page 87: ...service prints allow you to evaluate the printer s print quality 1 Press the Printer Menu Select button 2 Select the Help Pages 3 Scroll to either Service Print 1 or Service Print 2 and press Print Printing the configuration page The configuration page shows a great deal of information regarding the data and set up values stored in NVRAM In the same Help pages menu you can also print the startup p...

Page 88: ...ncil scribe a line across the white tracking roller located at the front of the developer roller 5 Position the white roller so the mark is even with the edge of the nearly developer frame 6 Hold the carousel lock so it will not impede the carousel s movement 7 With a slow smooth action rotate the carousel assembly 180o Do not allow the carousel to stop as the developer pass the drum surface Conti...

Page 89: ...Service Guide 75 Adjusting for impulse banding Place mark on white roller After carousel rotation mark should move 2mm Install shim Developer roller Lift up slightly to install shim Toner 3041 32 ...

Page 90: ...76 Phaser 780 Color Printer ...

Page 91: ...opier paper should have very few problems since this paper is smooth and relatively dust free You should thoroughly inspect and clean these printers Ask each printer customer about the type of paper he or she uses so that you can be sure to clean the parts of the printer that particular paper may affect If a customer is printing on the more unusual or dustier papers then you should pay particular ...

Page 92: ...uum the window clean 9 Wipe off the pre exposure erase lamp with a lint free wipe 10 Vacuum out the interior of the printer 11 Vacuum loose toner out of the carousel assembly 12 Remove and clean the accumulator belt cleaner assembly Removing the accumulator belt cleaner assembly is explained on the Phaser 780 Service CD ROM Once removed gently vacuum the cleaner assembly using a vacuum with a brus...

Page 93: ...ll network parameters or print the Configuration Page To reset the image processor to its factory default values follow this procedure 1 Turn on the printer 2 When the row of begins to be displayed on the front panel press and release button 1 and then press and release button 4 3 When the front panel displays Password press and release button 1 then press and release button 3 The display responds...

Page 94: ...80 Phaser 780 Color Printer ...

Page 95: ...c illustrates how to remove and replace key printer Field Replaceable Units FRUs Refer to the later topic FRU List on page 137 for a list of the printer s FRUs For more detailed removal replacement procedures refer to the Phaser 780 Service CD ROM ...

Page 96: ... rail latch as you slide the front of the paper feeder out far enough to disengage the latch 3 Push in on the rear rail latch as you slide the rear of the paper feeder out far enough to disengage the latch 4 Slide the paper feeder out of the printer Reverse these steps to install the paper feeder Removing the paper feeder 780 5 34 Front latch Rear latch ...

Page 97: ...ng securing the rear arm of the registration chute to the paper feeder 3 Remove the screw securing the ground wire to the chute Remove the wire 4 Open the registration chute 5 Slide the chute to the rear and remove the chute Reverse these step to install the registration chute Removing the registration chute Ground wire Registration chute 780 5 37 ...

Page 98: ...nnect the wiring harness from the registration clutch 3 Open the registration chute 4 Remove the E ring securing the registration clutch to the rear of the metal registration roller Remove the registration clutch from the roller Reverse these steps to install the registration clutch Removing the registration clutch Registration clutch Wiring harness 780 5 40 ...

Page 99: ...ke clutch assembly to the side of the paper feeder Remove the assembly 4 Remove the E ring securing the registration brake clutch to the clutch shaft and remove the clutch 5 Remove the E ring securing the registration brake gear to the gear shaft Remove the gear Reverse these steps to install the registration brake clutch Removing the registration brake clutch 780 5 46 Registration brake assembly ...

Page 100: ...ng the out gear at the front end of the metal registration roller Remove the gear 4 Remove the rear bearing from the metal registration roller 5 Slide the metal registration roller to the rear slide the front of the roller out of the front bearing and remove the roller from the main paper feeder Reverse these steps to install the feeder metal registration roller Removing the metal registration rol...

Page 101: ...eeder 4 Remove the rear bearing and black spring from the rear end of the rubber registration roller 5 Slide the rubber registration roller out of the paper feeder Note the silver spring and bearing on the front end of the roller Reverse these steps to install the feeder rubber registration roller The front portion of the shaft is longer than the rear Removing the rubber registration roller Rear b...

Page 102: ...per feeder Remove the gear assembly 5 Remove the E rings securing the feeder pre registration clutch and the pre registration gear to the pre registration support Remove the support 6 Slide the feeder pre registration gear off the shaft 7 Undress the J95 wiring harness and slide the feeder pre registration clutch off the feeder pre registration shaft Removing the feeder pre registration clutch Pre...

Page 103: ... paper feeder frame 5 Remove the E ring and rear bearing securing the idler gear to the rear of the feeder pre registration shaft Remove the idler gear 6 Lift the pre registration roller up 7 Slide the feeder pre registration roller to the rear of the paper feeder freeing the front of the shaft from front of the paper feeder 8 Slide the feeder pre registration roller to the front free the rear of ...

Page 104: ...90 Phaser 780 Color Printer Removing the feeder pre registration roller 780 5 38 Out holder Pre registration knob Front bearing Pre registration roll shaft Pre registration gear 2 Idler gear ...

Page 105: ...e the stopper 6 Remove the E ring securing the front of the turn roller shaft to the front bearing 7 Disconnect the turn arm spring from the printer frame 8 Remove the E ring securing the round cover over the turn arm gear Remove the cover 9 Slide the rear of the turn roller shaft out of the turn arm assembly 10 Slide the front of the turn roll shaft out of the front bearing Remove the turn roller...

Page 106: ...e wire clip to the paper feed drive gear train Move the clip and harness out of the way 4 Remove the five screws securing the paper feed drive gear train to the printer frame Remove the gear train 5 Remove the two wire clamps from the paper feed drive gear train Reverse these steps to install the paper feed drive gear train Removing the paper feed drive gear train Wire clip 780 5 73 Wire clamps Pa...

Page 107: ...m the paper feed motor 3 Remove the four screws securing the paper feed motor to the fuser drive gear train Remove the motor 4 Remove the two motor supports Reverse these steps to install the paper feed motor Removing the paper feed motor Motor supports 780 5 75 Wiring harness Paper feed motor ...

Page 108: ...k up gear pick up cam gear and lever stopper off the shaft 4 Remove the E ring securing the rear shaft bearing to the rear of the multi purpose tray 5 Remove the E ring securing the front shaft bearing to the front of the multi purpose tray 6 Slide the multi purpose tray roller assembly out of the multi purpose tray assembly Removing the multi purpose tray roller assembly Rear bearing Front bearin...

Page 109: ...ore away from the front pick roller 3 Slide the front pick roller toward the front roller core so the pick up roll clears the locking pin Remove the front pick roller 4 Release the latch holding the rear roller core to the pick roller shaft and slide the roller away from the rear pick roller 5 Slide the rear pick up roller toward the rear roller core so the pick roller clears the locking pin Remov...

Page 110: ...rpose tray pick rollers Note the arrows molded into the sides of the pick roller ensure they are oriented the correct direction upon installation Removing the multi purpose tray pick rollers 780 5 26 Latch Front core rollers Printer front Pick up rollers Rear core rollers ...

Page 111: ...f the printer frame 4 Reach inside the printer cavity and slide the front end of the auto density calibration sensor out of the hole at the front of the printer 5 Pull the wiring harness out through the grommet hole Caution Do not touch or scratch the accumulator belt when removing the auto density calibration sensor 6 Lift the rear end of the auto density calibration sensor out of the cutout at t...

Page 112: ...98 Phaser 780 Color Printer Removing the auto density calibration sensor 780 5 48 Auto density calibration sensor Rear cutout ...

Page 113: ...veloper assembly to the carousel frame appears through the access hole a few inches above the carousel knob 5 Remove the shoulder screw securing the developer assembly to the carousel frame Keep the carousel in this position 6 Reach in through the top of the printer slide the developer assembly to the front of the printer to free the gears at the rear of the developer assembly 7 Lift the front of ...

Page 114: ...100 Phaser 780 Color Printer Removing a developer assembly Shoulder screw Developer assembly Carousel latch 780 5 53 Remove shipping developer cover before installing new developer assembly ...

Page 115: ...ng harness from the developer clutch 3 Remove the fuser drive train gear as described in Fuser drive gear train on page 126 4 Remove the four screws securing the developer clutch to the printer frame Remove the clutch Reverse these steps to install the developer clutch Removing the developer clutch Developer clutch Wiring harness 780 5 81 ...

Page 116: ...he inner cover 4 Remove the wire and wire clamp from the developer tie plate 5 Remove the two screws securing the developer tie plate to the rear of the printer frame 6 Remove the two screws securing the developer tie plate to the front of the printer frame 7 Slide the tie plate up and out of the printer frame Reverse these steps to install the developer tie plate ...

Page 117: ...Service Guide 103 Removing the developer tie plate 780 5 82 Wire clamp Developer tie plate ...

Page 118: ... Slide the toner developer dispense motor up and slightly to the left to free the motor shaft gear from the frame Remove the motor 4 Disconnect the wiring harness from the toner developer dispense motor Note Install the motor using the two left side mounting screw holes Reverse these steps to install the toner developer dispense motor Removing the toner developer dispense motor Toner developer dis...

Page 119: ...w voltage power supply 8 Remove the fuser drive gear train 9 Remove the developer clutch 10 Remove the developer tie plate 11 Remove the carousel sensor 12 Remove the large E ring securing the rear carousel bearing to the rear of the printer frame Slide the rear bearing off the carousel frame shaft 13 Slide the front carousel bearing off of the carousel frame shaft 14 Slide the carousel frame asse...

Page 120: ...106 Phaser 780 Color Printer Removing the carousel assembly 780 5 54 Rear bearing Carousel assembly Front bearing Screw ...

Page 121: ...isconnect the wiring harness from the carousel motor 3 Remove the three screws securing the carousel motor to the printer frame Remove the motor Reverse these steps to install the carousel motor Removing the carousel motor 780 5 78 Wiring harness Carousel motor ...

Page 122: ...ove the wiring harnesses from the carousel motor board 3 Remove the screw securing the carousel motor board to the printer frame Remove the board Reverse these steps to install the carousel motor board Removing the carousel motor board 780 5 79 Wiring harness Carousel motor board ...

Page 123: ...e the plate along with the attached carousel sensor from the frame 3 Disconnect the wiring harness from the carousel sensor 4 Squeeze the three latches securing the sensor to the plate and remove the sensor Reverse these steps to install the carousel sensor Removing the carousel sensor 780 5 56 Carousel sensor plate Carousel sensor Wiring harness ...

Page 124: ... harnesses from the laser diode board 4 Disconnect the wiring harness from the start of scan sensor board 5 Remove the four screws securing the laser unit to the printer frame 6 Carefully lift the laser unit off the printer frame Reach under the unit and disconnect the wiring harness from the laser unit motor board 7 Remove the laser unit Reverse these steps to install the laser unit ...

Page 125: ...Service Guide 111 Removing the laser unit Laser unit Laser cover 780 5 47 ...

Page 126: ...he waste cartridge sensor 5 Free the wiring harnesses from the wire clamps 6 Disconnect the wiring harness from the erase lamp 7 Remove the two screws securing the erase lamp rail assembly to the front of the printer frame Caution Be careful not to damage the accumulator belt underneath the erase lamp rail assembly 8 Lift the erase lamp rail assembly up through the top of the printer frame Reverse...

Page 127: ...Service Guide 113 Removing the erase lamp rail assembly Wire clamps 780 5 50 Erase lamp rail assembly Disconnect wiring harnesses ...

Page 128: ...embly as described in Erase lamp rail assembly on page 112 2 Release the three latches holding the erase lamp assembly to the erase lamp rail assembly Remove the lamp Reverse these steps to install the erase lamp Removing the erase lamp Erase lamp latch Erase lamp 780 5 49 ...

Page 129: ... high voltage power supply bracket Move the bracket out of the way 7 Inside the printer frame remove the two screws securing the process drive unit to the rear of the accumulator belt assembly 8 Hold the process drive gear train it is heavy while you remove the seven screws securing the drive unit to the printer frame Carefully pull the assembly away from the frame Reverse these steps to install t...

Page 130: ...116 Phaser 780 Color Printer Removing the process drive unit Wiring harness High voltage power supply bracket Process drive unit 780 5 77 Accumulator belt bracket ...

Page 131: ...acket holding the water auger housing 5 Remove the low voltage power supply 6 Remove the two screws securing the accumulator belt rear bracket to the rear of the printer frame Remove the bracket 7 Remove the screw securing the auger drive assembly to the printer frame 8 Remove the screw securing the auger tube to the rear of the printer frame 9 Remove the screw securing the auger assembly bracket ...

Page 132: ...118 Phaser 780 Color Printer Removing the waste auger assembly Waste auger drive assembly Waste auger assembly 780 5 64 ...

Page 133: ... Hold on to the front and the rear of the accumulator belt assembly shaft Note for reassembly the orientation of the spring collar and K clip Push in on the spring loaded collar to release the front of the accumulator belt assembly drive shaft from the front of the printer frame 10 Lift up the accumulator belt assembly free the two high voltage wires from the grommet hole at the rear of the frame ...

Page 134: ...120 Phaser 780 Color Printer Removing the accumulator belt assembly Spring loaded collar 780 5 59 Accumulator belt assembly Accumulator belt assembly Bearing fits in hole ...

Page 135: ...the cleaner support to the printer frame Remove the cleaner support while retaining the spring on the cleaner support 5 Slide the belt cleaner assembly to the front of the printer and remove the assembly through the fuser cavity Reverse these steps to install the accumulator belt cleaner assembly Enter diagnostics and select Reset Accumulator Belt Cleaner Life Removing the accumulator belt cleaner...

Page 136: ... the topic Accumulator belt cleaner assembly on page 121 3 Reach through the empty fuser cavity and slide the second bias transfer roller assembly out of the second bias transfer roller front and rear brackets and out of the printer Reverse these steps to install the second bias transfer roller assembly Removing the second bias transfer roller assembly Second bias transfer roller assembly 780 5 62...

Page 137: ...assembly on page 123 3 Remove the waste auger assembly as described in Waste auger assembly on page 117 4 Remove the three screws securing the second bias transfer roller cam assembly to the printer frame Pull the assembly a few inches away from the rear frame 5 Disconnect the wiring harness running to the second bias transfer roller cam assembly 6 Remove the second bias transfer roller cam assemb...

Page 138: ...124 Phaser 780 Color Printer Removing the second bias transfer roller cam assembly 780 5 60 Wiring harness Second bias transfer roller cam assembly ...

Page 139: ...r assembly and pull the assembly out of the printer To install the fuser assembly in the printer lift the end of the fuser assembly as you insert the assembly side rails into the guide wheels inside the printer Lower the end of the fuser assembly and slide the assembly into the printer Reinstall the screw to secure the fuser assembly to the printer frame Removing the fuser assembly Fuser assembly ...

Page 140: ...acket 5 Remove the screw securing the paper feed motor bracket to the fuser drive gear train and remove the bracket 6 Reach inside the empty fuser assembly cavity and remove the E ring securing the fuser drive gear shaft to the auger drive assembly 7 Remove the five screws securing the fuser drive gear train to the printer frame Remove the gear train Reverse these steps to install the fuser drive ...

Page 141: ...Service Guide 127 Removing the fuser drive gear train Fuser drive gear train Paper feed motor bracket 780 5 74 Auger assembly E ring ...

Page 142: ...er exit assembly to the printer frame 4 Lift the lower exit assembly to unhook the top of the assembly from the printer frame Remove the assembly 5 Disconnect the wiring harness from the top exit sensor and the wiring harness from the exit chute switch both located on the back of the lower exit assembly 6 Remove the wires from the wire clips that are molded into the side of the lower exit assembly...

Page 143: ...Service Guide 129 Removing the lower exit assembly 780 5 68 Wiring harness Lower exit assembly ...

Page 144: ...e screw securing the full stack sensor and its bracket Squeeze the four latches securing the full stack sensor to the bracket 3 Disconnect the sensor s connector P J 167 Reverse these steps to install the full stack sensor Removing the stack full sensor 780 5 158 Full stack sensor ...

Page 145: ...ses from the low voltage power supply 4 Release the wiring harness from the wire clip located at the top left of the low voltage power supply 5 Remove the four screws securing the low voltage power supply to the printer frame Lift and remove the low voltage power supply from the printer frame Reverse these steps to install the low voltage power supply Removing the low voltage power supply 780 5 83...

Page 146: ...nnect the five high voltage wiring harness from the high voltage power supply 4 Remove the four screws securing the high voltage power supply to the high voltage power supply brackets Remove the high voltage power supply Reverse these steps to install the high voltage power supply Removing the high voltage power supply 780 5 84 Wiring harness High voltage power supply ...

Page 147: ... the chassis disconnecting the image processor from the engine control board Swap components If you are replacing the image processor board exchange The Boot ROM PLCC The NVRAM chip DIP The Real Time Clock module The components contains important customer created parameters The printer may not operate correctly without the components being swapped Also transfer from the old board to the new board ...

Page 148: ...hassis assembly to the printer frame 4 Remove the five screws securing the top of the image processor chassis assembly to the printer frame 5 Lift the image processor chassis assembly up and off the four loosened screws located at the bottom of the chassis Remove the chassis from the printer frame Reverse these steps to install the image processor chassis Removing the image processor chassis 780 5...

Page 149: ...esses connected to the print engine control board 4 Remove the screw securing the ground wire to the print engine control board Remove the wire 5 Remove the three other screws securing the print engine control board to the printer frame Remove the board Reverse these steps to install the engine control board Perform the Life Date Restore Life Count to restore the counts to the engine control board...

Page 150: ...136 Phaser 780 Color Printer ...

Page 151: ...rinter produced on that day The serial number is coded as follows JLxxDMY J indicates the headquarter country of the manufacturing company Japan L indicates the modification level of the printer ranging alpha numerically from 0 to Z xx alpha numerically indicates the sequence of the printer among the printers produce on that day of manufacture ranging from 01 to ZZ representing 1 to 1296 the lette...

Page 152: ...138 Phaser 780 Color Printer Printer cabinet FRUs Z780 5 119 7a 11 6 5 3c 4 3a 2 1c 9 1c 1b 1b 1a 3b 7b 8 9 9 10 7c 12 ...

Page 153: ... 3a 3b 3c 118 9715 00 1 1 1 Carousel latch kit Carousel latch lever Carousel latch spring Carousel latch assembly 4 118 9737 00 1 Left lower cover 5 118 9739 00 1 Front LCD panel 6 118 9734 00 1 Top cover and stopper 7 7a 7b 7c 118 9716 00 118 9864 00 1 1 1 Rear cover assembly kit Toner Filter Rear cover Access cover 8 118 9738 00 1 Right cover with shield 9 118 9884 00 1 Front lower cover 10 118 ...

Page 154: ...140 Phaser 780 Color Printer Paper feeder FRUs Z780 5 120 10 8 5 7 9b 9c 9d 9a 9e 4 3 2 10 1 6a 6b 7 6c 6d 6e 6f 6g ...

Page 155: ... 00 2 Paper pick rollers 6 6a 6b 6c 6d 6e 6f 118 9718 00 1 1 1 1 1 1 1 Turn roller assembly kit Turn gear pin Turn arm spring Turn rear bearing Turn assembly Turn gear Turn roller shaft Turn front bearing 7 118 9983 00 1 Feed roller bearing 8 118 9745 00 1 Turn chute 9 9a 9b 9c 9d 9e 118 9719 00 1 1 1 1 1 Paper empty sensor assembly kit Empty sensor harness Empty sensor Sensor actuator Sensor brac...

Page 156: ...142 Phaser 780 Color Printer Multi purpose tray cover FRUs 780 5 121 3 1 4 2 5 ...

Page 157: ...fective Discont d Qty Name and description 1 118 9748 00 1 Multi purpose tray left front cover 2 118 9749 00 1 Multi purpose tray right rear cover 3 118 9751 00 1 Multi purpose tray extender 4 118 9750 00 1 Multi purpose tray holder 5 118 9720 00 1 Multi purpose tray assembly items 1 thru 4 ...

Page 158: ...144 Phaser 780 Color Printer Multi purpose tray FRUs 1 4 2 3 7 6 5 8 9 780 5 122 11 12 13 10 ...

Page 159: ... 9827 00 1 Multi purpose tray paper sensor 5 118 9756 00 1 Multi purpose tray pick up cam gear 6 118 9757 00 1 Multi purpose tray cam gear spring 7 118 9758 00 1 Multi purpose tray pick up gear 8 118 5759 00 1 Multi purpose tray pick up spring 9 118 5760 00 1 Multi purpose tray pick up solenoid 10 118 9755 00 2 Multi purpose pick roller kit 11 118 9752 00 1 Multi purpose tray long paper sensor 12 ...

Page 160: ...146 Phaser 780 Color Printer Paper feeder cover FRUs 780 5 123 1 2 3 ...

Page 161: ...able 5 Paper feeder cover FRUs Parts Part number Serial number Effective Discont d Qty Name and description 1 118 9766 00 1 Paper feeder turn chute 2 118 9765 00 1 Paper feeder cover 3 118 9865 00 1 paper feeder assembly ...

Page 162: ...148 Phaser 780 Color Printer Paper feeder FRUs 1 2 3 5 4a 4b 6 7 780 5 124 ...

Page 163: ...1 118 9771 00 1 Registration rubber roller 2 118 9768 00 1 Feeder pre registration roller 3 118 9770 00 1 Registration clutch 4 4a 4b 118 9721 00 1 Registration spring kit Rear spring black Front spring silver 5 118 9769 00 1 Pre registration clutch 6 118 9767 00 1 Pre registration knob 7 118 9752 00 1 Registration sensor ...

Page 164: ...150 Phaser 780 Color Printer Imaging FRUs 1 2 3 4 5 6 7 780 5 125 ...

Page 165: ...on 1 118 9774 00 1 Laser unit 2 118 9778 00 1 Erase lamp 3 118 9777 00 1 Auto density calibration sensor assembly 4 118 9722 00 1 Bias charge roller connector kit with wiring harness 5 118 9779 00 1 Waste cartridge full sensor 6 118 9780 00 1 Waste cartridge installed sensor 7 118 9781 00 1 Imaging unit connector ...

Page 166: ...152 Phaser 780 Color Printer Developer FRUs 780 5 126 1 1 1 2 2 2 3 3 3 4 4 4 ...

Page 167: ... number Effective Discont d Qty Name and description 1 118 9782 00 1 Developer assembly Black 2 118 9783 00 1 Developer assembly Cyan 3 118 9784 00 1 Developer assembly Magenta 4 118 9785 00 1 Developer assembly Yellow 116 0073 00 Developer shim kit 1 each of 4 sizes ...

Page 168: ...154 Phaser 780 Color Printer Carousel FRUs 4c 4d 5 4b 4a 3 2 1 780 5 127 6 ...

Page 169: ...9787 00 1 Toner cartridge presence sensor 2 118 9724 00 1 Developer contact assembly 3 118 9820 00 1 Carousel knob 4 4a 4b 4c 4d 118 9723 00 1 1 1 1 Carousel assembly kit Carousel knob Carousel front bearing Carousel frame Carousel rear bearing 5 118 9788 00 1 New toner cartridge sensor 6 118 9786 00 1 Carousel home sensor ...

Page 170: ...156 Phaser 780 Color Printer Accumulator belt assembly FRUs 5 8d 2b 3 2a 1 6 7 8a 8b 8c 780 5 128 ...

Page 171: ...eaner support assembly Belt cleaner 3 118 9791 00 1 Second bias transfer roller cam assembly 5 118 9789 00 1 Accumulator belt assembly 6 118 9793 00 1 Waste auger assembly 7 118 9792 00 1 Transfer roller cam solenoid 8 8a 8b 8c 8d 118 9725 00 1 1 1 1 Second bias transfer roller assembly kit Second bias transfer bracket Second bias transfer bearing 6 Second bias transfer bearing 4 Second bias rolle...

Page 172: ...158 Phaser 780 Color Printer Fuser assembly FRUs 1 2 3 780 5 129 4 ...

Page 173: ...r Serial number Effective Discont d Qty Name and description 1 118 9886 01 118 9887 01 1 1 Fuser 110 VAC Fuser 220 VAC 2 016 1866 00 1 Fuser roll cartridge 3 118 9986 00 1 Fuser tray release lever 4 118 9727 00 118 9728 00 1 Fuser assembly 110V Fuser assembly 220V ...

Page 174: ...160 Phaser 780 Color Printer Paper exit FRUs 780 5 130 1 2 3 3 3 3 3 ...

Page 175: ...e 161 Table 12 Paper exit FRUs Parts Part number Serial number Effective Discont d Qty Name and description 1 118 9798 00 1 Lower exit assembly 2 118 9799 00 1 Upper exit assembly 3 118 9800 00 1 Exit tray assembly ...

Page 176: ...162 Phaser 780 Color Printer Paper exit FRUs 780 5 131 1c 1c 1f 1b 1a 1a 1a 1a 1a 1a 1a 1a 1d 1e 1b 1e 1b 2 5 4 3 ...

Page 177: ... and description 1 1a 1b 1c 1d 1e 1f 118 9729 00 1 Exit upper roller kit Exit idler gear Exit spur gear Exit rear bearing Exit 3 roller Exit front bearing Exit 2 roller 2 118 9802 00 1 Exit door switch 3 118 9801 00 1 Media exit sensor with flag 4 118 9803 00 1 Fuser fan 5 116 0050 00 1 Full stack sensor ...

Page 178: ...164 Phaser 780 Color Printer Drive FRUs 780 5 132 1 2 3 4 6 5 9 8 7a 7d 7c 7c 7b ...

Page 179: ...cess drive assembly 3 Process motor part of process drive assembly 4 118 9809 00 1 Carousel motor board 5 118 9810 00 1 Toner developer dispense motor 6 118 9811 00 1 Developer clutch 7 7a 7b 7c 7d 118 9730 00 Paper feed motor assembly kit Paper feed motor support Paper feed motor Harness clamp Paper feed bracket 8 118 9805 00 Fuser drive assembly 9 118 9808 00 Carousel motor ...

Page 180: ...166 Phaser 780 Color Printer Electronic rear FRUs 780 5 133 3 1 4 2a 2b 5 A 6 A Part of Carousel FRU Part 2 Part of Imaging FRU Part 4 ...

Page 181: ...ion 1 118 9873 00 1 High voltage power supply board 2 2a 2b 118 9731 00 1 1 Developer fan kit Developer fan Developer fan duct 3 118 9816 00 1 Top cover switch 4 118 9817 00 1 Fuser connector Main 5 119 5871 00 119 5872 00 1 1 Low voltage power supply 110 VAC Low voltage power supply 220 VAC 6 118 9819 00 Main harness DC ...

Page 182: ...168 Phaser 780 Color Printer Electronics front FRUs 780 5 134 2 4 5 6 3 8 9 7 1 10 ...

Page 183: ...ont cover switch right 2 118 9821 00 1 Front cover switch left 3 118 9815 00 1 Exit connector 8 4 118 9814 00 1 Exit connector 4 5 118 9824 00 1 Video harness 6 118 9825 00 1 Laser unit harness 7 118 9796 00 1 Engine control board 8 118 9823 00 1 Paper feeder harness 9 118 9863 00 1 Environmental sensor 10 163 1283 00 1 Print engine NVRAM chip ...

Page 184: ...170 Phaser 780 Color Printer Image processor FRUs 780 5 135 1 2 3 6 5 4 7 8 9 12 10 11 ...

Page 185: ...688 00 671 4686 00 1 1 1 1 Font ROM SIMM Kanji Font ROM SIMM Simplified Chinese Font ROM SIMM Traditional Chinese Font ROM SIMM Korean 6 671 4672 51 671 4673 51 PostScript Code SIMM Base v2 86 PostScript Code SIMM Graphics and Plus v2 86 7 671 4306 50 SCSI riser board 8 671 3994 00 671 3932 00 671 4034 00 386 6998 00 213 1090 00 1 1 1 1 2 Ethernet 100baseT Network card TokenRing card LocalTalk car...

Page 186: ...172 Phaser 780 Color Printer Optional lower feeder cabinet FRUs 780 5 136 7 8 8 8 8 1 1 2 3 4 5 6 6 ...

Page 187: ...iption 1 118 9923 00 1 Lower feeder front cover 2 118 9926 00 1 Lower feeder left cover 3 118 9924 00 1 Lower feeder rear cover 4 118 9925 00 1 Lower feeder harness cover 5 118 9928 00 1 Lower feeder chute assembly 6 118 9929 00 1 Lower feeder chute support 7 118 9927 00 1 Lower feeder right cover 8 118 9930 00 1 Lower feeder caster ...

Page 188: ...174 Phaser 780 Color Printer Optional Feeder FRUs 1 7 A B C 7 7 2 4 5 3 1 1 C B A D D 780 5 137 8 8 6 9 10 Items 1 thru 9 ...

Page 189: ...934 00 1 Lower feeder gear assembly 3 118 9933 00 1 Lower feeder motor 4 118 9936 00 1 Lower feeder interface harness 5 118 9935 00 1 Lower feeder circuit board 6 118 9747 00 Lower feeder paper size sensor 7 118 9932 00 1 Lower feeder turn in chute 8 118 9985 00 1 Tray spacer 9 118 9802 00 1 Lower feeder chute switch 10 436 0367 00 1 Lower tray assembly optional feeder ...

Page 190: ...100 50 Sheets 016 1699 00 Plain Paper 24 b 500 Sheets 016 1700 00 Plain Paper 24 a3 500 Sheets 016 1701 00 Transparency A 50 Sheets 016 1702 00 Transparency A4 50 Sheets 016 1703 00 Paper Image Transfer B 100 Sheets 016 1704 00 Paper Glossy A 100 100 Sheets 016 1705 00 Paper Glossy A4 100 100 Sheets 016 1706 00 Transparency Tab Extra 50 Sheets 016 1709 00 Paper Tab Plus 24 500 Sheets 016 1718 00 P...

Page 191: ...e Setup Guide German 063 3116 40 Phasershare Setup Guide Spanish 063 3126 00 CD Adobe Type Manager 063 3181 00 CD Phaser Match Color Match 070 9925 00 Advanced Features Troubleshooting English 161 0066 00 Power Cord 115v 161 0066 09 Power Cord 220v 161 0066 10 Power Cord U K 161 0066 11 Power Cord Aust 161 0154 00 Power Cord Swiss 161 0240 00 Power Cord Danish 436 0366 00 Universal Size Paper Tray...

Page 192: ...semblies California only 003 1496 00 003 1497 00 Vacuum cleaner 110 115 VAC Vacuum cleaner 220 240 VAC 003 1498 00 Vacuum cleaner filter Type 2 3M 004 4845 00 Shipping Box 003 0602 00 1 Pozidrive screwdriver tip 006 7971 00 Imaging unit lightshield Table 20 Supplies and accessories Parts Part number Serial number Effective Discont d Qty Name and description ...

Page 193: ...vice Print 1 Black Cyan Magenta Yellow 3 Replace Magenta Toner Cartridge Press i for information Help Pages Consumable Pages Print Help Pages Service Print 1 Print Toner Black Magenta Cyan Yellow Your average coverage page 20 0 Fuser Roll Imaging Unit Count Pages 1061 Count Pages 1061 S N 00 00 00 00 00 00 Avg toner coverage color 20 Date installed 11 1 98 0 50 100 10 Life Remaining 0 50 100 10 Li...

Page 194: ...esolutions The thin lines should be fully separated from each other 6 Text The text should be sharp with no discernible voids Interpreting Service Print 3 Service print 3 should always be printed on B size paper 1 Skew The difference between the values measured at each corner of the leading edge of the print should be no greater than 2 mm 2 Leading edge The value measure from the leading edge to t...

Page 195: ...r to the topic Repetitive mark appears on each print on page 56 It discusses caused of repeating spots based on the distance between the spots Interpreting Sevice Print 5 Yellow Calibration Page Service print 5 is a 100 yellow solid fill Refer to the topic Printing and print quality problems on page 43 for solution to any print problems detected Look for voids repeating spots and banding This soli...

Page 196: ...cted Look for voids repeating spots and banding This solid fill is also useful for flushing out defective magenta toner Interpreting Sevice Print 7 Cyan Calibration Page Service print 7 is a 100 cyan solid fill Refer to the topic Printing and print quality problems on page 43 for solution to any print problems detected Look for voids repeating spots and banding This solid fill is also useful for f...

Page 197: ...uality problems on page 43 for solution to any print problems detected Look for voids repeating spots and banding This solid fill is also useful for flushing out defective black toner Service Print 9 Fuser Cleaning Page Service print 9 is a blank sheet of paper used to clean the fuser rollers as well as test the operation of the paper feed components ...

Page 198: ...184 Phaser 780 Color Printer ...

Page 199: ...17 J19 J35 J32 J33 J21 J12 J19 J20 J19 J20 J105 J102 J103 J107 J101 J106 J104 J70 J97 J191 J192 J193 J194 J195 J196 J19 J197 J13 J122 J14 J121 J123 J124 J17 J81 J86 J18 J116 J88 J83 J16 J22 J84 J85 J20 J93 J98 J99 J95 J91 J94 J94 J90 J204 J92 J20 J205 J206 J203 J113 J201 J202 J165 J161 J17 J166 J167 J163 J111 J19 J16 J42 J41 J17 J87 J161 J89 J168 J58 J19 J56 J82 J18 J55 J16 J245 J246 J247 J19 J63 ...

Page 200: ...r P J88 Toner Box Sensor P J83 19 Map 2 F203 Engine control board Fuser Assembly P J71 20 Map 2 F204 Engine control board Paper feeder P J91 21 Map 2 F204 Engine control board Low voltage power supply P J32 22 Map 2 C204 Communications Assembly Engine control board P J18 22A Map 2 C204 P J22 Engine control board P J16 32 Map 6 D609 Low voltage power supply Engine control board P J21 33 Map 6 D610 ...

Page 201: ...2 Cleaner Cam Solenoid Fuser Tray Assembly P J71 62A Map 8 E812 Cleaner Cam Solenoid P J62 Fuser Tray Assembly P J71 63 Map 7 C710 BTR Cam Solenoid Engine control board P J19 63A Map 7 C710 P J63 Engine control board P J19 68 Map 6 B610 Optional high capacity feeder 68A Map 6 B610 P J68 Option high capacity feeder 69A Map 8 H813 Option high capacity feeder 69B Map 8 H813 Option high capacity feede...

Page 202: ... 80 Map 8 D813 Fuser chute fan Fuser tray assembly P J80A 80A Map 8 D813 P J80 Fuser tray assembly P J71 81 Map 1 C110 Auto density calibration sensor assembly P J81A 81A Map 1 C110 P J81 Engine control board P J17 82 Map 6 G608 Developer Fan P J82A 82A Map 6 G608 P J82A Engine control board P J17 83 Map 1 G106 Toner box sensor P J83A 83A Map 1 G106 P J83 P J116 84 Map 1 I107 CRUM assembly P J85 P...

Page 203: ... P J95A 95A Map 4 G408 P J95 Paper feeder P J110B P J115 97 Map 2 F204 Paper feeder P J 91 Front cover switch R P J191 P J70 98 Map 4 D409 Front OHP sensor Paper feeder P J91 99 Map 4 E408 Rear OHP sensor Paper feeder P J91 101 Map 2 D212 Tray no paper sensor P J107 P J101A 101A Map 2 D212 P J101 Engine control board P J20 102 Map 7 D711 Size Switch assembly Engine control board P J19 103A Map 2 F...

Page 204: ... Multi purpose tray clutch P J202A P J202B Pick up solenoid P J201A P J202B 115 Map 4 H408 P J94A P J95A Terminated 116 Map 1 H106 P J83A Waste toner sensor P J88 P J116A 116A Map 1 H106 P J116 Engine control board P J18 117 Map 5 D507 Fuser In Sensor P J76 121 Map 5 D507 Laser diode assembly Engine control board P J14 P J196 122 Map 5 D506 Laser diode assembly Engine control board P J13 123 Map 5...

Page 205: ... 1 E109 Right front cover switch P J195 195 Map 6 H607 Top cover switch P J195A 195A Map 6 H607 P J195 P J194 P J196 196 Map 2 F203 Laser diode assembly P J121 P J195 Low voltage power supply P J33 197 Map 5 H506 Left front cover switch P J197A 197A Map 5 H506 P J197 Engine control board P J19 201A Map 4 I408 P J201B Multi purpose tray assembly P J113B 201B Map 4 I408 Pick up solenoid P J201A 202A...

Page 206: ... C F423 Map 5 D511 DTS Plate High voltage power supply P J G F791 Map 8 F807 Pressure roller heat rod Heat roller heat rod A Map 6 B606 High voltage power supply P J F421 C Map 6 C607 High voltage power supply P J F422 D Map 6 B609 High voltage power supply First bias transfer roller bias plate F Map 6 B608 High voltage power supply Second bias transfer roller contact plate G Map 6 B608 High volta...

Page 207: ...t wiring dressing can result in wires pinched by cabinet panels or damaged by moving parts of the printer Map 1 Wiring routing at the top and front of the printer 88 F422 81 81A 192 194 193 191 84 84A 85 86 86A 83 83A 116 116A 3041 10 101 102 103 104 105 106 107 108 109 110 111 112 113 114 115 A B C D E F G H I J K L ...

Page 208: ... Wire routing around the engine control board 3041 11 201 202 203 204 205 206 207 208 209 210 211 212 213 214 215 A B C D E F G H I J K L 14 16 17 18 20 21 11 105 105A 103 103A 106 106A 101 101A 104 104A 13 12 10 91 107 97 196 19 22 22A ...

Page 209: ...Service Guide 19 Map 3 Wiring routing around the image processor board 3041 12 301 302 303 304 305 306 307 308 309 310 311 312 313 314 315 A B C D E F G H I J K L 317 310 310 ...

Page 210: ...ng routing around the paper feeder 98 99 207 203 206 205 109 109A 113A 113B 92A 92B 90A 90B 202A 202B 201A 201B 93 115 204 95 95A 94 94A 110A 110B 91 3041 13 401 402 403 404 405 406 407 408 409 410 411 412 413 414 415 A B C D E F G H I J K L ...

Page 211: ...19 Map 5 Wire routing around the laser scanner and high voltage power supply 197 197A F421 124 122 121 123 87 F423 T4 T3 57 3041 14 501 502 503 504 505 506 507 508 509 510 511 512 513 514 515 A B C D E F G H I J K L ...

Page 212: ...e routing at the rear of the printer 3041 15 601 602 603 604 605 606 607 608 609 610 611 612 613 614 615 A B C D E F G H I J K L 42 D F G A C 51 52 247 246 245 195 195A 82 82A 103A 68 68A 132 132A 131 131A 41 33 32 35 CN4 49 CN1 CN3 50 CN2 ...

Page 213: ...ervice Guide 19 Map 7 Wire routing around the power supply 3041 16 701 702 703 704 705 706 707 708 709 710 711 712 713 714 715 63 63A 102 35 70 71 71A 56 56A A B C D E F G H I J K L 55 58 161A 163A 111A ...

Page 214: ...around the fuser 111A 111B T1 62 62A 80 80A 79 72A 72B 76 76A 69A 69B 78A 78B 74 74A 73 73A 77 77A 71 F791 75 T2 T5 117 168 165 166 89 89A 161A 161B 163A 163B 3041 17 801 802 803 804 805 806 807 808 809 810 811 812 813 814 815 A B C D E F G H I J K L ...

Page 215: ...Service Guide 20 Wiring 1 Low voltage power supply laser unit and interlock switches 3041 19 ENGINE CONTROL BOARD LOW VOLTAGE POWER SUPPLY PAPER FEEDER LASER UNIT 13 14 15 ...

Page 216: ...202 Phaser 780 Color Printer Wiring 2 Engine control board auto density calibration sensor erase lamp waste toner sensor 3041 20 ...

Page 217: ...nts 3041 21 ENGINE CONTROL BOARD HIGH VOLTAGE POWER SUPPLY 7 6 BIAS CHARGE ROLLER CONNECTOR ASSY FIRST BIAS TRANSFER ROLLER BIAS PLATE FIRST BIAS TRANSFER ROLLER ACCUMULATOR BELT ASSY LOW VOLTAGE POWER SUPPLY DEVELOPER ASSY SECOND BIAS TRANSFER ROLLER ASSY SECOND BIAS TRANSFER ROLLER 2ND BIAS TRANSFER ROLLER CAM ASSY ...

Page 218: ...ntrol board used cartridge sensor cartridge sensor carousel sensor developer clutch developer fan toner dispense motor 3041 22 ENGINE CONTROL BOARD CAROUSEL SENSOR TONER DISPENSE MOTOR ASSY TONER DISPENSE MOTOR ON L 24VDC CAROUSEL HOME SENSED H 5VDC ...

Page 219: ...trol board low voltage power supply carousel motor board rotary motor 3041 23 ENGINE CONTROL BOARD CAROUSEL MOTOR BOARD CAROUSEL MOTOR ASSY LOW VOLTAGE POWER SUPPLY CAROUSEL MOTOR HOLD L 5VDC CAROUSEL MOTOR ON L 5VDC CAROUSEL MOTOR CLOCK ...

Page 220: ...ontrol board low voltage power supply bias transfer roller cam solenoid accumulator belt sensor paper feeder motor process motor 3041 24 ENGINE CONTROL BOARD BIAS TRANSFER ROLLER CAM SOLENOID ACCUMULATOR SENSOR PAPER FEEDER LOW VOLTAGE POWER SUPPLY ...

Page 221: ...Service Guide 20 Wiring 7 Engine control board low voltage power supply fuser oil roll assembly 3041 25 LOW VOLTAGE POWER SUPPLY PRESSURE ROLLER HEAT ROLLER ENGINE CONTROL BOARD ...

Page 222: ...208 Phaser 780 Color Printer Wiring 8 Engine control board fuser assembly environment sensor 3041 26 ENGINE CONTROL BOARD ...

Page 223: ...Service Guide 20 Wiring 9 Engine control board paper size switch board feed solenoid no paper sensor low paper sensor 3041 27 ENGINE CONTROL BOARD PAPER SIZE SWITCH ASSY ...

Page 224: ...210 Phaser 780 Color Printer Wiring 10 Engine control board paper feeder 3041 28 ENGINE CONTROL BOARD PAPER FEEDER FRONT TRANSPARENCY SENSOR REAR TRANSPARENCY SENSOR ...

Page 225: ...SE TRAY OHP SENSOR MULTI PURPOSE TRAY LONG N P SENSOR MULTI PURPOSE TRAY SHORT N P SENSOR MULTI PURPOSE TRAY CLUTCH MULTI PURPOSE TRAY PICK UP SOLENOID PAPER FEEDER MULTI PURPOSE TRAY EDGE PAPER SENSED L 5VDC MULTI PURPOSE TRAY OHP SENSED L 5VDC MULTI PURPOSE TRAY LONG PAPER SENSED L 5VDC MULTI PURPOSE TRAY SHORT PAPER SENSED L 5VDC MULTI PURPOSE TRAY CLUTCH ON L 24VDC ...

Page 226: ...212 Phaser 780 Color Printer Wiring 12 Engine control board top exit sensor media exit switch full stack sensor fuser fan 3041 30 ENGINE CONTROL BOARD MEDIA EXIT SWITCH ON L 5VDC ...

Page 227: ...Service Guide 21 Wiring 13 Engine control board image processor board front panel image processor fan 3041 31 ENGINE CONTROL BOARD IMAGE PROCESSOR BOARD IMAGE PROCESSOR FAN FRONT PANEL ...

Page 228: ...214 Phaser 780 Color Printer Wiring 14 LowerTray Assembly master wiring diagram 3041 59 BOARD 2 BOARD 1 BOARD 4 BOARD 3 ...

Page 229: ...Service Guide 21 Wiring 15 Engine control board and low voltage power supply to LowerTray Assembly feeder board 3041 60 ...

Page 230: ...216 Phaser 780 Color Printer Wiring 16 LowerTray Assembly feeder board to feeder chute switch size switches and feeder motor 3041 61 ...

Page 231: ...Service Guide 21 Wiring 17 LowerTray Assembly feeder board to no paper sensors and low paper sensors 3041 62 ...

Page 232: ...218 Phaser 780 Color Printer Wiring 18 LowerTray Assembly feeder board to feed solenoids and turn chutes 3041 63 ...

Page 233: ...Service Guide 21 ...

Page 234: ...220 Phaser 780 Color Printer ...

Reviews: