background image

Step Five

Testing the wiring

Caution

• These tests are to be performed using standard testing practices and

procedures and should only be carried out by properly trained and
experienced persons.

• Before applying power to the control for testing, each terminal plug must be

unplugged from its header on the control. Pull straight down to unplug.

• A good quality electrical test meter, capable of reading from at least

0 — 200 Volts AC, and at least 0 — 1,000,000 Ohms, is essential to properly
test this control.

Test the sensors

• These tests must be made 

before turning on the power supply, and with the

terminals unplugged.

• The sensors are to be tested according to the instructions in Brochure D 001.

Test the power supply

Make sure exposed wiring or bare terminals are not in contact with any other wires or grounded surfaces. Turn on the power to the
transformer and use an AC voltmeter to measure the voltage between terminals 

Power C — R (1 and 2).  22 to 26 Volts AC should be

measured at these terminals.

Test the powered inputs

If an external Heat Demand or Setpoint Demand signal is used, power up the Heat or Setpoint Demand circuit and supply a Demand
signal to the control. Use an AC voltmeter to measure the voltage between terminals 

Heat Dem (5 and 6). 22 to 26 Volts AC should be

measured at these terminals.

If a system pump circuit is connected to the 

System Pmp  (3 and 4) terminals;  make sure power to the circuit is off and install a jumper

in the terminal plug between terminals (3 and 4). When the circuit is powered-up, the pump should operate. If it does not come on,
check the circuit wiring for errors and ensure that it is powered up and the voltage is correct. Check the devices in the circuit (pump,
switching relay, etc.) for faults. If the pump operates properly when the circuit is powered up, disconnect the power, remove the jumper
and proceed to the next step.

If a combustion air damper circuit is connected to the 

Comb. Air  (7 and 8) terminals;  make sure power to the circuit is off and install

a jumper in the terminal plug between terminals (7 and 8). When the circuit is powered-up, the combustion air damper should operate.
If it does not come on, check the circuit wiring for errors and ensure that it is powered up and the voltage is correct. Check the devices
in the circuit (damper motor, switching relay, etc.) for faults. If the damper operates properly when the circuit is powered up, disconnect
the power, remove the jumper and proceed to the next step.

Make sure power to the Stage 1 boiler circuit is off and install a jumper in the terminal plug between the 

Stage 1 (9 and 10) terminals.

When the circuit is powered-up, the boiler should operate. If it does not come on, check the circuit wiring for errors and ensure that
it is powered up and the voltage is correct. Check the devices in the circuit (limits, flow switches, etc.) for faults. If the boiler operates
properly when the circuit is powered up, disconnect the power, remove the jumper and check the remaining stages in the same way.
If all stages operate correctly, proceed to the next step.

9

Connect the control

Turn the power off and make sure all test jumpers have been removed from
the plugs.

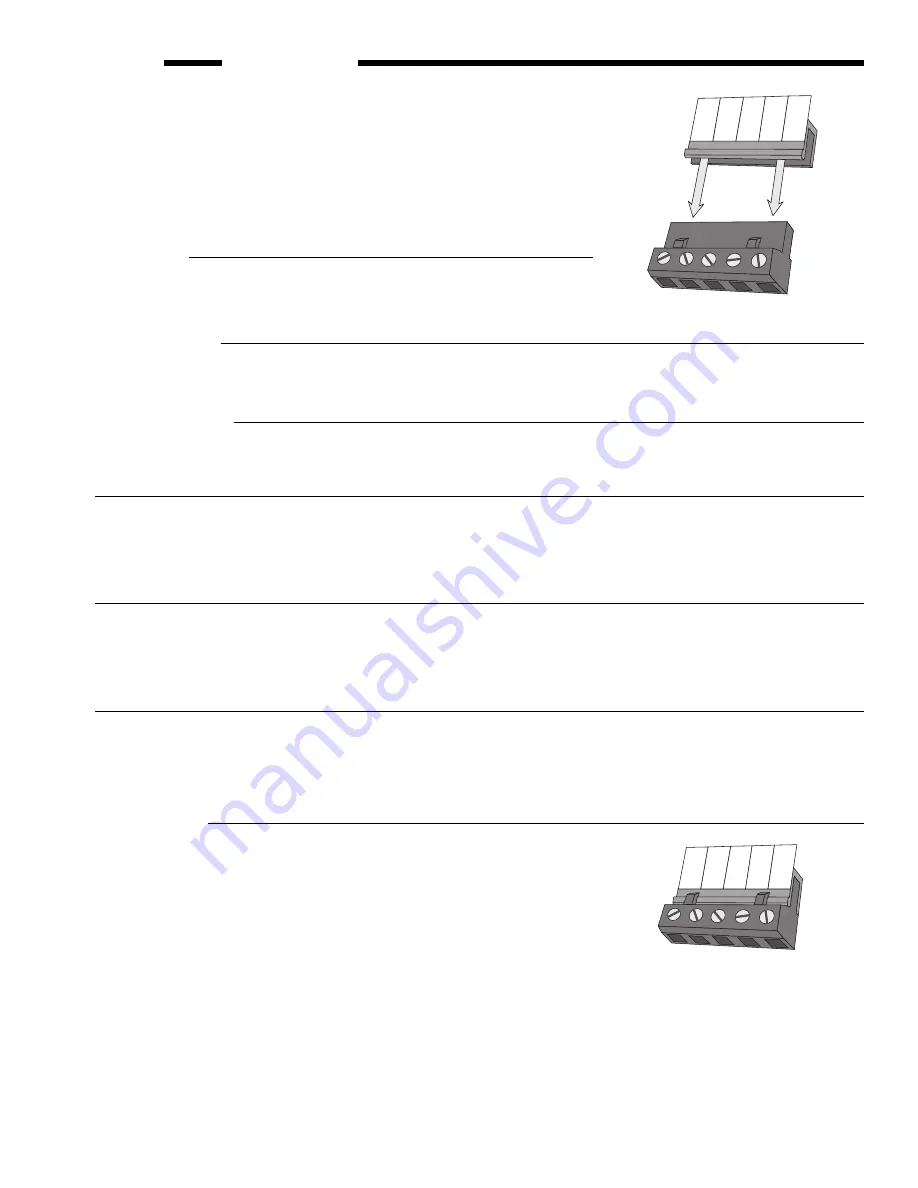
Connect the plugs to the control by carefully aligning them with their respective headers
and pushing them upwards into the headers. The plugs should snap firmly into place.

The control wiring is now complete and has been tested. The control is ready for set-up
and operation.

Terminal plug pushed into

its header on the control

26

28

27

29 30

Com

Sen

UnO

Sw

Out

Sen

10K

Zone

Sup

Sen

Terminal plug disconnected

from its header on the control

26

28

27

29 30

Com
Sen

UnO

Sw

Out

Sen

10K

Zone

Sup

Sen

Caution

The tekmar Eight Stage Boiler Control 258 is an operating control and is not certified or intended for
use as a safety device. 

Under no circumstances should safety limit devices be left disconnected after

installation of this control. The installer shall check all applicable code requirements and obtain
necessary inspections to ensure that the installation is in compliance with those requirements.
This Control operates remote devices such as pumps and combustion air dampers as well as the
boilers, and these devices may be started by the control at any time. Installers must install approved
electrical disconnects at these locations to allow these devices to be serviced safely.

Summary of Contents for Eight Stage Boiler Control 258

Page 1: ...mand Minimum WWSD Pump Stage 1 Stage 2 Comb air Stage 3 Stage 6 Stage 5 Stage 8 Stage 7 Stage 4 Menu Item Override Setpoint Actual Supply Target Supply S PRGM TEMP F C TIME USE AMPM UNOCC OVR M T W T...

Page 2: ...ugh water to keep the room temperature warm particularly during the colder weather If the Heating Curve selected is too high the supply water will be too hot for the conditions and the building will o...

Page 3: ...ntrol The effect of the Integral function can also be easily viewed by not allowing a rise in supply temperature when the control asks for more heat The displayed target temperature will show a slow b...

Page 4: ...allow Heating Curve operation System pump light on the system pump relay is on closing the contacts between terminals System Pmp 3 4 Comb air light on the combustion air relay is on closing the contac...

Page 5: ...e Occupied room temperature setting the control enters WWSD When switched into Unoccupied mode the UNOCC display element will replace the OCC display element and the control will switch from operating...

Page 6: ...e Stage and Comb air lights will be shut off with the boilers and combustion air damper The control will continue to cycle the boilers and combustion air damper to maintain the supply at the target te...

Page 7: ...lighter guage wire is too fragile and may also contribute too much resistance to the circuit Power should not be applied to any of the wires during this rough in wiring stage Step Four Electrical con...

Page 8: ...nals Heat Dem 5 and 6 When 24Vac is applied to these terminals the control will recognize a call for heat from the system DIP switch must be set to Reset If a 24Vac Setpoint Demand signal is used aqua...

Page 9: ...powered up the combustion air damper should operate If it does not come on check the circuit wiring for errors and ensure that it is powered up and the voltage is correct Check the devices in the cir...

Page 10: ...e Heating Curve use the following formula Outdoor air temperature Supply water temperature 50 10 30 1 10 12 10 F 23 C 110 43 70 21 70 21 90 32 210 99 170 77 150 65 130 54 190 88 3 6 3 0 2 4 2 0 1 6 0...

Page 11: ...w Domestic Hot Water boilers to be switched over to assist the heating boilers during peak load times Int timer switch The 258 control has an internal timer programmed using the LCD display and keypad...

Page 12: ...tback and delivering cold water to the boilers increased load Typically this will cause many or all of the boilers to be staged on with minimum delay which is the correct control action for the situat...

Page 13: ...ustion air damper will remain open After the 5 minutes the control will automatically exit the test routine and enter the normal operating mode If there is no Heat Demand the control will not allow a...

Page 14: ...ply temperatures and the LED system status lights display the operation of the various system components A competent troubleshooter can locate system faults without having to go any further than obser...

Page 15: ...tual Supply Target Supply F S TEMP OCC S M W T F T Auto Stage 1 2 3 4 5 6 7 8 Perm Demand Ext timer Fixed last Int timer Lo Hi fire Fixed lead Rotate Off 1 2 3 4 5 6 7 8 9 External Demand Off 1 2 3 4...

Page 16: ...ress or to change the day pointer PROGRAM MENU VIEWING Must be set to Int timer Auto 1 2 3 4 5 6 7 8 Perm Demand Ext timer Int timer Off 1 2 3 4 5 6 7 8 9 External Demand Off 1 2 3 4 5 6 Stpnt Reset P...

Page 17: ...button when the control is showing a fixed display Setpoint Actual Supply Target Supply F S TEMP S M W T F T OVR UNOCC Which mode is selected See page 3 Menu Item Override Menu Item Override Menu Item...

Page 18: ...nOcc 1 5 00 pm Occ 2 10 30 pm UnOcc 2 Friday 6 00 am Occ 1 8 30 am UnOcc 1 5 00 pm Occ 2 11 30 pm UnOcc 2 Saturday 8 00 am Occ 1 11 30 pm UnOcc 1 Null Occ 2 Null UnOcc 2 Schedule P 5 Day Time Temperat...

Page 19: ...when powered down for up to 10 years Battery backup Maintains clock operation for 24hrs when powered down Dial Switch Settings Heating Curve 0 4 to 3 6 Minimum Off 80 to 170 F Off 27 to 77 C Boiler D...

Page 20: ...antability and fitness for a particular purpose shall not extend beyond 24 months from the date of invoice or 12 months from the date of installation of the product whichever occurs first Replacements...

Reviews: