


Hardware Installation Procedure
2-33
Eq
uip
m
ent Insta
lla
tio
n
2
0
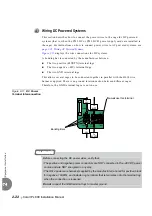
The power supply is inserted only after the system has been completely grounded and
the jumpers configured. Verify that the cage is grounded and that the configuration
jumpers have been adjusted before performing the procedure described in this section.
For more information, see
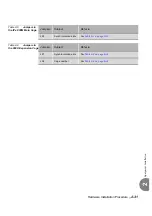
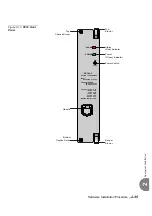
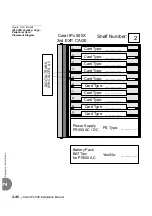
The power supplies used in the Coral IPx
800
consist of an AC powered
(PS19 AC) or a –48VDC powered (PS19 DC or DC-D) power supply unit.
The PS19 is installed in the extreme left slot of the peripheral card cage.
See
through
See
for further details on the PS19 power supply units.
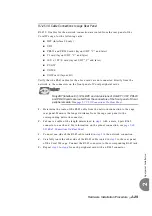
1.
Connect the static dissipating wrist strap connector to the cage and wear the strap.
2.
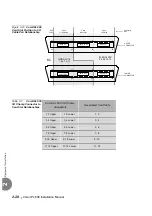
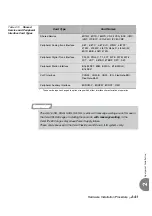
The power supply includes a ring generator that is required for single-line
telephone (8SLS, 16SLS, 24SLS cards) or magneto telephone (8SM
card)
station circuits. Either 20Hz or 25Hz ringing frequency can be supplied, by
configuring jumper located on the power supply card. Verify that the jumper is
configured according to local requirements. The procedure is as follows:
for PS19 DC
for PS19 DC-D
for PS19 AC
9
Installing the Power Supply Card
Coral power supply units (PS19 AC, PS19 DC and PS19 DC-D) are heavy.
Handle with care and do not drop.
Coral power supply circuit cards contain static-sensitive circuitry that could be damaged
or destroyed by electro-static discharge (ESD).
Always wear the static dissipating wrist strap connected to the cage while handling the
circuit cards. See
Hold circuit cards by their edges to avoid touching contact surfaces.
Summary of Contents for Coral IPx 500X
Page 2: ......
Page 4: ......
Page 10: ...vi...
Page 16: ......
Page 22: ......
Page 28: ......
Page 32: ...1 4 Coral IPx 800 Installation Manual Document Description 1 NOTES...
Page 34: ...1 6 Coral IPx 800 Installation Manual Special Symbols Used in this Document 1 NOTES...
Page 40: ......
Page 48: ...2 8 Coral IPx 800 Installation Manual Site Inspection 2 NOTES...
Page 90: ......
Page 116: ...3 26 Coral IPx 800 Installation Manual Shared Service and Peripheral Card Test 3 NOTES...
Page 118: ...3 28 Coral IPx 800 Installation Manual Installation Wrap up 3 NOTES...
Page 120: ......
Page 126: ......
Page 142: ...5 16 Coral IPx 800 Installation Manual Protection Devices 5 NOTES...
Page 150: ...5 24 Coral IPx 800 Installation Manual Terminal Data Communication Ports RS 232E 5 NOTES...
Page 242: ......
Page 278: ...6 38 Coral IPx 800 Installation Manual Cage Description and Installation 6 NOTES...
Page 292: ...6 52 Coral IPx 800 Installation Manual Coral IPx 800X Expansion Cage Description 6 NOTES...
Page 312: ...6 72 Coral IPx 800 Installation Manual System Configuration Options Coral IPx 800 6 NOTES...
Page 314: ......
Page 352: ...7 38 Coral IPx 800 Installation Manual PS19 DC D Power Supply Unit with Duplication 7 NOTES...
Page 368: ......
Page 372: ...8 4 Coral IPx 800 Installation Manual Common Control Cards 8 NOTES...
Page 382: ...8 14 Coral IPx 800 Installation Manual Software Authorization Unit SAU 8 NOTES...
Page 384: ...8 16 Coral IPx 800 Installation Manual MAP 8 NOTES...
Page 386: ...8 18 Coral IPx 800 Installation Manual LIU 8 NOTES...
Page 392: ......
Page 396: ...8 26 Coral IPx 800 Installation Manual HDC Card High Density Control 8 NOTES...
Page 399: ......


