


3-10
Coral IPx 800 Installation Manual
Comm
on Co
ntr
o
l T
est
3
6.
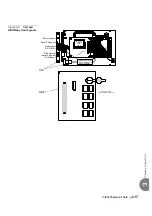
Carefully remove the plastic insulation from under the lithium battery on the
MEX-IP2 card. See
7.
Insert the MEX-IP2 card fully into its card slot.
8.
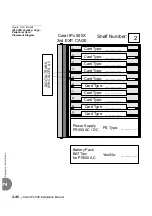
Verify that the serial number on the SAU device matches the serial number on the
IMC8/IMC16 card (except for the last digit).
Contact your Coral manufacturer’s representative if the numbers do not match.
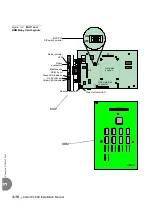
9.
Attach the SAU to the connector on the front panel of the MEX-IP2 just below the
IMC8/IMC16 flash memory card. See
. Use a #2 (1/8 or 4mm)
straight-blade screwdriver to tighten the two screws securing the SAU to the
MEX-IP2 until snug.
10.
Insert the IMC8/IMC16 flash memory card into the drive on the front panel of the
MEX-IP2 just above the SAU device. See
Insert the IMC8/IMC16 card with its data label facing right (that is, the control
cards exterior) so that the data can be read without removing the card.
11.
Verify that the DIP switches on the front panel of the MEX-IP2 are set to the right.
12.
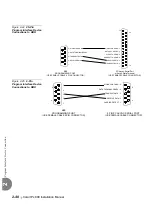
Attach the Program Interface (PI) device cable to the KB0 programming port
connector on the front side of the MEX-IP2 card. Verify that the PI device is
configured to match the data rate, word length, parity, and stop bits of the KB0
port. Default settings for KB0 are 9600 bps, 8 data bit, no parity, and 1 stop bit,
respectively.
13.
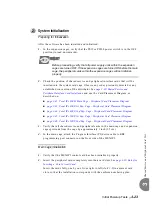
Turn ON the power switch on the PS19 unit of the main cage.
14.
On the front panel of the PS19 unit, verify that the green Power indicator is lit,
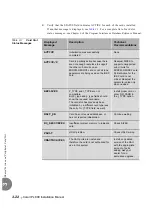
while the red Alarm indicator is not lit. If the red alarm indicator illuminates, see:
page 7-13, Troubleshooting (PS19 DC)
page 7-33, Troubleshooting (PS19 DC-D)
,
page 7-49, Troubleshooting (PS19 AC)
, in Chapter 7.
15.
On the front panel of the MEX-IP2, verify that the decimal point (green LED) in
the numeric display illuminates.
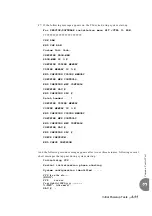
16.
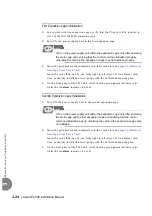
If the following message appears on the PI device and is repeated continuously:
For SERVICE/SOFTWARE installation menu HIT <CTRL I> NOW
*************************
CHK RAM
END CHK RAM
Custom Init Code...
NO CCS VERSION
The line that reads NO CCS VERSION indicates that no generic feature software
was detected in the IMC8/IMC16 card. To load generic feature software into the
IMC8/IMC16 card, follow the procedure in Section 4.1 - Generic Feature Software
Upgrade
Summary of Contents for Coral IPx 500X
Page 2: ......
Page 4: ......
Page 10: ...vi...
Page 16: ......
Page 22: ......
Page 28: ......
Page 32: ...1 4 Coral IPx 800 Installation Manual Document Description 1 NOTES...
Page 34: ...1 6 Coral IPx 800 Installation Manual Special Symbols Used in this Document 1 NOTES...
Page 40: ......
Page 48: ...2 8 Coral IPx 800 Installation Manual Site Inspection 2 NOTES...
Page 90: ......
Page 116: ...3 26 Coral IPx 800 Installation Manual Shared Service and Peripheral Card Test 3 NOTES...
Page 118: ...3 28 Coral IPx 800 Installation Manual Installation Wrap up 3 NOTES...
Page 120: ......
Page 126: ......
Page 142: ...5 16 Coral IPx 800 Installation Manual Protection Devices 5 NOTES...
Page 150: ...5 24 Coral IPx 800 Installation Manual Terminal Data Communication Ports RS 232E 5 NOTES...
Page 242: ......
Page 278: ...6 38 Coral IPx 800 Installation Manual Cage Description and Installation 6 NOTES...
Page 292: ...6 52 Coral IPx 800 Installation Manual Coral IPx 800X Expansion Cage Description 6 NOTES...
Page 312: ...6 72 Coral IPx 800 Installation Manual System Configuration Options Coral IPx 800 6 NOTES...
Page 314: ......
Page 352: ...7 38 Coral IPx 800 Installation Manual PS19 DC D Power Supply Unit with Duplication 7 NOTES...
Page 368: ......
Page 372: ...8 4 Coral IPx 800 Installation Manual Common Control Cards 8 NOTES...
Page 382: ...8 14 Coral IPx 800 Installation Manual Software Authorization Unit SAU 8 NOTES...
Page 384: ...8 16 Coral IPx 800 Installation Manual MAP 8 NOTES...
Page 386: ...8 18 Coral IPx 800 Installation Manual LIU 8 NOTES...
Page 392: ......
Page 396: ...8 26 Coral IPx 800 Installation Manual HDC Card High Density Control 8 NOTES...
Page 399: ......


