background image

4. Select a Destination drive and, if desired, enable the Trim feature which will apply a DCO

on the destination to make it appear exactly as large as the original source drive.

5. If desired, enable read-back verification. This will read the entire destination drive back

after the Restore job is complete, calculate a read-back hash value, and compare that
value with the original image file acquisition hash.

CHAPTER 4   Using the TX1

87

Summary of Contents for TX1

Page 1: ...USER GUIDE Tableau TX1 Version 2 0...

Page 2: ...Fax 1 519 888 0677 Support https support opentext com For more information visit https www opentext com Copyright 2018 Open Text All Rights Reserved Trademarks owned by Open Text One or more patents...

Page 3: ...verview 9 Tableau TX1 10 TX1 Kit Contents 12 Navigating the TX1 14 Home Screen 14 Side Navigation Menu 16 Jobs Tab 16 Job Status 17 Quick Reference Guide 19 Reading the Status LEDs 19 Interpreting Aud...

Page 4: ...R 4 Using the TX1 33 Overview 34 Navigating TX1 Features and Options 34 Home Screen 34 Jobs screen 34 Side Navigation menu 34 Preconditions Checking 35 Duplicating 35 Cloning 35 Imaging 35 Performing...

Page 5: ...0 Browse Filesystem 102 SMART Data 102 Export 103 Eject 105 Logs Module 105 Sample Log 107 CHAPTER 5 Adapters 111 Overview 112 IDE Adapter 112 Using the TDA7 5 112 PCIe Adapters 113 Apple Target Disk...

Page 6: ...vi...

Page 7: ...CHAPTER 1 PREFACE About this Guide 8 Drive Capacity and Transfer Rate Measurement Conventions 8...

Page 8: ...as well as answers to fre quently asked questions FAQ visit OpenText My Support at https sup port opentext com Drive Capacity and Transfer Rate Measurement Conventions The computer industry generally...

Page 9: ...HAPTER 2 OVERVIEW TOPICS IN THIS CHAPTER Tableau TX1 10 TX1 Kit Contents 12 Navigating the TX1 14 Reading the Status LEDs 19 Interpreting Audio Feedback 20 On screen Warnings 20 USB Keyboard Support 2...

Page 10: ...upport for cableless toolless SATA or SAS destination drive connections via the optional drive bay TX1 S1 which also provides drive cooling l The ability to duplicate a source drive to up to four dest...

Page 11: ...gs for case documentation l Clearly labeled and color coded source write blocked and destination read write ports l User interface localization support for German English Spanish French Portuguese Rus...

Page 12: ...urce write blocked side of TX1 The right destination read write side of TX1 TX1 Kit Contents The TX1 ships in a boxed kit with custom foam that includes the following items 12 Tableau TX1 User Guide V...

Page 13: ...ons of source and destination drives The TP6 uses a universal 3 prong style AC line cord and is compatible with 110 240V AC line voltages worldwide TC4 8 R3 Unified SATA SAS signal and power to 8 SATA...

Page 14: ...stacking foam inserts in your own hard sided case Navigating the TX1 Use the TX1 touchscreen display to navigate from module to module and choose or modify options Use the touchscreen keyboard or a US...

Page 15: ...the main screen Home and Jobs The Home tab shows the Home screen or one of the many other screens The Jobs tab always shows the Jobs summary screen and the current number of total active and queued jo...

Page 16: ...s are underway each active or queued job will increment the counter The Jobs tab is a convenient way to keep track of queued jobs active jobs and recent work done by TX1 The Jobs screen has three sect...

Page 17: ...d queued jobs the Jobs tab counter reads 3 In the second example there are no active or queued jobs only several recent jobs Job Status After a job starts its Job Status screen is automatically displa...

Page 18: ...sy to spot drives that are in use Similarly drives that are part of a queued but not yet active job will show as an orange border triangle with white in the middle Once a job has completed the Job Sta...

Page 19: ...ob Status screen can also be viewed for completed jobs that are shown in the Recent section of the Jobs tab Simply tap on the job row from the Recent jobs section and the final Job Status screen for t...

Page 20: ...link speed No Link Off Off 100 Mbps Link On Blink Off 1 Gbps Link On Blink Yellow 10 Gbps Link On Blink Green Interpreting Audio Feedback The TX1 plays one of two sounds that indicate status at the e...

Page 21: ...nto either USB port on the front of the TX1 Some users find it more convenient to use an external keyboard to enter data instead of using the virtual touchscreen keyboard Localized keyboard support is...

Page 22: ...22 Tableau TX1 User Guide Version 2 0...

Page 23: ...CHAPTER 3 CONFIGURING THE TX1 Startup Sequence 24 Configuring the TX1 24 Network Settings 26 Default Settings 27 Connecting Drives 30...

Page 24: ...e Side Navigation menu icon in the upper left corner to access the following options l Home Return to the Home screen l Logs Access the forensic log screen l System Settings Access the System Settings...

Page 25: ...l settings such as Date Time as shown in the image above Once the section expands tap a setting value to reveal and select from a drop down menu The UI display language can be set to German English Sp...

Page 26: ...Network Settings Tap Network Settings to display the Network Settings page 26 Tableau TX1 User Guide Version 2 0...

Page 27: ...s attached to a network that supports jumbo frames change the MTU value to 9000 to enable much faster network transfer speeds Each network device in the end to end communication path should use the sa...

Page 28: ...it Changing the order of selection changes the order in which each element is incorporated into the image directory path Note Certain combinations of image directory and image name settings can result...

Page 29: ...ttings can easily be restored to their factory set values Simply select the Defaults item from the side navigation menu and then scroll to the bottom of the default settings screen Select the Restore...

Page 30: ...to connect a PCIe drive A Tableau PCIe adapter sold separately is required to image PCIe drives The Tableau IDE PCIe adapter TDA7 5 sold separately is required to image IDE drives For detailed inform...

Page 31: ...log files Note The USB accessory ports on the TX1 are NOT write protected Evidence media should never be connected to these ports Drive Detection After booting the TX1 begins detecting connected driv...

Page 32: ...32 Tableau TX1 User Guide Version 2 0...

Page 33: ...erview 34 Navigating TX1 Features and Options 34 Preconditions Checking 35 Duplicating 35 Hashing 54 Logical Imaging 57 Verifying 80 Browsing 84 Restore 85 Viewing Sources and Destinations 89 Media Ut...

Page 34: ...e structure Home Screen l Duplicate l Logical l Verify l Hash l Browse l Restore l Sources Accessory Drives and Destinations o View connected drive detail o Access media utilities Jobs screen l Job su...

Page 35: ...risk of overwriting valuable data There is no need to format the destination media as the clone will apply the file system of the source media if one exists to the destination media automatically It i...

Page 36: ...ive However if using Ex01 or E01 the source drive may fit on a smaller drive because these formats can compress the data before writing to the destination drive There is no guarantee that the data wil...

Page 37: ...are automatically selected If you are satisfied with the default settings and the selected Source and Destination drives press the Start Duplication button at the bottom of the screen to begin the jo...

Page 38: ...te that the source selection modal will automatically close once a drive has been selec ted If a different source is desired simply go back into the Select a Source screen by tap ping on the 2 or Sour...

Page 39: ...e original DCO setting back to the source drive This provides a convenient way to ensure that all source evidence is acquired and that the drive is returned to its original state at the end of the dup...

Page 40: ...lable for SATA drives that support DCO 5 To change or add the destination drive s tap the 3 or Destination s heading From the destination list modal that displays select one or more drives from the li...

Page 41: ...irectory label to enter a Browse modal where you can select a different destination base directory create and select a new directory or delete a directory Tap one or more of the four buttons Date and...

Page 42: ...To change the Common Settings tap the 4 or Common Settings heading Select up to two hash types of MD5 SHA 1 and SHA 256 Some hash types will be disabled for certain image file formats such as Ex01 an...

Page 43: ...as the last step To change the Image Settings tap the 5 or Image Settings heading Image name defines the base filename for image segments The default value is image Tap the Image name text area to ch...

Page 44: ...ents or chunks on the destination drive that contain the data copied from the drive Segments are written to the destination drive according to the following convention image base directory directory n...

Page 45: ...be used to do a standalone verification of the original image or to Restore an image file to the original drive format Duplication Over a Network The 10 gigabit Ethernet interface of the TX1 enables s...

Page 46: ...the iSCSI server by tapping on the Address field If needed change the default iSCSI port from 3260 to the port used by the iSCSI server If needed enter a Discovery username and password 46 Tableau TX...

Page 47: ...over button to discover available iSCSI targets If the discovery is successful a list of available iSCSI targets will appear below Tap an iSCSI target and the iSCSI Login screen displays CHAPTER 4 Usi...

Page 48: ...tton to login and mount the iSCSI target If the login is suc cessful you can optionally save the target as a Bookmark for convenient future access To save as a Bookmark enable or disable the desired U...

Page 49: ...where you chose to mount it The target can now be accessed like a normal drive for Duplication as a source if mounted as a source a Duplication as a destination if mounted as a des tination Hash as a...

Page 50: ...ion To add a CIFS share as a des tination drive tap the Destinations button at the bottom of the Home screen Tap the orange plus button in the upper right corner of the drive list and tap Mount CIFS S...

Page 51: ...share Enter the IP address or server name and share name of the CIFS share If needed enter a username and password Select the SMB Server Message Block version of the destination CIFS share server 1 0...

Page 52: ...is successful you can optionally save the share as a bookmark for convenient future access To save a share as a bookmark enable or disable the desired username and password values to be saved and then...

Page 53: ...4 The CIFS share should now be listed in the Destinations list and can be selected as a des tination for an Image Duplication and or a verify operation CHAPTER 4 Using the TX1 53...

Page 54: ...a CIFS share is selected as a destination Hashing Forensic practitioners may need to calculate the hash values or fingerprints for a source drive without making a copy of the drive The Hash function...

Page 55: ...To create a hash of a source drive 1 From the Home screen tap the Hash button 2 Enter Job notes select a Source drive and review Settings and change if desired CHAPTER 4 Using the TX1 55...

Page 56: ...3 Tap the Start Hash button at the bottom of the screen 56 Tableau TX1 User Guide Version 2 0...

Page 57: ...for file based evidence acquisition from locally attached and network based source filesystems This tool saves valuable time by focusing on specific files of interest rather than acquiring the entire...

Page 58: ...filesystem involved in the job Due to the wide range of variables in a logical image job such as file data compressibility and acquisition dataset size it is not possible to determine with certainty i...

Page 59: ...tart Logical Image button at the bottom of the screen to begin the job Note Logical image job source auto selection is distinct from Duplication job source auto selection in that a logical image job o...

Page 60: ...twork shares can be mounted from the Sources button on the Main screen as well Once the source drive share list is set simply tap the desired filesystem tile to select it as the source for the logical...

Page 61: ...arnings in multiple locations but the DCO will need to be permanently removed using the manual HPA DCO Disable media utility before gaining access to all portions of the source media 5 The next step i...

Page 62: ...is setting assumes that NO files and folders will be acquired which requires defining which ones to INCLUDE l Define what to exclude This setting assumes that ALL files and folders will be acquired wh...

Page 63: ...de In the example shown above Define what to include is selected which means the initial acquisition dataset is empty To manually select which files and folders to include tap the blue circle plus sig...

Page 64: ...50 files folders Children files folders of a selected parent folder do not count towards this limit l If a parent folder is selected individual children cannot be deselected First deselect the parent...

Page 65: ...t are of interest to a forensic invest igation Adding searches will include exclude every instance of that kind of file l Multiple searches can be configured for a given job using the Add Search butto...

Page 66: ...seen by tapping the blue help button circle with question mark to the right of the file type parameter field All extensions associated with each file type are found in File Extensions on page 75 Usin...

Page 67: ...fined list of folders known to be associated with them which can be seen by tapping the help button to the right of the folder parameter field Selecting either of those pre defined values will limit t...

Page 68: ...amps for that filesystem match the File Date setting Note Some filesystem types particularly FAT32 do not support time zone independent timestamps There is no way to determine the time zone used for F...

Page 69: ...Details section below for more information regard ing captured metadata o Directory This identifies in which directory the logical image job output files will be stored The default directory will init...

Page 70: ...t the right side of the drive tile or from the Destinations button on the Home screen Network shares can also be used as logical image job destinations To make a network share visible in the Select de...

Page 71: ...l not be acquired In that case the metadata output file will show an error condition in the entry for the unreadable file and the Lx01 will indicate the error condition which enables forensic analysis...

Page 72: ...Logical Image Job Status Once a logical image job has been started the Job Status screen will automatically display as shown below 72 Tableau TX1 User Guide Version 2 0...

Page 73: ...canned files o Scanned shows the number of files the job has checked so far to see if it should include them o Matched shows the number of files that will be acquired by this job out of the num ber of...

Page 74: ...Lx01 job type No Lx01 file set or tx1_packed_log file is generated for the Metadata job type If all destinations are configured to be the Metadata job type and no hashes are configured the file data f...

Page 75: ...not manu ally selected are not included l Define what to exclude all files and folders not matching Exclude searches and not manu ally selected are included Note that new searches will use the top lev...

Page 76: ...ha arc lzh pak hqx image sparseimage marc cab b64 gho rpm rzip rz sea sdn stf squashfs sqz sit sitx td0 ufa bar cpio taz z tar tgz uu uue xcr yz yc zdg zip zoo Databases asl cdb ntx csv dbf idx ind db...

Page 77: ...la mdz wiz mcc oft msc dat ppt xls pot pub cbt diz efx evy xml faq hwp aw oth htm html asp aspx log wke wk1 wks fm3 wk3 fmt ami adx ntf id ide mht mhtml obt cue ybk obd cpe cov docx doc wbk asd dot wp...

Page 78: ...sce scr scp scg scu sci sck scq scl scf scn sco scz cpi c64 ce1 ce2 gmf csb cpx csi jff cmf cpt map cmx cmv bmf xar abk cdr pat cdt cdx ct cur dif lbm bbm anm gem dvi ce cft cut dhp pal ed5 ed6 emf qf...

Page 79: ...ntent Path Contains the full filesystem relative path for this entry Example users charles pictures Type Either contains Directory Symlink or File depending on what kind of entry this row represents F...

Page 80: ...e file by reading back the data from the image file calculating a hash value of that data and then comparing that calculated hash value with the value of the original acquisition hash Note that while...

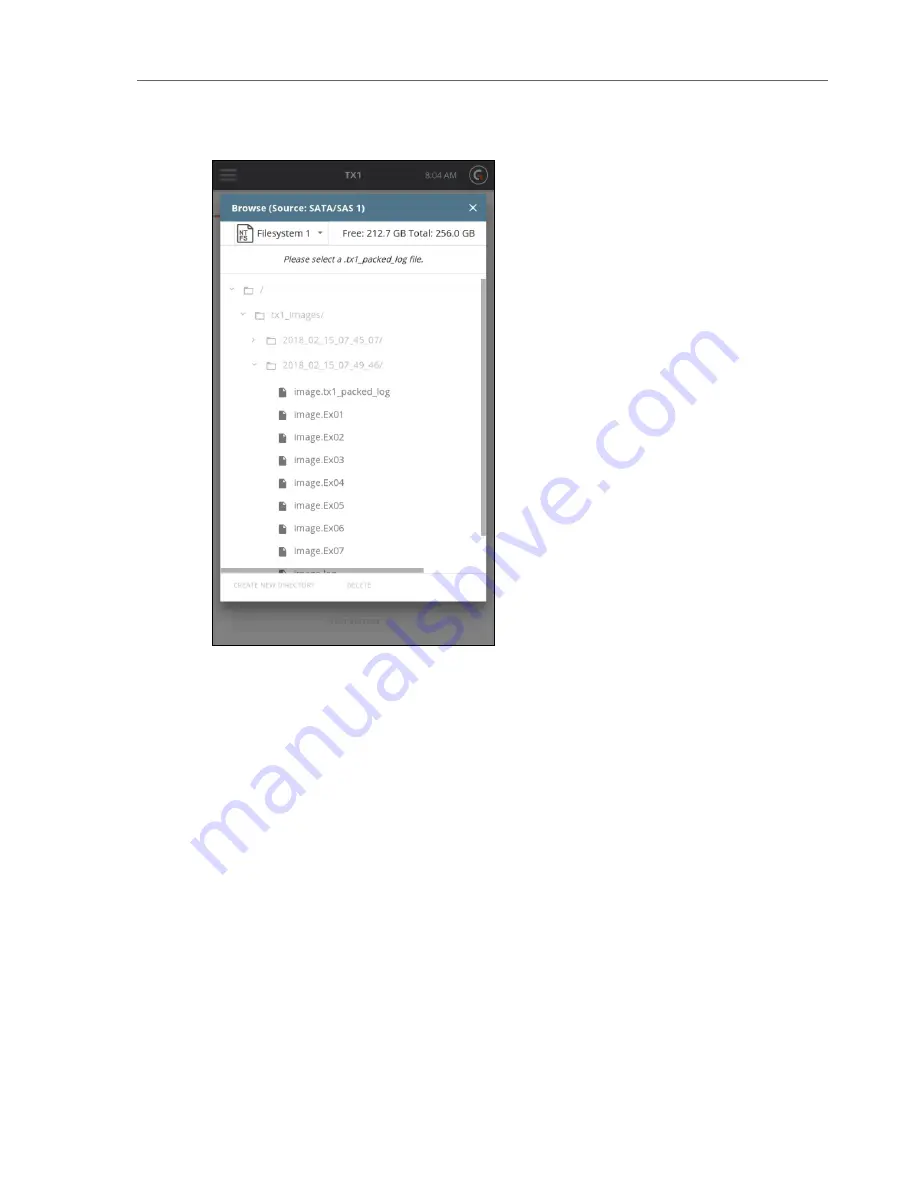
Page 81: ...estination drive 1 From the Home screen tap the Verify button 2 Enter Job notes and select a Destination drive 3 Select a Packed log file Browse the destination and locate an existing TX1 packed log f...

Page 82: ...of the file list in a given source folder when browsing This provides easy access to these types of files in situations where there are many segment files 4 Tap the Start Verification button at the bo...

Page 83: ...The verification process begins A job status modal displays the verification status CHAPTER 4 Using the TX1 83...

Page 84: ...of the top status bar or from the Side Navigation Menu Browsing The Browse function provides an easy way to view the contents of a recognized filesystem on any mounted drive whether it is connected l...

Page 85: ...by which each drive should be imaged or when checking the contents of a destination drive to free up space by deleting unneeded directories and files Restore The Restore function allows for recreation...

Page 86: ...s will always appear at the top of the file list in a given source folder when browsing This provides easy access to these types of files in situations where there are many segment files 86 Tableau TX...

Page 87: ...ake it appear exactly as large as the original source drive 5 If desired enable read back verification This will read the entire destination drive back after the Restore job is complete calculate a re...

Page 88: ...6 Tap the Start Restore button at the bottom of the screen A job status modal displays 88 Tableau TX1 User Guide Version 2 0...

Page 89: ...isplay on screen The log for the completed job can be viewed by tapping on the View Log link on the right side of the top Job Status bar or through the Side Navigation menu Viewing Sources and Destina...

Page 90: ...row to view the drive details screen and to access Media Utilities or tap the options icon three vertical dots located on the right side of the drive row to view more options 90 Tableau TX1 User Guide...

Page 91: ...a filesystem to display In use and Free utilization information Note All the information in the section above also pertains to the USB Accessory drives The USB Accessory button only appears in the bo...

Page 92: ...he Sources and Destinations drive lists at the bottom of the main screen or when adding sources or destinations during job setup This information is also present in the header section at the top of th...

Page 93: ...ssory only l Format destination accessory only l Encryption l HPA DCO Disable ATA drives only l Blank Check l Browse Filesystem l SMART ATA drives only l Export iSCSI target l Eject Wiping Destination...

Page 94: ...the erase state How the erase state is implemented may vary depending on the drive manufacturer not necessarily 00h This feature is available for SSD destinations only Note Overwrite wipes do not ove...

Page 95: ...essing drives with all modern operation systems EXT4 is recommended for use with Linux forensic tools HFS is recommended for use with MacOS forensic tools Encryption The TX1 can encrypt destination an...

Page 96: ...ns only the encrypted container The encryption password can be changed only on destination and accessory drives as it requires a write modification to the encrypted header Guidance Software is not abl...

Page 97: ...t had its HPA disabled in this manner will automatically return it to its original state Using the HPA DCO Disable media utility on TX1 will permanently disable the HPA setting Use caution when using...

Page 98: ...98 Tableau TX1 User Guide Version 2 0...

Page 99: ...low for hot drive removal including power cycling To disable a DCO on an IDE drive 1 Confirm the TX1 is powered off 2 Connect the IDE drive to a Tableau IDE Adapter TDA7 5 and connect the adapter to t...

Page 100: ...tem reset will occur imme diately after the TX1 issues the removal commands to the drive The log will reflect successful completion of the DCO disable operation after the command has been issued to th...

Page 101: ...of the available sectors randomly to determine whether they are blank Complete Reads in 100 of the available sectors to check if the drive is blank A sector is considered blank if it contains only th...

Page 102: ...tion information and a pulldown for selecting the desired filesystem if the media being browsed has more than one The third row provides the complete path information for the currently selected file f...

Page 103: ...N internet via the Ethernet connection on the rear of the TX1 During the export process the TX1 will assign a unique IQN iSCSI Qualified Name to each exported drive This IQN is used by the remote init...

Page 104: ...the protocol of the drive being exported with an incrementing number at the end However the user can edit this portion of the IQN via the optional Suffix entry field on the iSCSI Export setup screen a...

Page 105: ...er and is recommended before unplugging any attached media from a powered TX1 For destination and accessory drives in particular since they are read write failure to eject a drive prior to removal fro...

Page 106: ...log summary row specifies the type of operation the second part displays the date and time the log was created and the last part displays the result of the logged operation Tap on a job row to view o...

Page 107: ...to either one of the front USB accessory ports or the right side destination ports To delete all of the logs stored on this TX1 tap the Delete all Logs button on the bottom of the Log List screen Samp...

Page 108: ...108 Tableau TX1 User Guide Version 2 0...

Page 109: ...successfully read sector data after an initial read error is encountered the Total recoverable errors count will reflect the number original read errors encountered The Total unrecoverable errors cou...

Page 110: ...110 Tableau TX1 User Guide Version 2 0...

Page 111: ...CHAPTER 5 ADAPTERS Overview 112 IDE Adapter 112 PCIe Adapters 113 Apple Target Disk Mode Acquisition Adapters 113...

Page 112: ...1 kit includes the IDE power and signal cables used to connect the IDE drive to the adapter The PCIe cable used to connect the adapter to the TX1 is included with the TX1 kit Using the TDA7 5 1 With t...

Page 113: ...Adapters The TX1 is designed to acquire Apple computers that support Target Disk Mode This can be done via three different Apple computer connection interfaces USB C FireWire and Thunderbolt 2 Dependi...

Page 114: ...B source port These adapter cables are widely available from a variety of commercial retailers including Apple A USB C to USB A adapter cable is shown below FireWire Adapter Cable The TX1 has a source...

Page 115: ...ate adapters cables A Thunderbolt 2 to FireWire 800 9 pin adapter is used along with the same FireWire 800 9 pin to 9 pin cable shown above to connect between the Thunderbolt 2 port on the Macintosh a...

Page 116: ...116 Tableau TX1 User Guide Version 2 0...

Page 117: ...CHAPTER 6 SPECIFICATIONS TROUBLESHOOTING AND SUPPORT Specifications 118 Troubleshooting Common Problems 120 Support 121...

Page 118: ...PS Standard A connector TX1 S1 One TX1 S1 Two SATA SAS 6 GBPS signal connector Drive Power Two 3M style 4 pin power connectors for SATA SAS drive power Connectors Miscellaneous Ethernet One 10 Gbps Et...

Page 119: ...xternal drives DC Input 24 VDC Nominal DC Output per drive 5 12V 2A Spin up 5 12V 1A Continuous Dimensions 9 5 in L x 6 5 in W x 2 625 in H Weight 35 oz 980 g Storage Temperature Range 20 to 70 Celsiu...

Page 120: ...ng power on initialization and self test the TX1 checks the output voltages of the power supply If the voltage is below the minimum specification the TX1 displays a warning If you are having difficult...

Page 121: ...R2 With some SATA drives the SATA connector may be loose Ensure the cable is seated properly in the SATA connector of the drive Tableau has tested the TX1 with an extensive in house library of differ...

Page 122: ...122 Tableau TX1 User Guide Version 2 0...

Page 123: ...ettings 27 Disabling HPA and DCO 97 Drive Capacity and Transfer Rate Measurement Conventions 8 Duplicate 35 Duplicating 35 Duplication Over a Network 45 E Eject 105 Encryption 95 Expansion Modules 111...

Page 124: ...Network Settings 26 O On screen Warnings 20 Overview 9 34 112 P PCIe Adapters 113 Power Supply Issues 120 Preconditions Checking 35 Preface 7 Problems with Drive Detection 120 R Reading the LEDs 19 S...

Page 125: ...Firmware 29 USB Keyboard Support 21 Using the TD3 33 Using the TDA7 5 112 V Verify 80 Verifying 80 Viewing Sources and Destinations 89 W Wiping Accessory Drives 93 Wiping Destination Drives 93 Wiping...

Reviews: