background image

81

Click for contents

Frequently Asked Questions

Can I play video(s) on my NVR that I have copied to a USB flash drive?

No, your NVR doesn’t have the option to play video(s) from a USB flash drive. 
You will have to play them on your computer or mobile device.

What is the largest hard drive that I can install inside my NVR?

The largest hard drive you can install is 6TB (terabyte). We recommend that 
you purchase a drive that is surveillance rated such as the Western Digital 
Purple™ and Seagate Skyhawk™ range of drives.

Can I connect and record to a portable USB hard drive?

No, your NVR will only record to the internal hard drive that is installed.

Can I connect and copy videos to a portable USB hard drive?

Due to the nature of how portable USB hard drives operate, there is no guar-
antee that your drive, when connected to the NVR’s USB port, will work. You’ll 
have to give it a try. For backup purposes, we recommend using a USB flash 
drive.

How do I save video recordings that are on my NVR?

To copy video recordings to a USB flash drive, use the Search: Events function 
(see page 43).

Can I use my own email address and server instead of creating a new one?

You can providing you have the settings required for the SMTP port and serv-
er. If you don’t have this, you will have to contact your internet service provid-
er to get this information.

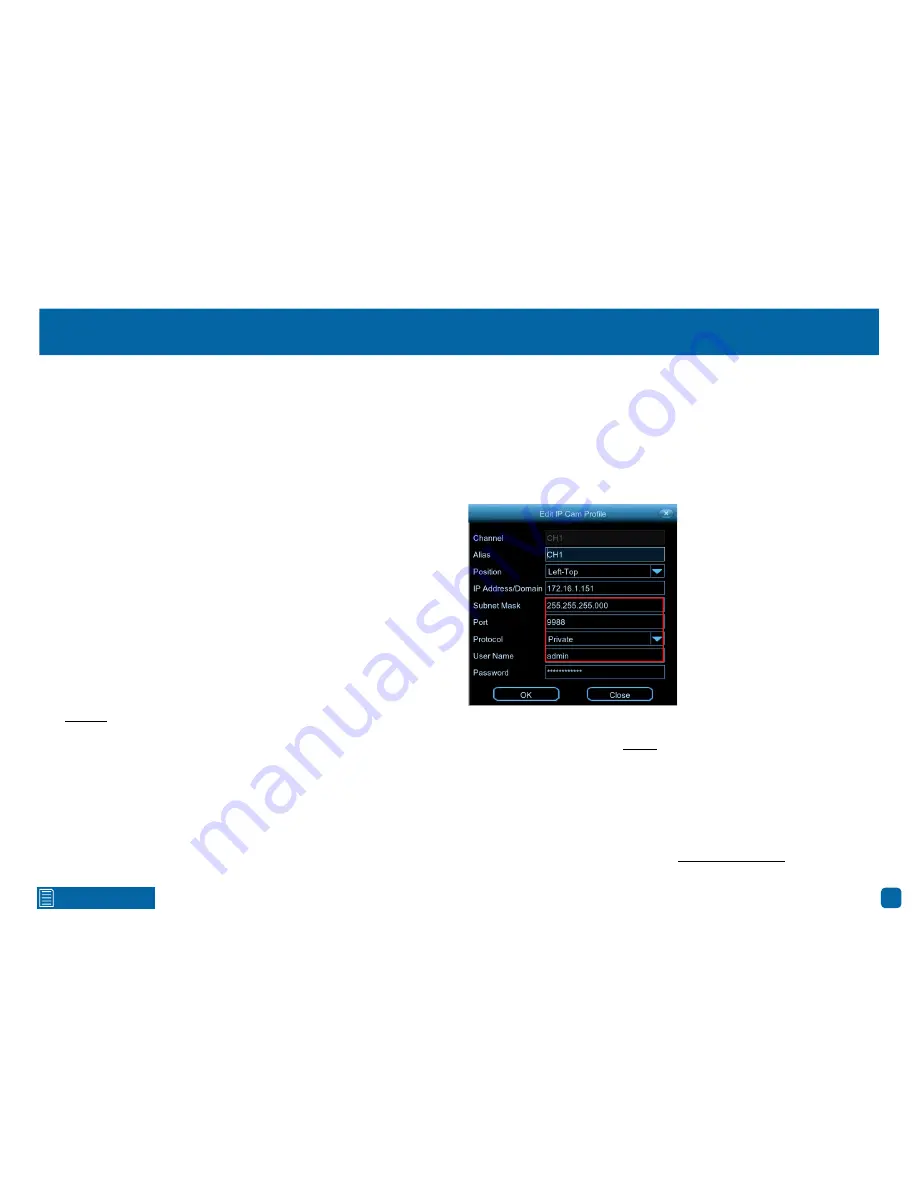
One or more cameras display “Off-line” in Live View mode.

The reason this is happening is because your NVR cannot verify the camera 
that is connected to the camera input. Either a setting has changed (such as 

password) or if you have added a camera that is connected to your router, it 
may have been accidentally disconnected from your router. Try the following:

1.

 Right-click the mouse in Live View mode then click “Main Menu”.

2.

 On the “IP Channel” tab, click the “Edit” button for the channel that is dis-

playing the “Off-line” message.

3.

 You will see the following screen:

4.

 Make sure the settings highlighted above match what you see on-screen. 

Input the default password - admin then click the “OK” button. 

5.

 A green status button will appear indicating successful connection.

For cameras connected directly to your router, check cables and connections 
to make sure they are not disconnected.

Can I change the camera’s default password?

Yes you can, go to our support center support.swann.com to download our 
camera configuration software. Search for - 7450 Camera Configuration.

Summary of Contents for PLATINUM HD

Page 1: ...Security Made Smarter PLATINUM DIGITAL HD Professional HD Security System INSTRUCTION MANUAL...

Page 2: ...pose it is the buyer s responsibility to be aware of all applicable laws and regulations that prohibit or limit the use of cameras and to comply with the applicable laws and regulations FCC Regulation...

Page 3: ...aracters and can contain a mixture of numbers and letters Use a password that you are familiar with but is not easily known to others 7 Write down your password in the space provided below for safe ke...

Page 4: ...Z Camera 31 Creating a Preset 32 Display IP Channel 33 Recording Configuration 34 Record Record 35 Record Schedule 36 Capture Capture 37 Capture Schedule 8 channel model 38 Playback Backup 39 Search G...

Page 5: ...ntain 67 Advanced Events 69 Advanced Auto Upgrade 70 System Status 71 Search Log 72 System Info 73 System Channel Info 74 System Record Info 75 Glossary 76 Frequently Asked Questions 81 Warranty Infor...

Page 6: ...check the status or operation of your NVR and cameras using the icons and Menu Bar on the Live View screen Right click the mouse to access the Menu Bar CH1 09 05 2017 04 30 15 PM Front Yard CH2 09 05...

Page 7: ...tus Icons Menu Bar Camera Group CH1 09 05 2017 04 30 15 PM Front Yard CH2 09 05 2017 04 30 15 PM Back Yard CH3 09 05 2017 04 30 15 PM Staircase CH4 09 05 2017 04 30 15 PM Side Gate 1 3 4 9 5 6 7 8 2 1...

Page 8: ...audio click the speaker icon to mute 10 Click this to access the Search menu 11 Click this to access the Startup Wizard Please note The 16 channel model will have additional camera views available tw...

Page 9: ...hat are available on your NVR You can also access previous ly recorded video for playback and to copy to a storage device such as a USB flash drive To maintain system integrity a firmware up grade can...

Page 10: ...on the left hand side of the Menu Clicking each category will reveal a number of tabs or sub categories that can be changed from their de fault setting To exit or access the previous menu right click...

Page 11: ...the Main Menu You can change the resolution bitrate OSD on screen display position as well as image settings for hue brightness contrast and saturation Your NVR has con trols for detecting motion all...

Page 12: ...NVR itself Refresh Rate This setting correlates to the Video Format selection in the Startup Wizard When selecting NTSC 60Hz will be displayed When se lecting PAL 50Hz will be displayed OSD Position...

Page 13: ...Saturation This alters how much color is displayed in the image Use the slider to adjust each setting Click the Default button to reset all settings When finished click the Save button then click Clos...

Page 14: ...djusted if needed Click and hold the slider left or right to change The higher the number the greater the delay Lens Flip Lets you turn the image upside down Angle Flip Lets you horizontally reverse t...

Page 15: ...moving objects appearing on screen WDR WideDynamicRange This function will balance out images that have a large dynamic range It does this by brightening dark areas and darken ing bright areas An exa...

Page 16: ...e Shutter This function controls the length of time a camera s shutter is open and the amount of light reaching the sensor In low light situations the shut ter needs to stay open longer in order for t...

Page 17: ...n be created per camera Mask Area Click the Setup button to create one or more masks see page 18 Creating a Privacy Mask This function can be used to obscure all or part of your image for privacy up t...

Page 18: ...s have been created to block out cars and pedestrians adjacent to the front yard of the house This will minimise false triggers and block movement that is not relevant to entry via the front entrance...

Page 19: ...using the remote playback feature in the HomeSafe View app The second method of compression is H 264 This is a commonly used format for recording and compressing video and is used in Blu ray players...

Page 20: ...BR is the recommend edcontrolmethod Asthebitrateisvariable yourNVRcanusealowerbitrate if there is little to no movement detected This will result in a lower recording size as well as a lower bandwidth...

Page 21: ...priate recording settings is dependent on camera location lighting conditions and the level of quality required Some experimentation is recommended to select the best settings Don t forget to click Sa...

Page 22: ...ote playback feature in the HomeSafe View app The second method of compression is H 264 This is a commonly used format for recording and compressing video and is used in Blu ray players and to broadca...

Page 23: ...he bandwidth required Increase the bitrate in small doses until you are satisfied with the image quality Pleasenote When streaming live video the overall quality is dependent on your internet connecti...

Page 24: ...lt in less hard drive space used when recording before older videos are automatically over written and will consume less bandwidth when using the remote playback feature in the HomeSafe View app The s...

Page 25: ...tetoaddmoredetailtothecamera simage butjustbeaware this will increase the bandwidth required Increase the bitrate in small doses until you are satisfied with the image quality Pleasenote When streamin...

Page 26: ...ertain areas if you wish see page 28 Motion Detection Setup Post Recording This option instructs your NVR to record for a set period of time after an event has occurred For most instances the default...

Page 27: ...o view the camera full screen in Live View mode when motion has been detected SendtoCloud Click the checkbox to copy snapshots to the cloud via Dropbox see page 62 Device Cloud Record Channel This opt...

Page 28: ...or square can be enabled to detect motion The same action also applies to delete an area that has been created In the example provided a motion detection area has been created for the front yard but e...

Page 29: ...r cameras to overlook cars in the driveway and similar locations can be very useful Avoiding False Triggers 1 A tree shrub or foliage that is blown by the wind angle the camera so wind blown objects a...

Page 30: ...to a different po sition Cruise mode can also be used to move the camera to different preset positions that have been created To configure your PTZ camera consult the instruction manual included with...

Page 31: ...the camera will pan or tilt Move the slider to decrease or increase the speed 4 Click this to access the Preset panel This allows you to create multiple preset positions and to access the camera s on...

Page 32: ...t particular position When creating a preset position you may want to make note which position is assigned to each number 2 Clickthedialogueboxtochangethelengthoftime inseconds thecamera will stay at...

Page 33: ...d your network connected cam era 2 After a short moment your NVR will detect the camera and it will appear as shown in the screenshot above right Click the checkbox to select 3 Input the password if r...

Page 34: ...d and Capture menus thatareaccessiblefromtheMainMenu From here you can access and change the default recording schedule presented as a 24 hour 7 days a week grid and is color coded for each camera con...

Page 35: ...am can be select ed This requires less bandwidth to stream the video from your NVR to your mobile device Mainstream video is used for playback when using your NVR directly If remote playback is not re...

Page 36: ...if Normal Motion or Alarm recording is not required on one or more sections that have recording enabled In the above example a Motion recording schedule has been created for 12 00 a m to 06 00 p m an...

Page 37: ...re Enable this feature if you would like to manually take a snapshot using the Manual Capture button on the camera toolbar As this is an added feature a capture schedule is not enabled by default To e...

Page 38: ...The same action can also be applied if Normal Motion or Alarm capture mode is not required on one or more sections that have been enabled In the above example a Motion capture schedule has been create...

Page 39: ...ly recorded vid eos as well as snapshots that are stored on your NVR s hard drive You have the choice of playing video that matches your record ing schedule manual recordings or motion events only The...

Page 40: ...rticular dates that match your search criteria Click on a date that you want to select for playback 7 When selecting all cameras for playback this will indicate the channels that match your search eac...

Page 41: ...e are your reverse slow motion play pause stop and fast forward con trols Subsequent presses of the reverse slow motion and fast forward buttons will increase the speed of each action 3 Select a camer...

Page 42: ...ew folder if required Click OK to save then click Close when finished 5 Click this button to mute or unmute the audio 6 Click and hold the slider left or right to change the volume level the cameras i...

Page 43: ...stocopyallorselectedeventsthatmatchyoursearch criteria Search Clickthistodisplayalistofeventsthatmatchyoursearchcriteria as shown above Double click an event to play the event will play full screen Cl...

Page 44: ...elect the type of snapshot you would like to search on Quick Backup Click this to copy all snapshots matching your search criteria Search Click this to display a list of snapshots that match your sear...

Page 45: ...6 Click this to view a single snapshot at a time 7 Click this to view four snapshots at a time 8 Click this to view eight snapshots at a time Right click to exit Playing a Slideshow Play 12 05 2017 1...

Page 46: ...ack only one camera can be selected 4 Click the drop down menu to select the video type that you want to search on In most circumstances Motion would be selected but you can leave this on All if you w...

Page 47: ...everse slow motion and fast forward buttons will increase the speed of each action 3 Select a particular split screen click this but ton then click and drag an area to get a close up view Use the pict...

Page 48: ...ware you candownloadafreecopyfromwww videolan org Insert a USB flash drive to your NVR then click Save You have the choice of formatting the flash drive or creating a new folder if required Click OK t...

Page 49: ...rates Some of the options such as dis play resolution time zone email configura tion Daylight Saving and password creation are configured during the Startup Wizard For experienced network users your N...

Page 50: ...econds is the maximum VGA HDMI Resolution Select a display resolution that is suitable for your TV 1920 x 1080 will suit most TVs If you have a 4K capable TV you can select either 2K 2560 x 1440 or 4K...

Page 51: ...Static IP Address Each device on your network must have a unique IP address A typical address might be 192 168 1 24 or something similar Subnet Mask This allows the flow of network traffic between hos...

Page 52: ...ly configure the router for the purposes of remote access This is not required when using UID to access your NVR via the HomeSafe View app You can enable UPNP if required Don t forget to click Save to...

Page 53: ...o Manual Mode Click the drop down menu and ad just accordingly Please note When changing back to Auto Mode any camera or camer as that you have added in Manual Mode will be deleted Don t forget to cli...

Page 54: ...hen click OK A mes sage will appear if the test has been successful Click OK to continue If the test email is not in your inbox check your junk or spam folder Email not working Please try the followin...

Page 55: ...rror and if one or more channels has lost the feed from its camera see page 69 Advanced Events It s recommended to leave the default schedule in place in case there is an exception that you need to be...

Page 56: ...ount Password Enter the password for your account Test DDNS Click this button then click OK to confirm your account details After a short moment you will see DDNS test is successful Click OK to close...

Page 57: ...twork in the Main Menu to display the IP address into VLC The following is an example of what you need to enter rtsp 192 168 99 160 554 ch01 0 rtsp 192 168 99 160 This is the IP address of your NVR 55...

Page 58: ...stances the default selection will be suitable however you can change this if you wish Alarm Out Click the checkbox to enable the alarm output when one or more alarm sensors have been triggered Show M...

Page 59: ...ots to the cloud via Dropbox see page 62 Device Cloud Record Channel This option instructs your NVR to trigger additional camer as to start recording when one or more alarm sensors have been triggered...

Page 60: ...t HDD Click the checkbox to select the hard drive then click this but ton to format A message will appear noting that all data will be erased Click OK to continue Please note From time to time we reco...

Page 61: ...Long This is a longer test that verifies the above as well as performing a surface scan to reveal problematic areas if any and forces bad sector relo cation When performing a test your NVR will contin...

Page 62: ...to enable cloud storage for the other cameras available With the cloud function enabled you need to instruct your NVR to send alerts to the cloud 1 In the Main Menu click Alarm 2 Click the drop down...

Page 63: ...or city Language Select a language you would like the system menus to be dis played in Multiple languages are available Video Format Select the correct video standard for your country USA and Canada...

Page 64: ...Saving starts and ends Week Select the month a particular day and time when Daylight Saving startsandends Forexample 2a m onthefirstSundayofaparticularmonth Date Select the start date click the calen...

Page 65: ...e and time are not correct click this button to update then click OK to continue Don t forget to click Save to apply settings Click the Default button to revert back to default settings Click the Clos...

Page 66: ...m Additional user accounts can also be enabled 1 Select user1 then click the Edit button 2 Click the drop down menu to enable 3 Enter a user name and password 4 Click the Save button enter the admin p...

Page 67: ...ault settings Click the checkbox for the camera that you want to restore or click Select All to select all cameras Click OK to continue A message will appear on screen and the camera will momentarily...

Page 68: ...When the firmware upgrade has completed the camera will mo mentarily reset Click OK to close It s recommended to reboot your NVR to maintain operational integrity Please note To restore all default s...

Page 69: ...ve for when an event occurs Buzzer Click the drop down menu and select the time period for the internal buzzer to activate for the event selected Please note When your NVR detects an exception it will...

Page 70: ...By default your NVR will automatical ly check and alert you if new firmware is available for download Click the checkbox if you would like to disable this feature Check now Click this button to check...

Page 71: ...tions that have been selected for your NVR to function Each action that your NVR performs as well as events detected are logged which you can search and view If you call our helpdesk for assistance ou...

Page 72: ...to search for Search Click this to display a list of log files that match your search criteria Double click a file to display information about that log Backup Click this to copy the log files that m...

Page 73: ...If you call our helpdesk for assistance our staff may ask you to access this tab to assist them in solving any technical issues that you may be having This tab displays technical information about you...

Page 74: ...m Substream and Mobilestream settings used for each camera connected If you call our helpdesk for assistance our staff may ask you to access this tab to assist them in solving any technical issues tha...

Page 75: ...ys the recording settings for each camera connected If you call our helpdesk for assistance our staff may ask you to access this tab to assist them in solving any technical issues that you may be havi...

Page 76: ...protocol addresses For example www google com will have a DNS server address that is equivalent to 74 125 224 72 The DNS server is automatically provided by your internet service provider Auto focus...

Page 77: ...where your DVR or NVR will record both Mainstream and Substream video at the same time Format Is a command that prepares a storage device such as a USB flash drive or hard drive to hold data Firmware...

Page 78: ...ca Canada and some Latin American countries In NTSC 30 frames are transmitted each second Optical Zoom Is a true zoom feature It allows you to zoom in or out on an object to get a closer view by using...

Page 79: ...In the context of the DVR or NVR primarily used for email server connections Static When referring to IP addresses this is where a device s IP address has been manually entered Sometimes used on older...

Page 80: ...a potential alarm event and is considered to occur any time your DVR or NVR doesn t receive an active video signal from any one of its video inputs Video Quality Diagnostics Enables your DVR or NVR to...

Page 81: ...ail address and server instead of creating a new one You can providing you have the settings required for the SMTP port and serv er If you don t have this you will have to contact your internet servic...

Page 82: ...y of origin The warranty does not cover any incidental accidental or consequential damages arising from the use of or the inability to use this product Any costs associ ated with the fitting or remova...

Page 83: ...Warranty 1 800 627 2799 M F 9am 5pm US PT AUSTRALIA 1800 788 210 NEW ZEALAND Toll Free 0800 479 266 UK 0808 168 9031 M7450_VER1E070717 Swann 2017 Security Made Smarter Tell us what you think We are co...

Reviews: