background image

96

27

�����������

27.1 Periodic Maintenance Schedule

W

Wa

arrn

niin

ng

g:: To ensure proper operation of the SwitchPoint Infinity 3, maintenance

should be performed by the end user periodically.

M

Ma

aiin

ntte

en

na

an

ncce

e A

Accttiivviittyy

IIn

nssttrru

uccttiio

on

n

T

Tiim

me

elliin

ne

e

Keep surrounding area of SPI3
free of dust

Clean with dry cloth

Always

Restart the SPI3 unit

SPI3 control system requires no
preventative or periodic maintenance.
Stryker recommends you restart the
SPI3 control system weekly for best
performance (

see 23 Shutting Down

the SwitchPoint Infinity 3, page 74

).

Weekly

For SPI3 only, ensure LEDs for
fans located on the back of the
video router are illuminated in
green when video router is on.
For SPI3-Lite, check the fan
status by listening or feeling for
airflow, or by checking the
Hardware Status page.

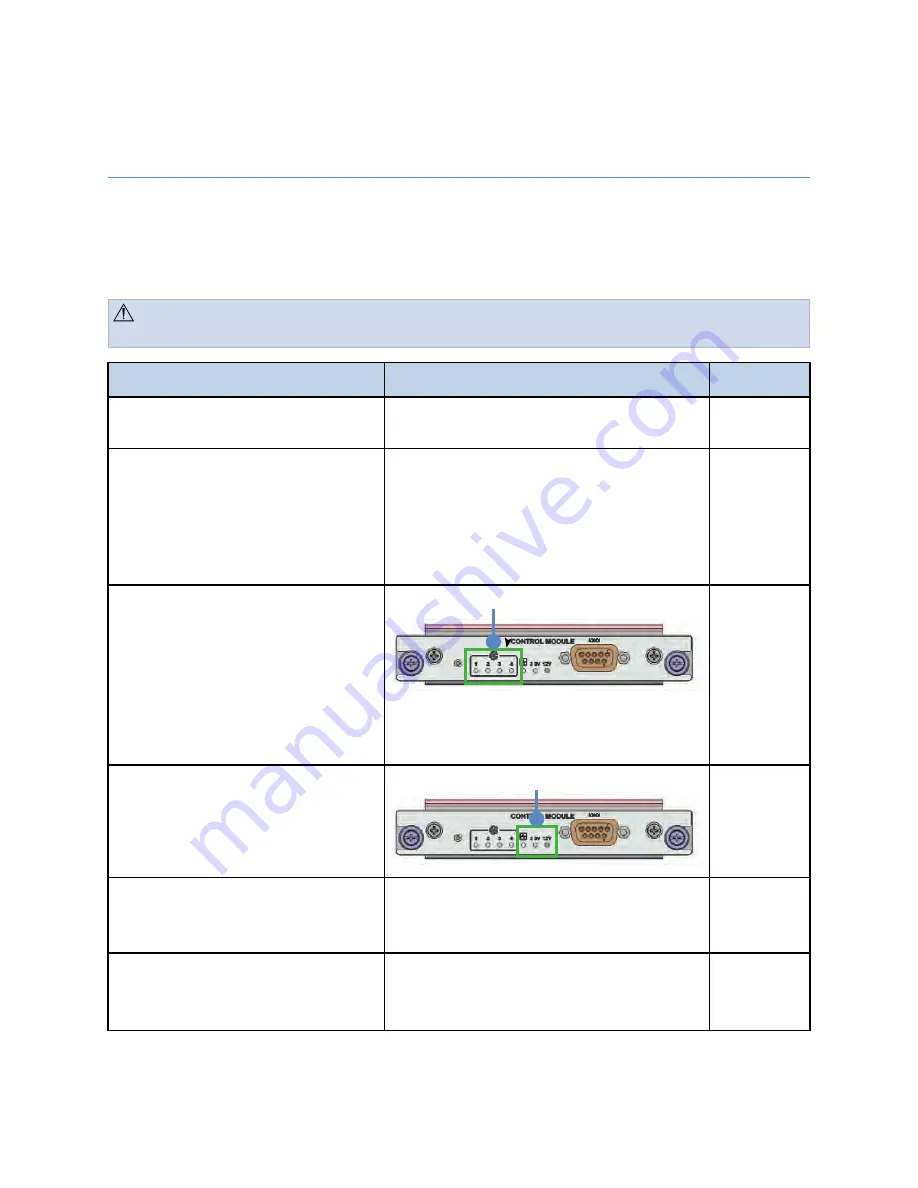
LED Location

Every 6
months

For SPI3 only, ensure LEDs for
voltage levels located on the
back of the video router are
illuminated in green when video
router is on.

LED Location

Every 6
months

Inspect cable connections on the
front of the Control System

Push and reconnect any cables that
appear to be loose (

see 25.2.1 Router

Drawings, page 78

)

Every 6
months

Calibrate the Touch Panel

Plug a USB compatible keyboard in the
expansion module in case keyboard is
not connected

As
necessary

Summary of Contents for SwitchPoint Infinity 3

Page 1: ...an nd d S Sw wiit tc ch hP Po oiin nt t I In nf fiin niit ty y 3 3 L Liit te e R Ro ou ut te er r a an nd d C Co on nt tr ro oll S Sy ys st te em m O Op pe er ra at tiio on ns s a an nd d M Ma aiin nt...

Page 2: ......

Page 3: ...outer and Conferencing Interface 13 5 5 E Eq qu uiip pm me en nt t C Co on nn ne ec ct tiio on ns s 1 14 4 5 1 Connectors Used by the SwitchPoint Infinity 3 Control System 14 5 2 Connections Overview...

Page 4: ...election 29 7 2 3 Saving a Visual Route as a Preset 29 7 3 Text Routing 29 7 3 1 Creating a Text Route 29 7 3 2 Creating a New Text Route 30 7 3 3 Saving a Text Route as a Preset 30 8 8 P PI IP P a an...

Page 5: ...10 13 Advanced Call Types 50 10 13 1 Broadcast 50 10 13 2 View Only 51 10 13 3 Meeting Room 51 1 11 1 S Su ur rg giic ca all T Tiim me eo ou ut t 5 53 3 11 1 Surgical Timeout Procedure 53 1 12 2 C Co...

Page 6: ...ideo Routing Tips 76 25 2 Troubleshooting the SwitchPoint Infinity 3 78 25 2 1 Router Drawings 78 25 2 2 Troubleshooting Steps 81 25 2 3 Connecting External Video Devices 86 2 26 6 P Ph hy ys siic ca...

Page 7: ...6 1 Damage Claims 99 27 6 2 Service 100 2 28 8 E EU UL LA A T Te er rm ms s 1 10 01 1 2 29 9 W WE EE EE E P Pa as ss sp po or rt t S SP PI I3 3 L Liit te e 1 10 03 3 3 30 0 C Co on nt ta ac ct t I In...

Page 8: ......

Page 9: ...uses Ultra High Frequency UHF to transmit to the receiver UHF is a common frequency range which television stations use to broadcast their signal The wireless microphone has been tested to meet medica...

Page 10: ...als such as gauze or surgical drapes 8 To prevent a fire allow adequate air circulation to prevent internal heat buildup 9 Do not touch the front panel input or output circuitry and a patient at the s...

Page 11: ...e when connected to other equipment 6 Do not position the unit such that it is difficult to disconnect the power cord 7 Caution Federal law United States of America restricts this device to use by or...

Page 12: ...ce instructions in the literature accompanying the product A lightning bolt indicates the presence of hazardous voltage Refer all service to authorized personnel Temperature limits Denotes humidity li...

Page 13: ...and Electronic Equipment this symbol indicates that the product must not be disposed of as unsorted municipal waste but should be collected separately Note The device does not contain any hazardous m...

Page 14: ...ryker may result in increased electromagnetic emissions or decreased immunity of the equipment or system The equipment should not be used adjacent to or stacked with other equipment If stacking or adj...

Page 15: ...well as other devices Contact Stryker to determine if a device is compatible with SwitchPoint Infinity 3 4 1 An Integrated Voice Video and Data Router and Conferencing Interface The SwitchPoint Infin...

Page 16: ...ceive video directly from Endoscopic and Room Cameras Printer Digital Capture Device Voice Control Device and other video device outputs All of the connections are located on the front panel For video...

Page 17: ...connected to the audio outputs on the SwitchPoint Infinity 3 Control System 5 2 5 RS 232 Connectivity The SwitchPoint Infinity 3 Router has 16 RS 232 ports that can be used to connect devices that us...

Page 18: ...he e A Ad dv va an nc ce ed d S Se et tu up p a ar re ea a o of f t th he e u us se er r iin nt te er rf fa ac ce e C Ch ha an ng giin ng g c ca ab blle e c co on nn ne ec ct tiio on ns s w wiit th ho...

Page 19: ...u ur re e o on n t th he e s su ur rf fa ac ce e o of f t th he e s sc cr re ee en n a an nd d b be e c ca ar re ef fu ull n no ot t t to o s sc cr ra at tc ch h t th he e s su ur rf fa ac ce e w wiit...

Page 20: ...ome Page in the Control Section 6 2 Quick Button Bar The Quick Button Bar is displayed below the Control Section It provides quick access to the functions most often used such as the Calls Advanced Ro...

Page 21: ...etup button allows access to the Software Configuration screens of the SwitchPoint Infinity 3 Control System and the Video Network Hub if present If the Sidne Voice Activation System or SDC3 Voice Pac...

Page 22: ...ws you to quickly save a room setup as a preset that will appear in the Presets menu see 9 2 Saving a Preset page 34 6 3 4 SORN Support The SORN button allows you to go to the Technical Support Notifi...

Page 23: ...c ce e c co on nt tr ra ac ct t m mu us st t b be e p pu ur rc ch ha as se ed d 6 3 5 Help The Help screen offers tutorials that explain how to operate the system To access the Help section press the...

Page 24: ...icates the suite monitors are on unless they have been manually switched off in which case they will need to be manually switched back on If it is not highlighted the suite monitors are off Powering o...

Page 25: ...e menu press the desired P Pr re es se et t button The preset will automatically load see 9 Presets page 34 6 5 Screensaver After 2 hours of non use the SwitchPoint Infinity Touch Panel screensaver wi...

Page 26: ...tem gives special distinction to devices such as the Stryker Digital Capture SDC and Sidne These devices are capable of receiving video signals but their output can be re routed to a display so that t...

Page 27: ...a Source on a Display To view a source on a display perform the following steps 1 Select a source Item 1 such as the Endo Cam from the Sources area located on the left side of the screen The button w...

Page 28: ...e es sk kt to op p v viie ew we er r w wiillll o on nlly y b be e a ab blle e t to o v viie ew w a a v viid de eo o s so ou ur rc ce e t th ha at t h ha as s b be ee en n r ro ou ut te ed d t to o t t...

Page 29: ...Select the Sidne or SDC3 destination from the Devices area The icon for the video source being routed through Sidne or SDC3 will be displayed on the device button 3 For Sidne only select a device thro...

Page 30: ...te ed d I In n t th he e p pr re ev viio ou us s e ex xa am mp plle e iif f M Mo on niit to or r 2 2 iis s s se elle ec ct te ed d b be ef fo or re e s se elle ec ct tiin ng g t th he e S SD DC C H HD...

Page 31: ...e e r ro ou ut te e w wiillll n no ot t b be e s su uc cc ce es ss sf fu ull 3 If you wish to route the video through a device such as Sidne or SDC3 select it from the Devices list and then select a d...

Page 32: ...u The video source will be routed to the selected device and the output of that device will be available to route to another device or display 3 Select a display to view the source or device from the...

Page 33: ...PIP PBP feature press the P PI IP P button located on the Quick Button Bar The Picture in Picture screen will open F Fiig gu ur re e 1 12 2 P Piic ct tu ur re e iin n P Piic ct tu ur re e V Viie ew w...

Page 34: ...or small image The large inset will fill up approximately 1 4 of the screen and the small inset will fill up approximately 1 9 of the screen This option only applies to the PIP feature 8 2 Quad View N...

Page 35: ...Select Destination drop down menu is used to select a display to route the image to A preview of the display will appear in the box in the upper right hand corner of the screen N No ot te e I If f iit...

Page 36: ...than seven presets have been configured a scroll bar will appear on the right side of the window The current page number and the number of pages will appear between the up and down scroll buttons F F...

Page 37: ...Press D Do on ne e when finished The Enter Name field will display the new preset name 5 Select the preset group where you want to save your new preset If only one preset group has been configured it...

Page 38: ...r re ev viie ew w b bu ut tt to on n d diis sp plla ay ys s iic co on ns s f fo or r a allll o of f t th he e f fu un nc ct tiio on ns s t th ha at t a ar re e c co on nt tr ro olllle ed d iin n t th...

Page 39: ...for an incoming Codec call from any available Codec meaning that when a call comes from a specified Codec the call will be automatically connected whereas all other calls will need to be accepted bef...

Page 40: ...ured sources and devices capable of being routed out of the room When a source or device is selected from the What you send list it is previewed in the video preview frame above the drop down menus Th...

Page 41: ...ng g t th he e o of ff fs siit te e C Co od de ec c iis s n no ot t a av va aiilla ab blle e f fr ro om m t th he e C Ca am mp pu us s S St ta at tu us s iin nt te er rf fa ac ce e 10 3 Campus Codec...

Page 42: ...d diis sa ab blle ed d 3 Select which room to connect to from the Room Name drop down menu 4 Press the green C Ca allll button under the number pad to make the call If the call is successful you will...

Page 43: ...l T Ty yp pe es s p pa ag ge e 5 50 0 2 Select the connection method from the Connection Method drop down menu 3 Select which room to connect to from the Room Name drop down menu 4 Press the green C C...

Page 44: ...e Active Call screen are used to select which camera to control during a call The camera controls work in the same manner as the Room Camera controls on the Room Camera interface The What you send and...

Page 45: ...Status screen will open F Fiig gu ur re e 2 24 4 A Ac ct tiiv ve e C Ca allll S St ta at tu us s S Sc cr re ee en n Depending on the type of call you are involved in call information will be displaye...

Page 46: ...e is On you can still make outgoing calls to other rooms The Private On state is restored after the call If you attempt to connect to a room that is In Private the call must be accepted by the callee...

Page 47: ...will automatically attempt to connect to the destination If the call is successful you will be taken to the Active Call screen 10 8 Call Groups The Call Groups tab provides call specific presets for c...

Page 48: ...ig gu ur re e 2 27 7 S St to or re e N Nu um mb be er r S Sc cr re ee en n 3 Select the white text field or the E Ed diit t button next to the Enter Name field Enter the preset name using the on scree...

Page 49: ...from the Connection Speed drop down menu 4 Select the Codec to be used from the Codec Name drop down menu 5 Enter the IP address using the on screen keypad 6 Press the green C Ca allll button located...

Page 50: ...teway call 1 From the Manual Dial tab select the call type from the Connection Type drop down menu 2 Select the Codec to be used from the Codec Name drop down menu 3 Select the call speed or bandwidth...

Page 51: ...ut t a an nd d n no ot t a ac cc ce es ss siib blle e 10 12 1Desktop User Access Clicking on the Desktop Users button opens the Desktop Users menu that shows what users are viewing your endpoint F Fii...

Page 52: ...h a a V Viid de eo o N Ne et tw wo or rk k H Hu ub b Broadcast and View call types allow a single direction video and audio call The broadcasting endpoint initiates a broadcast call and can select mu...

Page 53: ...o Network Hub that has the Meeting Room option installed If these features are available within the ORIS the SwitchPoint Infinity 3 Control System is automatically capable of using them and no additio...

Page 54: ...ll can be disconnected by pressing the red H Ha an ng g U Up p button from the Active Call interface N No ot te e A Allll e en nd dp po oiin nt ts s m mu us st t d diis sc co on nn ne ec ct t f fr ro...

Page 55: ...de ed d t th ha at t a a n ne ew w p pa at tiie en nt t c ca as se e iis s c cr re ea at te ed d a an nd d t th he e p pa at tiie en nt t iin nf fo or rm ma at tiio on n iis s a ad dd de ed d o on n...

Page 56: ...imeout F Fiig gu ur re e 3 32 2 S Su ur rg giic ca all T Tiim me eo ou ut t C Co ou un nt t D Do ow wn n F Fiig gu ur re e 3 33 3 S Su ur rg giic ca all T Tiim me eo ou ut t V Ve er riif fiic ca at ti...

Page 57: ...er r o of f t th he e s sc cr re ee en n 5 Once all of the questions have been answered a Surgical Timeout Verification Summary will appear that can then be printed out and placed with the patient s...

Page 58: ...A Ab bo or rt t S Sc cr re ee en n 8 To abort the procedure press the Y Ye es s button To cancel and return to the procedure press the N No o button N No ot te e F Fo or r iin nf fo or rm ma at tiio...

Page 59: ...ra Insufflator Light Source Shaver and Arthroscopy Pump that are controlled by the optional SDC3 or Sidne Voice Activation System Voice Package This section will not display any device buttons if your...

Page 60: ...PC and an Auxiliary AUX PC Press the button on the SwitchPoint Infinity 3 Control System Home screen for the target PC to be controlled The monitor will now display the output of the target PC and the...

Page 61: ...The M Mu ut te e button toggles on and off and stays highlighted in orange when muted F Fiig gu ur re e 3 38 8 S Sp pe ea ak ke er r C Co on nt tr ro olls s S Sc cr re ee en n 14 2 Input Levels The I...

Page 62: ...er supports up to four outputs including two outputs for the speakers To access the Output Levels screen press the A Au ud diio o L Le ev ve ells s button on the Quick Button Bar and press the Output...

Page 63: ...61 F Fiig gu ur re e 4 40 0 O Ou ut tp pu ut t L Le ev ve ells s S Sc cr re ee en n...

Page 64: ...ay in the OR From each tab you can turn on or off the display as well as select the image you want to view on that display F Fiig gu ur re e 4 41 1 D Diis sp plla ay ys s S Sc cr re ee en n To turn a...

Page 65: ...one of the available room cameras from the sub tabs at the top of the screen 2 Direct the camera by pressing and holding the button that corresponds to the desired direction you want the camera to pa...

Page 66: ...manually adjust the exposure of the room camera press the or buttons under the Manual Settings 2 To have the camera automatically adjust the settings press the A Au ut to o button under the Manual set...

Page 67: ...d d b by y t th he e T To ou uc ch h P Pa an ne ell e ev ve en n t th ho ou ug gh h t th he e S SD DC C t to ou uc ch hs sc cr re ee en n iis s b blla ac ck k T To ou uc ch hiin ng g t th he e S SD DC...

Page 68: ...ation room The Observation Room PC will automatically display this screen when turned on F Fiig gu ur re e 4 44 4 O Ob bs se er rv va at tiio on n R Ro oo om m S Sc cr re ee en n To access the Observa...

Page 69: ...adjust the speaker volume press the and buttons to decrease or increase the volume respectively in the observation room The M Mu ut te e button in the center will turn off the audio for the speaker T...

Page 70: ...a button is pressed the room lights will adjust to the correct level for that preset F Fiig gu ur re e 4 46 6 R Ro oo om m L Liig gh ht ts s S Sc cr re ee en n Any of the five presets can be saved in...

Page 71: ...ress C CT TR RL L A AL LT T C C 2 A DOS window will appear and the calibration session will begin C Ca au ut tiio on n DO NOT close the DOS window as this will interrupt the calibration process and ca...

Page 72: ...70 F Fiig gu ur re e 4 48 8 F Fiin na all C Ca alliib br ra at tiio on n S Sc cr re ee en n...

Page 73: ...e numbers respectively 3 Use the 1 12 2 H Ho ou ur r and 2 24 4 H Ho ou ur r buttons to select how you would like the time to be displayed 4 The S Sh ho ow w and H Hiid de e buttons determine whether...

Page 74: ...tiio on ne ed d a ab bo ov ve e P Plle ea as se e c co on nt ta ac ct t y yo ou ur r I IT T p pe er rs so on nn ne ell o or r S St tr ry yk ke er r T Te ec ch hn niic ca all S Su up pp po or rt t a a...

Page 75: ...Br riie ef f D De es sc cr riip pt tiio on n o of f t th he e I Is ss su ue e A brief explanation of the problem being experienced for example There is interference visible on the flat panel display...

Page 76: ...the S Sh hu ut td do ow wn n button that appears in the bottom right corner of the Setup screen A dialog box will appear asking if you would like to shutdown or restart the system F Fiig gu ur re e 5...

Page 77: ...urces In the event that the primary care video is lost to the display s and manual rerouting or use of preset fails to restore the video the user should switch the system to backup video mode using th...

Page 78: ...is a powerful tool for managing video audio and data communication within the iSuite Operating Room With a little patience and forethought the room setup can be changed quickly between cases and even...

Page 79: ...77 F Fiig gu ur re e 5 52 2 E Ex xa am mp plle e R Ro ou ut te es s...

Page 80: ...Router Drawings F Fiig gu ur re e 5 53 3 S SP PI I3 3 R Ro ou ut te er r ON OFF Button Video Output Mic Level Inputs Video Pass Thru Module Line Level Inputs Optical DVI D Output Line Level Outputs S...

Page 81: ...cts to a potential equalization conductor The resulting medical electrical system shall follow all applicable IEC 60601 1 requirements Fan Module Input Slots 1 8 Audio Module Output Slots 1 8 Video Pa...

Page 82: ...medical electrical system shall follow all applicable IEC 60601 1 requirements F Fiig gu ur re e 5 55 5 F Fr ro on nt t o of f C Co on nt tr ro oll S Sy ys st te em m F Fiig gu ur re e 5 56 6 B Ba ac...

Page 83: ...udio Output to router Video Output to router Preview Input USB 3 0 Ports Connects to a potential equalization conductor The resulting medical electrical system shall follow all applicable IEC 60601 1...

Page 84: ...nel and then plug it in again Touch doesn t work Ensure the serial or USB cable is securely attached to both Control Section and Touch Panel Calibrate the Touch Panel by pressing CTRL ALT C and follow...

Page 85: ...e Wireless Microphone Batteries page 99 Audio not leaving room Check the wireless microphone batteries if the mic is not heard in other locations The LED on the top of the wireless mic belt pack shoul...

Page 86: ...amera Video is displayed on a flat panel monitor Ensure that the light source camera and monitor are turned ON Route the Endoscopic camera to a different monitor to ensure it displays an image Ensure...

Page 87: ...keyboard do not function when in PC screen Reboot the router Ensure that the USB connection on the back of the Control System is securely connected C Co om mm mu un niic ca at tiio on n S Sy ym mp pt...

Page 88: ...wo o I I O O p po or rt ts s r re ella at te ed d t to o t th he e s sa am me e d de ev viic ce e w wo ou ulld d b be e iin n t th he e r ro ou ut te e e e g g r ro ou ut tiin ng g t th he e H Hu ub...

Page 89: ...iio on ns s No Power to Unit Check power circuit feeding the Hub Rooms Not Connecting Ensure Hub network has power Check link lights on Ethernet switch for solid illumination Codec Troubleshooting Cal...

Page 90: ...ty 10 to 90 Non Condensing Maximum Elevation 3050 m 10 006 5 ft 26 2 SPI3 Electrical and Physical Specifications Dimensions 609 mm 24 H x 523 mm 20 6 W x 432 mm 17 D Power Consumption 570 VA Input Vol...

Page 91: ...ing Weight router packaging only 21 1 kg 46 6 lbs Shipping Dimensions w x h x d router packaging only 584 mm 23 H x 559 mm 22 W x 533 mm 21 D Total Shipping Weight Router Monitor Control Section Acces...

Page 92: ...Stand w x h x d 533 4 mm x 425 5 533 4 mm x 190 5 mm 21 0 x 16 75 21 0 x 7 5 Weight 6 9 kg 15 2 lbs Power Consumption Max 60 W Input Voltage Range 100 240VAC Total Shipping Weight 7 9 kg 17 4 lbs Shi...

Page 93: ...mm mu un niit ty y The SwitchPoint Infinity 3 Control System is intended for use in the electromagnetic environment specified below The customer or the user of the SwitchPoint Infinity 3 Control Syst...

Page 94: ...f the user of the SwitchPoint Infinity 3 Control System requires continued operation during power mains interruptions it is recommended that the SwitchPoint Infinity 3 Control System be powered from a...

Page 95: ...ting of the transmitter in watts W according to the transmitter manufacturer and d is the recommended separation distance in meters m Field strengths from fixed RF transmitters as determined by an ele...

Page 96: ...l System as recommended below according to the maximum output power of the communications equipment R Ra at te e m ma ax xiim mu um m o ou ut tp pu ut t p po ow we er r o of f t tr ra an ns sm miit tt...

Page 97: ...netic site survey should be considered If the measured field strength in the location in which the SwitchPoint Infinity 3 Control System is used exceeds the applicable RF compliance level above the Sw...

Page 98: ...he SwitchPoint Infinity 3 page 74 Weekly For SPI3 only ensure LEDs for fans located on the back of the video router are illuminated in green when video router is on For SPI3 Lite check the fan status...

Page 99: ...st te em m Clean the Touch Screen To clean the touch screen use window or glass cleaner Put the cleaner on a clean cloth and wipe the touch screen N Ne ev ve er r apply the cleaner directly on the tou...

Page 100: ...ot use alcohol methyl ethyl or isopropyl or any strong solvent Do not use thinner or benzene abrasive cleaners or compressed air of any kind on the Touch Panel display or the preview monitor Do not al...

Page 101: ...place the batteries in the wireless microphone locate the battery hatch on the right side of the unit Slide down the eject button to open the hatch and then replace the batteries Be sure to place the...

Page 102: ...fiin niit ty y 3 3 C Co on nt tr ro oll S Sy ys st te em m d de es sc cr riib be ed d iin n t th hiis s m ma an nu ua all iis s c co on ns st ta an nt tlly y b be eiin ng g r re ev viie ew we ed d a a...

Page 103: ...E THAT THE SOFTWARE IS SUITABLE FOR SUCH USE NO WARRANTIES FOR THE SOFTWARE THE SOFTWARE is provided AS IS and with all faults THE ENTIRE RISK AS TO SATISFACTORY QUALITY PERFORMANCE ACCURACY AND EFFOR...

Page 104: ...FER ALLOWED BUT WITH RESTRICTIONS You may permanently transfer rights under this EULA only as part of a permanent sale or transfer of the Device and only if the recipient agrees to this EULA If the SO...

Page 105: ...103 29 R Re ec cy yc clliin ng g G Gu uiid de e...

Page 106: ...O OI IN NT T I IN NF FI IN NI IT TY Y 3 3 L LI IT TE E N No ot te e T Th he e S SP PI I3 3 L Liit te e s sy ys st te em m s sh hiip ps s w wiit th h e eiit th he er r a a 1 19 9 iin nc ch h o or r 2 2...

Page 107: ...E I It te e m m C Co om mp po o n ne en nt t I It t e em m S Su ub b C Co om mp po o n ne en nt t R Re ec cy yc clliin ng g M Ma at te er riia all C Co od de e Q Qt ty y I Im mp po or rt ta an nt t I...

Page 108: ...ves B Decals Polycarbonate Film 4 Attached by permanent acrylic adhesive C PCB PCB 1 See Items D and E Detail PCB D Heat Sink Aluminum and Steel 1 Aluminum heat sink retained by steel spring clip E He...

Page 109: ...tic elastomer santroprene w nylon rivet and drive screw 4 Remove by single screw per item C Cable Manage ment Nylon 6 6 4 Removes by single screw per item D Decal Polycarbonate Film 1 Attached by perm...

Page 110: ...t t e em m S Su ub b C Co om mp po o n ne en nt t R Re ec cy yc clliin ng g M Ma at te er riia all C Co od de e Q Qt ty y I Im mp po or rt ta an nt t I In nf fo or rm ma at tiio on n 3 Power Supply A...

Page 111: ...ainted with polyester powder coating I It te e m m C Co om mp po o n ne en nt t I It t e em m S Su ub b C Co om mp po o n ne en nt t R Re ec cy yc clliin ng g M Ma at te er riia all C Co od de e Q Qt...

Page 112: ...s Fan 1 Removes with four 4 screws Contains multiple electrolytic CAPs G Daugh ter Cards PCB 3 Removes by depressing clips and rotating out H Battery Lithium battery 1 Non rechargable Lithium coin bat...

Page 113: ...g M Ma at te er riia all C Co od de e Q Qt ty y I Im mp po or rt ta an nt t I In nf fo or rm ma at tiio on n 6 Fan Tray A Chassis Steel zinc coated 1 B Decal Polycarbonate film 1 Attached by permanen...

Page 114: ...k screws Contains a decorative polycarbonate decal attached with acrylic based adhesive B PCB PCB 1 C Heat Sink Aluminum plastic 1 Removes by flexing plastic clip off of device Available installation...

Page 115: ...A Panel Steel zinc coated 1 Removes with two 2 screws four 4 jack screws Contains a decorative polycarbonate decal attached with acrylic based adhesive B PCB PCB 1 Available installation in slots 3 9...

Page 116: ...or rm ma at tiio on n 11 Optical DVI D Input A Panel Steel zinc coated 1 Removes with two 2 screws Contains a decorative polycarbonate decal attached with acrylic based adhesive B PCB PCB 1 C Housing...

Page 117: ...M Ma at te er riia all C Co od de e Q Qt ty y I Im mp po or rt ta an nt t I In nf fo or rm ma at tiio on n 13 DVI IOutput A Panel Steel zinc coated 1 Removes with two 2 screws two 2 jack screws Conta...

Page 118: ...C Heat Sink Aluminum plastic 1 Removes by flexing plastic clip off of device Only in slots 8 and or 9on RIGHT output side I It te e m m C Co om mp po o n ne en nt t I It t e em m S Su ub b C Co om mp...

Page 119: ...In nf fo or rm ma at tiio on n 17 Control KVM A Panel Steel zinc coated 1 Removes with two 2 screws Contains a decorative polycarbonate decal attached with acrylic based adhesive B PCB PCB 1 Any slot...

Page 120: ...Q Qt ty y I Im mp po or rt ta an nt t I In nf fo or rm ma at tiio on n 19 Product Cover A Cover PC ABS plastic 1 Ink pad printed on logo is RoHS and WEEE compliant B Spring Steel 1 Removes when button...

Page 121: ...IT TY Y 3 3 L LI IT TE E 20 Video Pass Through Module A Panel Steel zinc coated 1 STYLE 1 Removes with two 2 screws and four 4 jack screws STYLE 2 Removes with four 4 jack screws and two 2 retention n...

Page 122: ...stions or concerns Stryker Communications 571 Silveron Blvd Flower Mound TX 75028 Toll Free 866 841 5663 1 972 410 7100 For international service locations refer to the Stryker website at the followin...

Page 123: ......

Page 124: ...porate affiliated entities own use or have applied for the following trademarks or service marks t th he e S St tr ry yk ke er r L Lo og go o S Sw wiit tc ch hP Po oiin nt t I In nf fiin niit ty y E E...

Reviews: