61
Linear Editing
Cha
p
te
r 4
Re
c
o
rdin
g
a
nd Pla
y
b
a
c
k
A PFD23 Professional Disc with a 2 times normal data
transfer rate cannot be used for linear editing.
Connections
Make connections in the same way as for a cut editing
system
When making the connections, also refer to the operation
manuals provided with the equipment to be connected.
Preparations for editing
Recording format settings
Before performing clip editing, you need to set the
recording format of the PDW-F1600 units to match the
recording format of the editing target clip. The following
table shows the required settings.
See page 128 for more information about setup menu
operations.
See page 152 for more information about maintenance
menu operations.
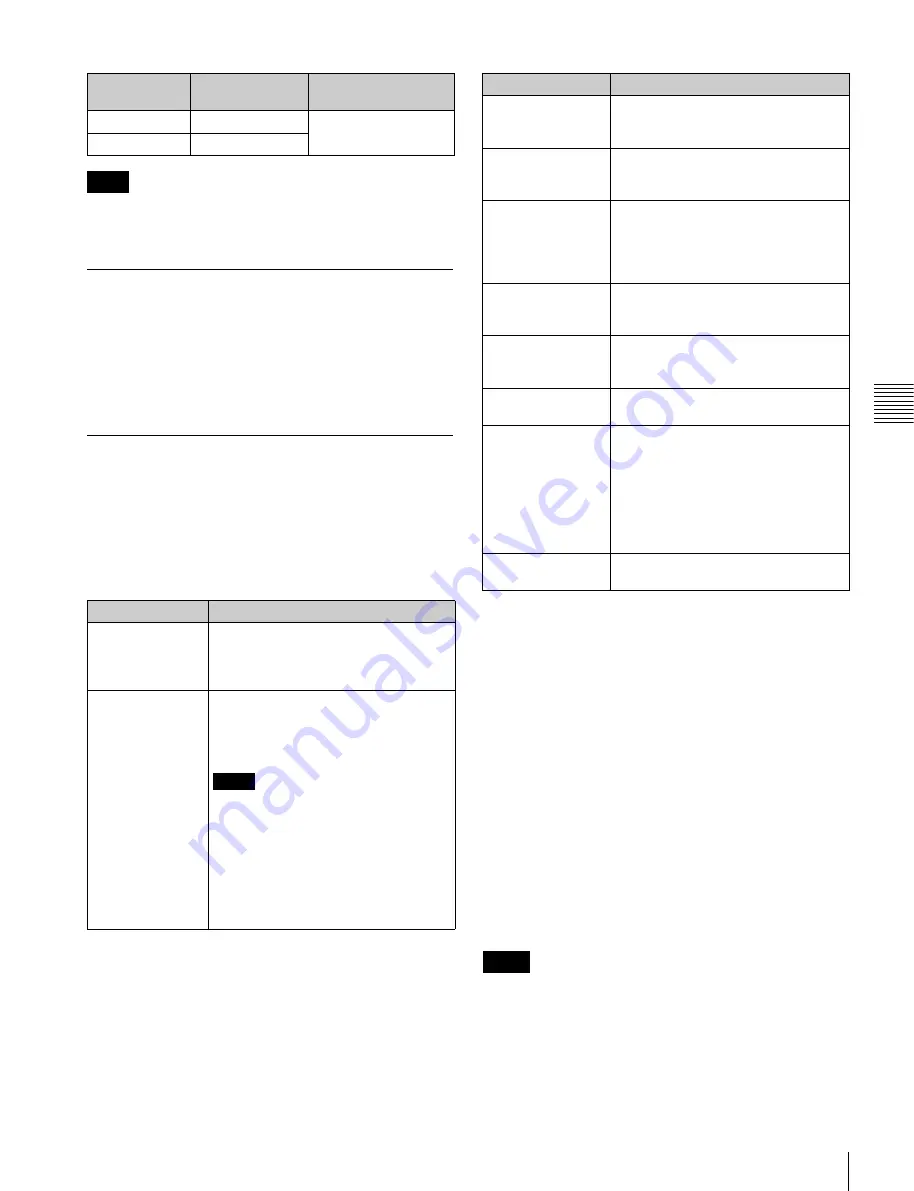
Settings required for editing
The following table shows the settings required for editing.
See page 152 for more information about maintenance
menu operations.
See page 48 for more information about function menu
operations.
See page 128 for more information about setup menu
operations.
To edit clips created by application
software on devices other than XDCAM
devices
You can use application software on devices other than
XDCAM devices to create clips, and then copy them to
this unit as files. To edit such clips, set maintenance menu
item M39: OTHER CONFIG >M394: HD L.EDIT to
“Extra (extra mode)”.
• Clips edited in extra mode cannot be edited on XDCAM
devices with software versions earlier than 1.51, or on
this unit when this unit is set to standard mode.
• If you want to use extra mode, select extra mode on
every PDW-F1600/HD1500 that you connect to the
editing system.
Model number Capacity
Data transfer rate
(writing)
PFD23A
23.3 GB
2.4 times normal
PFD50DLA
50.0 GB
Note
Item
Setting
Recording format
Check the recording format of the clip
with the display window
and select the same format with setup
menu item 031 RECORDING FORMAT.
Audio/Non-audio
(data)
To perform insert editing of non-audio
(data), set maintenance menu item
M37: AUDIO CONFIG >M372: NON-
AUDIO INPUT to “data”.
Notes
• When you insert non-audio into a clip,
the channels containing the non-
audio are treated as non-audio
across their entire length.
• Use channel pairs (CH1/2, CH3/4,
CH5/6, CH7/8) for non-audio insert
editing. Non-audio editing is not
executed unless a channel pair is
specified.
Item
Setting
Audio digital signal
processor
With the maintenance menu item M39:
OTHER CONFIG >M393: AUDIO DSP,
select “linear edit”.
Video input signal
Select the video input signal with V
INPUT on page P1 VIDEO of the
function menu.
Audio input signal
Select the audio input signal with A1
INPUT and A2 INPUT on page P2
AUDIO, and A3 INPUT to A8 INPUT
on page P3 AUDIO of the function
menu.
Input audio level
Adjust the input audio level with the
CH-1/ALL CH and CH-2 to CH-4
knobs.
Edit point transition
type
With setup menu item 317 AUDIO
EDIT MODE, select “cut edit” or “cross
fade”.
Audio mix
See the next section “To set up mixing
of audio input signals”.
Time code
• With TCG on page P5 TC of the
function menu, select “INT”.
• With PRST/RGN on page P5 TC of
the function menu, select
“PRESET”.
• With RUN MODE on page P5 TC of
the function menu, select “FREE
RUN”.
Repeat playback
mode
With setup menu item 142 REPEAT
MODE, select “off”.
Notes


