1-22
Chapter 6 Adjusting and Setting Through Menus
Chapter 6
Adjusting and Setting Through Menus
91
(GB)
Icon/Menu
Submenu
Setting
(page)
VTR
VTR SET
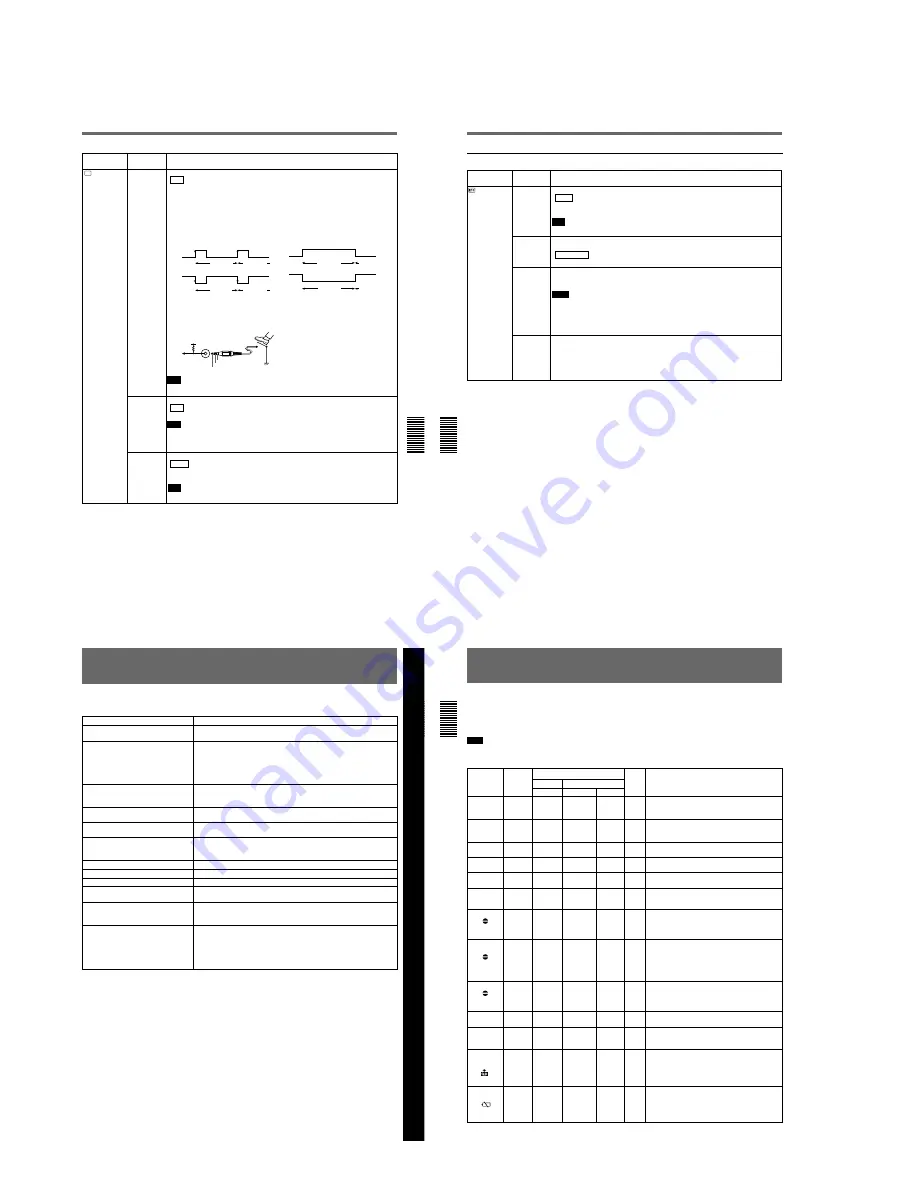
FOOT SW
Selects a foot switch mode.
OFF :
Disables the foot switch.
EDGE HIGH:
Switches between recording and recording pause mode each time you
release the foot switch.
EDGE LOW:
Switches between recording and recording pause mode each time you press
the foot switch. (This is the most popular use for foot switch.)
LEVEL HIGH:
Records only while the foot switch is released.
LEVEL LOW:
Records only while the foot switch is pressed.
The following shows the trigger statuses.
The following shows the foot switch circuit.
Note
You cannot operate audio dubbing or duplication from the foot switch.
EDGE HIGH
EDGE LOW
Recording
Recording
pause
Recording
Recording
pause
LEVEL HIGH
LEVEL LOW
Recording
Recording
pause
Recording
Recording
pause
DSR-50/50P
5 V
Stereo
minijack
GND
Tally LED
Foot Switch
DV EE OUT
(page 37 (GB))
Selects the output from the DV IN/OUT connector in the EE mode.
OFF :
Outputs only the playback video and audio signals from the DV IN/OUT connector.
ON:
Outputs the selected analog input signals from the DV IN/OUT connector.
Note
When you connect a computer to the DV IN/OUT connector, depending on your computer
software, the selected analog input signals may be output to the computer even if this item
is set to OFF.
STILL PICT
Switches the image displayed in the still mode.
AUTO :
Displays an optimized image according to the movement in the image.
FRAME:
Displays a frame image.
FIELD:
Displays a field image.
Note
If you select FIELD, the image of field 2 is displayed.
Operating the Menus
Chapter 6 Adjusting and Setting Through Menus
92
(GB)
Chapter 6
Adjusting and Setting Through Menus
OTHERS menu
Icon/Menu
Submenu
Setting
(page)
OTHERS
BEEP
Selects the beep.
BEEP :
Normal beep
MELODY:
Melody beep (The melody beep is also mixed during a menu operation.)
OFF:
Disables the beep.
Note
The beep sound is mixed only on the headphone sound and return sound to the camera.
A BACK COL Changes the background color of the AUDIO screen when you have set the DISPLAY
(MENU/TC/AUDIO) selector on the front panel to AUDIO.
HALFTONE :
Halftone
BLACK:
Black
CLOCK SET
Sets the internal clock of the unit.
Rotating and pressing the SEL/PUSH EXEC dial, sets the time (year, month, day, hour and
minute). (When you set the minute, the second count will start from 00.)
Notes
• Regardless of the DATE DISP setting, the date is displayed in the Y/M/D format while you
are setting CLOCK SET.
• The internal backup battery will be fully charged in about 10 hours when power is provided
to the unit. A fully charged internal backup battery can run the internal clock for about one
month without the battery pack or power provided through the AC adaptor.
HRS METER
(page 97 (GB))
Displays the accumulated time counts (by the digital hours meter) in units of 10 hours or 10
counts.
OPERATION:
Power on duration
DRUM RUN:
Drum rotation duration
TAPE RUN:
Tape run duration
THREADING:
Tape unthreading count
Chapter 7
Maintenance
93
(GB)
Chapter 7 Maintenance
Symptom
Cause/Remedy
The power cannot be turned on.
• Battery pack charge is low.
t
Replace the battery pack.
• The AC adaptor is disconnected.
t
Connect the AC adaptor.
The unit will not operate even if the power
has been turned on.
• Moisture condensation has occurred.
t
Turn off the power, remove the battery
pack and disconnect the AC adaptor. Reinstall the battery pack or connect the
AC adaptor after about one minute and turn on the power. Then if there is a
cassette in the unit, remove the cassette and keep the cassette lid open, power
on the unit and leave it on for more than one hour.
• The cassette is not inserted straight.
t
Insert it straight.
The cassette cannot be inserted.
• There is moisture condensation on the head drum.
t
Keep the cassette lid
open and turn the power on. Then, wait more than one hour.
• The cassette is not inserted straight.
t
Insert it straight.
It takes time to eject the cassette.
This is not a malfunction.
t
This unit ejects the cassette slowly to protect the
tape.
No picture.
The video heads are dirty.
t
Clean the video heads using the supplied cleaning
cassette.
Noise appears on the screen.
• A damaged cassette is inserted.
t
Insert an other cassette.
• The video heads are dirty.
t
Clean the video heads using the supplied
cleaning cassette.
No picture via the DV jack.
Reconnect the i.LINK cable (DV cable) (not supplied).
The audio is noisy.
A damaged cassette is inserted.
t
Insert an other cassette.
Pause is released automatically.
Pause mode is automatically released to protect the tape.
Duplication does not function.
Check the STOP/CAUTION No. and the warning messages displayed on the
LCD monitor. Take the appropriate action
(See page 72 (GB)).
Audio dubbing does not function.
You are trying to dub the sound on a DV-formatted tape.
t
You can dub the
sound only on a DVCAM-formatted tape. Use a DVCAM-formatted tape
(See
page 74 (GB)).
A menu is not available.
• If you have set the DVCAM/DV select switch to DV, some menus will be
disabled.
t
Set the DVCAM/DV select switch to DVCAM
(See page 29 (GB)).
• Some menus are only available in the EE mode or playback mode.
t
Set the
unit to the EE mode or playback mode.
• Some TC/UB SET menu items are available only if you have set TC MAKE to
PRESET.
t
Set TC MAKE to PRESET.
Troubleshooting
Please check the following before contacting your Sony dealer.
Chapter 7 Maintenance
94
(GB)
Chapter 7
Maintenance
Chapter 7 Maintenance
Alarm Message
Alarm Messages
If an error occurs, a warning appears on the LCD monitor and the VIDEO OUT1 output (if the SUPERIMPOSE
switch is set to ON). If you have set the DISPLAY (LCD OFF/OFF/ON) selector to LCD OFF, you still can
recognize a warning by means of the display window, the warning indicator or warning tone. Check them with the
following list.
Note
A warning tone is only output to the headphones or return sound to the camera. The warning tone is not output to
the AUDIO MONITOR OUT jack or the AUDIO OUT jacks.
LCD
monitor
Display
window
Indicator lamp (flash/on)
a)
Unit
Camera
WARNING
REC/Tally
BATT
Beep
Description/Recovery
%
%
Rapid
flashing
Rapid
flashing
Beep
Moisture condensation (without a tape)
t
Keep the
cassette lid open and turn the power on, then wait
more than one hour.
%
Z
%
Z
Rapid
flashing
Rapid
flashing
Beep
Moisture condensation (with a tape)
t
Remove the
cassette and keep the cassette lid open and turn the
power on, then wait more than one hour.
Q
NO TAPE
Q
Slow
flashing
Beep
You tried to record without a cassette.
t
Insert a
cassette.
Q
Q
Slow
flashing
Slow
flashing
No
beep
The tape is reaching the end.
t
Provide a new
cassette.
Q
Z
TAPE END
Q
Z
ON
Rapid
flashing
Beep
The tape reached the end and still tried to record.
t
Rewind the tape or replace the tape with a new one.
Q
Z
Q
Z
Slow
flashing
Beep
The cassette is write-protected. (The REC/SAVE switch
is set to SAVE.)
t
Set the REC/SAVE switch to REC
or use another cassette
(See page 40 (GB)).
REC MODE
Slow
flashing
Beep
You tried to dub the sound onto a tape that is not
DVCAM-formatted.
t
Use a DVCAM-formatted tape
on which the sound has been recorded in the 32 kHz
audio mode (4-channel/12 bits).
TAPE
Slow
flashing
Beep
You tried to dub the sound onto a blank tape or onto
a tape on which the sound has been not recorded in
the 32 kHz audio mode (4-channel/12 bits).
t
Use a
DVCAM-formatted tape on which the sound has been
recorded in the 32 kHz audio mode (4-channel/12
bits).
DV IN
Slow
flashing
Beep
You tried to dub the sound when the INPUT SELECT
selector has been set to DV.
t
You cannot dub the
sound in the DV input mode. Select another input
mode.
CLOCK SET
No
beep
You have not set the clock when you turned on the unit.
t
Set the clock with the menu
(See page 92 (GB)).
COPY
INHIBIT
Slow
flashing
Beep
You tried to record a copyright-protected source.
t
You cannot record a copyright-protected source
(See page 43 (GB)).
Rapid
flashing
Rapid
flashing
No
beep
The video heads are clogged.
t
Clean the video
heads with the supplied cleaning cassette. (The unit
detects if the video heads are clean only before
recording. If the video heads get clogged during
recording, the unit cannot detect it.)
e
Slow
flashing
Slow
flashing
Slow
flashing
No
beep
The power voltage is low.
t
If you are using a
battery pack, replace the battery pack. If you are
using an AC adaptor, select NI-CD in
u
REMAIN. If
the warning is still displayed, use an AC adaptor that
meets the specifications of the unit.
x
Y
x
Displayed
alternately
CLEANING
CASSETTE


