EN.17
(by anchor or screw) in accordance with
para. 7.3.2 of this Manual.
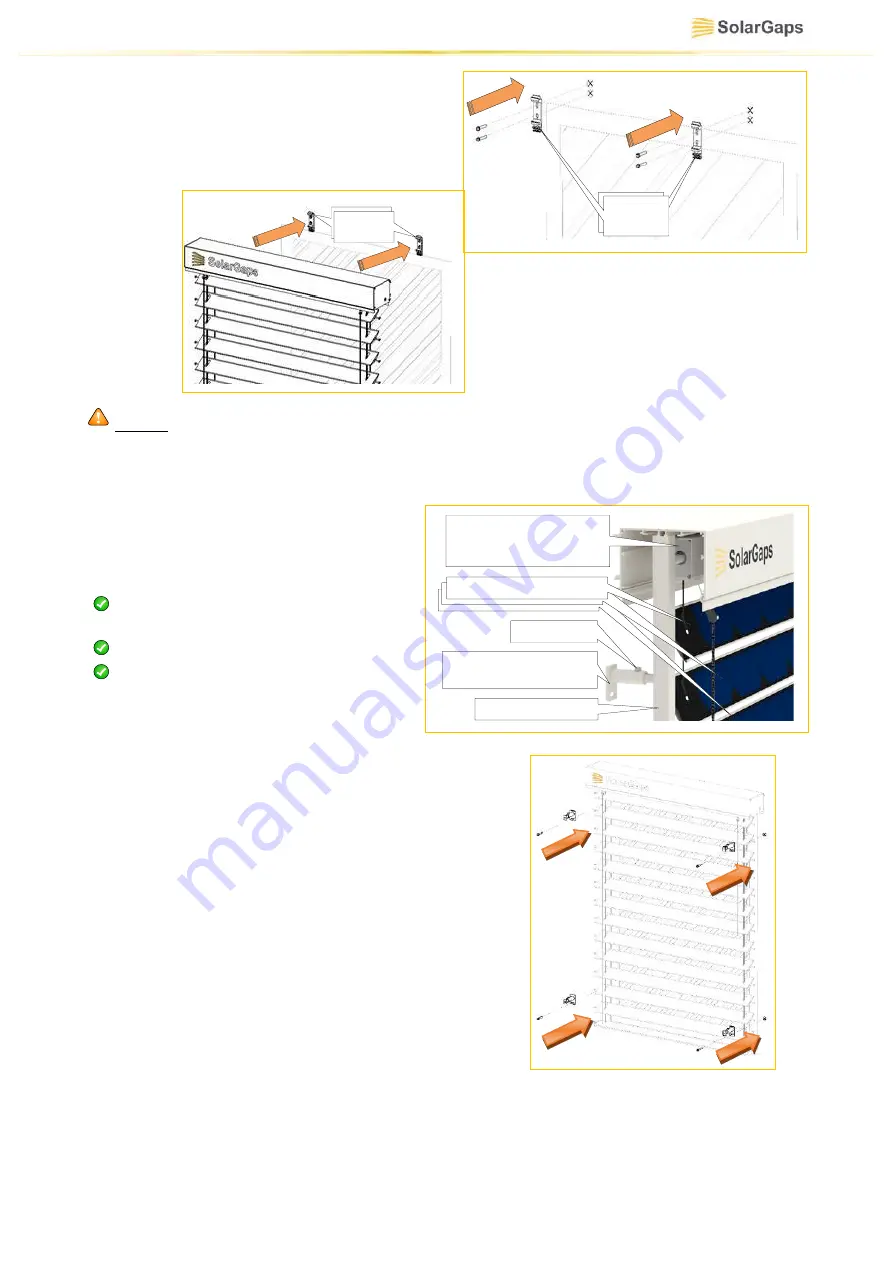
See Figure on the right
→
кронштейни
-
зачіпи
Latch
brackets
7.2.4.
кронштейни
-
зачіпи
Latch
brackets
Hang up the cornice with casing on the
latch brackets.
←
See Figure on the left.
NOTE:
The package of BLINDS includes a hard casing made of extruded aluminium
alloy and a cornice made of high strength aluminium section. Therefore, installation is
highly simplified since the latch brackets can be fixed on walls or window frames in
convenient places
.
7.3.
Install the slotted side guides as
follows:
7.3.1.
Mark out points for holes to fix the
mushroom brackets taking into
account the following requirements:
offset from the end of a guide ~
100 mm;
equispaced locations of brackets;
vertical position of the guides.
Casing containing electric motor,
mechanisms and control unit
located under cornice
ламелі
з
сонячними
елементами
Fixing screw
Mushroom corbel for installation
of the slotted side guide
Slotted side guide
ламелі
з
сонячними
елементами
Slats with solar cells
7.3.2.
Drill holes to fix the mushroom brackets -the
same way as in para. 7.2.3 of this Manual.
7.3.3.
Fix the mushroom brackets to the working
surface using an appropriate fixing method (by
anchor or screw) in accordance with para. 7.2.3 of
this Manual.
See Figure on the right
→
:
7.3.4.
Insert
guiding rollers
of slats with solar cells
into slotted side guides in a way to ensure free
motion of the slats under operating conditions.
7.3.5.
Summary of Contents for SGV1C80-10-R Series
Page 1: ...VENETIAN BLINDS WITH SOLAR PANELS OPERATION MANUAL EN ...
Page 43: ...EN 43 Annex 2 ...
Page 44: ...EN 44 Annex 3 ...


