


SECTION 3 - INSTALLATION
Page S3-50
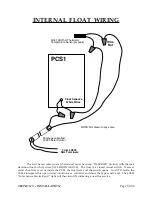
CIRCUIT BOARD CONNECTIONS
Transformer
Plug
Yellow
Green
Red
SENSORS
WTR SOL
Attic
Sensor
Pool Water
Sensor
Green Ground
Wire to
Transformer
Do Not Short Pins
VLV SWP PMP
COMPOOL
Relay to power PCS1
plugs into PMP socket
PMP Socket
Plug the
PCS1 Power Relay
installed at the bottom of the high
voltage compartment into this socket. [See next page].
SWP Socket
Plug the optional sweep [pool cleaner] pump relay into this socket.
VLV Socket
Plug the bypass valve operator into this socket.
WTR Terminals
Connect the pool water temperature sensor wires here.
SOL Terminals
Connect the attic temperature sensor wires here.
Power Plug
The three wire keyed plug from the power transformer plugs into the
upper right corner of the circuit board.
Green Ground Lug
Ensure that the green ground screw with lug is connected to the lower
right corner of the circuit board.
Summary of Contents for PCS1
Page 7: ...SECTION 1 SYSTEM ARRIVAL Page S1 1 SECTION ONE SYSTEM ARRIVAL...
Page 22: ...SECTION 2 HEATING DATA Page S2 1 SECTION TWO HEATING DATA...
Page 28: ...BTUS Vs GPM BTUS Vs T SECTION 2 HEATING DATA Page S2 7...
Page 34: ...SECTION 3 INSTALLATION Page S3 1 SECTION THREE INSTALLATION...
Page 65: ...Attic Installation Photos SECTION 3 INSTALLATION Page S3 31...
Page 66: ...Attic Installation Photos SECTION 3 INSTALLATION Page S3 32...
Page 88: ...SECTION 4 SERVICE Page S4 1 SECTION FOUR SERVICE...
Page 99: ...Common Questions Page 1 of 10 COMMON QUESTIONS...
Page 109: ...Dictionary of Terms Page 1 of 4 DICTIONARY OF TERMS...


