


SECTION 3 - INSTALLATION
Page S3-10
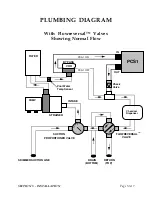
PLUMBING NOTES
NOTE
: In theses notes, some comments refer specifically to flowreversal
valves that allow the poolÕs water to rise from the bottom of the pool. Such a
condition makes the pool more enjoyable to use since the water is the same
temperature throughout the pool. If the flowreversal valves are not used, simply
ignore these comments. See the plumbing diagrams that follow for further
explanation.
1. The use of a
temporary bypass loop
at the support system simulates the
attic based PCS1 and allows the support system to be completely tested prior to
plumbing the PCS1 and bringing it on line. While this step is certainly optional,
those who are inexperienced in PVC plumbing -- should give it serious
consideration.
2. The
support system plumbing
is the most complicated part of the PCS1
installation. Once it has been determined that the support system is plumbed
properly and functional -- the balance of the installation is relatively simple.
3. A
bypass testing loop
can be installed at the support system, within the
attic, or at any point up to where the PCS1 is to be installed.
NOTE
: the bypass loop, when installed within the attic, can take the form of a
section of pipe with union fittings identical to those on the PCS1. An attic bypass
loop is helpful when the entire installation can be completed and there is a delay in
the PCS1 delivery.
4.
Rigid PVC pipe
is used at the support system location for most
connections. Use of 2Ó pvc pipe can make the valve installations easier. It has better
flow characteristics than 1 1/2Ó pvc. This helps on long pipe runs or large pools.
5.
Flexible PVC pipe
can be used within the attic to minimize joints and
provide installation ease. This flexible pvc pipe should be a continuous length from
both inlet and outlet through the eaves or other location where it is connected to
the rigid pvc pipe with a straight SXS coupling [cemented].
Summary of Contents for PCS1
Page 7: ...SECTION 1 SYSTEM ARRIVAL Page S1 1 SECTION ONE SYSTEM ARRIVAL...
Page 22: ...SECTION 2 HEATING DATA Page S2 1 SECTION TWO HEATING DATA...
Page 28: ...BTUS Vs GPM BTUS Vs T SECTION 2 HEATING DATA Page S2 7...
Page 34: ...SECTION 3 INSTALLATION Page S3 1 SECTION THREE INSTALLATION...
Page 65: ...Attic Installation Photos SECTION 3 INSTALLATION Page S3 31...
Page 66: ...Attic Installation Photos SECTION 3 INSTALLATION Page S3 32...
Page 88: ...SECTION 4 SERVICE Page S4 1 SECTION FOUR SERVICE...
Page 99: ...Common Questions Page 1 of 10 COMMON QUESTIONS...
Page 109: ...Dictionary of Terms Page 1 of 4 DICTIONARY OF TERMS...


