7
Silhouette Cameo® 4 User Manual
Navigate Silhouette Studio®
Now that you’ve downloaded Silhouette Studio®, it’s time to learn how to use it. To open Silhouette Studio®,
locate the Silhouette Studio® icon on the desktop or in the Start Menu on your PC or in the Applications
folder on your Mac. Double-click the icon to run the application.
Once Silhouette Studio® has loaded, you will notice a blank 12-inch-by-12-inch design area on your screen as well as
tools that surround that area.
In this manual, you will learn the basics of how to use the software. If you would like to learn more, you can access the
Silhouette Studio® software manual. You can find the manual on SilhouetteAmerica.com/setup under Step 6 or on
Silhouette101.com.
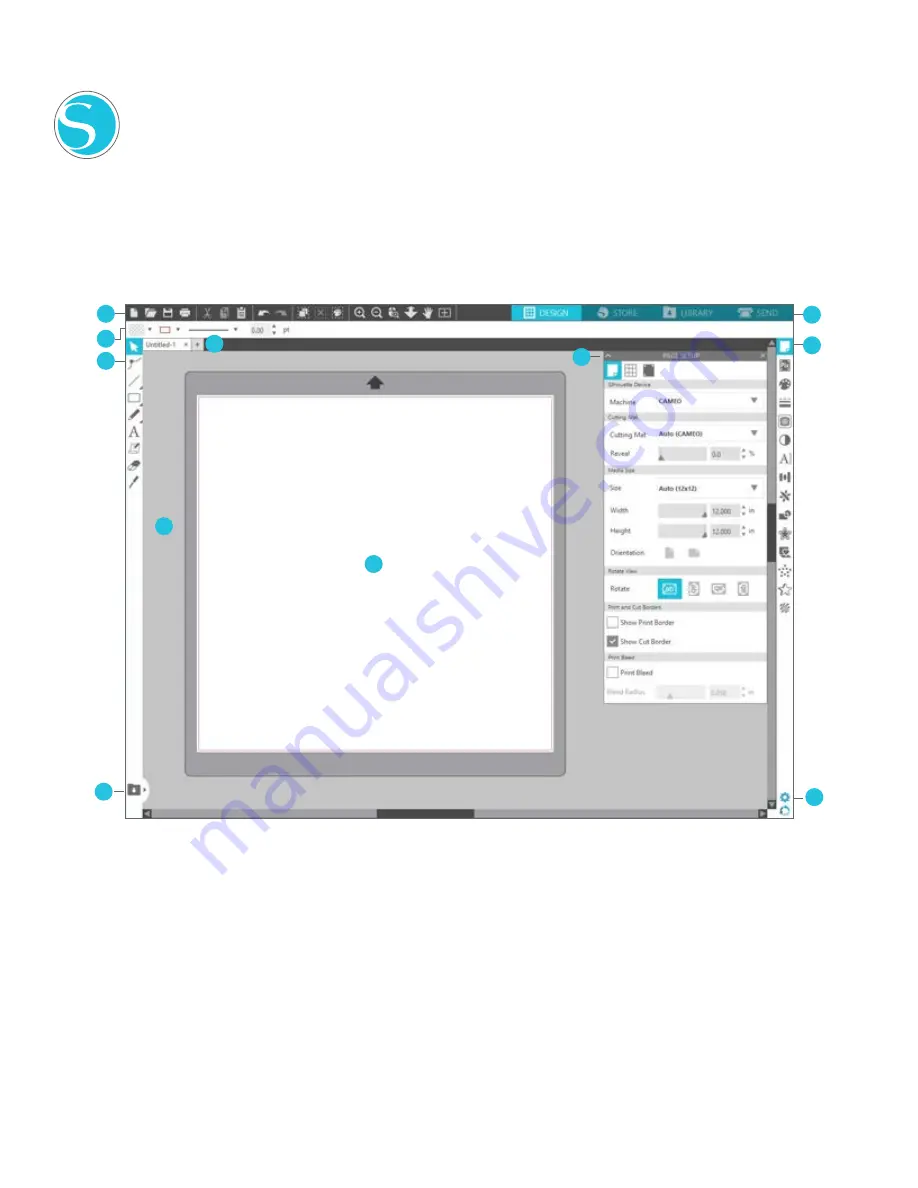
Work Area Overview
1. Document Tools—Tools you need to adjust your document or select objects on your document.
2. Quick-access Toolbar—These tools that come up are specific to the task you are doing to help make adjustments easier.
3. Drawing Tools—The drawing tools are what you’ll use to make shapes and add text to the design area.
4. Library Split Screen—This button allows you to create a library/design space split screen.
5. Document Tabs—These tabs are what you’ll use to switch between documents you have open.
6. Holding Area (Gray)—The holding area can be used to hold designs if you’re rearranging your design space. Designs left in this area will not be
cut or printed.
7. Active Cut Area—Here you’ll create and place your designs. Anything left in this area can be cut or printed.
8. Navigation Tabs—These tabs will take you to certain places in the software.
9. Silhouette Studio® Tools—The Silhouette Studio® tools have different functions you can use to adjust your designs.
10. Panels—Here is where the panels for the Silhouette Studio® tools pop up to give you more options.
11. Preferences and Themes—These options allow you to adjust your preferences and settings for Silhouette Studio®.
1
2
3
4
5
6
7
8
9
11
10
Summary of Contents for CAMEO 4
Page 1: ...User Manual ...


