


6
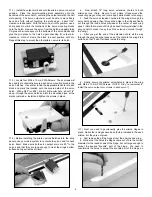
Next apply glue to the hardwood front wing joiner and to the
aluminum tube rear wing joiner. Next slide the wing joiners into
one wing panel, and then slide the other wing panel in place over
the exposed end of the joiners, joining the two panels at the
center. Firmly press the wing panels together and wipe off any
excess glue with a paper towel and alcohol. Make sure the wing
panels are accurately aligned with each other by checking the
alignment of the leading and trailing edges.
Use tape at the
leading and trailing edge joints to hold them in the correct position.
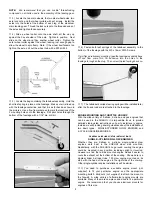
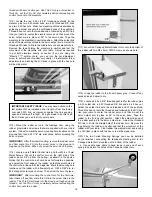
Place a clean rag on the floor next to a wall. Stand the wing
upright, with one wing tip on the cloth, as vertical as possible,
leaning against the wall. Place a weight on the upper wing tip and
allow this assembly to fully cure. Continue watching for excess
epoxy oozing out of the joint as it cures and wipe it off.
NOTE: It's very important to use plenty of epoxy when gluing the
wing panels together. The strength of your wing joint depends on
it! Don't worry if the excess glue oozes out and gets on the
covering material. With slow-drying epoxy, you will have plenty of
time to clean up all the glue smears with a paper towel soaked in
rubbing alcohol. Also, if possible get someone to help you with this
procedure. An extra set of hands makes the job much easier!
While one person holds the two wing panels firmly together in
correct alignment, the other person can clean off the excess glue
and tape the wing panels together.
❑
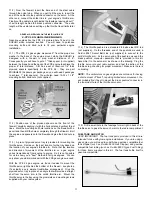
9) Locate the 1/8" thick plywood part WF-1 and trial fit it in
place on the front of the wing. The top edge of WF-1 must fit flush
with the top surface of the wing. Also make sure WF-1 seats
tightly against the front surface of the wing. There should be no
gaps! If there is a gap, find out what's causing it and fix it. Once
you are satisfied that the plywood former fits properly, glue it
securely in place. Let dry.
❑
10) Using a 3/8" dia. bit, drill two holes in the front of the wing
for the 3/8" dia. x 1-5/8" long leading edge dowels. The holes in
WF-1 show the exact locations.
Drill completely through the
foremost wing structure, including the hardwood wing joiner.
that the hinge can be pushed in far enough for the pivot point to
line up with the front "V" point of the aileron leading edge. We
recommend enlarging the opening of the hinge holes slightly with
a hand-held 1/4" dia. drill bit. You only need to twist the drill bit
in about an 1/4" or so. Countersink all of the hinge holes in the
leading edge of the ailerons in this manner. This will allow a
gapless hinge line with proper hinge movement.
c. Trial fit the ailerons back onto all the hinges and the wing one
more time to make sure everything lines up properly. You want the
beveled leading edge of the aileron to be as close to the mating
wing as possible while still allowing full movement. When satisfied
that everything is good, take it back apart for the gluing process.
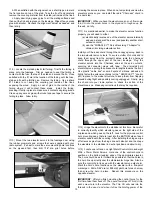
d. We recommend using slow drying epoxy glue for gluing the
hinges so that you will have ample time for cleanup and alignment.
Epoxy the hinges into the ailerons first and let dry. Then hinge
each aileron to its appropriate wing panel. The best procedure
with this type of hinge is to inject the glue into the hole and then
insert the hinge.
Use a clean cloth soaked with methanol or
rubbing alcohol to wipe off any excess glue that has oozes out
onto the control surface. Then move on to the next hinge.
IMPORTANT NOTE: Be sure to correctly identify which aileron is
for the right wing and which is for the left wing by looking for the
aileron horn plywood mounting pad that is inset into the BOTTOM
side of each aileron, underneath the covering.
❑
8) Now it's time to glue the wing panels together permanently!
Start by mixing up an ample amount of slow-drying epoxy glue.
Use a wire, stick or small throw-away brush to liberally coat the
inside of the wing joiner pockets in the end of the wing panels with
glue. Then apply a liberal coat of epoxy to the exposed center ribs
of each wing panel.
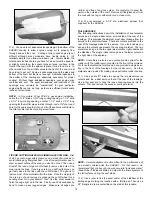
MODELER’S TIP: Apply a coat of petroleum jelly, such as
Vaseline
®
, to the hinge knuckle. The petroleum jelly will keep
the epoxy from sticking to the knuckle and causing a bind. Do
not get petroleum jelly on the round shank of the hinge, where
you want the glue to stick.
Summary of Contents for SUKHOI SU-31 ARF
Page 23: ...23 ...