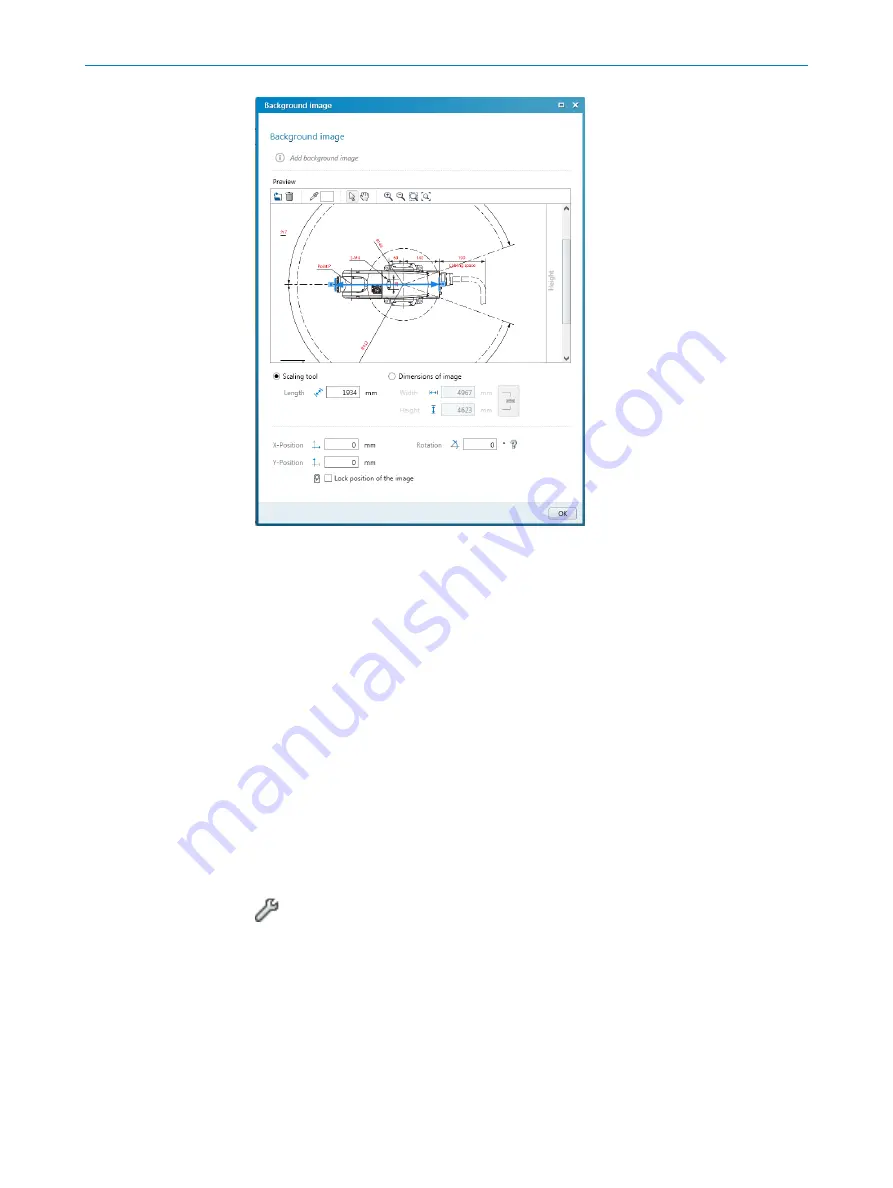
background image

Figure 51: Background image

1.

Click on 

Edit background image

 in the toolbar.

The 

Background image

 dialog box opens.

2.

Click on 

Search...

.

3.

Select the file for the background image.

Safety Designer displays the background image.

4.

If necessary, use the pipette icon to select a color of the image to make this color
transparent.

5.

Adjust the size of the image with the scaling tool or by directly entering the dimen‐
sions. Use the scaling tool to move the tips of the blue arrow to two known points
and then enter the distance between the points in the 

Length

 field.

6.

Enter the 

X position

Y position

 and 

rotation

 in the field editor’s coordinates system.

You can then freely move or rotate the background image in the field editor.

7.

If required, click the option 

Lock position of background image

.

It is no longer possible to change the background image in the field editor.

7.8.5

Settings for the field editor

You can edit settings for the field editor.

You can open the settings using the tool 

Edit field editor settings

.

Field calculation

You specify whether the fields are calculated manually or automatically after drawing.

If you select the 

Manual

 option, first draw the areas to be monitored. Then click on 

Calcu‐

late field

 so that the Safety Designer calculates the field that the safety laser scanner

actually monitors.

If you select the 

Automatic

 option, the drawn areas are immediately converted into

fields.

CONFIGURATION

84

O P E R A T I N G   I N S T R U C T I O N S | outdoorScan3 Core I/O

8023152/160F/2019-11-14 | SICK

Subject to change without notice

Summary of Contents for outdoorScan3 Core I/O

Page 1: ...O P E R A T I N G I N S T R U C T I O N S outdoorScan3 Core I O Safety laser scanner ...

Page 2: ...ible within the limits of the legal determination of Copyright Law Any modifica tion abridgment or translation of this document is prohibited without the express writ ten permission of SICK AG The trademarks stated in this document are the property of their respective owner SICK AG All rights reserved Original document This document is an original document of SICK AG 2 O P E R A T I N G I N S T R ...

Page 3: ...nitoring case 20 3 3 Example applications 21 4 Project planning 23 4 1 Manufacturer of the machine 23 4 2 Operator of the machine 23 4 3 Outdoor applications 23 4 3 1 Permissible outdoor use 23 4 3 2 Ambient conditions when used outdoors 24 4 4 Assembly 28 4 4 1 Protection from influences 30 4 4 2 Preventing unprotected areas 30 4 4 3 Response time of the safety laser scanner 33 4 4 4 Monitoring c...

Page 4: ...onfiguration 66 7 1 General requirements 66 7 1 1 Delivery state 66 7 2 Safety Designer 66 7 2 1 Installation assistant 66 7 2 2 Projects 66 7 2 3 User interface 67 7 2 4 User groups 67 7 2 5 Settings 68 7 2 6 Configuration 69 7 3 Overview 71 7 3 1 Functional scope 72 7 4 Reading configuration 73 7 5 Identification 74 7 6 Application 75 7 7 Monitoring plane 76 7 7 1 Parameters for the monitoring p...

Page 5: ...tart 99 7 15 2 Factory settings 100 7 15 3 Managing passwords 100 8 Commissioning 101 8 1 Safety 101 8 2 Alignment 101 8 3 Switching on 102 8 4 Thorough check 103 9 Operation 105 9 1 Safety 105 9 2 Regular thorough check 105 9 3 LEDs 105 9 4 Buttons and display 106 10 Maintenance 111 10 1 Safety 111 10 2 Regular cleaning 111 10 3 Replacing the optics cover 112 10 4 Replacing the safety laser scann...

Page 6: ...er time 135 13 6 Sensing range 136 13 7 Dimensional drawings 138 14 Ordering information 139 14 1 Scope of delivery 139 14 2 Ordering information 139 15 Spare parts 140 15 1 Safety laser scanner without system plug 140 15 2 System plug 140 16 Accessories 141 16 1 Brackets 141 16 2 Connection technology 143 16 3 Alignment aid 144 16 4 Cleaning agent 144 16 5 Test rods 144 17 Glossary 145 18 Annex 1...

Page 7: ...n from interference from systems in close proximity 152 19 List of figures 154 20 List of tables 156 CONTENTS 8023152 160F 2019 11 14 SICK O P E R A T I N G I N S T R U C T I O N S outdoorScan3 Core I O 7 Subject to change without notice ...

Page 8: ...nd selected chapters of these operating instructions Target group Chapter of these operating instructions Project developers planners developers designers Project planning page 23 Configuration page 66 Technical data page 129 Accessories page 141 Installers Mounting page 58 Electricians Electrical installation page 62 Safety experts such as CE authorized repre sentatives compliance officers people...

Page 9: ...ing possible danger which may lead to moderate or minor injuries if not prevented NOTICE Indicates a situation presenting possible danger which may lead to property damage if not prevented NOTE Indicates useful tips and recommendations Instructions to action b The arrow denotes instructions to action 1 The sequence of instructions for action is numbered 2 Follow the order in which the numbered ins...

Page 10: ...2014 EN 60825 1 2014 21 CFR 1040 10 and 1040 11 except for changes due to Laser Notice No 50 of 24 06 2007 The safety laser scanner s accessible laser is not hazardous as long as the beam cross section is not reduced by optical instruments such as magnifying glasses lenses tele scopes The curved part of the optics cover is the outlet for the laser radiation The laser marking is located on the unde...

Page 11: ...n framework the machine manufacturer must ensure they conduct the following steps in particular Take into consideration the difference between the application stated explicitly in this document and the actual operational purpose Take into consideration application specific standards e g ISO 25119 Conduct systematic analyses and consult appropriate standards e g IEC 62998 Conduct a systematic valid...

Page 12: ...Configuration For configuration a person is considered competent when he she has the expertise and experience in the relevant field and is sufficiently familiar with the application of the protective device on the machine that he she can assess its work safety aspects Commissioning For commissioning a person is considered competent when he she has the expertise and experience in the relevant field...

Page 13: ...mple using a safe control or safety relays and stop the dan gerous state The safety laser scanner operates on the principle of time of flight measurement It emits light pulses in regular very short intervals If the light strikes an object it is reflected The safety laser scanner receives the reflected light The safety laser scanner calculates the distance to the object based on the time interval b...

Page 14: ...e to allow it to be detected safely The scan cycle time also influences the response time The resolution in protective fields can be set to various values according to the intended purpose Geometry of the scan plane The laser beams emitted cover a sector of a circle so an object can be detected in an area of up to 275 The sector of a circle covered ranges from 47 5 to 227 5 where 90 denotes the ax...

Page 15: ...nd display page 106 Information about connections see Connections page 17 The safety laser scanner can be mounted and operated in any alignment In this docu ment position and direction information is used as follows with respect to the safety laser scanner as long as different usage is not indicated separately The top is the side of the safety laser scanner on which the optics cover is located The...

Page 16: ...ors The safety laser scanner outputs important status information using a number of light emitting diodes The safety laser scanner has a graphical display and 4 pushbuttons for additional information 4 status light emitting diodes are located directly above the display 1 2 3 4 Figure 5 Status LEDs Table 2 Status LEDs Number Function Color Meaning 1 OFF state Red Lights up red when the OSSD pair is...

Page 17: ...ine e g if there is a change of operating mode If the protective device is config ured appropriately it will activate a different monitoring case after receiving a new con trol input The control input information must be transmitted reliably Generally at least 2 sepa rate channels are used to do this A static control input is a dual channel control input which evaluates the status of every channel...

Page 18: ...eld types depending on how the safety laser scanner is used Protective field Warning field Table 3 Field types and their function Protective field Warning field Safe switch off according to ISO 13849 1 Yes PL d No Max scanning range of the safety laser scanner 4 0 m 40 m Purpose Detection and protection of people Functional use no safety rele vant use Protective field The protective field protects...

Page 19: ...elds in a field set are monitored simulta neously A field set can contain various types of field A typical application is the use of a protective field with one or more warning fields if a vehicle approaches a person a warning field triggers an optical or acoustic signal If the person does not react to this and the vehicle continues to approach the safety laser scanner detects an object in the pro...

Page 20: ... can be assigned to each operational status The safety laser scanner receives a defined signal for the current operational status via the control inputs If there is a change of signal the safety laser scanner switches from one monitoring case to the monitoring case that is assigned to the new signal as well as the new operational status Generally one field set is assigned to each monitoring case F...

Page 21: ...ionary or mobile Horizontal scan plane Leg detection and detection of persons in a lying position Hazardous area protection In hazardous area protection people are detected if they stay in a defined area This type of protective device is suitable for machines where it is possible to see a haz ardous area completely from the reset pushbutton When the hazardous area is entered a stop signal is trigg...

Page 22: ...e when vehicles are moving or docking at a fixed station The safety laser scanner monitors the area in the direction of travel and stops the vehi cle as soon as an object is located in the protective field Figure 12 Mobile hazardous area protection detection of a person when a vehicle approaches 3 PRODUCT DESCRIPTION 22 O P E R A T I N G I N S T R U C T I O N S outdoorScan3 Core I O 8023152 160F 2...

Page 23: ...er scanner necessitate a new risk assessment The results of this risk assessment may require the operator of the machine to meet a manufacturer s obligations b Changes to the device s configuration may impair the protective function The effectiveness of the protective device must be checked after any change to the configuration The person carrying out the change is also responsible for maintain in...

Page 24: ...ood see Accessories page 141 b Mount the device in a protected area of the vehicle or machine see Mounting in the machine or vehicle s paneling page 32 Further remedial measures b Set multiple sampling to n 4 if the resultant response time permits this b Configure the protective field to be as small as possible The smaller the moni tored area the higher the availability of the machine b Make provi...

Page 25: ...e off although no people are located in the protective field Moisture can condense on the optics cover in particular when moving the device between indoors and outdoors due to the rapid change in temperature Remedial measures b Mount the device in a protected area of the vehicle or machine b Install an air circulator on the device b Install additional heating Precipitation and water spray on the d...

Page 26: ...he optics cover facing downwards to prevent accumulation of contaminants on the contamination measurement feature 1 Contaminants fall past the optics cover water flows off 2 Contamination measurement feature remains unobscured 3 Contamination or water collects on the base of the optics cover and triggers the contami nation measurement feature When using other suitable measures the device can be mo...

Page 27: ...Keep gases aerosols chemicals and salt spray away from the device b Mount the device in a protected area of the vehicle or machine Direct exposure to sunlight Direct exposure to sunlight can prematurely age the device Direct exposure to sunlight can affect the safety laser scanner This may impair the machine s availability That is to say the safety laser scanner switches the machine off although n...

Page 28: ...risk of tampering must be taken into account in the risk assessment and regular checks must be performed to ensure that there are no objects at close range 50 mm from the optics cover impairing the line of sight of the device 4 4 Assembly This chapter contains important information about the design Information about the individual steps for mounting the device see Mounting page 58 DANGER Hazard du...

Page 29: ...ing b Do not attach an additional front screen b If a viewing slit is required make sure that its size is sufficient see Dimensional drawings page 138 NOTE Certain optical and electromagnetic ambient conditions can affect the safety laser scanner This may impair the machine s availability That is to say the safety laser scan ner switches the machine off although no people are located in the protec...

Page 30: ...ht sources in the scan plane Mount the safety laser scanner so that it cannot be dazzled by incoming sunlight Do not position halogen lights infrared light sources or stroboscopes directly on the scan plane You can check the beam path of the safety laser scanner with the LS 80L scan finder part no 6020756 NOTE You must comply with the standard ISO 13855 when choosing the mounting method 4 4 2 Prev...

Page 31: ...cted If required this area must be secured using an undercut or frame for example Mounting with deflector plates Figure 17 Mounting with deflector plates example b Attach the deflector plates 1 so that it is not possible to step into unsecured areas b Attach the deflector plates so that they lie outside the scan plane PROJECT PLANNING 4 8023152 160F 2019 11 14 SICK O P E R A T I N G I N S T R U C ...

Page 32: ...no one can enter the unsecured areas b Prevent crawling beneath the undercut Design the undercut to be so low 2 that no one can crawl into it Mounting in the machine or vehicle s paneling 1 3 2 4 5 Figure 19 Mounting in vehicle paneling example 1 Mirror rotational axis 2 Scan plane 3 Required viewing slit 4 PROJECT PLANNING 32 O P E R A T I N G I N S T R U C T I O N S outdoorScan3 Core I O 8023152...

Page 33: ...that a person may already be in the newly activated protective field when switching takes place Only switching in time namely before the danger arises for the person at this location ensures protection DANGER Hazard due to lack of effectiveness of the protective device b Switching of the monitoring case should be timed so that the safety laser scanner detects a person in the protective field with ...

Page 34: ...ween monitor ing cases If tCSA tCSR earlier start is not necessary If tCSA tCSR you must start switching between monitoring cases earlier The time advance tCSP required is tCSP tCSR tCSA NOTE In some cases it is not possible to define when to switch for example because pro cessing times of the machine vary or the time advance means that the monitoring of an area finishes too early Follow one of th...

Page 35: ...m dis tance from the hazardous point This distance is required to prevent a person or part of their body from reaching the hazardous area before the end of the machine s danger ous state In hazardous area protection the minimum distance typically defines the protective field size required If you define a number of monitoring cases with different protective fields you must cal culate the protective...

Page 36: ...m height of the scan plane b If it is not possible to mount the safety laser scanner at a height of at least 300 mm use a finer resolution see Calculating required resolution page 40 4 4 5 2 Calculating minimum distance Overview The calculation of the minimum distance is based on international or national stan dards and statutory requirements applicable at the place of installation of the machine ...

Page 37: ...ime TZ tolerance range of the safety laser scanner see Data sheet page 129 ZR supplement for reflection based measurement errors in millimeters mm C supplement to protect against reaching over in millimeters mm The reach approach speed is already included in the formula Supplement ZR for reflection based measurement errors All devices If there is a retroreflector in the vicinity of the protective ...

Page 38: ... 850 mm then use the calculated value as supplement C If the result is C 850 mm then use C 850 mm this value corresponds to an arm s length and is valid as a minimum supplement to protect against reaching over 4 4 5 3 Height of the scan plane Overview If you choose a resolution of 70 mm for hazardous area protection it is not possible to detect a human leg under certain circumstances This is becau...

Page 39: ...e device by crawling beneath b Prevent people from being able to crawl beneath the protective field by mounting the safety laser scanner appropriately b If you mount the protective device higher than 300 mm you must use additional measures to prevent crawling beneath PROJECT PLANNING 4 8023152 160F 2019 11 14 SICK O P E R A T I N G I N S T R U C T I O N S outdoorScan3 Core I O 39 Subject to change...

Page 40: ...e is predefined and is less than 300 mm you can calculate the required resolution using the following formula dr HD 15 50 mm where dr coarsest permissible resolution of the safety laser scanner in millimeters mm HD height of the protective field above the floor in millimeters mm b The safety laser scanner s resolution can be set to the predefined value d If the result dr does not match any of thes...

Page 41: ...ety laser scanner detects a person s legs The protective field is parallel to the direction of approach S Figure 26 Mobile application in horizontal operation for hazardous area protection DANGER Hazard due to lack of effectiveness of the protective device In the case of non compliance it is possible that the dangerous state of the machine may not be stopped or not stopped in a timely manner 1 Cal...

Page 42: ...lated protective field length value is greater than the protective field range of the device the vehicle speed must be reduced The protective field length must then be recalculated based on the reduced speed If you define a number of monitoring cases with different protective fields you must cal culate the protective field size separately for each protective field used Supplement ZR for reflection...

Page 43: ... stopping distance in millimeters mm TZ tolerance range of the safety laser scanner see Data sheet page 129 ZR supplement for reflection based measurement errors in millimeters mm ZF supplement for lack of ground clearance of the vehicle in millimeters mm ZB supplement for the decreasing braking force of the vehicle from the vehicle documentation in millimeters mm Stopping distance SA The stopping...

Page 44: ...sponse time in mil limeters mm The distance SAnS depends on the safety laser scanner s response time and the vehicle s speed The distance SAnS is calculated using the following formula SAnS tR Vmax where tR safety laser scanner s response time in seconds s see Response times page 134 Vmax maximum speed of the vehicle from the vehicle documentation in mil limeters per second mm s If you define a nu...

Page 45: ...t page 129 ZR supplement for reflection based measurement errors in millimeters mm ZF supplement for lack of ground clearance of the vehicle in millimeters mm NOTE In many cases the safety laser scanner is mounted in the center of the vehicle If this is not the case you must define the protective field asymmetrically Make sure that the supplements are located on the right and left of the vehicle 4...

Page 46: ...on about integration in the electrical control Information about the individual steps for electrical installation of the device see Elec trical installation page 62 Information about pin assignment see Pin assignment page 64 2 Inverted mounting is recommended for outdoor applications 4 PROJECT PLANNING 46 O P E R A T I N G I N S T R U C T I O N S outdoorScan3 Core I O 8023152 160F 2019 11 14 SICK ...

Page 47: ...cording to ISO 13849 1 When using a safety controller different signal levels of both OSSDs in an OSSD pair must be detected depending on applicable national regulations or required reliability of the safety function The maximum discrepancy time tolerated by the control must be selected according to the application A restart interlock must be implemented depending on applicable national regula tio...

Page 48: ...aser scanner has a USB connection for configuration and diagnostics The USB connection complies with the USB 2 0 mini B standard female connector The USB connection may only be used temporarily and only for configuration and diagnos tics More information see Configuration page 66 and see Troubleshooting page 116 4 5 3 OSSDs Safety laser scanners with local outputs can be directly integrated into t...

Page 49: ...e that there can be no potential difference between the 0 V connections of the loads and those of the corresponding protective device Figure 33 No potential difference between load and protective device DANGER Hazard due to lack of effectiveness of the protective device In the case of non compliance it is possible that the dangerous state of the machine may not be stopped or not stopped in a timel...

Page 50: ...9 1 or SIL2 as per IEC 62061 Position dependent switching must be carried out by 2 independently wired signal sources such as 2 independent position switches Manual switching that depends on the operating mode must be carried out using a suitable manual control switch Use the same earthing method for all devices that are electrically connected to the safety laser scanner Voltage must be supplied i...

Page 51: ...accordance with SELV PELV IEC 60204 1 for all devices that are electrically connected to the safety laser scanner b All devices that are electrically connected to the safety laser scanner must be sup plied by the same voltage supply Information about electrical properties see Technical data page 129 Information about pin assignment see Electrical installation page 62 4 5 6 Restart interlock Depend...

Page 52: ...an object in the protective field when the reset pushbutton is pressed the safety output stays in the OFF state 4 After the reset the operator can restart the machine in a second step DANGER Hazard due to unexpected starting of the machine b Affix the control switch for resetting the restart interlock outside the hazardous area b Make sure that the control switch cannot be activated by a person wh...

Page 53: ...art interlock and external device monitoring EDM Uni I O 1 configured as input reset Uni I O 2 configured as input external device monitoring EDM Uni I O 3 configured as output reset required Restart interlock and external device monitoring EDM via safety relay The safety laser scanner can be integrated by means of a safety controller or a safety relay for example the safety relay UE10 2FG It is o...

Page 54: ... frequency of the thorough checks of the machine on the basis of the application conditions and the risk assessment Determination of the thorough checks must be documented in a traceable manner A thorough check must be carried out during commissioning and following modifi cations see Thorough check page 103 The regular thorough checks on the safety laser scanner must fulfill certain mini mum requi...

Page 55: ... further thorough checks are required or that some thorough checks must take place more frequently In many cases it makes sense to carry out the following thorough checks together with the regular thorough check Thorough visual check of the machine and the protective device page 57 Thorough check of the relevant points on the checklist see Checklist for initial commissioning and commissioning page...

Page 56: ...must be checked by appropriately qualified safety personnel Thorough check of the area to be protected The area to be protected and the detection capability are checked during this thorough check The thorough check covers the following points Changes in the detection capability thorough check of all configured fields Modifications tampering and damage to the protective device or the machine which ...

Page 57: ...d the protective device SICK recommends the following procedure b Check whether the machine or the protective device has been modified or manipu lated so that the effectiveness of the protective device may be impaired b Check the following points in particular Has the machine been retrofitted Have machine parts been removed Have modifications been made to the machine s surroundings Are there any d...

Page 58: ...onditions specified in the data sheet see Data sheet page 129 DANGER Hazard due to lack of effectiveness of the protective device Persons and parts of the body to be protected may not be recognized in case of non observance b Do not do repair work on device components b Do not make changes to or manipulate device components b Apart from the procedures described in this document the device componen...

Page 59: ...ulated for your machine see Assembly page 28 b Mount the safety laser scanner so that crawling beneath climbing over and stand ing behind the protective fields is impossible Figure 36 Prevent crawling beneath Figure 37 Prevent stepping over NOTE b Read this section completely before mounting the safety laser scanner Mounting instructions b The safety laser scanner s optics cover is an optical comp...

Page 60: ...e safety laser scanner may be mounted rotated by a maximum of 2 5 about the vertical axis b Location of the scan plane see Dimensional drawings page 138 b Take account of the tightening torque for the fixing screws M5 at rear at side 4 5 Nm 5 0 Nm M4 at rear at side 2 2 Nm 2 5 Nm Higher tightening torques may damage the thread Lower tightening torques do not offer sufficient protection against sli...

Page 61: ...engagement 7 5 mm see Dimensional drawings page 138 b Tightening torque 4 5 Nm to 5 0 Nm MOUNTING 5 8023152 160F 2019 11 14 SICK O P E R A T I N G I N S T R U C T I O N S outdoorScan3 Core I O 61 Subject to change without notice ...

Page 62: ...following control and electrical requirements are met so the safety laser scanner can fulfill its protective function b Use suitable power supply b Use the same earthing method for all devices that are electrically connected to the safety laser scanner b Check that all earthing points are connected with the same ground potential b Voltage supply must be supplied in accordance with SELV PELV IEC 60...

Page 63: ...r without reverse polarity protection diode you must connect the 0 V connections of these loads and those of the corresponding protective device individually and directly to the same 0 V terminal strip In the event of a fault this is the only way to ensure that there can be no potential difference between the 0 V connections of the loads and those of the corresponding protective device Figure 40 N...

Page 64: ...ections Safety laser scanner Suitable system plug Plug connector outdoorScan3 Core I O MICSX UBIZZZZZ1 part number 2101638 Connecting cable with M12 plug connector see page 64 6 3 Pin assignment You will find the pin assignment for the individual plug connectors in the following 6 3 1 Connecting cable with M12 plug connector Voltage is supplied and local inputs and outputs are connected via the co...

Page 65: ...configurable Control input A1 together with pin 7 Universal input resetting EDM external device monitor ing sleep mode restarting the device Universal output contamination fault reset required monitoring result warning field 7 Uni I O 3 Universal I O 3 configurable Control input A2 together with pin 6 Universal input resetting EDM external device monitor ing sleep mode restarting the device Univer...

Page 66: ...e or more devices in a project You can save the configuration data in a project file on the computer Creating a project b Click on New project This creates and opens an empty project Configuring a device online device connected to computer The following interfaces are suitable for configuration USB 3 If a device is connected to the computer Safety Designer can establish a connection to the device ...

Page 67: ...vices The user groups settings and passwords are part of the configuration stored in the device For certain actions e g transferring a configuration to the device you are requested to log onto the device with the respective user group Table 8 User groups User group Password Authorization Machine operator Does not need a password anyone can log in as a machine operator May read configuration from t...

Page 68: ...tton The Log in dialog box is opened 3 Select the desired user group 4 Enter the password and click on Log in 7 2 5 Settings Project information Under Project information you can enter a project name a user name and a short descrip tion of the project The information is saved in the project Network You can define network presettings here for network compatible devices which use these settings The ...

Page 69: ... An SNN which contains the current time stamp is generated and displayed in the Result field b In the Manual field enter a number between 1 and 9999 and click on Generate An SNN based on manual entry is generated and displayed in the Result field b Click on OK The Safety Network Number dialog box closes and the SNN is adopted Data recorder The data recorder saves records in a file b Enter the stor...

Page 70: ... device in the device catalog 4 The device is shown as a tile in the working area 7 2 6 2 Open the device window configure devices Open a device window to configure a device perform diagnostics or create reports You have the following options b Click on the Device tile Or b Open the tile menu and choose Configure The device window opens 4 4 When a device is configured offline for the first time th...

Page 71: ... in the project It highlights that these devices realize an application together by respond ing to one another for example Device information Name identifies the specific device Type code of the safety laser scanner Functional scope of the configuration in the project Functional scope of the configuration in the device Serial number of the safety laser scanner Functionality of the device CONFIGURA...

Page 72: ... to the safety laser scanner 7 3 1 Functional scope Older versions of the Safety Designer potentially do not support the full functionality of the latest devices Vice versa older devices might not support the full functionality of the latest Safety Designer To identify the different levels of the functionality we use a 3 digit version number The version number is marked with the letter V on the de...

Page 73: ... the project and the values in the device differ you can read the values out from the device and adopt them in the project b Click on Read from the device The values are read from the device and adopted in the project Configuration Name If a number of safety laser scanners are used in an application or in a project a unique device name helps to tell the individual devices apart Checksums A checksu...

Page 74: ...part b Give each device a unique device name Project name The project name is used to identify an entire project The same project name should be chosen for all devices in the project b Enter a project name Application name The application name can be the same for a number of devices in the project It high lights that these devices realize an application together by responding to one another for ex...

Page 75: ...Click on the pencil icon 2 Select an image file for the application The image is incorporated as a thumbnail Description A description makes it easier to understand an application s context more quickly b Enter a description with a maximum of 1000 characters 7 6 Application Overview Figure 47 Application 1 Basic settings for the application 2 Settings for the device which relate to the application...

Page 76: ...for this application type When using this application type the risk of tampering must be taken into account in the risk assessment and regular checks must be performed to ensure that there are no objects at close range 50 mm from the optics cover impairing the line of sight of the device Display language The safety laser scanner s display outputs notifications and statuses see Buttons and display ...

Page 77: ...igner will indicate this in the settings for the monitoring plane Name of the monitoring plane You can use the name to identify monitoring planes when creating fields and monitor ing cases and also in reports b Enter a descriptive name for the monitoring plane e g Hazardous area on the right hand side The name is used to identify the monitoring planes Protection task Hazardous area protection hori...

Page 78: ...ases the response time b Make a note of the safety laser scanner s new response time in Safety Designer b Adjust the minimum distance from the hazardous point to the new response time Multiple sampling indicates how often an object has to be scanned before the safety laser scanner reacts A higher multiple sampling reduces the possibility that insects weld sparks or other particles cause the machin...

Page 79: ... 2 Protective field red and warning field yellow created 3 Visible spatial contour 4 Create copy delete field set and fields 5 Define field type name field configure field In the Fields area you can draw the fields in a field set using the tools in the toolbar You can create field sets and fields in the Field set area In the area below you can define the field type enter the name and configure mul...

Page 80: ...ing coordinates see Editing fields using coordinates page 85 Push the object into the foreground or background Select field design Calculate field Zoom in Zoom out Zoom to area Zoom to work space Show snapshot of the spatial contour Clicking again clears the spatial contour shown Show live spatial contour Paste background image see Background image page 83 Open field editor settings Field display ...

Page 81: ... set template and may contain user defined field set templates 1 Choose Simple field set A field set containing one field is created 2 Enter a unique name for the field set under Name 3 Add further fields to the field set if necessary Add field 1 Select the field set to which you would like to add a field 2 Click on Add field to field set Another field is added to the selected field set Duplicate ...

Page 82: ...nd the object resolution for each field individu ally 1 Select multiple sampling Multiple sampling indicates how often an object has to be scanned before the safety laser scanner reacts 2 Select object resolution The object resolution defines the size that an object must be to allow it to be reli ably detected Field set name Assign a unique name for each field set 1 Select the field set to be edit...

Page 83: ...n 3 Select the required field sets and fields 4 Start the import The field sets and fields will be imported Exporting field sets and fields 1 Click on Export fields 2 Select the relevant folder and enter a file name for storing the field set informa tion 3 Select the required field sets and fields 4 Start the export The field sets and fields will be exported 7 8 4 Background image You can select a...

Page 84: ... rotate the background image in the field editor 7 If required click the option Lock position of background image It is no longer possible to change the background image in the field editor 7 8 5 Settings for the field editor You can edit settings for the field editor You can open the settings using the tool Edit field editor settings Field calculation You specify whether the fields are calculated...

Page 85: ... of grid The field editor s grid is displayed in the chosen color b Select Color of drawing area The field editor s drawing area is displayed in the chosen color 7 8 6 Editing fields using coordinates You can use coordinates to edit fields Depending on the form on which a field is based the appropriate input fields are displayed The example shows a dialog box for a rectan gle CONFIGURATION 7 80231...

Page 86: ...ine each point individually 7 8 7 Drawing in points that cannot be monitored The area to be monitored is scanned radially 1 For this reason shadows 3 are formed by objects in the room 2 support columns separator grids etc The safety laser scanner cannot monitor these areas 7 CONFIGURATION 86 O P E R A T I N G I N S T R U C T I O N S outdoorScan3 Core I O 8023152 160F 2019 11 14 SICK Subject to cha...

Page 87: ...tored areas may be created The field editor shows the shadowing of the masked area 3 1 Click on the tool Mask areas The tools you can use to draw fields are shown crosshatched 2 Choose a drawing tool 3 Draw the masked area The masked area is crosshatched in gray The field editor shows the shadowing of the masked area CONFIGURATION 7 8023152 160F 2019 11 14 SICK O P E R A T I N G I N S T R U C T I ...

Page 88: ...size of the field You can create a field using the Propose field tool Important information NOTE If you propose a protective field the proposal does not replace the calculation of the minimum distance You must calculate the minimum distance and check whether the size of the proposed protective field is sufficient You must also take into account the measurement tolerances of the safety laser scanne...

Page 89: ...safety laser scanner scans the contour of the room 3 If necessary reduce the size of the suggested field 4 Click on Propose field again The Safety Designer displays the proposed field 7 9 Inputs and outputs local Overview Figure 55 Inputs and outputs local 1 Overview plug connector of the safety laser scanner 2 Pin assignment 3 Available signals 4 Remove signal from connection 5 Further settings f...

Page 90: ...n input b Drop the signal on the pin The signal name is shown on the right next to the pins Removing signals b Click on the signal b Drag the signal on to the trash can symbol The pins are free again 7 9 1 Input signals External device monitoring EDM Signal from the auxiliary contacts of the positively guided contactors for external device monitoring EDM Reset Signal from the reset pushbutton to m...

Page 91: ...rotective field is then clear again Further topics Status display page 117 7 9 3 Further settings for some signals Safety Designer shows the setting options for some signals under Further settings at bot tom right DANGER Hazard due to lack of effectiveness of the protective device Hazard due to unexpected starting of the machine By configuring the restart interlock for an OSSD pair you can influen...

Page 92: ...ck b Select the option Immediate restart without restart interlock The OSSDs switch to the ON state if there is no longer an object in the protective field b Choose the option Restart interlock reset required The OSSDs only switch to the ON state if the operator activates the reset control switch b Choose the option Automatic restart after and enter the delay time The OSSDs switch to the ON state ...

Page 93: ...toring case You can create monitoring case tables and possible switching criteria for the monitoring cases in the monitoring case editor You can also define the monitoring cases and their input conditions and assign the field sets Further topics Monitoring case page 20 7 10 1 Settings for monitoring case tables Name Enter a name which is as descriptive as possible for the monitoring case table in ...

Page 94: ... to 480 ms Also take account of the notes relating to when to switch between monitoring cases see Monitoring case switching time page 33 7 10 2 Settings for monitoring cases Name Enter a name which is as descriptive as possible for the monitoring case in the Name field If you create a lot of monitoring cases you should consider a naming concept that makes it possible to identify the monitoring cas...

Page 95: ...can icon The field set is removed from the relevant monitoring case Defined cut off behavior DANGER Hazard due to lack of effectiveness of the protective device Persons and parts of the body to be protected may not be recognized in case of non observance The function Always ON has the same effect as a field which is always clear In a monitor ing case with the Always ON function the cut off path co...

Page 96: ... monitoring case is active for the selected input sample default monitoring case 1 is active You can switch inputs monitoring cases etc virtually using symbols and observe the result You can mark a field in the simulation as interrupted and check which result is trig gered by an object in the relevant field You can move fields to the foreground or to the background using the context menu right mou...

Page 97: ...guration is not verified the safety laser scanner may not be operated as a protective device You can start the safety function manually to test the safety laser scanner and the configuration The test operation has a time limit b Only operate the safety laser scanner as a protective device if the configuration is verified You can start the safety function manually to test the safety laser scanner w...

Page 98: ...s the safety function Stop stops the safety function DANGER Hazard due to lack of effectiveness of the protective device Persons and parts of the body to be protected may not be recognized in case of non observance If the configuration is verified the device automatically starts the safety function after switching on the voltage supply If the configuration is not verified the safety laser scanner ...

Page 99: ...ce you can restart the device or subsections of the device safety function connections additional functions Restarting safety function The fastest type of restart Serious faults remain even if the cause has been rectified for example a locking state because of a supply voltage which is too low Communication with the device remains intact connections for configuration safety function and data not r...

Page 100: ... of device communication is reset to factory settings connec tions for configuration safety function and data not relating to safety 7 15 3 Managing passwords Assigning or changing passwords 1 Establish a connection to the device 2 In the device window under Service choose the entry User password 3 Choose the user group in the User password dialog box 4 Enter the new password twice and use Accept ...

Page 101: ...eness of the protective device may be affected unintentionally b After every change to the machine and changes to the integration or operational and secondary conditions of the safety laser scanner check the protective device for effectiveness and recommission as specified in this chapter Before initial commissioning project planning mounting electrical installation and con figuration must be comp...

Page 102: ...ening torque 8 3 Switching on After switching on the safety laser scanner performs various internal tests The OFF LED illuminates continually The ON LED is off The start procedure lasts approx 10 seconds 8 COMMISSIONING 102 O P E R A T I N G I N S T R U C T I O N S outdoorScan3 Core I O 8023152 160F 2019 11 14 SICK Subject to change without notice ...

Page 103: ...on or because it is hidden from the operator s position More information about what the light emitting diodes mean and the symbols and infor mation shown on the display see Troubleshooting page 116 8 4 Thorough check Requirements for the thorough check during commissioning and in certain situations The protective device and its application must be thoroughly checked in the following situations Bef...

Page 104: ...ioning and in certain situations Thorough check of the relevant points on the checklist see Checklist for initial commissioning and commissioning page 151 Thorough visual check of the machine and the protective device page 57 Thorough check of the principal function of the protective device page 56 Thorough check of the area to be protected page 56 Make sure that the operating personnel has been i...

Page 105: ...eck The protective device must be checked regularly The type and frequency of thorough checks is defined by the manufacturer and the operating entity of the machine see Testing plan page 54 The regular thorough checks serve to investigate the effectiveness of the protective device and detect any ineffectiveness due to modifications or external influences such as damage or tampering b Carry out the...

Page 106: ...on the safety laser scanner 3 additional sets are arranged in pairs on the base of the optics cover So the light emitting diodes can also be seen in many cases when it is not possible to see the display e g due to the mounting situation or because it is hidden from the operator s position 9 4 Buttons and display The safety laser scanner is equipped with 4 pushbuttons and a graphical display You ca...

Page 107: ...played b If the display is switched off press any pushbutton to activate the display b Press any pushbutton to obtain more details about the displayed status informa tion b If there are a number of pages with detailed information this is shown in the top right of the display b Press the arrow buttons to change between a number of pages with detailed infor mation Table 17 Overview of status informa...

Page 108: ...cover Display flashes All devices and config urations Contamination fault All safety outputs in the OFF state Check the optics cover for damage Clean the optics cover Display flashes All devices and config urations Dazzle warning Check whether the safety laser scanner is being dazzled by an external light source in the scan plane e g sun halogen light infrared light source stroboscope Remove or co...

Page 109: ...tton to obtain more information Menu Figure 65 Menu The menu offers access to the main areas of device information diagnostics device restart and settings b Press the OK pushbutton 4 twice in succession to call up the menu b Change to the desired menu point using the arrow buttons 1 2 b Confirm the desired menu point using the OK button 4 b Use the same pushbuttons to navigate through the sub menu...

Page 110: ...he last 10 error messages Service currently measured contamination of the optics cover operating hours number of power up processes Device restart You have the following options in the device restart area Restart the safety laser scanner Settings You have the following options in the settings area Set the display brightness and contrast 9 OPERATION 110 O P E R A T I N G I N S T R U C T I O N S out...

Page 111: ...ents based on the application conditions DANGER Hazard due to lack of effectiveness of the protective device Persons and parts of the body to be protected may not be recognized in case of non observance b Make sure that the optical properties of the optics cover are not changed by beading water mist frost or ice formation If necessary remove any residues of this type or any other form of contamina...

Page 112: ... not cleaned and the contamination continues to increase the safety laser scanner switches to the OFF state for safety reasons and the display shows a contamination fault b Check the optics cover for damage b Clean the optics cover in a timely manner Further topics Spare parts page 140 Accessories page 141 10 3 Replacing the optics cover If the optics cover is scratched or damaged it must be repla...

Page 113: ...first time it reads the configuration from the sys tem plug and can be used without having to be reconfigured Approach 1 Make sure that the environment is clean and free of dust and moisture high air humidity fog rain hail snow 2 Unscrew screws in the system plug and remove the system plug from the defective safety laser scanner 3 Unscrew the fixing screws and remove the defective safety laser sca...

Page 114: ...ar care to conduct all of the thorough checks described see Commissioning page 101 10 5 Replacing the system plug If the system plug is damaged or defective you must replace it NOTICE Enclosure rating IP65 only applies if the safety laser scanner is closed and the system plug is mounted b Mount the system plug b Close the M12 plug connector on the safety laser scanner using a male cable con nector...

Page 115: ...described thorough checks see Thorough check page 103 1 3 2 Figure 66 Installing the system plug on the safety laser scanner 10 6 Regular thorough check The protective device must be checked regularly The type and frequency of thorough checks is defined by the manufacturer and the operating entity of the machine see Testing plan page 54 The regular thorough checks serve to investigate the effectiv...

Page 116: ...ly DANGER Hazard due to lack of effectiveness of the protective device Persons and parts of the body to be protected may not be recognized in case of non observance b Do not do repair work on device components b Do not make changes to or manipulate device components b Apart from the procedures described in this document the device components must not be opened NOTE Additional information on troubl...

Page 117: ...s of the safety laser scanner and for diagnostics and troubleshooting 11 3 1 Status display The display shows current information about the safety laser scanner s status The dis play switches off after approx 60 s if all fields are clear and no other notification is dis played b If the display is switched off press any pushbutton to activate the display b Press any pushbutton to obtain more detail...

Page 118: ...r Display flashes All devices and config urations Contamination fault All safety outputs in the OFF state Check the optics cover for damage Clean the optics cover Display flashes All devices and config urations Dazzle warning Check whether the safety laser scanner is being dazzled by an external light source in the scan plane e g sun halogen light infrared light source stroboscope Remove or cover ...

Page 119: ...input signal does not result in a fault All devices The device is not configured The device is in the as delivered state or has been reset to fac tory settings All safety outputs in the OFF state All devices and config urations Sleep mode All safety outputs in the OFF state Press any pushbutton to obtain more information 11 3 2 Detailed diagnostics The safety laser scanner is equipped with 4 pushb...

Page 120: ...point using the arrow buttons 1 2 b Confirm the desired menu point using the OK button 4 b Use the same pushbuttons to navigate through the sub menus b Press the back button 3 to return to the higher level menu point b Press the back button 3 multiple times to return to the status display If you do not press any pushbuttons for a time the display likewise changes back to the sta tus display Device...

Page 121: ... safety laser scanner Settings You have the following options in the settings area Set the display brightness and contrast 11 3 3 Fault display If there is a fault the display shows a warning symbol a type of fault and a fault code on a red flashing background Figure 70 Fault display The two character fault type will help you during troubleshooting The eight character fault code in the bottom line...

Page 122: ... exceeded for cur rent allowed short term or perma nently b Check the connected switching element F2 OSSD short circuit to 24 V There is a short circuit to 24 V at an OSSD b Check the wiring F3 OSSD short circuit to 0 V There is a short circuit to 0 V at an OSSD b Check the wiring F4 Short circuit between 2 OSSDs There is a short circuit between 2 OSSDs b Check the wiring F9 General OSSD fault At ...

Page 123: ... error The Safety laser scanner s operating temperature has exceeded or fallen below the permitted range b Check whether the safety laser scanner is being operated in accordance with the permissible ambient conditions W1 Warnings exceed toler ance time The combination of multiple warn ings has resulted in a fault The tol erance time of 1 s has been exceeded as there are multiple warnings b Use Saf...

Page 124: ...tings can be made in the safety designer frame Start recording Stop recording Typical applications Check spatial geometry Check where a person can stay or when a person is detected Check input information about the current monitoring case Check why safety outputs have switched Prerequisites Existing connection between Safety Designer and device Configuration in the project and configuration in the...

Page 125: ...o the OFF state Protective field is interrupted For each field interruption where a safety output switches to the OFF state the safety laser scanner stores the data from 10 scans When the internal memory of the safety laser scanner is full the scan data of the oldest field interruption is overwritten to store a new field interruption The position and time of the field interruption are retained The...

Page 126: ...Scan Event table The event table shows detailed information about the events which have led to a safety output switching to the OFF state Based on the measurement data a probable cause is assigned to each event Object The protective field was probably interrupted by an object Contamination The shutdown was triggered by a soiling of the optics cover in the area of the protective field Dazzling The ...

Page 127: ...he table header you can select the columns displayed in the mes sage history Safety Designer shows details about the events in the bottom part of the window ways to solve them are also shown Table 21 Print message history or save as a PDF Print message history Save message history as a PDF TROUBLESHOOTING 11 8023152 160F 2019 11 14 SICK O P E R A T I N G I N S T R U C T I O N S outdoorScan3 Core I...

Page 128: ...rdance with national waste disposal regulations Complementary information SICK will be glad to help you dispose of these devices on request 12 DECOMMISSIONING 128 O P E R A T I N G I N S T R U C T I O N S outdoorScan3 Core I O 8023152 160F 2019 11 14 SICK Subject to change without notice ...

Page 129: ...der Hardware Safety Designer Overview dialog box only with connected devices Safety Designer report Table 23 Functional scope of the outdoorScan3 Core I O Version number Amendments and new functions 1 0 0 First released version Revision The different revision statuses of the devices are identified by Rev followed by a three digit version number New devices have a label which indicates the revision...

Page 130: ...l supplement ZR for reflection based measure ment errors 350 mm Deviation from ideal flatness of scan field at 5 5 m 100 mm Distance of mirror rotational axis zero point of x and y axis to rear side of device 66 mm Distance between center point of scan plane and top edge of the housing 40 mm Multiple sampling 2 to 16 Safety related parameters Table 26 Safety related parameters outdoorScan3 Core I ...

Page 131: ... section 0 25 mm 35 m Configuration and diagnostic interface Type of interface USB 2 0 Connection type USB 2 0 mini B female connector Transmission rate 12 Mbit s Length of cable 5 m Electrical data Table 28 Electrical data outdoorScan3 Core I O Operating data Protection class III IEC 61140 Supply voltage UV 24 V DC 16 8 V to 30 V DC SELV PELV 1 Residual ripple 5 2 Start up current at 24 V 3 A Cur...

Page 132: ...thin an OSSD pair 1 ms typ 25 µs Universal output universal I O configured as output Output voltage HIGH UV 3 7 V UV Output voltage LOW 0 V to 2 V Output current HIGH 200 mA Leakage current 0 5 mA Switch on delay 40 ms Switch off delay 40 ms Static control input universal input universal I O configured as input Input voltage HIGH 24 V 13 V to 30 V Input voltage LOW 0 V 30 V to 5 V Input current HI...

Page 133: ... Optics cover material Polycarbonate Optics cover surface Outside with scratch resistant coating Ambient data Table 30 Ambient data outdoorScan3 Core I O Enclosure rating 1 IP65 IEC 60529 Housing type 3R UL 50E Ambient light immunity Halogen light 2 12000 lx IEC 61496 3 Sunlight 2 40 000 lx IEC 61496 3 Ambient operating tempera ture 25 C to 50 C 3 Storage temperature 25 C to 70 C Air humidity 95 n...

Page 134: ...velength 845 nm Detectable reflectance factor 1 8 to several 1 000 Maximum uniform contami nation of the optics cover without reducing the detec tion capability 1 30 Area where detection capabil ity is restricted 50 mm 2 Light spot diameter At front screen 18 mm At 4 0 m distance 12 mm Divergence of collimated beam 0 17 Receiving angle 0 75 Pulse duration Typ 4 ns Average output power 9 2 mW Laser...

Page 135: ...es apply tR response time tS scan cycle time Setting 40 ms tS 40 ms n set multiple sampling Preset to n 2 Multiple sampling can be changed for the safety laser scanner or for each individ ual field 2 n 16 tO time for processing and output Dependent on output used OSSD pair 1 tO 10 ms Table 32 Response time of an individual safety laser scanner Scan cycle time tS Output tO tR response time for mult...

Page 136: ...resolution that has been set Table 33 Protective field range Resolution Protective field range 70 mm 4 00 m 50 mm 3 50 m Range for warning fields For non safety applications warning fields the safety laser scanner has a larger range than the maximum protective field range The requirements for size and remission of objects to be detected are illustrated in the following graphs as a function of the ...

Page 137: ...he object in mm D Range in m 5 10 20 50 D m D m R 500 200 100 50 20 10 5 2 1 6 5 3 2 4 1 Figure 77 Scanning range and required remission for warning fields R Necessary minimum remission in TECHNICAL DATA 13 8023152 160F 2019 11 14 SICK O P E R A T I N G I N S T R U C T I O N S outdoorScan3 Core I O 137 Subject to change without notice ...

Page 138: ...l drawings 1 2 112 Ø 99 5 200 M5 7 5 85 44 12 135 1 111 1 300 47 1 47 9 40 1 25 25 22 36 1 36 9 3 Figure 78 Dimensional drawing All dimensions in mm 1 Mirror rotational axis 2 Scan plane 3 Required viewing slit 13 TECHNICAL DATA 138 O P E R A T I N G I N S T R U C T I O N S outdoorScan3 Core I O 8023152 160F 2019 11 14 SICK Subject to change without notice ...

Page 139: ... www sick com 14 2 Ordering information Table 34 outdoorScan3 Core I O ordering information Integration in the con trol Protective field range Type code Part number I O 4 0 m MICS3 AAUZ40AZ1P01 1094452 ORDERING INFORMATION 14 8023152 160F 2019 11 14 SICK O P E R A T I N G I N S T R U C T I O N S outdoorScan3 Core I O 139 Subject to change without notice ...

Page 140: ...utdoorScan3 Core I O 1094452 4 0 m MICS3 AAUZ40AZ1 1094451 15 2 System plug Table 36 System plug Spare part for Connection type Type code Part number Device Part number outdoorScan3 Core I O 1094452 Cable with plug connector MICSX UBIZZZZZ1 2101638 15 SPARE PARTS 140 O P E R A T I N G I N S T R U C T I O N S outdoorScan3 Core I O 8023152 160F 2019 11 14 SICK Subject to change without notice ...

Page 141: ...ance between mounting surface and device 52 3 mm only in conjunction with mounting kit 1a or 1b 2074184 Mounting kit 3 alignment bracket with protection for the optics cover align ment with cross wise axis and depth axis possible 2103049 Weather hood only in conjunction with mounting kit 3 2103050 Dimensional drawings 1 118 3 6 6 3 44 1 30 6 73 Ø 5 5 47 1 2 1 64 1 74 8 44 20 1 28 8 15 3 Figure 79 ...

Page 142: ... rotational axis 2 Scan plane 3 Countersink for M5 countersunk screw 1 1 2 127 4 207 8 184 137 83 1 78 6 67 8 23 5 20 57 8 50 2 5 8 10 1 4 Ø 6 Ø 6 Figure 81 Mounting kit 2a All dimensions in mm 16 ACCESSORIES 142 O P E R A T I N G I N S T R U C T I O N S outdoorScan3 Core I O 8023152 160F 2019 11 14 SICK Subject to change without notice ...

Page 143: ...tor 3 m cable USB A male connector 6042517 USB mini B male connector 5 m cable USB A male connector 6053566 USB A female connector 10 m cable USB A male connector active exten sion cable 6069292 Power supply units Table 40 Ordering information for power supply Part Type code Part number Output 24 V DC 50 W 2 1 A voltage supply NEC Class 2 SELV PELV input 120 V AC 240 V AC PS50WE24V 7028789 Output ...

Page 144: ...leaning agent ordering information Part Part number Anti static plastic cleaner 5600006 Lens cloth 4003353 16 5 Test rods Table 43 Ordering information test rods Part Part number Test rod 50 mm 2095105 Test rod 70 mm 2095139 16 ACCESSORIES 144 O P E R A T I N G I N S T R U C T I O N S outdoorScan3 Core I O 8023152 160F 2019 11 14 SICK Subject to change without notice ...

Page 145: ...ve device An electro sensitive protective device is a device or system of devices for safety related detection of people or parts of the body It is used to protect people from machines and facilities that pose a risk of injury It triggers the machine or facility to adopt a safe state before a person is exposed to a hazardous situation Examples include safety light curtains and safety laser scanner...

Page 146: ... controlled machine is triggered to quit its dangerous state and the start up of the machine is prevented e g the volt age at the OSSDs is LOW so that the machine is switched off and remains still ON state The ON state is the status of the outputs of the ESPE where the controlled machine is permitted to operate e g the voltage at the OSSDs is HIGH so that the machine can run OSSD Output signal swi...

Page 147: ...ple OFF state of the OSSD pair Restart interlock The restart interlock prevents the machine from automatically starting up for example after a protective device has responded while the machine is operating or after changing the machine s operating mode The restart interlock can be implemented in the protective device or in the safety controller A command to reset the protective device must be give...

Page 148: ...ety appli cations Certain universal inputs can also be used in pairs as a static control input Universal output A universal output outputs a signal depending on its configuration e g if the reset pushbutton needs to be pushed or if the optical cover is contaminated A universal output must not be used for safety functions Warning field The warning field monitors larger areas than the protective fie...

Page 149: ...fications stated in the EU declaration of conformity have been used as a basis for this Complete EU declaration of conformity for download You can call up the EU declaration of conformity and the current operating instructions for the protective device by entering the part number in the search field at www sick com part number see the type label entry in the Ident no field ANNEX 18 8023152 160F 20...

Page 150: ...2 6 GB T 2423 10 IEC 60068 2 27 GB T 2423 5 IEC 60204 1 GB 5226 1 IEC 60529 GB T 4208 IEC 60825 1 GB 7247 1 IEC 61131 2 GB T 15969 2 IEC 61140 GB T 17045 IEC 61496 1 GB T 19436 1 IEC 61496 3 GB 19436 3 IEC 61508 GB T 20438 IEC 62061 GB 28526 ISO 13849 1 GB T 16855 1 ISO 13855 GB T 19876 18 ANNEX 150 O P E R A T I N G I N S T R U C T I O N S outdoorScan3 Core I O 8023152 160F 2019 11 14 SICK Subjec...

Page 151: ...ditional mechanical protective measures fitted and secured against manipulation which prevent reaching below above or around the ESPE Yes No Has the maximum shutdown and or stopping time of the machine been mea sured specified and documented at the machine and or in the machine docu mentation Yes No Has the ESPE been mounted such that the required minimum distance from the nearest hazardous point ...

Page 152: ... condensation been prevented by suitable measures Yes No Has the device been mounted with the optics cover facing downward Yes No Have vibrations and knocks been damped by suitable measures Yes No 18 4 Mounting methods for protection from interference from systems in close proxim ity Mutual interference of several safety laser scanners is unlikely thanks to the safeHDDM scanning technology You can...

Page 153: ...with the optics cover facing upward and mounting the lower safety laser scanner with the optics cover facing downward 100 mm Figure 85 Mounting the upper safety laser scanner with the optics cover facing downward and mounting the lower safety laser scanner with the optics cover facing upward ANNEX 18 8023152 160F 2019 11 14 SICK O P E R A T I N G I N S T R U C T I O N S outdoorScan3 Core I O 153 S...

Page 154: ...dimensions in mm 38 23 Scan plane at ankle height 39 24 Scan plane at calf height 39 25 Distance of the protective field from the wall 40 26 Mobile application in horizontal operation for hazardous area protection 41 27 flat rate supplement ZF for lack of ground clearance 42 28 Minimum supplement for lack of ground clearance 43 29 Stopping distance as a function of the vehicle s speed 44 30 Recomm...

Page 155: ... and time offset for the switch off tests in an OSSD pair 136 76 Scanning range and object size for warning fields 137 77 Scanning range and required remission for warning fields 137 78 Dimensional drawing 138 79 Mounting kit 1a 141 80 Mounting kit 1b 142 81 Mounting kit 2a 142 82 Mounting kit 2b 143 83 Mounting 2 safety laser scanners with the optics cover facing downward 152 84 Mounting the uppe...

Page 156: ...age history or save as a PDF 127 22 Devices and type codes 129 23 Functional scope of the outdoorScan3 Core I O 129 24 Compatibility 129 25 Features 129 26 Safety related parameters 130 27 Interfaces 131 28 Electrical data 131 29 Mechanical data 133 30 Ambient data 133 31 Miscellaneous data 134 32 Response time of an individual safety laser scanner 135 33 Protective field range 136 34 outdoorScan3...

Page 157: ...LIST OF TABLES 20 8023152 160F 2019 11 14 SICK O P E R A T I N G I N S T R U C T I O N S outdoorScan3 Core I O 157 Subject to change without notice ...

Page 158: ...20 LIST OF TABLES 158 O P E R A T I N G I N S T R U C T I O N S outdoorScan3 Core I O 8023152 160F 2019 11 14 SICK Subject to change without notice ...

Page 159: ...LIST OF TABLES 20 8023152 160F 2019 11 14 SICK O P E R A T I N G I N S T R U C T I O N S outdoorScan3 Core I O 159 Subject to change without notice ...

Page 160: ...8080 7425 E Mail enquiry my sick com Mexico Phone 52 472 748 9451 E Mail mexico sick com Netherlands Phone 31 0 30 229 25 44 E Mail info sick nl New Zealand Phone 64 9 415 0459 0800 222 278 tollfree E Mail sales sick co nz Norway Phone 47 67 81 50 00 E Mail sick sick no Poland Phone 48 22 539 41 00 E Mail info sick pl Romania Phone 40 356 17 11 20 E Mail office sick ro Russia Phone 7 495 283 09 90...

Reviews: