


8
MAIN FUNCTIONS
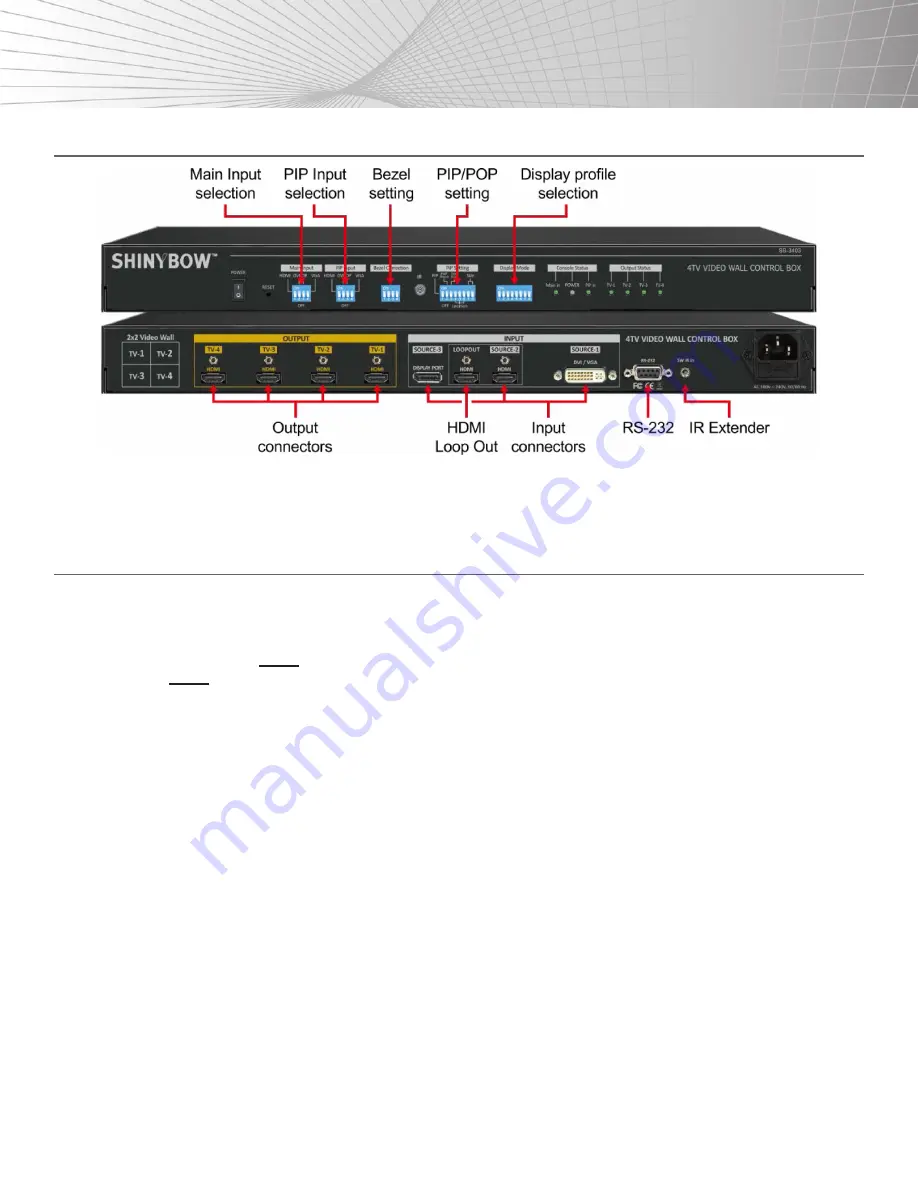
OUTLOOK AND MAIN FUNCTIONS
NOTE:
After finishing the Dip Switch settings, Power OFF and ON the unit again to execute the new settings.
HELPFUL TIPS FOR INSTALLATION AND OPERATION
1. Each SB-3403 is equipped with IR extenders. Users can extend the cable distance up to 20M through an audio cable.
2. If the PC tool is used, the connection is made via RS-232 port. The user needs to use the USB to RS-232 conversion cable for the
connection. The USB cable extender can be used for long distance control connections.
3.
OSD Lock / Unlock:
Press the
MENU
key on IR remote control for 5 seconds, the OSD function will be locked to prevent changes to
the settings. Press
MENU
key for 5 seconds again to unlock the OSD and the user can manipulate the OSD again.
4. Box ID allows the user to control different SB-3403’s at the same time without interference.
5. The Picture menu in the OSD can only be activated while the input signal is not in the color
[Preset Mode]
. To select
[Image Properties]
→[Custom]→[Save]
, then the user can activate the
[Picture]
menu again.
6. Image Setup menu will not be activated if the input source is not from VGA.
7. Once finishing one video wall setting, users can apply the same setting value to the next project with the same configuration. The GPM
PC tool can backup the setting or install the same setting to other units.
8. If using different aspect ratio LCD’s, but not 16:9, customized factory settings are required.
9. Poor cable connection signals or cables that are too long may cause noise on the display. Re-connect or replace with a new cable to
solve the problem.
10. If the video wall aspect ratio is not the same as the signal source, it will create an abnormal aspect ratio. Please select the correct
EDID to set the PC output to the desired resolution. For manual display modes, users can randomly adjust the H&V aspect ratios in the
range of 0.25x to 2.0x. This allows users to display (4) image ranges onto the screen when the set ratio is 0.25x.
11. To apply different
[Overlap]
values under the
[Video Wall]
menu or
[Ratio]
under the
[Manual Mode]
menu the user can also change
the aspect ratio.
12.
[F1]
key on the remote control can provide the image
[Shift]
function for each LCD. It can shift image positions in H&V directions
without changing the image size and display angle.


