


Total water required
Cleaning water required
Cleaning water required
Rinse water required
Chemical
20
10
10
MCC-3
1. Close the Inlet Sea Cock Valve.
2. If installed, put the Multi Media Filter Valves in the "Multi Media Filter Bypass" position during cleaning. See
figure in the topic
Multi Media Filter Backwash and Rinse
on page 44 for Multi Media Filter Bypass Valve
positioning.
3. Replace the Pre-filtration Cartridge with a new Sea Recovery Corporation-supplied Pre-filtration Element.
4. Fill a 10-gallon (37.8 liters) container with clean, potable water.
5. Configure the System for a Once-Through Rinse, as described within the topic
Once-through Configuration
on
page 51.
6. Start the System in
MANUAL MODE
.
Note:
System operation will deplete the fresh water in the container. Before depleting the water entirely,
touch the
STOP
button.
7. Once again, fill the container with 10 gallons (37.8 liters) of clean, potable water.
8. Add 1.5 lbs. (0.68 kg) of Sea Recovery Membrane Cleaning Compound MCC 1, MCC 2 or MCC 3 to the water
container and thoroughly mix the solution until the cleaning compound has dissolved.
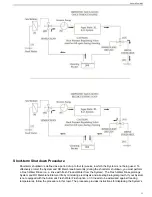
9. Configure the system for a Recirculating Closed Loop configuration.
10. Start the System in
MANUAL MODE
and operate it in the Recirculating Closed-Loop configuration for 60
minutes. After 60 minutes
STOP
the System.
11. Configure the system for a Once-Through Rinse.
12. Start the System in
MANUAL MODE
to discharge the cleaning chemical to waste.
Note:
System operation will deplete the fresh water in the container. Before depleting the water entirely,
touch the
STOP
button.
13. For the last time, fill the container with 10 gallons (37.8 liters) of clean, potable water.
14. Configure the system for a Recirculating Closed-Loop configuration.
15. Start the System in
MANUAL MODE
and operate it in the Recirculating Closed-Loop configuration for 10
minutes. After 10 minutes
STOP
the System.
16. Configure the system for a Once-Through Rinse.
17. Start the System in
MANUAL MODE
to discharge the rinse water to waste.
Note:
System operation will deplete the fresh water in the container. Before depleting the water entirely,
touch the
STOP
button.
The system is now ready for additional cleaning, use or storage. If further cleaning is necessary, repeat Steps
4 to 17 for each additional cleaning.
18. If the System will be expose to freezing temperatures, please review
Draining Component Water (for Winterizing)
on page 55.
57
General Operation
Summary of Contents for Aqua Matic XL Series
Page 2: ......
Page 10: ......
Page 28: ......
Page 38: ......
Page 45: ...45 Commissioning...
Page 46: ......
Page 58: ......
Page 76: ......
Page 89: ...Chapter 10 Appendix 89...
Page 90: ...ABS Certificate of Design Assessment Aqua Matic XL 2200 3600 90...
Page 91: ...FCC Compliance 91 Appendix...
Page 92: ...DNV ISO 9001 Certificate Aqua Matic XL 2200 3600 92...
Page 93: ...Single Phase Electrical Motor Wiring 93 Appendix...
Page 94: ...Three Phase Electrical Motor Wiring Aqua Matic XL 2200 3600 94...
Page 95: ...Three Phase Transformer Wiring 95 Appendix...
Page 96: ...New System Initial Readings Form Aqua Matic XL 2200 3600 96...
Page 97: ...Daily System Readings 97 Appendix...
Page 98: ......
Page 99: ...Chapter 11 Exploded Parts Views 99...
Page 100: ...Exploded Parts View...
Page 103: ...7 8 9 10 11 12 13 14 15 16 17 20 19 18 21 22 23 24 25 26 1 2 3 4 5 6 Exploded Parts View 4...
Page 111: ...14 13 2 16 13 12 3 8 10 9 7 1 5 4 6 14 13 15 15 17 13 12 11 18 15 Exploded Parts View 12...
Page 113: ...19 16 2 21 16 14 3 9 11 10 8 1 5 4 6 12 22 20 18 16 17 15 15 13 7 Exploded Parts View 14...
Page 115: ...2 3 10 12 11 9 1 5 4 21 13 20 18 15 19 18 19 15 17 14 16 8 18 15 7 Exploded Parts View 16...
Page 117: ...10 26 11 9 5 5 4 20 1 7 18 3 2 16 13 15 12 14 13 23 24 21 24 25 Exploded Parts View 18...
Page 119: ...12 10 13 11 5 5 4 6 1 9 20 3 2 17 16 14 18 15 19 17 16 14 18 15 8 7 Exploded Parts View 20...
Page 128: ...6 7 2 3 2 5 10 10 12 1 11 8 9 8 11 6 7 4 2 13 14 29...
Page 138: ...Chapter 12 Electric Diagrams Foldouts 101...
Page 139: ...Aqua Matic XL Series Three Phase Wiring Diagram...
Page 140: ......
Page 141: ......