


MAINTENANCE PROCEDURES
Spark Plug Installation
Prior to installation, ensure the contact
surfaces of the cylinder head and spark
plug are free of grime.
1. Using a wire feeler gauge, set elec-
trode gap as specified in the follow-
ing chart.
ENGINE
SPARK
PLUG
TORQUE
GAP
mm (in)
1503
NGK
DCPR8E
Hand
tighten
+ 1/4 turn
with a
socket
0.75
(.030)
2. Apply anti-seize lubricant over the
spark plug threads to prevent possi-
ble seizure.
3. Hand screw spark plug into cylinder
head. Then, tighten the spark plug
clockwise an additional 1/4 turn with
an approved spark plug socket.
Install ignition coil. Refer to
IGNITION
COIL INSTALLATION
.
Complete the installation in the re-
verse order of the removal.
Ignition Coils
Ignition Coil Removal
1. Open seat.
2. Remove engine cover (as applicable
to model).
Disconnect ignition coil connector.
NOTICE
Do not remove the igni-
tion coil before disconnecting the
input connector or the wires may be
damaged. Do not pry up ignition coil
with a screwdriver to avoid damage.
NOTE:
Twist ignition coil in both direc-
tions as you pull it up to ease removal.
Remove ignition coil from spark plug.
Ignition Coil Installation
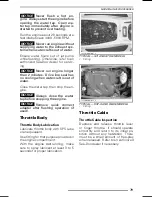
1. Pull rubber seal down.
sbs2009-011-002_a
1. Rubber seal pulled down
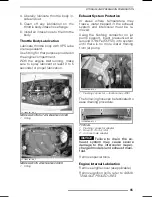
2. Apply DOW CORNING 111 (P/N 413
707 000) to rubber seal seat as
shown.
smr05-015-002_d
1. Apply product here
sbs2009-011-001_a
1. Apply product here
3. Pull rubber seal back on its seat
making sure the tabs on the ignition
coil and the slots in the seal properly
match together.
4. Leave a ring of grease on top of the
seal as shown to act as a water bar-
rier. Wipe off the excess.
_______________
77
Summary of Contents for GTI SE Series
Page 1: ......
Page 9: ...SAFETY INFORMATION ________ SAFETY INFORMATION ________ 7 ...
Page 37: ...WATERCRAFT INFORMATION _______________ 35 ...
Page 69: ...MAINTENANCE INFORMATION _______________ 67 ...
Page 90: ...STORAGE AND PRESEASON PREPARATION This page is intentionally blank 88 ______________ ...
Page 91: ...TECHNICAL INFORMATION _______________ 89 ...
Page 101: ...TROUBLESHOOTING _______________ 99 ...
Page 108: ...MONITORING SYSTEM This page is intentionally blank 106 ______________ ...
Page 109: ...WARRANTY ______________ 107 ...
Page 126: ...This page is intentionally blank 124 ______________ ...
Page 127: ...CUSTOMER INFORMATION ______________ 125 ...
Page 130: ...CHANGE OF ADDRESS OWNERSHIP This page is intentionally blank 128 ______________ ...
Page 131: ...CHANGE OF ADDRESS OWNERSHIP ______________ 129 ...
Page 132: ...CHANGE OF ADDRESS OWNERSHIP This page is intentionally blank 130 ______________ ...
Page 133: ...CHANGE OF ADDRESS OWNERSHIP ______________ 131 ...
Page 134: ...CHANGE OF ADDRESS OWNERSHIP This page is intentionally blank 132 ______________ ...
Page 135: ...NOTES ...
Page 136: ...NOTES ...
Page 137: ...NOTES ...
Page 138: ...NOTES ...
Page 140: ......


