background image

English - 49


Continued...

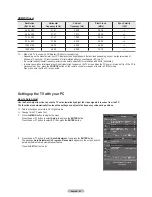
Using the V-Chip

U.S.A Only

This product is covered by the following U.S. patents : US4,930,158 US4,930,160 

The V-Chip feature automatically locks out programs that are deemed inappropriate for children.  

The user must enter a PIN (Personal ID number) before any of the V-Chip restrictions are set up or changed.

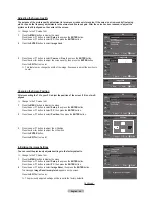
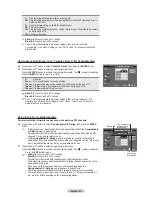
How to Enable/Disable the V-Chip

Press the 

MENU

 button to display the menu. 

Press the ▲ or ▼ button to select 

Setup

, then press the 

ENTER

 button.

Press the ▲ or ▼ button to select 

V-Chip

, then press the 

ENTER

 button. The message 

Enter PIN

 will appear. Enter your 4 digit PIN.

  The default PIN of a new TV set is “0-0-0-0”.

The 

V-Chip

 screen will appear.  

To enable the V-Chip feature, press the 

ENTER

 button so that the 

V-Chip Lock

 field is On. 

(Pressing the ▲ or ▼ button will alternate between 

Off

 and 

On

.) Press the 

ENTER

 button.

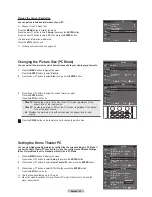
Setting Up Your Personal ID Number(PIN)

Press the ▲ or ▼ button to select 

Change PIN

, then press the 

ENTER

 button.

The 

Change PIN

 screen will appear. Choose any 4 digits for your PIN and enter them.  

Re-enter the same 4 digits. When the Confirm screen disappears, your PIN has been 

memorized.


If you forget the PIN, press the remote control buttons in the following sequence, which 

resets the pin to 0-0-0-0 : Power Off → MUTE → 8 → 2 → 4 → Power On.

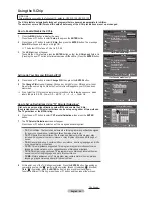
How to Set up Restrictions Using “TV Parental Guidelines”

First, set up a personal identification number(PIN), and enable the V-Chip. 

(See previous section.) Parental restrictions can be set up using either of two methods: 

The TV guidelines or the MPAA rating.

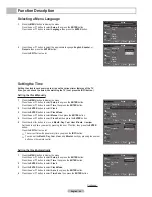
Press the ▲ or ▼ button to select 

TV Parental Guidelines

, then press the 

ENTER


button.

The 

TV Parental Guidelines

 screen will appear. 

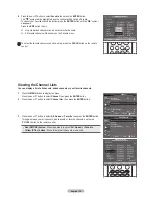
Press the ▲ or ▼ button to select one of the six aged based categories:

• 

TV-Y:

 All children. The themes and elements in this program are specifically designed 

for a very young audience, including children from ages two to six.

• 

TV-Y7:

 Directed to older children. The themes and elements in this program may 

include mild physical or comedic violence, or may frighten children under the age of 

seven.

• 

TV-G:

 General audience. It contains little or no violence, no strong language, and little 

or no sexual dialog or situations.

• 

TV-PG:

 Parental guidance suggested. This program may contain infrequent coarse 

language, limited violence, some suggestive sexual dialog and situations.

• 

TV-14:

 Parents strongly cautioned. This program may contain sophisticated themes, 

sexual content, strong language and more intense violence..

• 

TV-MA:

 Mature audiences only. This program may contain mature themes, profane 

language, graphic violence and explicit sexual content.

At this point, one of the TV-Ratings is selected. Press the 

ENTER

 button. Depending on 

your existing setup, the “   ” symbol will be selected. (Blank = Unblocked,   = Blocked) 

While “   ” is selected, press the 

ENTER

 button to block or unblock the category.  

To select a different TV-Rating, press the ▲ or ▼ button and then repeat the process.

V-Chip

V-Chip Lock 

: Off 

TV Parental Guidelines   

MPAA Rating

Downloadable U.S. Rating 

Change PIN 


Move

Enter

Off

On

Return

TV Parental Guidelines

TV-Y
TV-Y7
TV-G
TV-PG
TV-14
TV-MA

Allow All

Block All


ALL FV  V  S  L  D

Move

Enter

Return

Change PIN

Enter new PIN.

Confirm new PIN.

*

Enter PIN

* * * *

* *

Return

V-Chip

V-Chip Lock 

: Off 

TV Parental Guidelines   

MPAA Rating

Canadian English

Canadian French

Downloadable U.S. Rating 

Change PIN 


Move

Enter

Off

On

Return

<for USA models only>

<for Canada models only>

Summary of Contents for HL-T5075S - 50" Rear Projection TV

Page 1: ... your product at www samsung com global register Record your Model and Serial number here for future reference Model _______________ Serial No _______________ Owner s Instructions HL T4675S HL T5075S HL T5675S DLP TV ...

Page 2: ... parties In particular this product is licensed under the following US patents 5 991 715 5 740 317 4 972 484 5 214 678 5 323 396 5 539 829 5 606 618 5 530 655 5 777 992 6 289 308 5 610 985 5 481 643 5 544 247 5 960 037 6 023 490 5 878 080 and under US Published Patent Application No 2001 44713 A1 This license is limited to private non commercial use by end user consumers for licensed contents No r...

Page 3: ...y it was originally encoded for broadcast This is a big advantage for DTV over analog TV there is no noise ghosting static or scratchy audio 3 How can I connect an antenna in my townhouse co operative apartment condominium or apartment The Federal Communications Commission s OTARD Rule part of the Telecommunications Act of 1996 allows residents of condominiums townhouse or members of neighborhood ...

Page 4: ...ure 32 SOUND CONTROL Using Automatic Sound Settings 33 Customizing the Sound 33 Setting the TruSurround XT 34 Choosing a Multi Channel Sound MTS Track Digital 34 Choosing a Multi Channel Sound MTS Track Analog 35 Automatic Volume Control 35 Selecting the Internal Mute 36 CHANNEL CONTROL Clearing Scrambled Channels Digital 37 Adding and Erasing Channels 37 Setting Your Favorite Channels 38 Viewing ...

Page 5: ...nd off at any time you choose Adjustable picture and sound settings and the ability to memorize your favorite settings Automatic channel tuning for up to 181 channels A special filter to reduce or eliminate reception problems Fine tuning control for the sharpest picture possible A built in multi channel sound decoder for stereo and bilingual listening Built in dual channel speakers A special sleep...

Page 6: ...y cannot guarantee the quality of the product if an unauthorized lamp is used S Video Cable Antenna Cable Component Cables Audio Cables Video Cables D Sub Cable PC Audio Cable HDMI Cable HDMI DVI Cable Optical Cable 1Stereo 2RCA Cable Continued Viewing the Control Panel Buttons on the Lower Right Part of the Panel The buttons on the lower right panel control your TV s basic features including the ...

Page 7: ...e picture will automatically appear in about 15 seconds Auto Timer ON OFF has been set and the set will automatically be turned on in about 15 seconds A cooling fan inside the set is not operating normally Lamp cover on the side of the set is not properly shut Check if the ventilation hole on the side of the set is blocked because if the inner temperature is too high the power will shut off Lamp m...

Page 8: ...DIO IN Connect to the audio output jack on your PC SERVICE 2 This jack is for software upgrade SERVICE This jack is for service only HDMI 1 DVI IN Connect to the HDMI jack of a device with HDMI output This input can also be used as a DVI connection with separate analog audio inputs An optional HDMI DVI cable will be necessary to make this connection When using an optional HDMI DVI adapter the DVI ...

Page 9: ...ate your TV DVD STB CABLE box or VCR SOURCE Press to display all of the available video sources Press to backlight the VOL CH and the active source button TV DVD CABLE STB VCR on the remote control PRE CH Tunes to the previous channel a FAV CH Press to switch to your favorite channels b HDMI Selects the HDMI mode directly c VCR DVD Functions Rewind Stop Play Pause Fast Forward d CH CH Press to cha...

Page 10: ...that look like this see Antennas with 300 Ω Flat Twin Leads below If your antenna has one lead that looks like this see Antennas with 75 Ω Round Leads If you have two antennas see Separate VHF and UHF Antennas Antennas with 300 Ω Flat Twin Leads If you are using an off air antenna such as a roof antenna or rabbit ears that has 300 Ω twin flat leads follow the directions below 1 Place the wires fro...

Page 11: ...to the ANT IN terminal on your cable box This terminal might be labeled ANT IN VHF IN or simply IN 2 Connect this cable to a two way splitter 3 Connect an Antenna cable between an OUTPUT terminal on the splitter and the IN terminal on the cable box 4 Connect an Antenna cable between the ANT OUT terminal on the cable box and the B IN terminal on the RF A B switch 5 Connect another cable between the...

Page 12: ...ust connect two cables Each VCR has a different side panel configuration When connecting a VCR match the color of the connection terminal to the cable S Video Connection Your Samsung TV can be connected to the S Video jack of a VCR This connection delivers a better picture when compared to the regular Video connection above 1 To begin follow steps 1 3 in the previous section to connect the antenna...

Page 13: ...MPONENT IN 1 Y PB PR or COMPONENT IN 2 Y PB PR jacks on the TV and the COMPONENT OUT Y PB PR jacks on the DVD Player Set Top Box 2 Connect Audio Cables between the COMPONENT IN 1 L AUDIO R or COMPONENT IN 2 L AUDIO R jacks on the TV and the AUDIO OUT jacks on the DVD Player Set Top Box TV Side Panel DVD Player Set Top Box Audio Cable Not supplied 2 Component Cable Not supplied 1 Connecting a DVD P...

Page 14: ...plied 2 HDMI DVI Cable Not supplied 1 Connecting a Digital Audio System The side panel jacks on your TV make it easy to connect a Digital Audio System to your TV Each Digital Audio System has a different side panel configuration 1 Connect an Optical Cable between the DIGITAL AUDIO OUT OPTICAL jack on the TV and the Digital Audio Input jack on the Digital Audio System When a Digital Audio System is...

Page 15: ...el configuration When connecting a PC match the color of the connection terminal to the cable TV Side Panel Audio Cable Not supplied 1 Amplifier DVD Home Theater TV Side Panel PC PC Audio Cable Not supplied 2 D Sub Cable Not supplied 1 TV Side Panel PC HDMI DVI Cable Not supplied 1 1Stereo 2RCA Cable Not supplied 2 Using the HDMI DVI Cable 1 Connect a HDMI DVI Cable between the HDMI1 jack on the T...

Page 16: ...d you want to return to Dynamic Home mode press the Volume button and then hold down the MENU button for five seconds on the TV panel 4 Press the or button to memorize the channels of the selected connection Press the ENTER button to select Start If the antenna is connected to ANT 1 IN CABLE select Cable and if it is connected to ANT 2 IN AIR select Air If both ANT 1 IN CABLE and ANT 2 IN AIR are ...

Page 17: ... top the page 16 17 The Plug Play feature is only available in the TV and DTV mode Changing Channels Using the Channel Buttons Press the CH or CH button to change channels When you press the CH or CH button the TV changes channels in sequence You will see all the channels that the TV has memorized The TV must have memorized at least three channels You will not see channels that were either erased ...

Page 18: ... to quickly alternate between them Adjusting the Volume Press the VOL or VOL button to increase or decrease the volume Using the MUTE Button At any time you can cut off the sound using the MUTE button 1 Press the MUTE button and the sound cuts off The word Mute will appear in the lower left corner of the screen 2 To turn mute off press the MUTE button again or simply press the VOL or VOL button Vi...

Page 19: ...ss the ENTER button 2 Press the ENTER button select Antenna Press the or button to select Air or Cable then press the ENTER button Press the MENU button Storing Channels in Memory Automatic Method 1 Press the MENU button to display the menu Press the or button to select Channel then press the ENTER button 2 Press the or button to select Auto Program then press the ENTER button 3 Press the or butto...

Page 20: ...izing all available stations When pressing the ENTER button during a storing process the Stop Auto Program message will be displayed Select Yes by pressing the or button Press the EXIT button to exit The TV must be connected to an antenna cable in order to receive digital TV signals Even if a particular channel is deleted from the memory you can always tune to that channel directly by using the nu...

Page 21: ...fter set up repeat steps 2 3 and 4 but try one of the other codes listed for your brand of VCR If no other codes are listed try each VCR code 000 through 080 Note on Using Remote Control Modes VCR When your remote control is in VCR mode the volume buttons still control your TV s volume Setting Up the Remote to Operate Your Cable Box 1 Turn off your cable box 2 Press the CABLE button on your TV s r...

Page 22: ...des DVD When your remote control is in DVD mode the volume buttons still control your TV s volume Setting Up the Remote to Operate Your Set Top Box 1 Turn off your STB 2 Press the STB button on your TV s remote control 3 Press the SET button on your TV s remote control 4 Using the number buttons on your remote control enter three digits of the STB code listed on page 24 of this manual for your bra...

Page 23: ... 018 026 037 070 025 038 025 081 082 083 021 056 059 007 008 018 021 026 037 062 006 036 073 074 075 076 021 006 021 024 025 034 005 019 041 075 Brand MITSUBISHI MONTGOMERY WARD MTC MULTITECH NEC OPTIMUS PANASONIC PENTAX PENTEX RESEARCH PHILCO PHILIPS PIONEER PORTLAND PROSCAN QUARTZ QUASAR RADIO SHACK REALISTIC RCA SANSUI SANYO SCOTT SEARS SHARP SHIMTOM SIGNATURE SONY SYLVANIA SYMPHONIC TANDY TASH...

Page 24: ... 013 014 Brand ALPHASTAR ANAM CHANNEL MASTER CROSSDIGITAL CHAPARRAL DIRECT TV DAEWOO DISH NETWORK SYSTEM DISHPRO DRAKE DX ANTENNA ECHOSTAR EXPRESSVU GOI GE GENERAL INSTRUMENT HTS HOME CABLE HITACHI HUGHES NETWORK IQ IQ PRISM JANEIL JERROID JVC Code 023 043 018 034 019 035 015 016 017 019 022 045 060 061 062 065 066 067 068 074 069 070 069 018 024 032 027 025 069 070 071 069 069 065 046 047 048 063...

Page 25: ...74 122 123 027 065 077 078 079 082 080 125 081 095 066 146 067 068 090 060 061 089 133 135 069 074 074 064 113 071 073 091 110 089 092 091 022 033 115 116 073 051 108 109 073 059 100 106 107 074 075 025 031 057 058 054 055 056 076 093 074 094 073 Brand NORCENT NEXT BASE NEC NANTAUS NESA OPTOMEDIA ELECTRONICS OPTIVIEW ONKYO PHILCO PRINCETON PROSCAN PANASONIC PHILIPS ROTEL RIO RCA RAITE ROWA SAMPO S...

Page 26: ...nput Source Name Name the device connected to the input jacks to make your input source selection easier 1 Press the MENU button to display the menu Press the or button to select Input then press the ENTER button Press the or button to select Edit Name then press the ENTER button 2 Press the or button to select AV1 AV2 S Video1 S Video2 Component1 Component2 PC HDMI1 or HDMI2 input jack then press...

Page 27: ...tton 4 Press the or button to decrease or increase the value of a particular item Press the ENTER button Sharpness doesn t operate in PC mode Each adjusted setting will be stored separately according to its input mode When you make changes to Contrast Brightness Sharpness Color or Tint OSD color will also be adjusted accordingly 5 Press the ENTER button to return to Picture 6 Press the or button t...

Page 28: ...the ENTER button Press the EXIT button to exit When the picture mode is set to Movie or Standard Detailed Settings can be selected Black Adjust Off Low Medium High You can directly select the black level on the screen to adjust the screen depth Dynamic Contrast Off Low Medium High You can adjust the screen contrast so that the optimal contrast is provided Gamma 3 3 You can adjust the Primary Color...

Page 29: ...The screen size when Wide screen is vertically enlarged Zoom2 The screen size when the Zoom1 screen is vertically enlarged Wide Fit Enlarges the aspect ratio of the picture to fit the entire screen 4 3 Sets the picture to 4 3 normal mode In TV VIDEO S VIDEO and COMPONENT 480i 480p modes all screen modes can be selected 16 9 Zoom1 Zoom2 4 3 In COMPONENT 720p 1080i or HDMI 720p 1080i mode 16 9 4 3 Z...

Page 30: ...een with the DNIe feature activated If you set the DNIe to Demo you can view the applied DNIe and normal pictures on the screen for demonstration purposes Using this function you can view the difference in the visual quality 1 Press the MENU button to display the menu Press the ENTER button to select Picture 2 Press the or button to select DNIe then press the ENTER button This function doesn t wor...

Page 31: ...unction Help On SW Upgrade Move Enter Return Off On Setting the Color Gamut You can choose your favorite color gamut Color gamut means a color matrix made up with the basic colors of Red Green and Blue 1 Press the MENU button to display the menu Press the ENTER button to select Picture 2 Press the or button to select Color Gamut then press the ENTER button 3 Press the or button to select Normal or...

Page 32: ...kground If you wish to continue viewing the poor picture you must set the Blue Screen mode to Off 1 Press the MENU button to display the menu Press the or button to select Setup then press the ENTER button 2 Press the or button to select Blue Screen then press the ENTER button 3 Press the or button to select Off or On then press the ENTER button Press the EXIT button to exit Blue Screen is display...

Page 33: ...tomatic settings 1 Press the MENU button to display the menu Press the or button to select Sound then press the ENTER button 2 Press the or button to select Equalizer then press the ENTER button 3 Press the or button to select a particular frequency to adjust Press the or button to increase or decrease the level of the particular frequency then press the ENTER button Press the EXIT button to exit ...

Page 34: ...set Multi Track Options Preferred Language English Multi Track Sound Stereo English Spanish French Move Enter Move Enter Return Return Setting the TruSurround XT TruSurround XT is a patented SRS technology that solves the problem of playing 5 1 multichannel content over two speakers TruSurround delivers a compelling virtual surround sound experience through any two speaker playback system includin...

Page 35: ...sually a foreign language translation Press the MTS buttons on the remote control to select Mono Stereo or SAP Sound Mode Custom Equalizer SRS TruSurround XT Off Multi Track Options Auto Volume Off Internal Mute Off Reset Multi Track Options Preferred Language English Multi Track Sound Stereo Mono Stereo SAP Move Enter Return Move Enter Return Automatic Volume Control Reduces the difference in vol...

Page 36: ... the ENTER button 3 Press the or button to select Off or On then press the ENTER button Press the EXIT button to exit The left right audio outputs and digital audio outputs Optical remain enabled The VOL VOL and MUTE buttons do not operate when the Internal Mute is set to On Sound Mode Custom Equalizer SRS TruSurround XT Off Multi Track Options Auto Volume Off Internal Mute Off Reset Sound Mode Cu...

Page 37: ...ER button It searches scrambled channels which are to be removed from the list To stop searching scrambled channels Press the button to select Stop then press the ENTER button Press the button to select Yes then press the ENTER button 3 When the scrambled channel searching is completed press the ENTER button Press the EXIT button to exit Continued Clear Scrambled Channel Removing Scrambled Channel...

Page 38: ...and CH button to select the channel to be added or deleted then press the ENTER button Continued Channel List Added 1 2 DTVAir 2 1 Air 4 Air 6 DTVAir 7 1 Air 8 Air 9 Air 10 DTVAir 10 1 DTVAir 10 2 DTVAir 10 3 DTVAir 11 1 DTVAir 11 2 DTVAir 11 3 DTVAir 12 1 DTVAir 12 2 DTVAir 12 3 Air 13 DTVAir 13 1 DTVAir 13 2 DTVAir 13 3 DTVAir 13 4 Air 17 DTVAir 12 2 Air 28 Watch Add Delete Favorite List Mode De...

Page 39: ...ton to exit Only memorized channels can be set as favorite channels All favorite channels will be shown on the Favorite menu To select the favorite channels you have set up press the FAV CH button on the remote control Channel Antenna Air Auto Program Clear Scrambled Channel Channel List Name Fine Tune Signal Strength LNA On Move Enter Channel List All Added Favorite Default List Mode All Move Ent...

Page 40: ...Favorite Default List Mode All All Added Favorite Move Enter Return Return Labeling Channels Analog Channels can labelled so the their call letters appear whenever the channel is selected 1 Press the MENU button to display the menu Press the or button to select Channel then press the ENTER button Press the or button to select Name then press the ENTER button 2 Press the or button to select the cha...

Page 41: ...hannels you cannot fine tune a digital channel You can however adjust your antenna to improve the reception of available digital channels 1 Press the MENU button to display the menu Press the or button to select Channel then press the ENTER button 2 Press the or button to select Signal Strength then press the ENTER button If the signal strength meter indicates that the signal is weak physically ad...

Page 42: ...NTER button 2 Press the or button to select LNA then press the ENTER button 3 Press the or button to select Off or On then press the ENTER button Press the EXIT button to exit LNA functions only when antenna is set to Air The LNA setting must be made separately for each channel If the picture is noisy with the LNA set to On select Off Channel Antenna Air Auto Program Clear Scrambled Channel Channe...

Page 43: ...lso make sure that the PC is connected Setting up the TV with your PC How to Auto Adjust Use the Auto Adjust function to have the TV set automatically adjust the video signals it receives from the PC The function also automatically fine tunes the settings and adjusts the frequency values and positions This function does not work in DVI Digital mode Change to the PC mode first 1 Press the MENU butt...

Page 44: ...screen Press the EXIT button to exit The previously adjusted settings will be reset to the factory defaults Picture Move Enter Return Image Lock Position Auto Adjustment Image Reset Resolution 1024 x 768 60Hz Move Enter PC Image Reset is completed Return Adjusting the Screen Quality The purpose of the picture quality adjustment is to remove or reduce picture noise If the noise is not removed by fi...

Page 45: ...is switched to Home Theater PC mode DNIe is set to On and the menu is deactivated Picture Move Enter Return More Menu Transparency Medium Blue Screen Off Melody Low PC Home Theater PC Off HDMI Black Level Low More Move Enter Setup Return Picture Move Enter Return More Menu Transparency Medium Blue Screen Off Melody Low PC Home Theater PC Off HDMI Black Level Low More Move Enter Setup Return Off On...

Page 46: ... display the menu Press the or button to select Setup then press the ENTER button Press the or button to select Time then press the ENTER button 2 Press the ENTER button to select Clock 3 Press the ENTER button to select Clock Mode Press the or button to select Manual then press the ENTER button 4 Press the or button to select Clock Set then press the ENTER button 5 Press the or button to move to ...

Page 47: ...ctivated Off Timer Select hour minute am pm and Inactivated Activated To activate timer with the setting set to Activated Repeat Select Once Everyday Mon Fri Mon Sat or Sat Sun Volume Select the volume level you want the TV to be at when it turns on with the Timer Antenna Select Air or Cable Channel Select the channel you want to come on when the TV turns on with the Timer You can set the hour min...

Page 48: ...u display the TV menu in Game Mode the screen shakes slightly The mark appears on the screen which means that Game Mode is On with the selected source If Game Mode is On Picture Mode is automatically changed to Game and users cannot change the mode Sound Mode in the Sound menu is deactivated Adjust the sound using the Equalizer The Reset in the Sound menu is activated Reset function initializes th...

Page 49: ...ss the ENTER button 7 The TV Parental Guidelines screen will appear Press the or button to select one of the six aged based categories TV Y All children The themes and elements in this program are specifically designed for a very young audience including children from ages two to six TV Y7 Directed to older children The themes and elements in this program may include mild physical or comedic viole...

Page 50: ...y young children as well as young adults the TV guidelines must be set up separately for each age group How to Set up Restrictions Using MPAA Ratings G PG PG 13 R NC 17 X NR The MPAA rating system uses the Motion Picture Association of America MPAA system and its main application is for movies When the V Chip lock is on the TV will automatically block any programs that are coded with objectionable...

Page 51: ... ratings Block All Press to lock all TV ratings Parental restriction levels differ depending on the broadcasting station The default menu name and Downloadable US rating changes depending on the downloaded information Even if you set the On screen display to your desired language the Downloadable U S Rating menu will appear in English only The rating will automatically block certain categories tha...

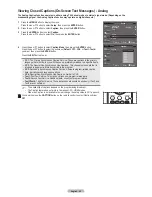
Page 52: ...ld be used only if Text1 and Text2 are not sufficient The availability of captions depend on the program being broadcast The Caption feature doesn t work in Component PC HDMI modes When the Caption is not available to view change the setup value to CC1 and such You can also press the CAPTION button on the remote control to select Captions On or Off Viewing Closed Captions On Screen Text Messages A...

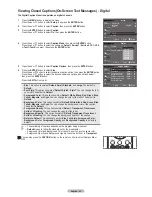
Page 53: ...arent You can also press the CAPTION button on the remote control to select Captions On or Off Viewing Closed Captions On Screen Text Messages Digital The Digital Captions function operates on digital channels 1 Press the MENU button to display the menu Press the or button to select Setup then press the ENTER button 2 Press the or button to select Caption then press the ENTER button 3 Press the EN...

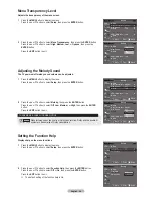
Page 54: ... MENU button to display the menu Press the or button to select Setup then press the ENTER button 2 Press the or button to select Function Help then press the ENTER button Press the or button to select Off or On then press the ENTER button Press the EXIT button to exit The default setting of the function help is On Picture Move Enter Return More Menu Transparency Medium Blue Screen Off Melody Low P...

Page 55: ... 30 seconds is displayed 5 If the firmware on the USB is properly recognized the message Upgrade version xxxx to version xxxx The system would be reset after upgrade is displayed Press the or button to select OK then press the ENTER button The upgrade starts Please be careful to not disconnect the power or remove the USB drive while upgrades are being applied The TV will shut off and turn on autom...

Page 56: ...nals Press the TV button to put your remote control in the TV mode Make sure the remote has batteries Check that the and ends of the batteries are inserted correctly Digital broadcasting screen problem Please check the digital signal strength and input antenna The image is too light or too dark Adjust the Brightness and Contrast Adjust the Fine tuning The visual qualities of digital channels vary ...

Page 57: ...o the store where you purchased the TV or to a Samsung Service center Caution Replace with the correct code numbered BP96 01653 lamp to avoid damage to the TV Turn the power off and wait for 30 minutes before replacing the lamp as it will be hot Do not touch the glass part of the lamp with your bare hands or insert any foreign object inside the cover as it may cause poor screen quality electric sh...

Page 58: ...quids near or on the TV Liquids that spill into it can cause serious damage Cabinet Never open the cabinet or touch the parts inside Wipe your TV with a clean and dry cloth Never use water cleaning fluids wax or chemicals Do not put heavy objects on the top of the cabinet This DLP TV projects the image onto a large screen by applying an optical system If you place the TV set face down it might cau...

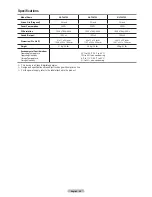
Page 59: ...5 x 13 x 32 inchs 1147 x 325 x 808 mm 50 x 13 x 29 inchs 1281 x 341 x 742 mm Weight 21 kg 46 lbs 26 kg 56 lbs 29 kg 63 lbs Environmental Considerations Operating Temperature Operating Humidity Storage Temperature Storage Humidity 50 F to 104 F 10 C to 40 C 10 to 80 non condensing 4 F to 113 F 20 C to 45 C 5 to 95 non condensing This device is a Class B digital apparatus Design and specifications a...

Page 60: ...may be distributed under the terms of this General Public License The Program below refers to any such program or work and a work based on the Program means either the Program or any derivative work under copyright law that is to say a work containing the Program or a portion of it either verbatim or with modifications and or translated into another language Hereinafter translation is included wit...

Page 61: ...se since you have not signed it However nothing else grants you permission to modify or distribute the Program or its derivative works These actions are prohibited by law if you do not accept this License Therefore by modifying or distributing the Program or any work based on the Program you indicate your acceptance of this License to do so and all its terms and conditions for copying distributing...

Page 62: ...ost effectively convey the exclusion of warranty and each file should have at least the copyright line and a pointer to where the full notice is found One line to give the program s name and a brief idea of what it does Copyright C year name of author This program is free software you can redistribute it and or modify it under the terms of the GNU General Public License as published by the Free So...

Page 63: ...GNU General Public License This license the GNU Lesser General Public License applies to certain designated libraries and is quite different from the ordinary General Public License We use this license for certain libraries in order to permit linking those libraries into non free programs When a program is linked with a library whether statically or using a shared library the combination of the tw...

Page 64: ...very part regardless of who wrote it Thus it is not the intent of this section to claim rights or contest your rights to work written entirely by you rather the intent is to exercise the right to control the distribution of derivative or collective works based on the Library In addition mere aggregation of another work not based on the Library with the Library or with a work based on the Library o...

Page 65: ... in a single library together with other library facilities not covered by this License and distribute such a combined library provided that the separate distribution of the work based on the Library and of the other library facilities is otherwise permitted and provided that you do these two things a Accompany the combined library with a copy of the same work based on the Library uncombined with ...

Page 66: ...ERVICING REPAIR OR CORRECTION 16 IN NO EVENT UNLESS REQUIRED BY APPLICABLE LAW OR AGREED TO IN WRITING WILL ANY COPYRIGHT HOLDER OR ANY OTHER PARTY WHO MAY MODIFY AND OR REDISTRIBUTE THE LIBRARY AS PERMITTED ABOVE BE LIABLE TO YOU FOR DAMAGES INCLUDING ANY GENERAL SPECIAL INCIDENTAL OR CONSEQUENTIAL DAMAGES ARISING OUT OF THE USE OR INABILITY TO USE THE LIBRARY INCLUDING BUT NOT LIMITED TO LOSS OF...

Page 67: ...esse suivante www samsung com global register Inscrire le modèle et le numéro de série ici pour référence future Modèle _______________ N de série _______________ Manuel du propriétaire HL T4675S HL T5075S HL T5675S Téléviseur à DLP ...

Page 68: ...ilisateur est fabriqué sous licence en vertu de droits de propriété intellectuelle de certaines tierces parties Ce produit est protégé en vertu des brevets américains suivants 5 991 715 5 740 317 4 972 484 5 214 678 5 323 396 5 539 829 5 606 618 5 530 655 5 777 992 6 289 308 5 610 985 5 481 643 5 544 247 5 960 037 6 023 490 5 878 080 et en vertu de la demande de brevet nº 2001 44713 A1 publiée aux...

Page 69: ...analogique il n y a pas de bruits parasites d images fantômes ni de sons altérés 3 Comment puis je brancher une antenne dans une maison en rangée un logement de coopérative d habitation condominium ou appartement La règle OTARD de la Commission fédérale des communications qui fait partie du Telecommunications Act Loi sur les télécommunications de 1996 permet aux résidents de condominiums et de mai...

Page 70: ...MI 32 Arrêt sur image 32 PARAMÈTRES AUDIO Réglage automatique du son 33 Réglages audio 33 Réglage de TruSurround XT 34 Sélection d une piste de son multicanaux numérique 34 Sélection d une piste de son multicanaux analogique 35 Contrôle automatique du volume 35 Sélection de la sourdine internee 36 RÉGLAGE DES CANAUX Suppression des canaux brouillés canaux numériques 37 Ajout et suppression de cana...

Page 71: ...nisation pouvant prendre en charge 181 chaînes Filtre spécial pour réduire ou éliminer les problèmes de réception Réglage précis de la syntonisation pour une netteté d image maximale Décodeur multi canal intégré permettant l écoute stéréo et bilingue Haut parleurs intégrés à deux canaux Minuterie spéciale de mise hors tension automatique de l appareil Téléviseur grand écran avec fonction de dimens...

Page 72: ...ilisation d ampoules non autorisées la société ne peut garantir la qualité du produit Câble S Vidéo Câble d antenne Câble à composants Câble audio Câbles vidéo Câble D Sub Câble Audio PC Câble HDMI Câble HDMI DVI Câble optique Câble 1 stéréo 2RCA Suite Affichage du panneau de configuration Touches de la partie inférieure droite du panneau Les touches du panneau inférieur droit permettent de comman...

Page 73: ...arche arrêt a été activée et le téléviseur s allumera automatiquement dans environ 15 secondes Un ventilateur à l intérieur du téléviseur ne fonctionne pas normalement Le couvercle d ampoule sur le côté du téléviseur est mal fermé Vérifier si l orifice de ventilation sur le côté du téléviseur est obstrué Si la température intérieure devient trop élevée la téléviseur s éteindra L ampoule peut être ...

Page 74: ...VICE 2 Cette prise est réservée aux mises à jour de logiciel SERVICE Cette prise est réservée à l entretien seulement HDMI 1 DVI IN Brancher à la prise HDMI d un appareil avec sortie HDMI Cette entrée peut également servir de branchement DVI avec entrées audio analogiques distinctes Un câble HDMI DVI optionnel est nécessaire pour faire ce branchement Lorsque l adaptateur HDMI DVI en option est uti...

Page 75: ...DVD le récepteur le câblosélecteur ou le magnétoscope SOURCE Appuyer sur cette touche pour afficher toutes les sources vidéo accessibles Appuyer sur cette touche pour illuminer les touches VOL et CH et la touche source active TV DVD CABLE STB VCR de la télécommande PRE CH Syntoniser le canal précédent a FAV CH Passer aux canaux favoris b HDMI Sélectionner directement le mode HDMI c Fonctions magné...

Page 76: ...e 300 Ω à deux conducteurs plats ci dessous Si l antenne est dotée d un câble de branchement semblable à celui représenté ici consulter la rubrique Antenne 75 Ω à connecteur rond Si le téléviseur est pourvu de deux antennes consulter la rubrique Antennes VHF et UHF séparées Antenne 300 Ω à deux conducteurs plats Si une antenne conventionnelle par exemple une antenne de toit ou des oreilles de lapi...

Page 77: ...cordé à l entrée d antenne ANT IN de le câblosélecteur Cette borne peut porter l inscription ANT IN VHF IN ou simplement IN 2 Relier ce câble à un répartiteur à deux voies 3 Raccorder un câble d antenne entre une sortie OUTPUT du répartiteur et l entrée IN du câblosélecteur 4 Raccorder un câble d antenne entre la sortie d antenne ANT OUT du câblosélecteur et l entrée B IN du commutateur RF A B 5 R...

Page 78: ...figuration du panneau latéral de chaque magnétoscope est différente Lors du branchement d un magnétoscope les couleurs du câble et de la borne de branchement doivent correspondre Branchement S Vidéo Le téléviseur Samsung peut être branché à la prise S Vidéo d un magnétoscope Ce raccordement offre une meilleure qualité d image que celle offerte par le raccordement vidéo standard ci dessus 1 Pour co...

Page 79: ...2 Y PB PR du téléviseur et les prises de sortie COMPONENT OUT Y PB PR du lecteur DVD ou du récepteur 2 Brancher les câbles audio entre les prises d entrée COMPONENT IN 1 L AUDIO R ouCOMPONENT IN 2 L AUDIO R du téléviseur et les prises de sortie AUDIO OUT du lecteur DVD ou du récepteur Panneau latéral du téléviseur Branchement d un lecteur DVD récepteur Câble audio non fourni 2 Câble de composant n...

Page 80: ...n fourni 1 Branchement d un système audionumérique Les prises du panneau latéral du téléviseur permettent de le brancher facilement à un système audionumérique La configuration du panneau latéral de chaque système audionumérique est différente 1 Brancher un câble optique entre les prises de sortie optique DIGITAL AUDIO OUT OPTICAL du téléviseur et les prises d entrée audionumérique du système audi...

Page 81: ...haque ordinateur est différente Lors du branchement d un ordinateur les couleurs du câble et de la borne de branchement doivent correspondre Panneau latéral du téléviseur Câble audio non fourni 1 Amplificateur système de cinéma maison à DVD Panneau latéral du téléviseur PC Câble audio PC non fourni 2 Câble D Sub non fourni 1 Panneau latéral du téléviseur PC Câble HDMI DVI non fourni 1 Câble 1Stere...

Page 82: ...lier communiquer avec le câblodistributeur 5 Le téléviseur commence la mémorisation des canaux accessibles Une fois la mémorisation terminée le menu Prog auto réapparaît Appuyer sur la touche ENTER lorsque la mémorisation des canaux est terminée Le menu Mode Horloge s affiche automatiquement Pour arrêter la recherche avant la fin appuyer sur la touche ENTER lorsque la fonction d arrêt est sélectio...

Page 83: ... et DTV Changement de canal Utilisation des touches de canaux Appuyer sur la touche CH ou CH pour changer de canal Lorsque la touche CH ou CH est enfoncée le téléviseur change de canal en séquence Tous les canaux mémorisés par le téléviseur défilent à l écran Le téléviseur doit avoir mémorisé au moins trois canaux Les canaux qui n ont pas été mémorisés ou qui ont été supprimés de la mémoire ne ser...

Page 84: ... syntoniser l autre canal Il suffit ensuite d appuyer sur la touche PRE CH pour passer de l un à l autre Réglage du volume Appuyer sur VOL or VOL pour augmenter ou diminuer le volume Utilisation de la touche de Mute En tout temps le son peut être mis en sourdine à l aide de la touche MUTE 1 Appuyer sur la touche MUTE pour couper le son L indicateur Mute apparaît dans le coin inférieur gauche de l ...

Page 85: ... pour choisir Antenne Appuyer sur la touche ou pour sélectionner Air ou Câble suivie de la touche ENTER Appuyer sur la touche MENU Mémorisation des chaînes méthode automatique 1 Appuyer sur la touche MENU pour afficher le menu Appuyer sur la touche ou pour sélectionner Chaîne suivie de la touche ENTER 2 Appuyer sur la touche ou pour sélectionner Prog auto suivie de la touche ENTER 3 Appuyer sur la...

Page 86: ...ence alors à mémoriser tous les canaux disponibles Lorsque la touche ENTER est enfoncée pendant un processus de mémorisation le message Arrêter Prog auto s affiche Sélectionner Oui en appuyant sur la touche ou Appuyer sur la touche EXIT pour quitter Le téléviseur doit être branché à l antenne câble pour pouvoir recevoir des signaux de télévision numériques Même si un canal donné est supprimé de la...

Page 87: ...mi ceux correspondant à la marque du magnétoscope Si aucun autre code n est répertorié essayer tous les codes de magnétoscope de 000 à 080 Remarque sur l utilisation des modes de la télécommande Magnétoscope Quand la télécommande est en mode VCR les touches de volume commandent toujours le volume du téléviseur Configuration de la télécommande pour faire fonctionner le câblosélecteur 1 Éteindre le ...

Page 88: ...e Lecteurs DVD Quand la télécommande est en mode DVD les touches de volume commandent toujours le volume du téléviseur Configuration de la télécommande pour contrôler le récepteur 1 Éteindre le récepteur 2 Appuyer sur la touche STB de la télécommande du téléviseur 3 Appuyer sur la touche SET de la télécommande du téléviseur 4 Appuyer sur les touches numériques de la télécommande qui correspondent ...

Page 89: ...6 037 007 008 018 026 037 070 025 038 025 081 082 083 021 056 059 007 008 018 021 026 037 062 006 036 073 074 075 076 021 006 021 024 025 034 005 019 041 075 Marque MITSUBISHI MONTGOMERY WARD MTC MULTITECH NEC OPTIMUS PANASONIC PENTAX PENTEX RESEARCH PHILCO PHILIPS PIONEER PORTLAND PROSCAN QUARTZ QUASAR RADIO SHACK REALISTIC RCA SANSUI SANYO SCOTT SEARS SHARP SHIMTOM SIGNATURE SONY SYLVANIA SYMPHO...

Page 90: ...012 013 014 Marque ALPHASTAR ANAM CHANNEL MASTER CROSSDIGITAL CHAPARRAL DIRECT TV DAEWOO DISH NETWORK SYSTEM DISHPRO DRAKE DX ANTENNA ECHOSTAR EXPRESSVU GOI GE GENERAL INSTRUMENT HTS HOME CABLE HITACHI HUGHES NETWORK IQ IQ PRISM JANEIL JERROID JVC Code 023 043 018 034 019 035 015 016 017 019 022 045 060 061 062 065 066 067 068 074 069 070 069 018 024 032 027 025 069 070 071 069 069 065 046 047 048...

Page 91: ...22 123 027 065 077 078 079 082 080 125 081 095 066 146 067 068 090 060 061 089 133 135 069 074 074 064 113 071 073 091 110 089 092 091 022 033 115 116 073 051 108 109 073 059 100 106 107 074 075 025 031 057 058 054 055 056 076 093 074 094 073 Marque NORCENT NEXT BASE NEC NANTAUS NESA OPTOMEDIA ELECTRONICS OPTIVIEW ONKYO PHILCO PRINCETON PROSCAN PANASONIC PHILIPS ROTEL RIO RCA RAITE ROWA SAMPO SONY...

Page 92: ...entrer le nom de la source d entrée Entrer le nom de l appareil branché aux prises d entrée afin de faciliter la sélection de la source d entrée 1 Appuyer sur la touche MENU pour afficher le menu Appuyer sur la touche ou pour sélectionner Entrée suivie de la touche ENTER Appuyer sur la touche ou pour sélectionner Entrer le nom suivie de la touche ENTER 2 Appuyer sur la touche ou pour sélectionner ...

Page 93: ...e ou pour augmenter ou réduire la valeur d un élément particulier Appuyer sur la touche ENTER Netteté ne fonctionne pas en mode PC Chaque option configurée est enregistrée séparément en fonction du mode d entrée Lorsque des modifications sont apportées au contraste à la luminosité à la Netteté à la couleur ou à la teinte les couleurs à l écran s ajustent en conséquence 5 Appuyer sur la touche ENTE...

Page 94: ...rd ou Cinéma Réglage du noir Off Basse Moyen Haute Il est possible de régler directement le niveau de noir de l écran afin d ajuster la profondeur de l écran Contraste dynam Off Basse Moyen Haute Il est possible de régler le contraste de l écran afin d obtenir un contraste optimal Gamma 3 3 Il est possible d ajuster l intensité des couleurs primaires Appuyer sur ou jusqu à l atteinte du réglage op...

Page 95: ... est agrandi verticalement Zoom2 Format de l écran lorsque l écran Zoom1 est agrandi verticalement Format Large Augmente le facteur de forme de l image pour qu elle remplisse l écran en entier 4 3 Règle l image au format normal 4 3 En mode DTV 720p 1080i Composant 720p 1080i ou HDMI 720p 1080i il est possible de sélectionner un des formats suivants 16 9 4 3 et Large En mode Analogique TV AV S VIDE...

Page 96: ...ppuyer sur la touche ENTER pour choisir Image 2 Appuyer sur la touche ou pour sélectionner DNIe suivie de la touche ENTER Cette fonction est désactivée lorsque la source d entrée est en mode PC 3 Appuyer sur la touche ou pour sélectionner Off Démo ou On suivie de la touche ENTER Appuyer sur la touche EXIT pour quitter le menu Off Met le mode DNIe hors fonction Demo L écran de droite présente l ima...

Page 97: ...base du rouge du vert et du bleu 1 Appuyer sur la touche MENU pour afficher le menu Appuyer sur la touche ENTER pour choisir Image 2 Appuyer sur la touche ou pour sélectionner Gamme de couleurs suivie de la touche ENTER 3 Appuyer sur la touche ou pour sélectionner Normal ou sRGB suivie de la touche ENTER Appuyer sur la touche EXIT pour quitter le menu Normal La gamme de couleurs normale offre des ...

Page 98: ...tinuer à voir l image de mauvaise qualité le mode écran bleu doit être Off 1 Appuyer sur la touche MENU pour afficher le menu Appuyer sur la touche ou pour sélectionner Configuration suivie de la touche ENTER 2 Appuyer sur la touche ou pour sélectionner Écran bleu suivie de la touche ENTER 3 Appuyer sur la touche ou pour sélectionner Off ou On suivie de la touche ENTER Appuyer sur la touche EXIT p...

Page 99: ...sur la touche ou pour sélectionner Égaliseur suivie de la touche ENTER 3 Appuyer sur ou pour choisir une fréquence particulière à ajuster Appuyer sur la touche ou pour augmenter ou réduire le niveau de la fréquence particulière suivie de la touche ENTER Appuyer sur la touche EXIT pour quitter le menu Réglage de l équilibre du son G D Pour régler l équilibre du son des haut parleurs gauche et droit...

Page 100: ...technique TruSurround le téléspectateur vit une expérience polyphonique totale le son enveloppant étant diffusé par les deux enceintes de reproduction auxquelles s ajoutent les haut parleurs intégrés au téléviseur Ce système est totalement compatible avec tous les formats multicanaux 1 Appuyer sur la touche MENU pour afficher le menu Appuyer sur la touche ou pour sélectionner Son suivie de la touc...

Page 101: ...ituellement un doublage en langue étrangère Appuyer sur la touche MTS de la télécommande pour sélectionner Mono Stéréo ou SAP Contrôle automatique du volume Réduit la différence de niveau sonore entre les diffuseurs 1 Appuyer sur la touche MENU pour afficher le menu Appuyer sur la touche ou pour sélectionner Son suivie de la touche ENTER 2 Appuyer sur la touche ou pour sélectionner Volume auto sui...

Page 102: ...uivie de la touche ENTER 3 Appuyer sur la touche ou pour sélectionner Off ou On suivie de la touche ENTER Appuyer sur la touche EXIT pour quitter le menu Les sorties audio gauche droite et les sorties audionumériques optique restent actives Les touches VOL VOL et MUTEne fonctionnent pas lorsque la sourdine interne est activée Son Mode Personnel Égaliseur SRS TruSurround XT Off Options multi pistes...

Page 103: ...Effacer les canaux brouillés suivie de la touche ENTER Cette fonction détecte les canaux brouillés à supprimer de la liste Pour arrêter la fonction de recherche des canaux brouillés Appuyer sur la touche pour sélectionner Arrêt suivie de la touche ENTER Appuyer sur la touche pour sélectionner Oui suivie de la touche ENTER 3 Lorsque la recherche de canaux brouillés est terminée appuyer sur la touch...

Page 104: ...ous les canaux en mémoire Appuyer sur la touche ADD DEL de la télécommande Appuyer sur la touche CH ou CH pour sélectionner le canal à ajouter ou à supprimer suivie de la touche ENTER Suite Liste des canaux Ajouter 1 2 DTVAir 2 1 Air 4 Air 6 DTVAir 7 1 Air 8 Air 9 Air 10 DTVAir 10 1 DTVAir 10 2 DTVAir 10 3 DTVAir 11 1 DTVAir 11 2 DTVAir 11 3 DTVAir 12 1 DTVAir 12 2 DTVAir 12 3 Air 13 DTVAir 13 1 D...

Page 105: ...symbole disparaisse Appuyer sur la touche EXIT pour quitter le menu Seuls les canaux déjà en mémoire peuvent faire partie des canaux favoris Tous les canaux favoris sont affichés dans le menu Favoris Pour accéder aux canaux classés dans la liste des canaux favoris appuyer sur la touche FAV CH de la télé commande Chaîne Antenne Air Prog auto Effacer les canaux brouillés Liste des canaux Nom Syn Pré...

Page 106: ...é 1 Appuyer sur la touche MENU pour afficher le menu Appuyer sur la touche ou pour sélectionner Chaîne suivie de la touche ENTER Appuyer sur la touche ou pour sélectionner Nom suivie de la touche ENTER 2 Appuyer sur la touche ou pour sélectionner le canal à renommer suivie de la touche ENTER 3 Appuyer sur la touche ou pour choisir une lettre un chiffre ou une espace ce qui donne la séquence A à Z ...

Page 107: ...ogiques il n est pas possible de syntoniser un canal numérique avec précision Cependant il est possible d ajuster l antenne pour améliorer la réception des canaux numériques accessibles 1 Appuyer sur la touche MENU pour afficher le menu Appuyer sur la touche ou pour sélectionner Chaîne suivie de la touche ENTER 2 Appuyer sur la touche ou pour sélectionner Puissance signal suivie de la touche ENTER...

Page 108: ...er sur la touche ou pour sélectionner LNA suivie de la touche ENTER 3 Appuyer sur la touche ou pour sélectionner Off ou On suivie de la touche ENTER Appuyer sur la touche EXIT pour quitter le menu LNA ne fonctionne que lorsque l antenne est réglée à Air Il faut régler l amplificateur à faible bruit séparément pour chaque canal Si l image présente des parasites lorsque l amplificateur à faible brui...

Page 109: ... outre que l ordinateur est branché Configuration du téléviseur par l ordinateur Réglages automatiques Utiliser la fonction de réglage automatique pour que le téléviseur règle automatiquement les signaux vidéo reçus de l ordinateur En outre cette fonction syntonise automatiquement les réglages et ajuste les valeurs et les positions de la fréquence Cette fonction n est pas accessible en mode DVI Nu...

Page 110: ...églage de la qualité de l image supprime ou réduit les parasites Si la syntonisation fine ne suffit pas à supprimer les parasites régler la fréquence le mieux possible puis recommencer la syntonisation fine Une fois les parasites réduits reprendre le réglage de l image de façon à bien centrer celle ci sur l écran Passer d abord en mode PC 1 Appuyer sur la touche MENU pour afficher le menu Appuyer ...

Page 111: ...Redimensionnement de l image mode PC Il est possible de choisir le format de l image qui correspond à ses exigences 1 Appuyer sur la touche MENU pour afficher le menu Appuyer sur la touche ENTER pour choisir Image 2 Appuyer sur la touche ou pour sélectionner Format suivie de la touche ENTER 3 Appuyer sur la touche ou pour sélectionner le format d écran désiré Appuyer sur la touche ENTER Appuyer su...

Page 112: ...ficher le menu Appuyer sur la touche ou pour sélectionner Configuration suivie de la touche ENTER Appuyer sur la touche ou pour sélectionner Heure suivie de la touche ENTER 2 Appuyer sur ENTER pour choisir Horloge 3 Appuyer sur ENTER pour choisir Horloge Appuyer sur la touche ou pour sélectionner Manuel suivie de la touche ENTER 4 Appuyer sur la touche ou pour sélectionner Rég horloge suivie de la...

Page 113: ...er l heure les minutes am pm et Désactiver Activer Pour activer la mise en veille avec le réglage choisi sélectionner Activer Répéter Sélectionner Une fois Tous les jours Lundi vendredi Lundi samedi et Sam à dim Volume Sélectionner le niveau sonore du téléviseur au moment de sa mise sous tension par la minuterie Antenna Sélectionner Air ou Câble Chaîne Sélectionner lecanal désiré pour la mise sous...

Page 114: ... écran vibre légèrement La marque s affiche à l écran indiquant que le mode Jeu est activé avec la source sélectionnée Si le mode Jeu est activé Le mode Image est automatiquement réglé à Jeu et les utilisateurs ne peuvent le modifier Le mode Son du menu Son est désactivé Régler le son à l aide de l égalisateur La fonction Rétablir du menu Son est activée La fonction Rétablir initialise les paramèt...

Page 115: ...cran Cont paren TV s affiche Appuyer sur la touche ou pour sélectionner une des six classifications établies en fonction de l âge TV Y Tous les enfants Les thèmes et éléments de cette émission ont été spécialement conçus pour un public très jeune notamment les enfants de deux à six ans TV Y7 Vise des enfants plus vieux Les thèmes et éléments de cette émission peuvent comprendre un certain niveau d...

Page 116: ...unes enfants ainsi que de jeunes adultes les classifications doivent être définies séparément pour ces groupes Configuration des restrictions par les codes MPAA G PG PG 13 R NC 17 X NR Le système de classification MPAA qui est basé sur les codes établis par la Motion Picture Association of America MPAA s applique surtout aux longs métrages Lorsque la fonction Blocage puce V est activée les émissio...

Page 117: ...tions Bloq tout Appuyer sur cette touche pour bloquer toutes les classifications Les niveaux de contrôle parental varient selon la station émettrice Le nom de menu par défaut et les modifications de catégories américaines téléchargeables varient selon les informations téléchargées Même si l affichage à l écran est dans une autre langue le menu Catég américaine téléchargeable ne s affiche qu en ang...

Page 118: ... données d affichage uniquement si les fonctions d affichage Text1 and Text2 sont insuffisantes L option de sous titrage dépend de l émission diffusée L option de sous titrage ne fonctionne pas aux modes COMPOSANTE PC HDMI Si le sous titrage n est pas accessible modifier la valeur du paramètre à CC1 et suivantes Il est aussi possible d appuyer sur la touche CAPTION de la télécommande pour régler l...

Page 119: ...ent Il est aussi possible d appuyer sur la touche CAPTION de la télécommande pour régler le sous titrage à On ou Off Affichage des sous titres codés messages à l écran numériques La fonction de sous titrage numérique est compatible avec les canaux numériques 1 Appuyer sur la touche MENU pour afficher le menu Appuyer sur la touche ou pour sélectionner Configuration suivie de la touche ENTER 2 Appuy...

Page 120: ...e dans le menu des fonctions 1 Appuyer sur la touche MENU pour afficher le menu Appuyer sur la touche ou pour sélectionner Configuration suivie de la touche ENTER 2 Appuyer sur la touche ou pour sélectionner Fonction d aide suivie de la touche ENTER Appuyer sur la touche ou pour sélectionner Off ou On suivie de la touche ENTER Appuyer sur la touche EXIT pour quitter le menu Le paramètre par défaut...

Page 121: ...5 Si le microprogramme de la clé USB est reconnu le message Mettre à niveau de la version xxxx à la version xxxx Le système sera réinitialisé après la mise à niveau s affiche Appuyer sur la touche ou pour sélectionner OK suivie de la touche ENTER La mise à niveau démarre Veiller à ne pas débrancher l alimentation et à ne pas retirer la clé USB pendant l application des mises à jour Le téléviseur s...

Page 122: ...rifier les bornes des piles Appuyer sur la touche TV pour régler la télécommande au mode TV S assurer qu il y a des piles dans la télécommande Vérifier si les bornes et des batteries sont insérées correctement Problème d écran en diffusion numérique Vérifier la puissance du signal numérique et l entrée de l antenne L image est trop pâle ou trop foncée Régler la luminosité et le contraste Utiliser ...

Page 123: ... au centre de service Samsung Mise en garde Remplacer l ampoule par une ampoule du bon numéro de code BP96 01653 afin d éviter d endommager le téléviseur Éteindre le téléviseur et attendre 30 minutes que l ampoule ait le temps de refroidir avant de la remplacer Ne pas toucher la portion de verre de l ampoule avec les doigts nus Ne pas insérer d objet à l intérieur du couvercle Ce faire pourrait en...

Page 124: ...iquide renversé sur l ensemble pourrait causer de graves dommages Machine Ne jamais ouvrir le boîtier et ne jamais toucher aux pièces internes Essuyer le téléviseur à l aide d un linge propre et sec Ne jamais utiliser d eau de nettoyants liquides de cires ou de produits chimiques Ne pas déposer d objets lourds sur le boîtier Ce téléviseur à DLP projette une image sur un large écran par l intermédi...

Page 125: ... mm 50 x 13 x 29 pouces 1281 x 341 x 742 mm Poids 21 kg 46 lbs 26 kg 56 lbs 29 kg 63 lbs Environnement d utilisation Température pour le fonctionnement Niveau d humidité relative pour le fonctionnement Température pour l entreposage Niveau d humidité pour l entreposage 50 F à 104 F 10 C à 40 C 10 à 80 sans condensation 20 00 C à 45 00 C 20 C à 45 C 5 à 95 sans condensation Appareil numérique de ca...

Page 126: ...Cette page est laissée intentionnellement en blanc ...

Page 127: ...Cette page est laissée intentionnellement en blanc ...

Page 128: ...uer avec le centre de service à la clientèle SAMSUNG Country Customer Care Center Web Site Address CANADA 1 800 SAMSUNG 7267864 www samsung com ca Samsung Electronics Canada Inc Customer Service 55 Standish Court Mississauga Ontario L5R 4B2 Canada Samsung Electronique Canada Inc Service à la Clientèle 55 Standish Court Mississauga Ontario L5R 4B2 Canada U S A 1 800 SAMSUNG 7267864 www samsung com ...

Reviews: