background image

MF 5990dn - Agoris M943dn

- 9 -

2 - 

Installation

6

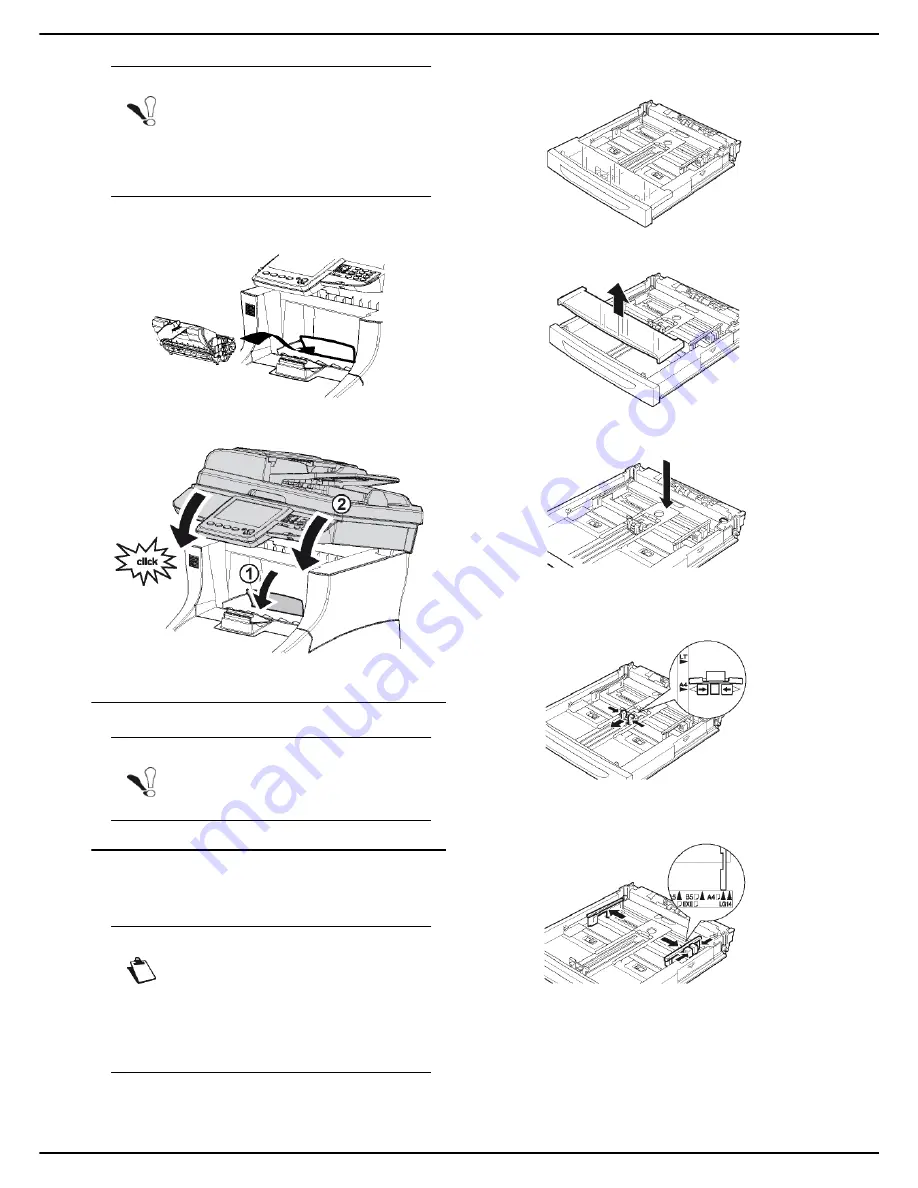
Insert the toner cartridge into its compartment, 
pushing it fully in until it engages (last movement 
downwards).

7

Close the access flap to the toner cartridge and 
lower the flatbed scanner.

Loading media

Loading paper into the paper tray

The procedure for loading paper described in this section 
applies to all paper trays in the machine.

1

Remove the paper tray from the machine and place 
it on a flat surface.

2

Remove the cover from the paper tray.

3

Press the paper compression flap to lock it.

4

Press on the longitudinal paper guide and slide it to 
the required paper format.

5

Press on the right lateral paper guide and slide it to 
the required paper format.

Note

Make sure you remove the toner cartridge 
cover horizontally so as not to break it inside 
the toner cartridge.
After removing the cover, do not shake the 
toner cartridge. You may risk spilling toner.

Note

Before loading paper, consult the section 
Recommendations for paper [

140].

Note

If you are using paper format greater than 
A4, see the section Loading paper format 
larger than A4 [

10].

If you are using transparencies, see the 
section Loading transparencies into the 
paper tray [

11].

Summary of Contents for Agoris M943dn

Page 1: ...TELECOM User Manual MF5990dn Agoris M943dn...

Page 2: ...r receiving them In this configuration it is preferable to use direct telephone lines reserved exclusively for the machine in order to maintain it constantly in service and to receive communications w...

Page 3: ...ission settings 26 Fax reception settings 28 Configuring the fax server optional 30 Advanced fax settings 31 Service default settings 32 Copy function default settings 32 Fax emission default settings...

Page 4: ...n to Archive 68 Stopping an emission in progress 69 Receiving emails 69 Monitoring document emissions 69 Forcing an emission request 70 Editing an emission request 70 Deleting a document awaiting emis...

Page 5: ...Precautions for use 114 Operating environment 114 Precautions for using the machine 114 Precautions for using the touch screen 115 Safety information 115 Safety during operation 115 Handling and movi...

Page 6: ...per adjustment guide 11 Main paper tray 3 Automatic document feeder 12 On Off button 4 Original document output 13 Secondary paper tray 5 Paper reception stop 14 Toner cartridge access button 6 Finger...

Page 7: ...depending on the model 23 Duplex module Key Description To access the machine s home screen To activate the Send Fax function To activate the Scan Document function To activate the Copy Document func...

Page 8: ...ide supplied with this option for installation instructions Perfume diffuser The perfume unit is an option enabling you to install a perfume diffuser on the machine When this option is installed and a...

Page 9: ...3 Press the paper compression flap to lock it 4 Press on the longitudinal paper guide and slide it to the required paper format 5 Press on the right lateral paper guide and slide it to the required p...

Page 10: ...aper format larger than A4 The procedure for loading paper described in this section applies to all paper trays in the machine 1 Remove the paper tray from the machine and place it on a flat surface 2...

Page 11: ...format and type used in the ma chine The machine automatically detects standard paper formats To check define the format and type of pa per loaded consult the section Paper settings 24 Loading transp...

Page 12: ...the paper tray Ensure that the cover is properly closed 10 Replace the paper tray in the machine and push it in fully 11 Define the format and type of transparencies used in the machine The machine au...

Page 13: ...ax settings machine name and number local network settings automatic configuration of the Ethernet network paper settings To configure the geographic settings 1 Press the MENU key 2 Press SETTINGS GEN...

Page 14: ...onfiguration of the Ethernet network automatic allocation of the IP address via the DHCP server 1 In the menu SETTINGS press COMMUNICATION LOCAL NETWORK ETHERNET IPV4 CONFIGURATION 2 Select AUTOMATIC...

Page 15: ...ANDS or OTHER PARAMETERS Navigation path To help know where you are in the menu arborescence the upper frame of the screen displays the navigation path leading to the current menu For example to creat...

Page 16: ...lt the section Using a USB memory key 59 SETTINGS This menu allows you to access the machine s configuration parameters For more information consult the section Configuring the machine and the service...

Page 17: ...e is used to identify the gravity of the problem red a serious error has occurred rendering one or more machine functions unusable You must resolve the incident immediately e g paper jam paper out cov...

Page 18: ...ng the document 1 Move the paper guides apart to the maximum 2 Insert your document in the automatic feeder side to be copied facing upwards 3 Adjust the paper guides against the document 4 Set the li...

Page 19: ...ne displays the identification screen To log out manually 1 Press MENU 2 Press OTHER COMMANDS AUTHENTICATION LOG OFF The machine disconnects you from your user ac count Personalising your user account...

Page 20: ...slide it slowly downwards The machine informs you when the option is successful If you have entered your email address the ma chine automatically sends you your fingerprint 7 When you have made the mo...

Page 21: ...eing executed by another connected user General settings Date Time Settings Setting the date and the time At any time you can edit the machine s date and time 1 Press MENU 2 Select SETTINGS GENERAL DA...

Page 22: ...d automatically 1 Press MENU 2 Select SETTINGS GENERAL GEOGRAPHICAL TELEPHONE NETWORK 3 Select the required option from the list Use the up and down arrows to scroll through the available op tions Pre...

Page 23: ...t the required option from the list Press OK to confirm the new setting 4 Press MENU to return to the home screen Perfume Setting The perfume unit is an option enabling you to install a perfume diffus...

Page 24: ...o correct and adjust the scanner printer margins 1 Press MENU 2 Select SETTINGS SCANN PRINTER ADJUSTMENTS 3 Make the necessary adjustment s 4 Press MENU to return to the home screen To define the pa p...

Page 25: ...nter error in PC print mode PAGE TIMEOUT Waiting time for data from the PC before the PC print page is cancelled SYMBOL SET This parameter is used to draw up the set of symbols The possible values are...

Page 26: ...ION FAX EMISSION PREFIXES 3 Press LENGTH 4 Enter the length of the local prefix between 1 and 10 using the virtual keyboard Use the and keys to pass from one character to the next In the event of an e...

Page 27: ...he required recipient from the entries in the address book Press OK to confirm the new setting 7 Press MENU to return to the home screen Advanced fax emission settings 1 Press MENU 2 Select SETTINGS C...

Page 28: ...printing received documents To activate toner saving printing 1 Press MENU 2 Select SETTINGS COMMUNICATION FAX RECEPTION PRINT 3 Press TONER SAVE 4 Select the required status by pressing the check box...

Page 29: ...device receives the documents the machine the PC the PC if available otherwise the machine For more information consult the section PC functions 75 To select the reception mode 1 Press MENU 2 Select S...

Page 30: ...l address using the virtual keyboard Use the and keys to pass from one character to the next In the event of an error use the key to delete a character 3 Press OK to confirm the new setting Defining t...

Page 31: ...itchboard 1 Press the MENU key 2 Select SETTINGS COMMUNICATION FAX ADVANCED 3 Press L1 DIALLING 4 Select the type of telephone switchboard for tele phone line L1 from the list Press OK to confirm the...

Page 32: ...Fax emission default settings 1 Press FAX EMISSION 2 Make the required adjustments The following table lists the available parameters 3 When you have made the adjustments press BY DEFAULT in the navig...

Page 33: ...DARY DNS WINS 1 SERVER et WINS 2 SERVER are correctly entered If this is not the case you will have to configure them manually Manual configuration of the Ethernet network To manually configure the ma...

Page 34: ...ct SETTINGS COMMUNICATION LOCAL NETWORK ETHERNET 3 Press SPEED 4 Select the communication speed required from the options available in the list AUTOMATIC 100 FULL DUPLEX 100 HALF DUPLEX 10 FULL DUPLEX...

Page 35: ...list Press OK to confirm the new setting 5 Press PORT 6 Enter the number of the server port from 1 to 65535 using the virtual keyboard or the number pad The default port is 21 990 for a connection wi...

Page 36: ...S COMMUNICATION SERVICES 3 Press the required setting RAW PRINT LPR PRINT or IPP PRINT 4 To activate deactivate the protocol selected press ACTIVATION Select the required status and press OK to confir...

Page 37: ...Enter the login and press OK to con firm 5 Press PASSWORD Enter the password and press OK to confirm 6 Press PRIMARY DNS Enter the name or IP ad dress of the primary DNS server and press OK to confir...

Page 38: ...emission report for documents sent via email You can choose between several criteria for printing out emission reports WITH a report is printed when the emission was suc cessful or when it is definit...

Page 39: ...ting to the server centre The connection to the server centre can be configured on the machine This information will be supplied with your maintenance contract To consult configure the connection to t...

Page 40: ...ommunications made emission and reception in a communications log The following communications are saved in the log faxes sent and received emails sent and received scan to archive operations The comm...

Page 41: ...the event of technical intervention or during a maintenance operation To access this information 1 Press MENU 2 Select OTHER COMMANDS STATUS The following information can be consulted Counter Descrip...

Page 42: ...ator rights and thus authorizes access to all machine functions with no quota restrictions Note if you activate user rights management and limit access to all machine functions without creating user a...

Page 43: ...only authorised user ac counts can view and print re ceived faxes saved in the memory in the print queue after logging in Press OK to confirm the new setting SCANNING Select the required status NO an...

Page 44: ...The list of existing user accounts is displayed on the screen Use the up and down arrows to view the whole list 3 Select the user account to delete and press OK The selected user account is deleted P...

Page 45: ...ge counters To print out an interim report of usage counters 1 Press the MENU key 2 Select SETTINGS OTHER PARAMETERS RIGHTS MANAGEMENT COUNTERS 3 Press PRINT The machine prints out the interim report...

Page 46: ...s and short edges Long edge binding The pages are printed to be bound on the left margin and turned from right to left Short edge binding The pages are printed to be bound at the top and turned from b...

Page 47: ...ner consumed on the page and thus reduce printing costs When using this mode the consumption of toner is reduced and the print is lighter Cancelling an operation 1 Insert the document to photocopy see...

Page 48: ...K to confirm 13 If you are using the autofeed scanner you can mo saic print your documents Press MOSAIC and se lect the required option from the list see section Mosaic copy 46 Press OK to confirm 14...

Page 49: ...suitable contrast for your document from the available options Press OK to confirm 6 To change the luminosity press LUMINOSITY Se lect the most suitable luminosity for your document from the available...

Page 50: ...Select the contact or list of contacts required from the address book entries Use the up and down arrows to view all entries in the ad dress book OR Enter the first few letters of the name of your co...

Page 51: ...K then Select the contact or list of contacts required from the address book entries Use the up and down arrows to view all entries in the ad dress book OR Enter the first few letters of the name of y...

Page 52: ...emission is stopped is deleted from the emission queue To stop an emission in progress 1 Press A message asking you to confirm the cancellation is displayed on the screen 2 Press OK to confirm cancell...

Page 53: ...ssion request Delete an emission request on standby or rejected Print out a document awaiting emission Forcing an emission request To force sending or resend a fax that is on standby or has been rejec...

Page 54: ...nt in two to make a booklet Personalised formats tab This tab allows you to create a personalised paper format The personalized paper format will then be available in the list of paper formats offered...

Page 55: ...rk The personalised watermark will then be available in the list of water marks offered by the machine Creating a watermark allows you to personalize the text to insert specify the font characteristic...

Page 56: ...er account Otherwise the machine will delete the print task from the print queue Receiving your fingerprint To save and receive your fingerprint in the form of an electronic file 1 Press the MENU key...

Page 57: ...and slide it slowly downwards 6 When the identification is successfully completed the machine prints your document If identification fails the machine displays an explanatory message insufficient righ...

Page 58: ...or reprint a document from the print queue 1 Press FORCE 2 Select the required print task and press OK You print task becomes the priority The corresponding document is printed as soon as the machine...

Page 59: ...y and selection suited to the types of documents you wish to print Printable files documents and images are displayed without taking account of their arborescence on the USB key Printing files from a...

Page 60: ...ion 1 Insert your USB key into the machine respecting the insertion direction The USB key is analyzed When the analysis is complete the USB KEY menu is displayed 2 Press PRINT The first settings appea...

Page 61: ...m 80 characters In the event of an error use the key to delete a char acter Press OK to confirm 5 To customize the name of the scanned file press FILE NAME Enter the name using the virtual key board m...

Page 62: ...he virtual keyboard or the number pad Press OK to confirm 13 To activate deactivate the Multiple Scan option press MULTIPLE ANALYSIS Select YES to acti vate it or NO to deactivate it see Using the Mul...

Page 63: ...d save it on a USB key connected to the machine Scan to Mail Send an email with the scanned document as an attachment Scan to File Save a scanned document in a file and place it directly on an FTP ser...

Page 64: ...ment Check the box to activate the required option Press OK to confirm 16 To specify the number of pages in the document before sending press NUMBER OF PAGES Enter the number of pages using the virtua...

Page 65: ...irectory is entered the files are stored directly in the root directory of the FTP server 10 To customize the name of the attachment press FILE NAME Enter the file name using the virtual keyboard maxi...

Page 66: ...on a computer connected to the local network on your PC for example To connect to the destination PC you must know the name of the PC the full path to the destination directory shared address the SMB...

Page 67: ...ect an SMB address then defined in an address book contact Press ADR BOOK then Select the required contact from the entries in the ad dress book Use the up and down arrows to view all en tries in the...

Page 68: ...ered on the ma chine a list of available computers is displayed on the screen Select the required computer and press OK to confirm 5 Press to send the document User rights The document is scanned and...

Page 69: ...2 Press OK to confirm cancelling the emission in progress For several recipients you can delete the other recipients from the emission queue see Deleting a document awaiting emission 70 If the machin...

Page 70: ...st from the emission queue 1 Press DISPLAY EDIT Documents sent by email or for archiving are identified by MAIL or NET documents sent to an FTP or SMB address are identified by FILE or NET 2 Select th...

Page 71: ...mark the contact as a favourite press FAVOURITE Check the box to select the required option Press OK to confirm You can now enter the contact details with at least one of the following Fax number and...

Page 72: ...st You can also enter the contact s name directly us ing the virtual keyboard Press OK to confirm the selection The contact properties appear on the screen 4 Change the required properties and confirm...

Page 73: ...list of contacts has been created Press MENU to exit the address book Editing a list of contacts To edit a list of contacts Cancelling an operation 1 Press the MENU key 2 Select ADDRESS BOOK LISTS EDI...

Page 74: ...te configuration 21 2 Select the tab ADDRESS BOOK 3 Select the menu TRANSFER PC 4 Select IMPORT A file selection window opens 5 Select the file to import and confirm The address book is imported to th...

Page 75: ...M memory of minimum 128 Mb for Windows 2000 minimum 192 Mb for Windows XP x86 Home and Pro 1 Gb for Windows Vista Installing the software This section describes the following installation procedures c...

Page 76: ...the menu Start All programmes Companion Suite Companion Suite Pro LH2 Companion Director or by clicking on the icon Companion Director on your desktop Installing drivers using the Companion Suite Pro...

Page 77: ...creen appears Click on Next to run the installation of the Companion Suite Pro kit on your PC 8 To continue the installation you must read and ac cept the software license proposed 9 Click on Next 10...

Page 78: ...sert the in stallation CD ROM Companion Suite Pro The PPD file is in the Drivers PPD directory The PostScript printer is identified by default as Laser HFFv2 PS Monitoring the multifunction machine Th...

Page 79: ...ed by the PC Consumables Display the status of consumables Links Display the links to the machine parameters and the address book Peripheral management This tab displays the list of peripherals manage...

Page 80: ...ipheral Only one peripheral can be connected at a time You can select the current peripheral by clicking on the radio button corresponding to the peripheral Connection status The status of the connect...

Page 81: ...e multifunction machine see section Unregistering a PC 39 Displaying the status of consumables The following information is available in the Consumables tab current status of consumables number of pag...

Page 82: ...on Analysis using the Scan to function Run the application by clicking on the Companion Director icon on your desktop or from the menu Start All programmes Companion Suite Companion Suite Pro LH2 Comp...

Page 83: ...cument in the PaperPort work space you can covert it into editable text 2 Drag the view of the scanned document onto the NotePad icon 3 The scanned text appears in the NotePad window Printing The Lase...

Page 84: ...s number in the Recipients field and click on or select a con tact or a group from one of the address books in the field Address books and click on Repeat this operation as many times as neces sary us...

Page 85: ...ore information consult the section Cover page 87 6 Click on OK to send your fax to all the contacts in your contacts list If you wish you can consult your emission request in the outbox Receiving a f...

Page 86: ...contains the following information the fax sender the date of reception of the fax the type of reception on the machine or on the PC the fax status Fax settings Accessing the Fax settings 1 Click on...

Page 87: ...field you want to be displayed on the cover page fax number comment subject etc As mentioned before these fields will be completed by the Fax application when the document is sent Creating a backgroun...

Page 88: ...the background image is created in C Program Files Companion Suite Pro LH2 Documents FAX Temporary you can add the required fields on the cover page background image To do so 1 Run Companion FAX Manag...

Page 89: ...ion window Description of the Cover page tab Note Adjust the size of your field boxes so that the text is legible Option Description Name of the cover page Name of the page selected by default or the...

Page 90: ...t the section Uninstalling drivers using the Companion Suite Pro software 90 If you installed the drivers manually consult the sec tion Manually uninstalling the drivers 90 Uninstalling drivers using...

Page 91: ...ice manager Start Control panel System Hardware Device manager or Start Control panel Hardware and sound Device manager depending on the operating system 2 In the sub menu Imaging devices select Scann...

Page 92: ...hich has remained too long in the paper tray Cleaning The presence of dust dirt and paper debris on the external surfaces and inside the printer may hinder its operation We recommend you clean it regu...

Page 93: ...reen you risk damaging it List of authorised and prohibited cleaning products 1 Press the On Off button to switch off the machine position 0 and disconnect the mains power cable 2 Clean the touch scre...

Page 94: ...ne on posi tion I 7 Make a copy to check that the symptoms have dis appeared Cleaning the paper feed rollers in the paper trays The procedure for cleaning the paper feed rollers described in this sect...

Page 95: ...ully in until it engages last movement downwards 8 Close the access flap to the toner cartridge and lower the flatbed scanner 9 Insert the smart card provided with the new toner cartridge into the sma...

Page 96: ...ONSUMABLES DECLARE REFILL 3 Press SCANNER FEEDER The machine takes the replacement of this consuma ble into account Servicing In order to ensure the performance of your machine the printer should be s...

Page 97: ...r Paper tray paper jam The procedure for removing paper jams described in this section applies to all paper trays in the machine 1 Remove the paper tray from the machine and place it on a flat surface...

Page 98: ...all paper from the machine s paper output 2 Open the cover of the duplex module by lifting the latch 3 Lift up the inner lever on the top left of the ma chine s rear cover 4 Open the rear cover 5 Remo...

Page 99: ...idge access button 3 Lift up the flatbed scanner and open the access flap to the toner cartridge 4 Remove the toner cartridge gently by pulling on its handle and place it on a flat surface 5 Remove th...

Page 100: ...from the machine 6 Place the automatic document feeder and the du plex module into their original plastic and card board boxes with their documents hardcopies CD ROMs etc 7 Pack the printer and place...

Page 101: ...r occurred Contact a maintenance technician The machine does not detect the presence of the document inserted in the autofeed scanner The document is too thick or incorrectly positioned 1 Remove the d...

Page 102: ...emory is insufficient If the print jobs dealt with by the machine are mostly comprised of very complex jobs and print times are affected you can add memory Contact your retailer for more information A...

Page 103: ...rts see Recommendations for the paper 140 The paper tray is not correctly installed Remove the paper tray you are printing from and re insert it completely The machine is not resting on a flat and sta...

Page 104: ...toner cartridge 8 The toner cartridge is defective or incorrectly installed Remove the toner cartridge and check its condition Replace the defective toner cartridge Correctly reinstall the toner cart...

Page 105: ...ctive Remove the toner cartridge and check its condition Replace the defective toner cartridge The toner cartridge is almost empty Replace the toner cartridge see Replacing the toner cartridge 94 The...

Page 106: ...is defective Remove the toner cartridge and check its condition Replace the defective toner cartridge Traces like hair inside and outside half shade zones The media used has been left in an open packe...

Page 107: ...ridge is defective or incorrectly installed Remove the toner cartridge and check its condition Replace the defective toner cartridge Correctly reinstall the toner cartridge see Installing the toner ca...

Page 108: ...ft of the machine s rear cover Open the rear cover Left up the levers to prevent creasing Once the envelope printing is complete remember to lower the levers again Fuzzy printing The media used is dam...

Page 109: ...e paper tray 11 Printing on postcards lacks clarity The postcards used are not compatible format thickness type etc Only use compatible media supports see Recommendations for the paper 140 The postcar...

Page 110: ...aper jam cover open 07 Disconnection The communication was cut off bad quality link Check the number 08 Quality The document you sent was not properly received Contact your correspondent to see whethe...

Page 111: ...and server parameters 45 Disconnection from provider The service is momentarily unavailable Try again later 46 SMTP server disconnection Disconnection from the outgoing SMTP server the service is mome...

Page 112: ...of procedures other than those specified in this guide may result in hazardous light exposure This equipment complies with international safety standards and is classified as a Class 1 Laser Product W...

Page 113: ...eclaration of conformity of Sagem Communications SAS with the applicable directions of the European Union as per the dates indicated 12 December 2006 Directive 2006 95 EC amended Harmonization of the...

Page 114: ...een 15 and 80 up to 65 ambient humidity for a temperature of 32 32 00 Precautions for using the machine The following section describes the precautions to be taken when using the machine During printi...

Page 115: ...wing symbols are used CAUTION Connect the mains cable directly to the wall socket and never use an extension flex Disconnect the power plug by pulling on the plug and not the cable if the power cable...

Page 116: ...t or radio TV or radiocommunications receivers placed in proximity especially if it is installed in a residential environment The installation instructions in this respect are important and must be ad...

Page 117: ...d the toner cartridge upside down Never incinerate toner or toner cartridges The sparks generated may cause burns Never open the toner cartridge or throw away the waste toner bottle Keep cartridges an...

Page 118: ...s following the date of delivery with your receipt as proof of purchase Definition The Software means the programs and associated documentation The presence of the logo green point means that a contri...

Page 119: ...D ROM on which the Software is recorded is guaranteed to be free from material physical defects under normal conditions of use and operation for a period of ninety 90 days after the date of delivery w...

Page 120: ...Windows 2000 Microsoft Windows Server 2003 Microsoft Windows Server 2008 Microsoft Windows XP Microsoft Windows Vista and all other Microsoft products mentioned are registered trademarks of Microsoft...

Page 121: ...s and that you know you can do these things To protect your rights we need to make restrictions that forbid anyone to deny you these rights or to ask you to surrender the rights These restrictions tra...

Page 122: ...of that work are not derived from the Program and can be reasonably considered independent and separate works in themselves then this License and its terms do not apply to those sections when you dist...

Page 123: ...on of this section is held invalid or unenforceable under any particular circumstance the balance of the section is intended to apply and the section as a whole is intended to apply in other circumsta...

Page 124: ...or modify it under the terms of the GNU General Public License as published by the Free Software Foundation either version 2 of the License or at your option any later version This program is distribu...

Page 125: ...making changes to the library and recompiling it And you must show them these terms so they know their rights We protect your rights with a two step method 1 we copyright the library and 2 we offer yo...

Page 126: ...e source code means all the source code for all modules it contains plus any associated interface definition files plus the scripts used to control compilation and installation of the library Activiti...

Page 127: ...the requirement to distribute the source code even though third parties are not compelled to copy the source along with the object code 5 A program that contains no derivative of any portion of the L...

Page 128: ...se permitted and provided that you do these two things a Accompany the combined library with a copy of the same work based on the Library uncombined with any other library facilities This must be dist...

Page 129: ...the two goals of preserving the free status of all derivatives of our free software and of promoting the sharing and reuse of software generally NO WARRANTY 15 BECAUSE THE LIBRARY IS LICENSED FREE OF...

Page 130: ...pieces of it in new free programs and that you know you can do these things To protect your rights we need to prevent others from denying you these rights or asking you to surrender the rights Therefo...

Page 131: ...a work A Standard Interface means an interface that either is an official standard defined by a recognized standards body or in the case of interfaces specified for a particular programming language...

Page 132: ...fee 5 Conveying Modified Source Versions You may convey a work based on the Program or the modifications to produce it from the Program in the form of source code under the terms of section 4 provide...

Page 133: ...e of the product Installation Information for a User Product means any methods procedures authorization keys or other information required to install and execute modified versions of a covered work in...

Page 134: ...or modify it is void and will automatically terminate your rights under this License including any patent licenses granted under the third paragraph of section 11 However if you cease all violation o...

Page 135: ...nd the patent license to downstream recipients Knowingly relying means you have actual knowledge that but for the patent license your conveying the covered work in a country or your recipient s use of...

Page 136: ...ES OF MERCHANTABILITY AND FITNESS FOR A PARTICULAR PURPOSE THE ENTIRE RISK AS TO THE QUALITY AND PERFORMANCE OF THE PROGRAM IS WITH YOU SHOULD THE PROGRAM PROVE DEFECTIVE YOU ASSUME THE COST OF ALL NE...

Page 137: ...u are welcome to redistribute it under certain conditions type show c for details The hypothetical commands show w and show c should show the appropriate parts of the General Public License Of course...

Page 138: ...erature Operating 10 C to 32 C 50 F to 89 6 F with maximum differ ence of 10 C per hour Storage 20 to 40 4 F to 104 F with maximum difference of 10 C per hour Admissible humidity 15 to 85 RH without c...

Page 139: ...pe C5 Envelope DL Envelope Monarch A6 postcard Japanese post card US postcard Index card Paper Standard Thick Fine Transparencies Envelopes Labels Postcards Weight 64 to 216 g m 17 1 to 80 lb Addition...

Page 140: ...4800 2400 bps The effective transmission duration for an A4 page varies from a few seconds to about one minute depending on the quality of the line the modem speed the quantity of information on the...

Page 141: ...97 0 8 2 x 11 7 Yes Yes Yes A5 148 0 x 210 0 5 9 x 8 3 Yes Yes Yes 1 3 A4 99 0 x 210 0 3 89 x 8 3 Yes Yes Yes B5 ISO 176 0 x 250 0 6 9 x 9 8 Yes Yes Yes B5 JIS 182 0 x 257 0 7 1 x 10 1 Yes Yes Yes Env...

Page 142: ...ments hooks or eyes Acid paper Any any other unapproved media Thick paper Paper is considered to be thick when its weight exceeds 90 g m 24 lb Recommendations for use Avoid placing different types of...

Page 143: ...mitting toxic vapours Pre sealed Main and additional paper tray Secondary paper tray Capacity Up to 550 sheets depending on thickness Maximum height 49 4 mm Up to 150 sheets depending on thickness Max...

Page 144: ...tective film that is unstuck Allowing adhesive substances to show on the surface Pre cut or perforated Cards Before starting printing cards print out a test on standard paper to check page formatting...

Page 145: ...ing printing index cards print out a test on standard paper to check page formatting Printable surface Each media has its own printable surface the maximum surface which can be printed clearly without...

Page 146: ...e a flap zone that is not guaranteed which varies according to type Page margins The margins are defined in the computer application When the application allows personalise the margins taking account...

Page 147: ...cument is correct but does not accept liability for error or omission Non contractual document All trademarks are registered by their respective owners Simplified joint stock company Capital 158 291 8...

Reviews: