background image

129

Section 4 - lubrication & maintenance

4.11  replacing hydraulic Filters

Before performing any maintenance procedure, 

make sure the cutting system is shutdown with 

the truck in the service position.

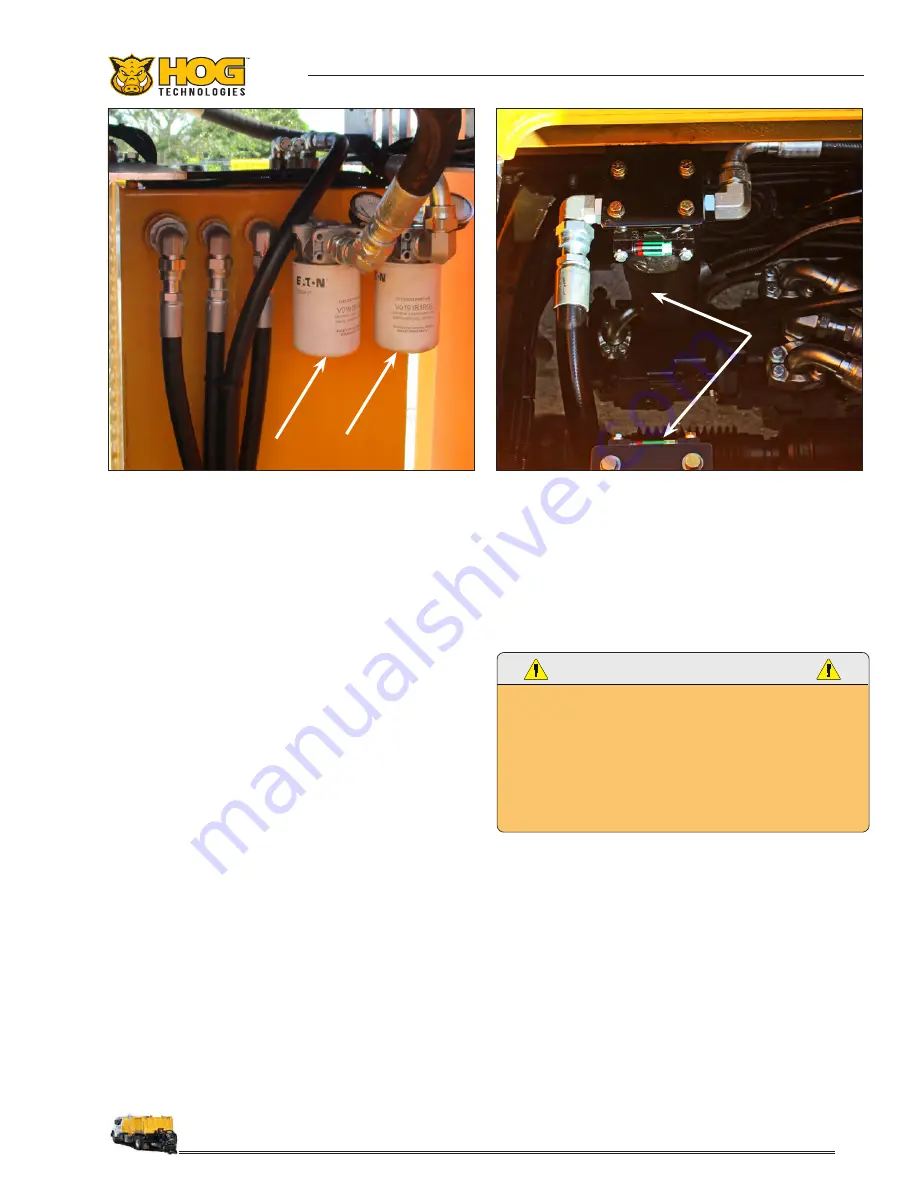
Low Pressure Return Filters

The filters are the spin on type filters located in the 

return line near the top of the hydraulic reservoir. 

Changing the filters:

1.  Make sure the hydraulic system is not pressur-

ized and the fluid is cool. Use a filter wrench 

and rotate the filters counterclockwise to re

-

move them. 

2. 

Lubricate the seal on the new filters with hy

-

draulic fluid.  

3. 

Install the filters and hand tighten.

4. 

Inspect the filters for leaks when the hydraulic 

system is activated.

Low Pressure Return Filters & Gauges 

On Hydraulic Reservoir

High Pressure Filters

The filters are the spin on type filters located below 

the center deck access plate. 

WARNING

S O M E   H Y D R A U L I C   C I R C U I T S  A R E   E Q U I P P E D   W I T H 
ACCUMULATORS THAT MAINTAIN PRESSURE IN THE 
CIRCUIT AFTER IT IS SHUTDOWN.  

ALWAYS MAKE SURE TO FOLLOW PROPER PROCEDURE 
TO BLEED PRESSURE FROM THE ACCUMULATORS AND 
HYDRAULIC CIRCUITS BEFORE SERVICING THE HIGH 
PRESSURE FILTERS. 

1.  Make sure the hydraulic system is not pres-

surized and the fluid is cool. 

2. 

Use a filter wrench and rotate the filters coun

-

terclockwise to remove them. 

3. 

Lubricate the seal on the new filters with hy

-

draulic fluid.  

4. 

Install the filters and hand tighten.

5. 

Inspect the filters for leaks when the hydraulic 

system is activated.

High Pressure Filters 

Below Deck Access Plate

Summary of Contents for RH7500

Page 1: ...RH7500 Operations Manual ...

Page 2: ......

Page 3: ...ORE ATTEMPTING TO CONNECT OPERATE OR REPAIR THIS EQUIPMENT THOROUGHLY READ THESE INSTRUCTIONS AND ANY SAFETY WARNING OR INSTRUCTION PAMPHLETS INCLUDED WITH YOUR SHIPMENT For any questions concerning safe operations and maintenance procedures contact your Hog Technologies Representative prior to use 772 223 7393 or 877 964 7312 Hog Technologies www hogtechnologies com COPYRIGHT Hog Technologies mai...

Page 4: ...STOP Toavoidseriousinjuryanddamagetoequipment MAKESURETOCOMPLETELY READ THIS MANUAL AND follow all safety and other precautions listed in THE manual and on COMPONENT LABELS Before OPERATING THIS EQUIPMENT ...

Page 5: ...S FOR PROPER TORQUE AT LEAST TWICE DAILY TEETH PINS SEMI CIRCLE MOTOR ECCENTRIC MOTOR RETAINER PLATE ALWAYS INSPECT BELTS AND SPROCKETS AT LEAST TWICE DAILY INSPECT ECCENTRIC ALIGNMENT DAILY COUNTERBALANCE WEIGHTS LEFT RIGHT MUST BE IN THE SAME POSITION INSPECT RUBBER GUARDS DAILY TO ENSURE THAT THEY CONTACT THE PAVEMENT SURFACE CHECK LUBRICANT LEVELS DAILY OMSI HYDRAULIC TANK GREASE PUMP TANK CHE...

Page 6: ...6 NOTES ...

Page 7: ... 2 2 Hydraulic System 22 2 3 Hydrostatic Drive System 28 2 4 Fluid Coolers 29 2 5 Water System 30 2 6 Handheld Pressure Washer 32 2 7 Lift Arm Locking Mechanism 33 2 8 Cutter 36 2 9 Drive Belts 40 2 10 Debris Recovery System 41 2 11 Debris Recovery Without Continuous Off Loading 42 2 12 Debris Recovery With Continuous Off Loading 46 2 13 Debris Tank 53 2 14 System Controls 55 2 15 Video Systems 60...

Page 8: ... Debris Recovery 100 3 20 Emergency Shutdown 102 3 21 Pressure Washer Operation 103 3 22 Operating in Freezing Conditions 105 Section 4 Lubrication Maintenance 4 1 Lubrication Maintenance Introduction 106 4 2 Lubrication Grease Point Locations 108 4 3 Periodic Maintenance Items 112 4 4 Truck Maintenance 113 4 5 Cutting Depth Adjustment Procedure 114 4 6 Replace Cutting Teeth 115 4 7 Cutter Eccentr...

Page 9: ...148 Water System 148 Laser Guidance System 149 Video System 149 Cutting System 149 Vacuum System 150 Appendix 3 Tools Spare Parts Mobile Tool Systems 152 Mobile Tool Systems 152 Mobile Spare Parts System 153 Appendix 4 Pre Op Checklist Pre Op Checklist 154 Appendix 5 Glossary Of Terms Glossary Of Terms 156 Appendix 6 Customer Support Support Web Site Customer Support 158 Table of Contents ...

Page 10: ...10 NOTES ...

Page 11: ...l expenses while building our mutual reputation of excellence This manual is designed to be used by operators trained by Hog Technologies During the training experience your team will be given the basic knowledge and skills necessary to maintain operate troubleshoot and repair your Rumble Hog This manual is an important aid in the operation and maintenance of your new equip ment Please take the ti...

Page 12: ...l not be liable for damage abnormal wear or consequential damage to their sys tem components resulting from the use of replacement components that are not furnished by Hog Technologies Hog Technologies will not be liable for charges incidental to the removal of damaged or defective com ponents lost time and profits or any consequential damages resulting from failure of the component Hog Technologi...

Page 13: ...e safe operation and maintenance of the equipment These instructions are in the form of a General Safety Section as well as individual NOTICE CAUTION WARNING and DANGER statements There are also WARNING AND DANGER LABELS located on some components You should read these warn ings carefully and make sure you understand the nature of the hazard as well as the precautions and recommended procedures re...

Page 14: ...ities or injuries Work zones need traffic controls identified by signs cones barrels and barriers You should always wear high visibility clothing with a fluorescent background and made of retro reflective material to be more visible to motorists and reduce the pos sibility of an accident Work stations should always be illuminated Outfit all operators and support personnel with proper safety appare...

Page 15: ...ety Rules and Statements Before operating or performing any maintenance on the vehicle review the following safety pre cautions These are included for your protection and safety Always observe the general safety rules during operation of the vehicle Also observe the safety rules set forth in the work place The need for ad ditional rules for safe operation may arise due to particular applications T...

Page 16: ...ng drum rotating always make sure the safety shroud is in place securely fastened DANGER A rotating cutting drum can cause severe injury or death if hands feet or loose clothing are caught by the teeth Additionally loose teeth or debris stuck in teeth can be thrown from the drum with enough force to cause injury Always make sure the safety shroud is properly installed and the head is on the ground...

Page 17: ...ked with the recommended operating pressure Never exceed the operating pres sure of the weakest component in the system Make sure hoses are protected from contact with sharp objects or chaffing Stretched or abused hose can fail prematurely and unexpectedly which could cause injury to personnel Hoses that have been exposed to excessive stretching kinks or chaffing should be replaced Always make sur...

Page 18: ...ance when raising the tank To avoid the possibility of electric shock do not raise the debris tank under or near any overhead electrical cables or wires Failure to follow this warning could lead to injury or death Always use the remote control to tilt the tank Keep working area clear of all pedestrians when operating scissor lift to raise the tank Never allow anyone to walk stand or perform work n...

Page 19: ...19 Section 1 Safety Information ...

Page 20: ...20 NOTES ...

Page 21: ...uck drive system two hydraulic systems a hydrauli cally powered cutting unit water dust supresion system video and laser guidance systems and a DC electrical system Trucks with optional debris recovery will be equipped with vacuum system connected to the cutter The cutter and most components are controlled by soft key switches in the cab mounted digital control panel and joystick control panels Ot...

Page 22: ...oller joystick remote control or on the rear of the debris tank direct hydraulic pressure to the various components Filters protect the system from debris Pressure gauges on the hydraulic manifold and near the filters alert the operator when they are dirty and require changing Reservoir A large reservoir tank mounted on the chassis be hind the cab provides hydraulic fluid for the system The pumps ...

Page 23: ... connected to an output on the right side of the Omsi It is dedicated to turning the drum and is controlled by a switch in the cab Pump 4 is the eccentric drive pump and is also mounted on the OMSI It turns in direct relation to the forward movement of the truck and inde pendent of the drum speed It is controlled by the PLC system according to the values assigned by the operator Pump 5 is the OMSI...

Page 24: ...he low and high pressure side of the manifold that is used to adjust the low pressure setting The solenoid valves are a cartridge type design that are easily replaced in the event of a failure Manual Down Pressure Valve Down pressure on the cutter arm is set and con trolled by a manual bypass valve located near the hydraulic manifold or digital controls on the cab touch screen controller A gauge n...

Page 25: ...e correct position If the hoses are installed in the wrong ports the motor will rotate opposite of the designed rotation which will per manently damage the motor Hydraulic Cylinders Hydraulic cylinders are used to raise and lower the cutter lift arm cutting drum debris tank and op tional continuous discharge auger Another cylinder activates and releases the locking arm latch that secures the cutte...

Page 26: ...ature or become contaminated is essential to the performance of the system As pumps cylinders and components wear they release tiny metal and rubber particles into the hydraulic fluid These particles act as a grinding compound as they flow through the system Or dinary dirt and water are common hydraulic fluid contaminants Any one of these will contribute to premature failure of hydraulic component...

Page 27: ...al canister that can withstand the operating pressure on the high pressure side of the pump The filters are located below the deck access plate near the hydraulic pumps A pressure gauge near each filter monitors the pressure and provides an indication of when the filter element is becom ing clogged and must be changed The elements should also be changed when the hydraulic oil is changed Suction Fi...

Page 28: ...d be conducted at each routine service inter val Remember that the hydraulic system can be severely damaged if it runs low on fluid Protect the hoses from contact with sharp objects or kinks Never operate the hydraulic system with a damaged hose or a hose that is questionable WARNING Injuries from HIGH PRESSURE HYDRAULIC SYSTEM component failures are very serious and can result in SEVERE INJURY OR...

Page 29: ...ging 2 4 Fluid Coolers The RH7500 is equipped with coolers for the en gine transmission drivetrain components and hydraulic system Engine And Drivetrain Coolers Heat exchangers that cool engine oil and trans mission fluid are located in front of the radiator in the engine compartment and on the chassis The heat exchanger for the hydrostatic drive is located above the passenger side tool box Refer ...

Page 30: ... the proper care and operation of the components Water Tank The water tank is mounted to the chassis just forward of the debris tank and made of stainless steel to reduce corrosion and provide a supply of clean fresh water to the pump A site tube on the forward side of the tank indicates the water level and a valve on the bottom of the tank allows for quick draining The water tank fill connection ...

Page 31: ...L ENTERING THE TANK ARE SUBJECT TO SLIPS AND FALLS POOR VENTILATION HEAT EXHAUSTION OR OTHER INJURIES COMMON TO WORKING IN CONFINED SPACES WITH LIMITED VENTILATION NO ONE SHOULD ENTER THE FRESHWATER TANK WITHOUT NOTIFYING A COWORKER OR ANOTHER PERSON FIRST THE PERSON WORKING INSIDE THE TANK SHOULD ALSO KEEP THE TRUCK IGNITION KEYS TO ENSURE THE UNIT CANNOT BE ACCIDENTALLY DRIVEN WITH that person I...

Page 32: ...ould be familiar with the normal sound of the pump and be prepared to turn off the pump and cutter if the sound changes Find and correct the problem before cutting operations resume 2 6 Handheld Pressure Washer A pressure washer is mounted to the chassis below the charge water pump It provides up to 4000 psi 276 BAR to the handheld spray gun The pressure hose and spray gun connect to a high pressu...

Page 33: ...e is set by the operator on the digital controller Once down pressure is set the cylinders allow the arm to float while Maintaining consistent down pressure on the cutter This allows Cutter Lift Arm the cutter and truck to follow the contour of the pavement without causing damage to the cutter or pavement WARNING AS THE LIFT arm MOVES UP AND DOWN PINCH POINTS ARE FORMED THAT CAN CAUSE SEVERE INJUR...

Page 34: ...arm A hinged locking plate on the top of the locking mechanism swings down manually to lock the latch in the closed position and prevent it from being released accidentally The hydraulic cylinder that opens and closes the latch is controlled by the LATCH TANK toggle switch on the rear of the debris tank and the UP Down switches in the remote control The operator must manually release the locking m...

Page 35: ...CUTTER IS HEAVY AND WILL CAUSE THE TRUCK CHASSIS TO BE OFF BALANCE IF IT IS NOT CENTERED BEFORE TRAVELING ON THE HIGHWAY THIS COULD CAUSE HANDLING PROBLEMS THAT COULD RESULT IN AN ACCIDENT ALWAYS MAKE SURE THE CUTTING UNIT IS MOVED TO THE CENTER OF THE TRUCK CHASSIS FOR PROPER BALANCE BEFORE TRAVELING ON THE HIGHWAY Articulation Hinge The cutter chassis is connected to the arm by an articulating h...

Page 36: ...ssis control cutting depth Hydraulic skip cylinders raise or lower the cutter to skip cuts in rumble strip mode or to temporally suspend planing A variety of cut widths and pat terns can be programmed into the digital controller by the operator The RPM of the eccentric is synchronized with the hydrostatic truck drive system This Maintains the cut width and pattern when truck speed is increased or ...

Page 37: ...erator is in the driver seat and monitoring the cutter and any personnel near the cutter with the video system whenever cutting drum is rotating The operator must be vigilant and prepared to shut the machine down immediately if a problem occurs while adjustments are being made to the cutter while the drum is rotating Cutter Eccentric The cutting drum is mounted to a rotating eccen tric system driv...

Page 38: ...rication Maintenance section for instruc tions on the adjusting the skip cylinders Torque Springs And Shock Absorbers A spring and gas charged shock absorber is con nected to a linkage attached to each cutting drum drive motor The spring and shock absorber absorb the spike in torque that occurs when the cutting teeth contact the pavement Gauge And Trim Wheels Rumble Mode Wheels There are two trim ...

Page 39: ...e wheels and planing chassis wheels support the cutter chassis at a preset height above the pavement cutting depth Chassis height sets the cutting depth for planing operations It is set to required specifications by adjusting the rear gauge wheels and planing chassis up or down The rear of the planing chassis is connected to the skip cylinders that raise the cutting drum off the pavement to tempor...

Page 40: ...he hydraulic motor to the eccentric drive axle are different and therefore have different tension specifications Additionally new belts have a different tension specification than used belts drive belts with 20 hours or more Instructions for adjusting the drive belts and ten sion specifications are included in the Lubrication Maintenance section of this manual WARNING THE DRIVE BELTS CAN CAUSE SEV...

Page 41: ...rators and a hydraulically powered auger that continuously discharges debris to the shoulder or dump truck during operation Trucks that are not equipped with an optional debris recovery system will have a non functioning debris tank and vacuum canister Even though both systems operate on the same principle there are significant differences in the components features and the operation of each syste...

Page 42: ...bris Recovery System W O Continuous Off loading System shroud Relief valves Kunkle valves on the debris tank and near the blower will automatically open if excessive vacuum in the system occurs Always test the valves and all vacuum hose connections at the start of each shift to ensure the valves are operating properly and there are no vacuum leaks in the system The blower bearing housing is equipp...

Page 43: ...S INTERNAL COMPONENTS HAVE EXTREMELY SMALL TOLERANCES AND MUST BE PROTECTED FROM THE DEBRIS and corrosion ANY FOD FOREIGN OBJECTS OR DEBRIS INCLUDING EXCESSIVE WATER CAN CAUSE SEVERE DAMAGE TO THE BLOWER The blower must be shutdown properly and in ternal components protected from corrosion with a light protective oil such as WD 40 LPS or CRC when the system is shutdown for the evening or an extend...

Page 44: ...hoses 1200 once each week Vacuum Tube Debris Tank to Cyclonic Separator Vacuum Hose Debris Tank to Cutter Some types of debris will buildup on the inside walls of the hoses to the point where it restricts debris flow in the system and reduces vacuum at the cutter Debris buildup inside the hoses can be removed by tapping the outside walls with a dead blow hammer while the system is operating at max...

Page 45: ...ouses the vacuum filter which protects the blower from debris and excessive moisture that makes it past the cyclonic separa tor The filter should be checked at the beginning of each shift and periodically during operation It is normal for some water vapor and debris to travel through the cyclonic separator to the vacuum filter canister where it will accumulate Excessive water in the canister can p...

Page 46: ... to ensure there are no damaged areas or holes that could allow debris to get into the vacuum blower or silencer Replace the filter if it is damaged or shows any sign of deterioration Blower internal components must be protected from corrosion with light oil such as WD 40 LPS or CRC when the system is shutdown for the evening or an extended period This is accomplished by opening the access door an...

Page 47: ...e Shaped Separator Auger 5 Hydraulic Hoses 9 Cyclonic Separator Door 2 Cone Shaped Separator Door 6 Vacuum Hose 10 Cyclonic Separator Box 3 Auger Hydraulic Motor 7 Vacuum Tube 11 Turret Lift Cylinder 4 Vacuum Check Valve 8 Cyclonic Separator The following is a description of the major compo nents in the system and their function Blower And Silencer The vacuum blower is powered by the hydraulic sys...

Page 48: ...order to clean the blower If large debris gets into the blower it can cause severe damage to the blower CAUTION THE BLOWER S INTERNAL COMPONENTS HAVE EXTREMELY SMALL TOLERANCES AND MUST BE PROTECTED FROM THE DEBRIS AND CORROSION ANY FOD FOREIGN OBJECTS OR DEBRIS INCLUDING EXCESSIVE WATER CAN CAUSE SEVERE DAMAGE TO THE BLOWER The blower must be shutdown properly and internal components protected fr...

Page 49: ...hoses develop wear points caused from the high velocity of abrasive debris traveling inside the hoses The wear points are most prevalent in the outside radius of tight bends where the debris hose rises above the tank The life of the hoses can be extended by rotating the hoses 1200 once each week Some types of debris will buildup on the inside walls of the hoses to the point where it restricts debr...

Page 50: ...e clearance to open truck hood to access the engine If the truck engine can t be started to activate the hydraulic system the tur ret can be manually moved right or left by using a wrench on the hex nut on the end of the turret worm gear shaft It is recommended that the separator always be moved to the driver side to provide clearance for engine access so the opera tor will be less likely forget t...

Page 51: ...houses the vacuum filter which protects the blower from debris and excessive moisture that makes it past the cyclonic separa tor The filter should be checked at the beginning of each shift and periodically during operation It is normal for some water vapor and debris to travel through the cyclonic separator to the vacuum filter canister where it will accumulate Excessive water in the canister can ...

Page 52: ...pressurized door and vacuum tube seals are supplied compressed air by the truck brake sys tem Solenoid activated pressure valves controlled by switches on the side of the chassis and below the rear of the tank inflates or deflates the seals Seal pressure is monitored by digital gauges in the controller Normal seal inflated seal pressure is 20 25 psi 1 4 1 7 BAR An optional material full level swit...

Page 53: ...to clean the tank and sump thoroughly with fresh water The debris tank should be checked at the begin ning of the shift as part of the pre start procedure or when you believe it may be reaching its capac ity It should also be checked at the end of each shift Debris should never be left in the tank for a period of more than two days Debris will harden and conform to the shape of the tank walls mak ...

Page 54: ... by switches in a panel lo cated on the rear of the chassis A stabilizer foot kickstand is lowered before the tank raises to provide additional stabilization for the chassis dur ing high lift dumping operations The stabilizer is an important safety feature on trucks equipped with the high dump system It is extremely important that operators deploy the stabilizer each time the debris tank is raised...

Page 55: ...ct the flow of fluid through the cylinders to control lift speed as the platform is raised or lowered The scissor linkage design provides excellent stability for the platform as it is raised However there are hazards related to this type of linkage that operators and all other personnel should be aware of Raising and lowering the platform is particularly dangerous because pinch points are formed b...

Page 56: ...he circuit to activate the function the soft Typical Rumble Hog Digital Controller MAIN Screen Note The controller display shown in this picture is for demonstration purposes only The display and controls in the controller on your truck may be different key button controls Consequently most soft keys function much like OFF ON or momentary switches Refer to the Digital Controller Screens and functi...

Page 57: ... system FLOAT Optional For grooving and marking removal CAMERA Activates the cameras on the front and rear of the truck 3 Joystick The joystick is spring loaded and will automatically return to the center neutral position when re leased It selects truck forward and reverse while in work mode A trigger switch on the front of the joystick provides a safety lockout feature and must be activated befor...

Page 58: ...truck The following is a description of the functions per formed by the side control switches 1 CHUTE A two position toggle switch that se lects the mode for the remote control switches Move the switch to the ON position to use the remote switches to raise or lower the chute Move the switch to the OFF position to cancel remote control 2 DOOR A two position toggle switch that se lects the mode for ...

Page 59: ... to tilt or lower the debris tank Move the switch to the OFF position to cancel remote control 4 SEALS A two position toggle switch that in flates and deflates the pneumatic seals on the vacuum tube coupler and debris tank door Move the switch to the ON position to inflate the seals Move the switch to the OFF position to deflate the seals A pressure gauge in the digital controller indicates seal p...

Page 60: ...ireless remote control communicates with a receiver located on the truck near the outside terminal box OTB It allows an assistant located near the truck to activate the skip cylinders to momentarily raise cutting drum from the pave ment to cause a manual skip This is useful when crossing intersections driveways or obstructions where rumble strips are not wanted and it is dif ficult for the operato...

Page 61: ...ove it left or right The following is a description of the functions con trolled by the wireless remote control on trucks equipped with debris recovery and continuous off loading 1 Used for remote skipping 2 Used for remote skipping 3 Auger UP primary cylinder 4 Auger DOWN primary cylinder 5 Auger UP secondary cylinder 6 Auger DOWN secondary cylinder 7 Skew auger right 8 Skew auger left 1 3 5 7 2 ...

Page 62: ...uck guidance and alignment purposes Typically the cross hair is aligned to the white line a seam or the edge of the pavement to help maintain proper truck and cutter alignment during cutting operations Two rear facing cameras mounted on the upper rear of the debris tank provide an overhead view of the pavement on each side of the cutter in sepa rate windows on the rear camera monitor These cameras...

Page 63: ...camera on separate windows simultaneously The operator can select to view any camera image in full screen mode using the buttons the monitor control panel Refer to the camera and monitor manufacturers manuals for additional instructions and mainte nance for the video cameras and monitors WARNING The VIDEO monitors obstruct the drivers forward visibility when traveling down the highway in travel mo...

Page 64: ...ot mode steady on or blinking Switches in the laser control panel in the cab control all laser functions The following is a de scription of the functions performed by the laser control panel 1 System Power Switch Energizes the laser system Note that the system requires sev eral minutes to warm up before the spot will appear 2 Laser Power Indicator Light A red LED that indicates the panel is energi...

Page 65: ... panel and in line fuses or circuit breakers for accessory circuits connected to the Main breakers The breakers must be on to power the cutter electrical system Each Main circuit breaker is equipped with a yellow indicator reset lever that indicates the status of the breaker ON or OFF TRIPPED and is used to reset the breaker if it trips or to turn the breakers and electrical system off These are h...

Page 66: ...ircuit breakers protect other circuits NOTICE THE CIRCUITS PROTECTED BY IN LINE FUSES WILL VARY IN LINE FUSE LOCATIONS WILL ALSO VARY DEPENDING ON THE ACCESSORY CIRCUIT PROTECTED THE MOST COMMON LOCATIONS FOR IN LINE FUSES OR CIRCUIT BREAKERS ARE NEAR THE Main CIRCUIT Breakers IN THE BATTERY COMPARTMENT NEAR THE ACCESSORY OR Inside THE otb box The fuses are color coded with the AMP rating printed ...

Page 67: ...o the relay that activates the video camera system 10 Protects and supplies power to the relay that activates the OMSI fluid cooler fan 11 Protects and supplies power to the relay that activates the toolbox lights Also powers and protects the remote control circuits 12 Protects and supplies power to the relay that activates the strobe lights 13 14 OTB Fuse Panel In line Fuses And Circuit Breakers ...

Page 68: ...n and all cutter systems and components Typically the engine will be operated at maximum full load RPM during operations The actual RPM will vary somewhat depending on the chassis and selected options Operating the engine below the minimum required RPM will place excess load on the engine resulting in poor efficiency and could cause it to overheat Transmission The chassis is equipped with an autom...

Page 69: ...ged and has a spring loaded safety pin that locks the ladder in the stored or deployed position To use the ladder release the safety pin and swing the ladder out until the pin locks in the deployed position Return the ladder to the stored position and secure it with the safety pin when service or inspections are complete Debris Tank Ladder Another ladder on the passenger side of the debris tank pr...

Page 70: ...TION Always MAKE SURE the TOOL BOX DOORS ARE CLOSED AND LATCHED before operating the truck TOOL BOX DOORS stick out from the side of the vehicle and can cause damage to the truck or other vehicles if they ARE NOT PROPERLY CLOSED AND LATCHED WHILE THE TRUCK IS MOVING ADDITIONALLY TOOLBOX DOOR LATCHES THAT ARE NOT LOCKED COULD WORK LOSE FROM VIBRATION ALLOWING THE DOORS TO OPEN AS THE TRUCK TRAVELS ...

Page 71: ...the lift arm hydraulic hoses vacuum hoses and all cutting system components for obvious signs of leaks wear and deterioration The inspection should be conducted in an orderly and consistent fashion to ensure all critical points are inspected each time Do not operate the unit until all ques tionable components are repaired or replaced The startup and shutdown procedures described in this section ar...

Page 72: ...bolts and parts 8 Inspect the cutter lift arm and slide track for loose components and damage 9 Check cutter eccentric drive belt tension and alignment 10 Make sure the cutting teeth are not excessively worn damaged or missing Replace or install teeth as required 11 Check clean water tank level and fill if neces sary Make sure the water supply valve is open 12 Verify debris tank door is closed pro...

Page 73: ...teps if your truck is equipped with an optional vacuum recovery sys tem with continuous off loading 1 Perform all vacuum debris recovery system without Continuous off loading inspection and maintenance steps 2 Inspect the cone shaped cyclonic separator on the auger for debris Clean if necessary 3 Inspect the secondary cyclonic separator for debris Clean if necessary 4 Inspect auger assembly for lo...

Page 74: ...water tank 1 Open the man way on the top of the rear fresh water tank and make sure the tank is clean Then close and latch the man way NOTICE IF A BUILD UP OF SLUDGE OR SLUDGE IS VISIBLE IN THE TANK IT MUST BE THOROUGHLY FLUSHED WITH FRESH WATER UNTIL ALL DEBRIS IS REMOVED 2 If this is the first time using the water source flush for several minutes prior to filling the tank to help ensure that no ...

Page 75: ...d choose the correct down pres sure on the cutter and required water pressure for cooling and dust control You will also need to set the cut spacing and skip pattern to accommodate job specifications The procedures for setting up the cutter are explained in this section Drum and Cutter Teeth Determine which teeth should be used and the width of the cut There are two types of teeth that can be used...

Page 76: ...kwise This will provide hydraulic pressure to rotate the eccentrics 8 Remove the milling depth adjustment wheels 9 Readjust gauge and trim wheels to achieve proper cutting depth 10 Activate the Hydraulic System 11 Unlatch the Cutting Head locking arm and lower the cutting chassis to the pavement 12 Adjust the down pressure for the type and quality of the pavement you will be working with The valve...

Page 77: ...er clockwise This is necessary because the eccentrics are locked and cannot turn 9 Install milling chassis and depth adjusting wheels 10 Activate the Hydraulic System 11 Unlatch the Cutting Head locking arm and lower the cutting chassis to the pavement 12 Adjust the down pressure The pressure re quired for milling is much less than pressure required for rumbling Reducing down pressure will result ...

Page 78: ...f the red line begins to show pump the plunger to increase the vacuum Typical Monitor Mounted to Windshield Front Camera Mounted 4 Remove the monitor and clean the suction cup and window if the red line becomes exposed frequently WARNING The VIDEO monitors obstruct the drivers forward visibility and could release from the windshield unexpectedly while traveling down the highway in travel mode Rest...

Page 79: ...oses Typically the cross hair is aligned to the white line or a seam in the pavement to help set the cutter at the proper offset and make sure the cutter position setting is Maintained The cutter video also assists the operator in making minor right left cutter position adjustments during cutting operations If the camera is not mounted use the following procedure to attach the camera 1 Attach the ...

Page 80: ...rator can also select laser spot mode steady on or blinking Switches in the laser control panel in the cab control all laser functions Use the following procedure to activate the laser guidance system 1 Activate the Power Switch Note that the system requires several minutes to warm up before the spot will appear 2 The red Laser Power indicator light on the panel will illuminate to indicate the sys...

Page 81: ...oot up 6 Double click on SOPAS Single Device The software will automatically search for the camera 7 In the Available Devices pop up window click on your device InspectorP30 NoName 8 At this point camera should be connected You should see live image of the line in Edit mode 9 Click on Replace reference image 10 Align the camera with a line so the image is in the center of a screen 11 Adjust image ...

Page 82: ... this step 9 Turn the cutter drum on 10 DO NOT INCREASE ENGINE RPM Engine speed must remain at low idle 11 Stay parked in this condition until hydraulic oil warms to greater than 68O F 20O C Once the oil has warmed above 68O 20O C follow these next steps 12 Put the Allison Transmission in Neutral 13 Press Mode 14 Press Drive on the Allison Transmission controller verify 4 4 on Allison Display 15 D...

Page 83: ...section before continuing with the next steps NOTICE IN COLD WEATHER HYDRAULIC FLUID CAN COOL BELOW 68o f 20o c DURING TRANSIT TO THE JOB SITE OR IF THE LAST CUTTER OPERATION IS MORE THAN 30 MINUTES 2 Position the truck 50 before the starting point and centered on the target line 3 Check the video and laser guidance systems for proper operation 4 Make sure the main breakers are on and all switches...

Page 84: ...just desired speed 6 To change directions squeeze the trigger on the joystick and move the joystick backwards TRUCK SPEED dial does not work in reverse Reverse speed is controlled by the joystick only If the joystick is moved without holding the trigger while the truck is moving the truck will stop as a safety precaution The truck can be moved forward or back ward by moving the joystick in the dir...

Page 85: ...ion the truck over the line Activate Hydro static Drive Set engine to 1000 RPM 2 Make sure the video guidance monitors are attached to the windshield 3 Turn ON the camera switch 4 Drive the truck in reverse 5 Position the rear camera so that it is in the right relationship with the cutter teeth in ac cordance with the desired offset from the line 6 Position the cutter head assembly at the center o...

Page 86: ... tons top of the joystick when necessary to keep the rear camera aligned This is also necessary procedure even in a bend Keeping the front camera aligned insures a consistent radius and bumping Left or Right buttons will keep the cutter on the line 10 The rear camera monitor cross hairs should be aligned with the center or the edge of the reference line Rear Video Monitor Forward Camera Video Moni...

Page 87: ...ess the DOWN button on the remote control until the hook is fully extended 5 By hand lift and hold the safety lock arm 6 With the safety lock arm up press and hold UP button until the latch hook is fully retracted 7 Now lower the latching arm to its resting posi tion 8 Detach and store the remote control Remote Switch Control Locking Arm Released From Lift Arm With Latch Closed For Operation Rear ...

Page 88: ...line pavement seam or edge of the pavement 2 Make sure the locking arm is released then use the joystick to move the cutter to the de sired offset position 3 Use the rear video cameras to make final cut ter offset adjustments Then align the rear video guidance indicator on a reference line seam or the edge of the pavement Rear Video Cameras Laser Spot Alignment Indicator On Reference Line ...

Page 89: ...unterclock wise when transferring from rumbling mode to planing mode to set proper down pressure for planing mode 4 When transferring from planing mode to rumbling mode rotate the knob 5 5 turns clockwise to set proper down pressure for rumbling CAUTION EXCESSIVE CUTTER DOWN PRESSURE CAN RAISE THE REAR TRUCK AXLES FROM THE PAVEMENT CAUSING LOSS OF TRACTION DAMAGE TO CUTTER COMPONENTS AND PAVEMENT ...

Page 90: ...to set the desired number of cuts to skip before cutting resumes 7 Skip pattern setting examples CUT 20 SKIP 20 CUT 25 SKIP 10 CUT 30 SKIP 15 8 Press ESC to return to the Main Screen when the cut pattern is set Nozzle Water Pressure The water pressure setting controls the volume of water sprayed on the cutter drum during cutting operations Use the following procedure to set water pres sure PSI 1 F...

Page 91: ...ogramed Use the following procedure to active the skip function with the wireless remote 1 Press any button to wake up the control 2 Press and hold either button to activate the skip cylinders and raise the cutting drum off the pavement and stop cutting 3 Release the buttons to lower the cutter to the pavement and resume cutting operations Trucks With Optional Continuous Off Loading The top button...

Page 92: ...c cylinder Release the button to stop the auger at the current height Press and hold button 6 to lower the front of the auger using the secondary rear hy draulic cylinder Release the button to stop the auger at the current height 4 Auger Right Left Function Press and hold button 7 to rotate the front of the auger to the right Release the but ton to stop the auger in the current position Press and ...

Page 93: ...rance should not be greater than 3 8 5 Open valve for in line mister jets This valve is located on the top of the cutting head assembly and is diverting water from spraying directly onto the cutting drum to inside of the vacuum head This ensures the debris is moist before entering the system 6 Press button 4 BLOWER on the Main control screen to activate the system Controller Main Screen Control Bu...

Page 94: ...rease auger speed to at least 50 6 Activate vacuum system as described in Vacuum System Operation Debris Recovery System With Optional Continuous Off Loading System Joystick Joystick Trigger A TRUCK SPEED Dial B Auger Speed Control Dial 3 5 7 4 6 8 Wireless Remote Control Auger Control Buttons 3 Raise Primary Auger Cylinder 4 Lower Primary Auger cylinder 5 Raise Secondary Auger Cylinder 6 Lower Se...

Page 95: ...ssure may allow the cutting head to bounce and damage the teeth 6 Make sure the eccentric relief valve is set cor rectly Refer to a section 7 Open the Water Supply Valve 8 Turn on the Charge Pump Button 5 on the control monitor 9 Use selector ball valve to direct water to the cut ting drum or into the vacuum head as desired Joystick Joystick Trigger A TRUCK SPEED Dial B A B Controller MAIN Screen ...

Page 96: ...led in the cutting drum Inspect cutter for worn or missing teeth before each shift Set down pressure at the start of each job Check cutter depth before starting each shift Remember that cutter diameter decreases as teeth wear Adjust standoff height if necessary Shift truck to work mode in the proper sequence Engage eccentric and cutting drum before lower ing cutter to the pavement Raise lift arm b...

Page 97: ...gauge wheels grove the pavement or the cutter kicks back while cut ting Use the following procedure to begin planing operations Starting Planing Operations 1 Perform all steps Pre Operation Inspection and System Startup Procedure 2 Align the truck according to procedures de scribed in Aligning Truck Setting Cutter Offset 3 Activate optional vacuum system if equipped or desired Main screen button 4...

Page 98: ...in this section are for demonstration purposes only The display and controls in the controller on your truck may be different Refer to the SunSource Hog Technologies User Guide for a description of the controls and features Routine Cutter Shutdown procedure 1 Raise the cutter off the pavement 2 Turn the TRUCK SPEED dial to 0 or bump the joystick to stop the truck Set the park brake 3 Disengage the...

Page 99: ...the latch locking plate to down to the locked position 8 Insert the two pins that secure the articulation hinge for travel 9 Disconnect the remote control and store it a safe place 10 If the truck is equipped with continuous off loading turn the auger off and center it above the truck Lower the auger to the travel po sition and secure it to the front cylinder with the safety pin 11 Turn the TRUCK ...

Page 100: ...blower is shutdown Press button 4 on the main screen to turn the blower off if necessary 5 Press button 5 on the controller Main Screen to turn the water pump off 6 Make sure all wastewater is drained from the debris tank Open the gravity drain valve to com pletely drain the tank if necessary 7 Move the Door Seal switch on the debris tank control panel to the DEFLATE position to completely deflate...

Page 101: ...g Check that the bag is installed properly and that the debris pump intake line is not blocked Also make sure the automatic float switch and cutoff ball valve are free 16 Then thoroughly clean the door seal close the door and secure it with the clamps 17 When the door is closed and latched use the DOOR SEAL switch to inflate the debris door seal Maximum seal pressure is 20 25 psi 1 4 1 7 BAR 18 Re...

Page 102: ...emptied periodically during operation Before performing the conversion procedure make sure the cutting system is shutdown with the park brake set and the truck in the service position Then use the following procedure to con vert continuous of loading to debris recovery mode 1 Make sure the truck is stopped with the park brake set and the truck in the service position 2 Disconnect the vacuum hose f...

Page 103: ...yclonic separator to the secondary canister separator from the top fitting on cone shaped separator 5 Connect the separator vacuum hose to the check valve vacuum fitting on the top of the debris tank 6 Make sure all hose connections are secure then activate the vacuum system and test for proper vacuum pressure 7 Reverse the procedure to convert the system back to continuous off loading mode ...

Page 104: ...NEUTRAL AND SHUTDOWN THE ENGINE 4 TURN THE POWER SWITCH ON THE JOY STICK PANEL OFF ALL TRUCK AND CUTTER SYSTEMS ARE NOW SHUTDOWN 5 WHEN THE SITUATION PERMITS RETURN ALL SWITCHES TO THE OFF POSITION AND ALL DIALS TO THE 0 SETTING WARNING IF AN EMERGENCY SITUATION INVOLVING THE POTENTIAL FOR PERSONAL INJURY AND OR EQUIPMENT DAMAGE OCCURS THE OPERATOR SHOULD ALWAYS SELECT THE EMERGENCY SHUTDOWN PROCE...

Page 105: ...nd water ball valves whenever it is not being used Pressure Washer Pump Water Supply Valve Clean Water Pressure Pump Supply Valves 1 Pressure Washer Water Supply Valve 4 Water System Pressure Pump 2 Wand Pressure Gauge 5 Pressure Pump Supply Valve 3 Manual Bypass Valve 6 Cutter Nozzle Water Supply Valve 1 3 2 5 4 6 Use the following procedures to activate or shut down the pressure washer Activatin...

Page 106: ...TLY CAUSING DAMAGE TO EQUIPMENT AND SERIOUS INJURY OR EVEN DEATH TO PERSONNEL Shutting Down The Pressure Washer 1 Reduce engine speed to idle 2 Slowly turn the hydraulic flow control valve clockwise until it seats in the closed position Then close the ON OFF hydraulic pressure valve to deactivate the hydraulic motor and pressure pump 3 Open the cutter nozzle water supply valve and slowly close the...

Page 107: ...ral seconds 9 Attach the hose and wand to the pressure washer Then close the nozzle supply valve and open the valve for the pressure washer Allow water to flow at low pressure until anti freeze flows from the wand nozzle for several seconds 10 Close the pressure washer supply valve and open the nozzle valve then turn off the pump 11 Turn the TRUCK PTO and POWER switches off and shut down the truck...

Page 108: ...108 NOTES ...

Page 109: ... every effort to ensure that the information we give is accurate and complete it is also true that constant improve ments are being made to the equipment models we build and sometimes there is a lag between the design change and the manual update The service intervals we provide in the Maintenance Matrix are meant to meet or exceed OEM specifications but no guarantee is expressed or implied Hog Te...

Page 110: ...hut down to prevent accidental activation of cut ting systems 3 Park vehicle on a level area and apply park ing brake 4 Shutdown the engine and disable the truck electrical system at the main circuit breakers 5 Follow all Lockout tagout and additional shut down procedures established in your company safety guidelines to complete the service position WARNING Severe injury to personnel or damage to ...

Page 111: ... 2 1 7 8 WARNING USE ONLY POLYREX EM GREASE IN ECCENTRIC BEARINGS THE USE OF ANY OTHER GREASE WILL RESULT IN LIQUEFIED OR HARDENED GREASE THAT WILL CAUSE BEARING FAILURE WARNING GREASE PURGES SKIP GAUGE AND TRIM WHEEL BEARINGS OF TAR AND OTHER MATERIAL THAT WILL CAUSE THE BEARINGS TO SEIZE WHEN THEY COOL AFTER OPERATION PERMANENTLY DAMAGING THE BEARINGS GREASE SKIP GAUGE AND TRIM WHEEL BEARINGS 3 ...

Page 112: ... Universal Joints Spline Shafts 2 Skip Wheel Bearings Auto Lube 7 Water Tank Fill Valve 3 Gauge Wheel Bearings 8 Debris Tank Door Hinges 4 Tool Box Access Panel Hinges Latches 9 Debris Tank Tilt Cylinder Bearings 5 Ladder Hinges Locking Pin 10 Debris Tank Tilt Hinges Rumble Hog Lubrication Chart 2 9 10 6 4 6 4 8 7 11 5 4 2 3 1 ...

Page 113: ...SCRIPTION ITEM COMPONENT DESCRIPTION 1 Ladder Hinges Locking Pin 4 Debris Tank Inspection Hatch Hinges Latch 2 Drain Valves 5 Articulation Hinge Optional 3 Latches Hinges 6 Lift Arm Hinge Pin Grease Fittings Rumble Hog Lubrication Chart 3 5 6 6 1 3 4 2 3 3 ...

Page 114: ...Reservoir Fill Fitting 2 Auger Pivot Gear Grease Fittings 3 Rumble Hog Lubrication Chart 4 2 1 NOTICE SOME LUBRICATION POINTS SHOWN IN THIS SECTION ARE FOR OPTIONAL EQUIPMENT THAT MAY NOT BE ON YOUR MACHINE Continuous OFF LOADING AUGER AUTO LUBE GREASE PUMP AND DEBRIS RECOVERY ARE SOME OF THE OPTIONS SHOWN ...

Page 115: ...d or worn out safety pins immediately if the spring becomes weak or damaged Safety Locking Pins Weekly 50 Hours Lubricate the retaining ball or sliding shaft on safety pins Inspect and test for proper operation Replace damaged corroded or worn out pins imme diately Ball Valves Monthly 200 Hours Open and close ball valves at least once each month to keep them free and operating prop erly Lubricate ...

Page 116: ...ce is ex tremely important in the OMSI Drive system Maintenance schedules are outlined in the OMSI Drive operating manual included with your truck They should be followed exactly Refer to the Lubrication Chart and Maintenance Matrix in this section for lubrication specifications Inspection And Maintenance Daily Inspect components for loose bolts Weekly 50 Hour Maintenance Check fluid level in the ...

Page 117: ...ered flat to the surface with the cover in place and all wheels contacting the surface 4 Loosen the jam nuts and turn adjusters clock wise to decrease depth or counterclockwise to increase depth Note that turning just the left or right adjuster with change the depth on only one side 5 Tighten the jam nuts on the adjusters and the three bolts on the gauge wheel plates to lock the adjustment Gauge W...

Page 118: ... pavement condition Before performing any maintenance procedure make sure the cutting system is shutdown with the park brake set and the truck in the service position To replace the cutting teeth 1 Make sure the truck is stopped with the park brake set and the truck in the service position 2 Remove the protector from the socket head screw 3 Remove the 3 8 socket head cap screw Cutting Drum With Te...

Page 119: ...ent 7 Install new tooth and wedge together with the bolt and washer Torque to 35 ft lbs 8 Install new bolt protector NOTICE THE THREADED INSERT IN THE BASE OF THE SOCKET IS REPLACEABLE CONTACT Hog Technologies FOR IN STRUCTIONS ALWAYS INSTALLA NEW WEDGE BOLTAND WASHER WITH A NEW TOOTH WEDGES ARE SOFT AND SACRIFICIAL THEY TYPICALLY WEAR FASTER THAN THE TEETH REPLACE WEDGE WHEN PULLER HOLE BECOMES E...

Page 120: ...DRIVE BELTS CAN CAUSE SEVERE DAMAGE TO PULLEYS SHAFTS AND BEARINGS IF THEYARE ADJUSTED TOO TIGHT OR MISALIGNED ALWAYS MAKE SURE THE BELTS ARE PROPERLY ALIGNED AND SET TO THE MANUFACTURES SPECIFICATIONS WHEN THEY REQUIRE ADJUSTMENT AND NEVER OVERTIGHTEN THE BELTS Before performing any maintenance procedure make sure the cutting system is shutdown with the truck in the service position Drive Belt In...

Page 121: ... entire belt width If the belt is a wide synchronous belt place a piece of steel or angle iron across the belt width and deflect the entire width of the belt evenly 2 If it is less than the minimum recommended deflection force the belt should be tightened If it is greater than the maximum recom mended deflection force the belt should be loosened Belt Tension Specifications Hydraulic Motor To Eccen...

Page 122: ...wing procedures to adjust the belts Step 1 Adjust Eccentric Drive Timing Make sure the left and right eccentric pulleys are in the same clock position Adjust pulleys if necessary Step 2 Adjust The Eccentric Drive Belts Threaded adjusting bolts and nuts inserted into holes in brackets just behind each eccentric drive axle pillow block are used to move the drive axle and set the tension for each dri...

Page 123: ... axle belt tension can be set The hydraulic motor is on an adjustable mount Threaded adjusting bolts inserted into threaded holes on each side of the motor mount are used to set the drive belt tension Use the following procedure to adjust the eccentric drive axle belt 1 Loosen the four bolts in the slotted holes on the hydraulic motor mount just enough to allow the motor to move Make sure not to l...

Page 124: ...rogrammed to run the pump once every 12 to 18 minutes of cutter run time for approximately 4 min The lubrication cycle can also be started manu ally by pressing a button on the pump control panel Lubrication frequency and cycle times can be changed to accommodate different operating conditions Refer to the pump manufacturer s manual for instructions to change the pump timer programming Fill the re...

Page 125: ...ke several days for the Auto Lube system to fill the line and provide lubrication Use a grease gun attached to one end of the line and pump until all air is purged and a steady stream of grease is flowing from the other end Attach the line to the divider valve and compo nent Then tighten the fittings Activate the pump manually until lubricant flows from the component bearing Refer to the manufactu...

Page 126: ...system is shutdown and the truck is in the service position Then use the following procedures to maintain the hydraulic system Daily Inspection and Maintenance Check the hydraulic fluid level each day or im mediately following the repair of a blown hose leaking fitting or any hydraulic system service Inspect all hoses fittings valves and seals for leaks daily Repair or replace leaking or mal funct...

Page 127: ...anged every 200 hours or if the engine begins to strain or stall when the hydrostatic drive is engaged Change the Donaldson charge filter for the cutter pump circuit It is the horizontal filter located below the chassis near the OMSI Drive This filter should be changed every 200 hours or if a drop in cutter pump charge pressure is indicated on the display with the system activated and fluid flowin...

Page 128: ...position and on level ground Make sure the hydraulic tank filters and all related components are thoroughly cleaned before servicing to prevent contamination Make sure all parts are clean before final assembly Draining and flushing the hydraulic tank 1 Make sure the hydraulic system is not pres surized and the fluid is cool 2 Drain the tank into a suitable container by removing drain plug at the b...

Page 129: ... the hydraulic system is activated Low Pressure Return Filters Gauges On Hydraulic Reservoir High Pressure Filters The filters are the spin on type filters located below the center deck access plate WARNING Some hydraulic circuits are equipped with accumulators that maintain pressure in the circuit after it is shutdown Always make sure to follow proper procedure to bleed pressure from the accumula...

Page 130: ... system is activated Zinga Suction Filter Below Hydraulic Reservoir Donaldson Filter Near OMSI Drive Zinga Hydrostatic Drive Eccentric Pump Suction Filter A spin on screen mesh type suction filter located below the hydraulic system reservoir 1 Make sure the fluid is cool 2 Use a filter wrench and rotate the filter coun terclockwise to remove it 3 Lubricate the seal on the new filter with hy drauli...

Page 131: ...ulators and hydraulic circuits before servicing the system Before performing any maintenance procedure make sure the cutting system is shutdown with the truck in the service position Inspection And Maintenance Weekly Check charge pressure Add nitrogen if nec essary NOTICE A SPECIAL CHARGING KIT IS REQUIRED TO TEST AND CHARGE ACCUMULATORS ACCUMULATORS ARE CHARGED WITH NITROGEN GAS COMPRESSED NITROG...

Page 132: ...umps and listen for unusual noises and proper operation Find and correct the cause of unusual noises or erratic operation Inspect high pressure hose for kinks damage or deterioration Replace if necessary Monthly Thoroughly flush clean water tank to remove accumulated debris Open and close valves at least once each month to keep them free and operating prop erly Lubricate and inspect valve shafts a...

Page 133: ...lter is serviced to ensure excess water does not collect to an unsafe level There is a manual drain valve at the bottom to remove excess water as needed The filter canister contains a pleated reusable vacuum filter that can be easily removed through the door on the side of the canister The filter should be inspected and cleaned before each shift A service port and plug is located in the filter The...

Page 134: ...ect the filter for holes and damage Replace the filter if its condition is questionable it is damaged or has holes that could allow debris to get into the blower 6 Install the cleaned or new filter and secure it with the wing nut Hand tighten the wing nut Make sure not to over tighten the wing nut and collapse the filter 7 Make sure the plug is secured in the filter ser vice port then close and la...

Page 135: ...valves Make sure to open and close all valves to keep them free and operating properly Inspect clean and lubricate the vacuum relief valve to keep it operating properly Vacuum Blower Blower Maintenance Overview The vacuum blower operates at an extremely high RPM and has specific lubrication and maintenance requirements It is also very susceptible to damage from debris because of the tight toleranc...

Page 136: ...umed water or debris to get into the vacuum blower or silencer Clean secure filtration is necessary to keep your vacuum blower in good operating condition Replace if necessary Check the vacuum canister door seal Clean or replace the seal if necessary 200 Hour Maintenance Perform all daily maintenance along with the items outlined in this section Inspect hydraulic motor coupler hydraulic hoses and ...

Page 137: ...ENTIAL TO PROPER BLOWER OPERATION AND SERVICE LIFE iT SHOULD NEVER BE OVERLOOKED 1 Park the truck reduce engine speed to idle and set the parking brake 2 With the engine at idle speed and the vacuum system engaged open the filter canister door 3 Open the canister drain valve and drain any accumulated water 4 Allow clean dry air to flow through the blower for several minutes to dry out internal com...

Page 138: ...g auger There are no moving parts and debris is separated by the cyclonic rotation of the air flow through the separator Separated debris flows down the funnel shaped sides to the auger where it is off loaded to the shoulder or dump vehicle traveling with the Rumble Hog Daily Maintenance Perform the following procedures every two hours of operation with the vacuum and off loading systems shutdown ...

Page 139: ...intenance Inspect and lubricate door hinges and latches Vacuum Canister and Filter The vacuum filter canister houses the vacuum filter to protect the blower from debris and should be checked at the beginning of each shift It is normal for water vapor to travel from the debris tank to the vacuum filter canister and gradually accumulate Therefore the canister should be drained at the start of each s...

Page 140: ...is complete 3 Remove the wing nut that secures the vacuum filter to the canister and remove the filter 4 Use a detergent degreaser to cut oil and grease then power wash the filter with pres sure not exceeding 2000 psi 138 bars 5 Thoroughly inspect the filter for holes and damage Replace the filter if its condition is questionable it is damaged or has holes that could allow debris to get into the b...

Page 141: ...t safety strut Make sure the hinge pins are tight and lubricate pins Lubricate the debris door gas spring pivot hinge pins Inspect and lubricate door hinges Lubricate inspection port hinges and latch Inspect the debris tank liner for worn and broken parts Clean and replace parts as necessary to keep the liner operating properly Monthly 200 Hour Maintenance Inspect debris tank door seal and inflati...

Page 142: ...er Filter for instructions on maintaining the vacuum system and cleaning the filter Daily Maintenance Check for obvious loose mounting nuts and bolts Check the oil level in the gear end of the blower It should be within 1 4 of the overflow plug threads Grease blower drive end bearings with the lu bricant recommended by the blower manufac turer Refer to the Service Matrix for lubricant specificatio...

Page 143: ...Shutdown CAUTION MOISTURE ALWAYS PRESENT IN VACUUM AIR FLOW WILL CAUSE CORROSION IN INTERNAL BLOWER COMPONENTS WHICH WILL CAUSE THE BLOWER TO SEIZE WHEN IT IS SHUTDOWN it IS IMPORTANT THAT LIGHT PROTECTIVE OIL IS INJECTED INTO THE SERVICE PORT WITH THE BLOWER OPERATING ANYTIME THE VACUUM SYSTEM IS SHUTDOWN EVEN JUST FOR A COUPLE OF HOURS THIS MAINTENANCE PROCEDURE IS ESSENTIAL TO PROPER BLOWER OPE...

Page 144: ... at the base of the separator for a excessive material Clean as required Check auger and pivot base for loose bolts Tighten as necessary Inspect hydraulic hoses and fittings for leaks Repair or replace as necessary Weekly Maintenance Lubricate pivot gear bearings at rear of auger Lubricate bearing at front of auger Inspect and lubricate all latches pins and hinges ...

Page 145: ...irt and debris from enter ing the gear case when the fill plugs are removed Checking The Gear Case Oil Level 1 Make sure the system is shutdown with the truck in the service position and on level ground 2 Remove the overflow plug on the side of the gear case The oil should be within 1 4 of the bottom of the plug threads 3 If the oil is low remove the breather plug and add oil until the oil level i...

Page 146: ...LL BLOWERS ARE EQUIPPED WITH A VALVE AND DRAIN PLUG SOME ARE EQUIPPED WITH A DRAIN PLUG ONLY Refilling the gear case 1 Clean the area around the breather plug on the top of the gear case and remove the plug 2 Make sure the drain valve is closed and the safety plug is installed in the valve fitting and tightened 3 Add the recommended amount and type of gear oil to the gear case Refer to the blower ...

Page 147: ...he de bris hose rises above the truck cab The life of the hoses in these areas can be ex tended by rotating the hoses 1200 every 200 hours Vacuum hoses should be inspected daily and replaced as needed Make sure the system is shutdown with the truck in the service position before rotating or replacing vacuum hoses NOTICE DAMAGED VACUUM HOSES CAN BE REPAIRED USING DUCT TAPE AS A TEMPORARY SOLUTION T...

Page 148: ...lyRex EM Grease Lift Arm Lift Arm Hinges and Other Grease Fittings Weekly Mobil PolyRex EM Grease Cutter Chassis Gauge Wheels Weekly Mobil PolyRex EM Grease Cutter Chassis Skip Cylinder Wheels Weekly Mobil PolyRex EM Grease Planing Chassis Gauge Wheels Weekly Mobil PolyRex EM Grease General Grease Points Hydraulic Ram Pivots Door Hinges Debris Tank Tilt Pins ETC Weekly More Frequently If Required ...

Page 149: ...eter to check the wire for continuity Test For Broken Cable Wires Disconnect the cable at both ends Use a multi meter in the continuity resistance mode and place the leads on the same numbered pins on each end of the cable You should get a reading close to Zero Ohms If you don t the wire is broken or one of the pins is not connected properly to the wire First check the connectors to be sure that t...

Page 150: ...150 NOTES ...

Page 151: ...ssion PTO to activate hydraulic system POWER switch on joystick panel is not ON Turn on POWER switch Hydraulic fluid low Add fluid to the hydraulic fluid reservoir Hose or fitting broken or leaking Tighten loose fitting or replace broken hose or fitting Cutter is down Raise cutter off pavement Water System Low water pressure Hydraulics not engaged Engage transmission PTO to activate hydraulic syst...

Page 152: ...onitor cables are not plugged in Attach cables Fuse is blown Replace blown fuse Cutting System Cutter and eccentric not activating POWER switch on joystick panel is not on Turn on POWER switch Digital controller is not on the Main Screen Set controller to the Main Screen then press button 6 Hydraulics not engaged Engage transmission and OMSI PTO units to activate hydraulic system Eccentric engaged...

Page 153: ...ter clearance when the skip cylinders are engaged Skip cylinders are not activating Find and correct the problem Cutting is not cutting rumble strips deep enough The cutter teeth have worn which has increased the standoff height Adjust the gauge wheels to set the proper standoff height There is not enough down pressure on the cutter Increase down pressure Cutter is not sitting square to the paveme...

Page 154: ...cuum filter is clogged Clean or replace vacuum filter Vacuum service port plug is not installed Insert service plug Vacuum loss or failure A vacuum hose is worn through or damaged Replace worn or damaged vacuum hose Vacuum hose plugged with debris Hit hose with dead blow hammer to breakup debris Replace hose if necessary Vacuum system relief valve sticks open Debris in relief valve is causing it t...

Page 155: ...155 Appendix 3 Tools Spare Parts ...

Page 156: ...156 Appendix 3 Tools Spare Parts ...

Page 157: ...Guidance System Working F F Engage Disengage Gearbox PTO General F F Engage Disengage Transmission PTO F F Filling Hose And Wrench Onboard F F All Joystick Switches And Controls Operating F F Accident Incident Decals F F All Digital Control Panel Switches Gauges Operating F F All Wires Brake Lines Hydraulic Lines Secure F F Wireless Remote Control Operating F F All Components Are Neat Organized F ...

Page 158: ...158 NOTES ...

Page 159: ...work Drum chassis The assembly that holds the drum and supporting mechanisms Eccentric A hydraulic cylinder that rotates on an out of center axis The eccentric is timed directly with the hydrostatic drive system to ensure precisely metered plunges of the drum Flapper Installed on the top of the silencer to keep water and debris from entering the system Float Mode Releases up or down hydraulic pres...

Page 160: ...olutions per minute The revolutions of the engine crankshaft pump or motor each minute Silencer Muffles the sound of the airflow being pulled through the vacuum blower Sight Tube Clear pipe on side of the clean water tank and debris tank that indicates the level of the water Soft Key Buttons that have a programmable response These may or may not be on a digital console Teeth sockets the places in ...

Page 161: ...ders Always contact Hog Technologies Customer Service Department for assis tance and cross reference specifications for parts you intend to purchase locally PARTS All replacement parts are available directly through Hog Technologies Get the parts you need when you need them Next day delivery is available in most locations Same day delivery available in some areas for parts ordered before 10 AM Eas...

Page 162: ...pe Hog please login or register 001 772 223 7393 This number that will find an available customer support representative 24 7 We are excited to take your call any hour of the day Please don t hesitate to call if we can help The Ambassador Club is added to the site Tuesday November 11 2008 The Ambassador Club is a place for Waterblasting Technologies Stripe Hog owners and operators to communicate s...

Page 163: ......

Page 164: ...Print Date 12 05 2019 Rev 1 A 3170 SE Slater Street Stuart Florida 34992 001 772 214 1714 P 001 772 223 5461 F www hogtechnologies com ...

Reviews: