GOLD LOUVERS (FD-LD)
The standard black louvers above and below the doors can
be replaced with a gold plated set. You may order these
from your dealer.
Dismantling and assembling louvers
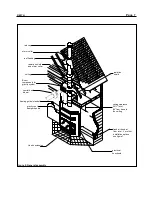
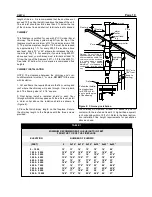
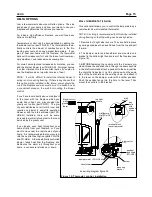
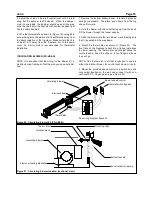
For the following refer to (Figure 22):
1. The louvers are held in place by springs underneath.
Therefore, to remove, push down from the top and pull
the top of the louvers forward.
2. Take the assembly apart by removing the top nuts from
the rods. Leave the bottom nuts and spring assemblies
on the ready rod.
3. Assemble the louvers the same way the black ones
came apart, reusing the original rods, spacers and
springs. There should be about 1/4" of the rod protruding
above the top nut.
4. Put the reassembled louvers back into the fireplace by
inserting the rods into the lower holes, and pushing the
louvers into place.
Warning:
Be sure to replace the heat shield behind the
top centre louvers the same way it was removed. Failure
to do this may result in a fire hazard (see Figure 22).
IMPORTANT!
Before you light the first fire after you
have installed the new louvers, you must wipe all finger-
prints and dirt off the gold plating. The gold louvers have
been coated with a silicone substance that will seal to the
gold louvers during the first fire. If you do not wipe off the
gold plating, the acid from your fingerprints or other sub-
stances will permanently etch the gold plating.
NOTE: Although the gold plating will not tarnish, care
must be taken not to scratch the surface.
DELTA ROCK RETAINER KIT (FD-KD)
Facing
Facing material may only be non-combustible such as
metal, brick, rock, concrete board, or ceramic tile. Gypsum
board is NOT an acceptable facing material.
Warning: DO NOT
restrict air flow through the inlet and
outlet louvers of the fireplace.
If you desire to fully face the fireplace with soldiering brick,
it is recommended that you purchase the rock retainer kit
(part FD-KD-1) to help keep the facing in place. It is NOT
recommended for brick or other self-supporting materials.
Follow these steps:
NOTE: Remove the fireplace doors and louvers, and store
them in a safe place until the masonry work is finished.
Acid from the cleaning operation will permanently damage
the gold plating. Ensure that the cover remains over the
right door.
NOTE: The louvers have two sets of mounting holes. Use
the rear set when there is no facing added to the fireplace
and use the front set when a facing has been added. This
is a cosmetic recommendation only.
Installation
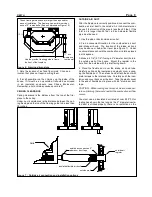
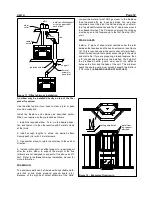
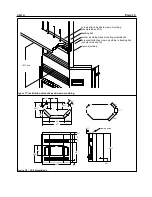
1. Start by installing the top centre expanded metal flush
and centred with the top centre louver opening. (It is rec-
ommended that you just clamp the centre piece in place
until the sides are lined up) Next install the right and left
expanded metal by aligning the edging and the mesh to the
centre piece and the side louver openings. Now install the
lower arch centre above the door aligning it to the side
pieces (see Figure 23).
NOTE: When using wider lintel bar for heavier rock, make
sure that you have enough room to open the door wide.
2. Cover any remaining area which you wish to put facing
material on with wire mesh, or metal lath, overlapping the
heavy expanded metal. Make sure nails or staples used
for fastening mesh penetrate the studs at least 1".
3. Mortar must be "thin set" or "thin bed" type, inherently
polymer modified. Do not add water to the mixture (this
applies to the grout as well). If the mortar is not modified,
you should add a synthetic latex additive. Mix to a firm,
moist consistency.
4. Using a plasterer’s or mason’s trowel, apply a scratch
coat that covers the wire mesh. Let the mortar set before
adding another coat. This will take several hours.
Afterwards, apply a thinner coat and the facing. Do not
Page 17
DELTA
rod
top nut
louver
heat shield
(center top louver
set only)
spacer
bottom nut
spring assembly
Figure 22 : Louver assembly

