MAINTENANCE
CLEANING
The high heat paint and gold plating can be cleaned with a
soft moist cloth. Use a mild detergent and water. Do not
use abrasive cleaners!
ASHES
Clean the ashes before they become too deep, i.e., before
you have a spillage problem when opening the doors.
Ashes should be placed in a metal container with a tight-fit-
ting lid. The closed container of ashes should be placed on
a non-combustible floor or on the ground well away from all
combustible materials. If the ashes are disposed of by bur-
ial, or otherwise locally dispersed, they should be retained
in the closed container until all cinders have thoroughly
cooled.
DOORS
Lubricate the door latch and hinges with an all-purpose
grease at least once during the burn season. The door has
been fitted and adjusted correctly at our factory. Under nor-
mal conditions only the door closer should need adjust-
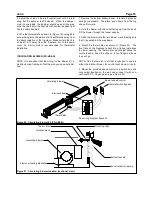
ment. To adjust the door closer catch, loosen the two
screws that hold the door closer in place. Slide the door
closer in 1/32" increments to the right, tighten screws and
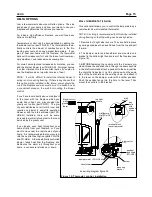
(as shown in figure 1a) test to ensure that the door closes
tightly. To check if the door seal is tight, try to slide a piece
of paper behind the door gasket from the top and bottom of
the door. If the door closes tight and you can still pass a
piece of paper past, the gasket may need replacing or the
doors need readjusting.
If the door has been replaced the following may need
adjusting. First check that the right side door is in the cen-
tre of its adjustment. Adjust the hinges so the door closer
closes the door. The hinges are adjustable by removing the
door, and loosening the small Allen screws on the right side
of the hinge. The hinge pins are manufactured off-centre
to facilitate easy adjustment. With a flat screwdriver, the
pins can be turned so that the doors seal well and fit with
each other. After adjustment, tighten the Allen screws,
holding the hinge pins in place with the screwdriver, and
replace the door. If the left side door fits correctly and the
front door does not pass the paper test, then the angle
bracket needs to be adjusted. Loosen the four screws that
are attached to the centre door and slightly adjust the Allen
screws in the angle bracket inward. Tighten the two screws
closer to the gasket first then the other two screws. Once
the left part of the door seals well the door closer may need
to be readjusted. If there is no more adjustment in the
door closer the right side door must be loosened and
adjusted slightly to the right. Adjust the left door until the
doors seal. If the door seal is damaged to the point where
it does not seal tightly, the gasket may need to be replaced.
The gasket replacement kit (part FD-GRK7) is available
from your dealer.
The door seal is the most important factor in control-
ling the burn rate of your Delta fireplace.
GLASS
In a controlled combustion firebox, temperatures are not
always high enough to keep the glass perfectly clean. We
have supplied you with special ceramic glass that will with-
stand the heat from the fireplace without cracking. A good
hot fire usually cleans off most of the deposits that have
accumulated.
Remember: the drier the wood, the cleaner the glass.
A word of caution: although heat will not break the glass,
be careful
not to hit the glass
with logs.
NOTE: Cleaner glass means a cleaner flue.
Warning:
Never clean this glass with an abrasive cleaner.
Use only a cleaner recommended by your dealer. Never
clean the glass while it is hot.You risk getting a serious
burn.
Page 5
DELTA
4- centre door
retaining screws
Allen screw(2)
door hinge
Allen screw(2)
left door
angle bracket
centre door
right door
adjustment
door closer
catch
right door
adjustment
right door
handle
Figure 1a : Door adjustments
front view


