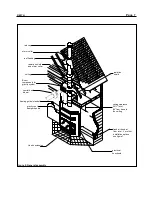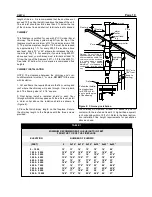
An elbow may be installed directly on top of the fire-
place if required.
Use the offset option if you need to clear a joist or pass
around a cupboard.
Install the fireplace and chimney as described earlier.
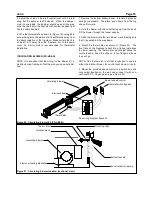
When you require an elbow, proceed as follows:
1. Install the required elbow. Turn it in the desired direc-
tion, and fasten it to the other section with 3 metal screws
at the joints.
2. Install enough lengths to obtain the desired offset.
Secure each joint with 3 metal screws.
3. Use another elbow to return the chimney to the vertical
direction.
4. Install a roof support, an offset support, or a wall support
after the return elbow, to support the weight of the flue
(elbows are not designed to support a flue above an off-
set). Refer to the
Excel
chimney installation manual for
more information.
FRAMING IN
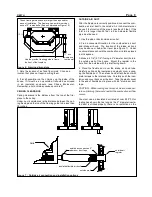
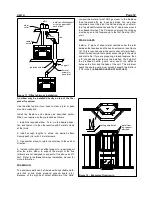
The enclosure walls can be framed with any suitable mate-
rials (2x4 or 2x6 studs, plywood, gypsum board, etc.).
Because of the high heat output potential of the Delta,
combustible material must NOT go closer to the fireplace
than the stand-offs, top, back and sides. You may also
completely cover the top of the Delta as long as you main-
tain top standoff clearances and the 2" clearances around
the chased chimney. The 2" clearance around the chimney
must be open to the fireplace up to the first fire stop (39½"
min.)
SPARK GUARD
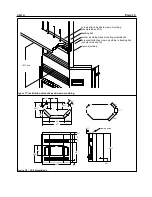
Install a 5" piece of sheet metal centred under the joint
between the fireplace and the hearth extension (see Figure
15). This is required under the centre door only (provided).
This will make certain that sparks cannot lodge in the crack
and start a fire. If you are preparing a raised fireplace, then
a “Z” shaped spark guard must be installed. The height of
the Z-shaped hearth guard must equal the distance
between the floor and the base of the unit. The minimum
depth the spark guard must extend beneath the Delta is
2 1/2 inches.
(Z-SHAPED GUARD NOT SUPPLIED)
.
Page 12
DELTA
storm
collar
radiation
shield
offset
rise
support
3 metal
screws in
each joint
radiation shield
Figure 11 : Offset chimney installation
attic
install an offset support
or roof support after
each offset
nailing strip detail
metal fram-
ing channel
provided
Figure 12: Example of framing-in


