


Galaxy A16F-R2422 Installation and Hardware Reference Manual
Subsystem Maintenance
5-6
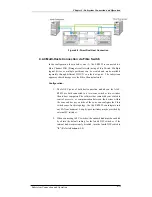
Step 5.
Secure the controller module to the subsystem
by installing the two
(2) screws on the levers. (See
Figure 5-6
)
Figure 5-6: Installing the Controller Module Screws
Step 6.
Re-attach all the cables
that were removed. These include the
cables that connect to the host and the expansion chassis, any
Ethernet cable that was previously attached to the LAN port, and
any cables that were attached to the COM ports.
5.3 DIMM Module Replacement
The subsystem comes with a pre-installed 256MB capacity or above DDR
RAM DIMM module on the controller. The controller supports memory up
to 2GB. If a DDR RAM DIMM module has been failed or a different size of
DIMM module needs to be used, the pre-installed module must be removed
and the new one installed. Replacement and installation instructions are
described fully below.
5.3.1 DIMM Module Considerations
If the memory module on the controller module is going to be replaced, the
following issues must be considered when purchasing a replacement DIMM
module:
•
Pre-installed DDR RAM DIMM module:
The A16F-R2422 RAID
subsystem comes with a 256MB capacity or above DDR RAM DIMM
pre-installed on the controller board. If you wish to change the size of
the DDR DIMM, then a new DIMM must be installed.
•
Purchasing considerations:
The A16F-R2422 supports DDR RAM
DIMM modules with memory capacities between 256MB and 2GB.
When purchasing a DDR RAM DIMM module to install on the A16F-
R2422 controller board, contact your subsystem vendor.