


Chapter 2: Hardware Installation
Hardware Installation
2-7
2.7.2 Hard Drive Installation
Step 1.
Correctly orient the hard drive;
making sure that the connector at the
back of the drive is facing the back of the drive tray. This connector is
connected to the MUX kit.
Step 2.
Insert the hard drive
by
holding the drive at an angle and inserting it
into the drive tray. (See
Figure 2-2
.)
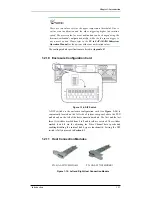
Figure 2-2: Installing a SATA Hard Drive
Step 3.
Connect the drive to the MUX kit
by sliding it towards the rear of the
drive tray until a solid connection between the drive connector and the
MUX kit connector has been made. (See
Figure 2-3
)
Figure 2-3: Connecting the Drive to MUX Kit
Step 4.
Insert four (4) supplied 6/32 flat-head
retention screws
to secure the
drive. (See
Figure 2-4
)
Figure 2-4: Fastening Four Hard Drive Retention Screws


