Chapter 2. Performance
17
ENGLISH
ENGLISH
ENGLISH
ENGLISH
ENGLISH
ENGLISH
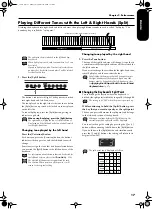
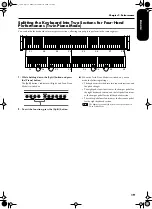
Playing Different Tones with the Left & Right Hands (Split)
Dividing the keyboard into right-hand and left-hand areas, then playing different sounds in each is called “Split play.” The
boundary key is called the “split point.”
1.
Press the [Split] button.
The button’s indicator will light. The keyboard is divided
into right-hand and left-hand areas.
The tone played on the right side is the tone in use before
the [Split] button is pressed, while the bass tone is played
on the left side.
To cancel Split play, press the [Split] button, getting its
indicator to go dark.
Changing tone played by the left hand
Press the [Variation] button.
Each time you press the [Variation] button, the button’s
indicator will change color, and the left-hand tone will
change.
Some tones assign the tone that had been selected before
you pressed the [Split] button to the left hand area of the
keyboard.
Changing tone played by the right hand
1.
Press the Tone button.
The tone of the right-hand area will change. A tone that is
a suitable match for the right-hand tone will be selected for
the left-hand area.
If you want to change the variation for the right-hand tone,
cancel Split play and then re-select the tone.
■
Changing the Keyboard’s Split Point
You can change the location where the keyboard is
divided (the split point) within the range of B1 through B6.
While continuing to hold the [Split] button, press
the key that you want to specify as the split point.
The key you pressed becomes the split point, and belongs
to the left-hand section of the keyboard.
You can also change the setting by pressing the [-] or [+]
button while continuing to hold down the [Split] button.
If you hold down the [Split] button and simultaneously
press the [-] and [+] buttons, the setting will return to its
original value (F
#
3).
C1 D1 E1 F1 G1 A1 B1
A0 B0
C2
C3
C4
C5
C8
B7
…
Split Point (set to F#3, when the power is turned on.)
Right-hand Tone
Left-hand Tone
The split point key is included in the left-hand key-
board area.
When Split play is used, only tone numbers 1 or 2 can
be selected.
If you use Split play with a Tone button for which tone
numbers 3 or 4 selected, tone number 1 will be selected
for that Tone button.
When using Dual play, press the [Split] button
The right hand will play the tone of the left button of
Dual play, and the left hand will play a suitable match
for the right-hand tone.
For information about the tones that can be selected for
the left hand section, refer to the
Tone List
(p. 216).
The selected left hand tone is remembered for each
Tone button. When you turn off the power, it will
return to the original setting.
1
In Split play, the damper pedal will be applied only to
the right-hand area of the keyboard. If you want the
damper pedal to be applied to the left-hand area, refer
to
Applying the Damper Pedal to the Left-hand
Keyboard Area
(p. 27).
The setting is at “F
#
3” when the piano is powered up.
When you continue holding the [Split] button, the
currently specified split point will be displayed.
The split point key is displayed as follows.
C C d E_
C C D E
E F F G
E F F G
A_ A b_ b
A A B B
Display
Letter
name
Display
Letter
name
Display
Letter
name
HP103_e.book Page 17 Sunday, September 12, 2004 1:37 PM
Summary of Contents for HP102e
Page 38: ...HP103e 102e Main Specifications 36 HP103_e book Page 36 Sunday September 12 2004 1 37 PM ...
Page 74: ...HP103e 102e Technische Daten 72 HP103_e book Page 72 Sunday September 12 2004 1 37 PM ...
Page 110: ...HP103e 102e Fiche technique 108 HP103_e book Page 108 Sunday September 12 2004 1 37 PM ...
Page 224: ...RES 423 04 602 00 0049 01 E D F It Sp Ol Cover4 e Page 222 Tuesday September 28 2004 5 00 PM ...

