


32
Sampling Menu
Item / Pa-
rameter
Value
Explanation
T1 T2
T3
T4
L3
L1 L2
Note off
Level
TVA Envelope
Time
Note on
LFO
An LFO (Low Frequency Oscillator) applies cyclic change to the sound.
There are two LFOs for each tone (LFO1/LFO2), and you can use them
to cyclically modulate the pitch, cutoff frequency, or volume to produce
modulation effects such as vibrato, wah, or tremolo. Both LFOs have the
same parameters.
LFO
Waveform
SIN, TRI,
SAW-UP,
SAW-DW,
SQR,
RND,
BEND-UP,
BEND-DW,
TRP, S&H,
CHS, VSIN,
STEP
LFO waveform
SIN:
Sine wave
TRI:
Triangle wave
SAW-UP:
Sawtooth wave
SAW-DW:
Sawtooth wave (negative polarity)
SQR:
Square wave
RND:
Random wave
BEND-UP:
A waveform that rises and then holds at the
reference level when it is reached
BEND-DW:
A waveform that falls and then holds at
the reference level when it is reached
TRP:
Trapezoidal wave
S&H:
Sample and Hold wave (the LFO value changes
once each cycle)
CHS:
Chaos wave
VSIN:
A modified sine wave. The amplitude of the sine
wave changes randomly once every cycle.
STEP:
A waveform that is created by the LFO Step
1–16 settings. It produces stepped change in a fixed
pattern.
* For some tones,
“BEND-UP”
or
“BEND-DW”
might not
produce an effect.
LFO Rate
0–127
LFO cycle speed
* This setting has no effect if WAVEFORM is set to
“CHS ”
LFO Delay
Time
0–127
Time from when you press (release) the key until the
LFO effect applies (continues)
When performing with a sound such as violin or wind
instrument, it is effective to apply vibrato after the
sound has sustained for a while, rather than as soon as
the sound begins.
* Make the settings appropriate to your purpose as described
in
“How to Apply the LFO”
(below).
LFO Fade
Mode
ON-IN,
ON-OUT,
OFF-IN,
OFF-OUT
Using LFO
* Make the settings appropriate to your purpose as described
in
“How to Apply the LFO”
(below).
LFO Fade
Time
0–127
Time until the LFO amplitude reaches the maximum
(minimum)
* Make the settings appropriate to your purpose as described
in
“How to Apply the LFO”
(below).
LFO Pitch
Depth
-63–+63
Depth to which LFO affects the pitch
LFO TVF
Depth
-63–+63
Depth to which LFO affects the cutoff frequency
LFO TVA
Depth
-63–+63
Depth to which LFO affects the volume
Item / Pa-
rameter
Value
Explanation
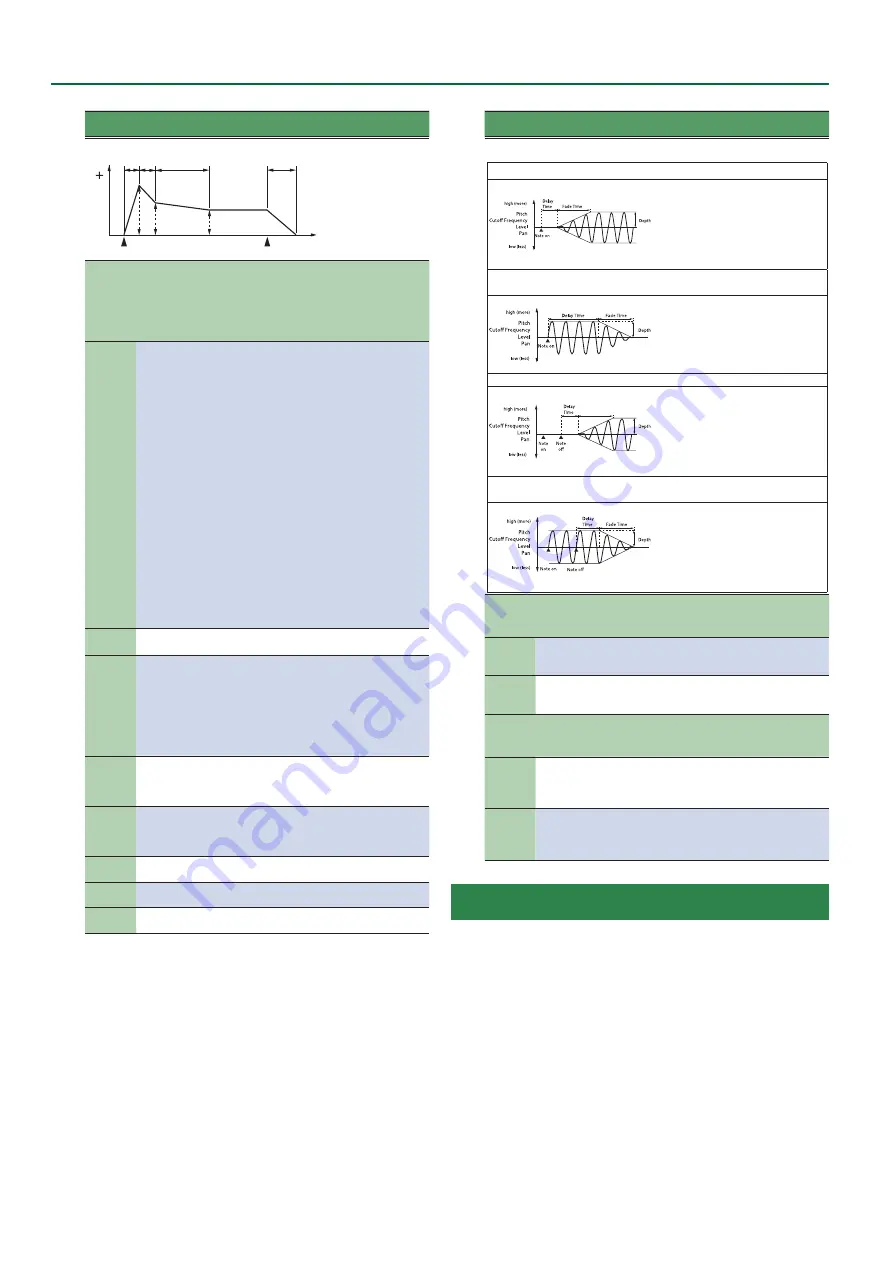
How to Apply the LFO
Apply the LFO gradually after the key is pressed
FADE MODE:
ON-IN
DELAY TIME:
Time from when the
keyboard is played until the LFO
begins to be applied
FADE TIME:
Time over which the LFO
amplitude will reach the maximum
after the DELAY TIME has elapsed
Apply the LFO immediately when the key is pressed, and then gradually
begin to decrease the effect
FADE MODE:
ON-OUT
DELAY TIME:
Time that the LFO will
continue after the keyboard is played
FADE TIME:
Time over which the LFO
amplitude will reach the minimum
after the DELAY TIME has elapsed
Apply the LFO gradually after the key is released
FADE MODE:
OFF-IN
DELAY TIME:
Time from when the
keyboard is released until the LFO
begins to be applied
FADE TIME:
Time over which the LFO
amplitude will reach the maximum
after the DELAY TIME has elapsed
Apply the LFO from when the key is pressed until it is released, and gradually
begin to decrease the effect when the key is released
FADE MODE:
OFF-OUT
DELAY TIME:
Time that the LFO
will continue after the keyboard is
released
FADE TIME:
Time over which the LFO
amplitude will reach the minimum
after the DELAY TIME has elapsed
KEY RANGE
These settings let you play different partials in different regions (note
numbers) of the keyboard.
Keyboard
Range
Lower
C-1–UP-
PER
Specifies the lowest key of the keyboard range for
each partial
Keyboard
Range
Upper
LOWER–
G9
Specifies the highest key of the keyboard range for
each partial.
VELOCITY RANGE
These settings let you play different partials according to your playing
strength (velocity) on the keyboard.
Velocity
Range
Lower
1–UPPER
Specifies the lowest playing strength that will sound
the partial.
Set this if you want to play different partials according
to your playing strength.
Velocity
Range
Upper
LOW-
ER–127
Specifies the highest playing strength that will sound
the partial.
Set this if you want to play different partials according
to your playing strength.
Deleting a User Tone
1
In the Tone section, press the
[User]
button.
The User Tone list appears.
2
Use the direct buttons to select the tone that you want
to delete.
3
Press the
[Option]
button.
The UST Option screen appears.
4
Use the direct buttons to select
“Delete ”
A confirmation message appears.
5
Use the function buttons to select
“YES ”
The User Tone is deleted.
If you decide not to delete, select
“NO ”
* Samples and multisamples are not deleted.


