


92
Activity 9 - Propulsion and Auxiliary Systems
B Class Atlantic 85 Manual – First Issue, June 2017
Activity 9 - Propulsion and Auxiliary Systems
Changing a propeller due to damage
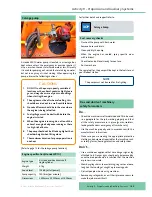
Propeller
Each Yamaha outboard engine is fitted with a Solas
stainless steel three bladed propeller.
The propeller is held on by a single castellated nut that
should only be tightened ‘finger tight’ (to facilitate
changing at sea), before passing a split pin through
the hole in the shaft. The pin is bent over to ensure it
stays in place.
The propeller has a moulded diverging ring designed to
produce an area of low pressure behind the propeller.
This prevents exhaust gases entering the work area of
the blades.
The propeller has a pressed rubber bush hub that is
designed to shear should the blades hit an immovable
object. This should prevent shock being transmitted into
the gearbox and powerhead.
SAFETY NOTICE
PROPELLERS CAN CAUSE SERIOUS INJURY
OR EVEN DEATH
KEEP WELL CLEAR WHILST ENGINE IS RUNNING
BOTH ASHORE OR AFLOAT
Propeller
Thrust
washer
Prop
shaft
Split pin
Spacer
Propellor
nut spacer
Propeller
nut
Trailing edge
Diverging ring
Hub
Blade root
Blade face
Leading edge
Blade tip
Blade back
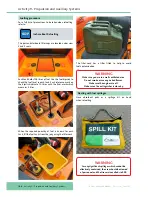
Propeller safety notice
From November 2016, A warning sticker must be fitted to
every RNLI outboard engine. This is the result of a number
of hazard observations regarding proximity of personnel to
outboard propellers, especially during wash-down.
Removal of the propeller
• Tilt the engine fully up.
• Remove the split pin.
• Remove the propellor nut.
• Remove the propeller.
Fitting a new propeller
• Apply marine grease (water-resistant grease) to the
propeller shaft.
• Slide the propeller (2) over the propeller shaft.
CAUTION
Make sure you install the thrust washer before
installing propeller. Failure to do so may cause
damage to the lower case and propeller boss.
• Tighten the propeller nut by hand, aligning the
castellated end with the hole in the propeller shaft.
CAUTION
You must only tighten the propeller nut by hand.
This is to ensure easy removal of the propeller in
an emergency situation.
• Insert a new split pin in the hole and bend the split pin
ends around the end of the propellor nut.
CAUTION
Make sure you use a new cotter pin and bend the
ends over securely. Failure to do this could risk the
propeller coming off during operation.
Summary of Contents for Atlantic 85
Page 1: ...B CLASS ATLANTIC 85 MANUAL...
Page 2: ......
Page 4: ......
Page 8: ......
Page 11: ...Activity 2 Personal Competencies Personal Competencies Activity 2...
Page 31: ...Activity 3 Launch and Recovery Launch and Recovery Activity 3...
Page 37: ...Activity 4 SAR Unit Handling and Seamanship SAR Unit Handling and Seamanship Activity 4...
Page 51: ...Activity 5 Search and Rescue Search and Rescue Activity 5...
Page 57: ...Activity 6 Communications Communications Activity 6...
Page 67: ...Activity 7 Navigation Navigation Activity 7...
Page 70: ......
Page 71: ...Activity 9 Propulsion and Auxiliary Systems Propulsion and Auxiliary Systems Activity 9...
Page 106: ......


