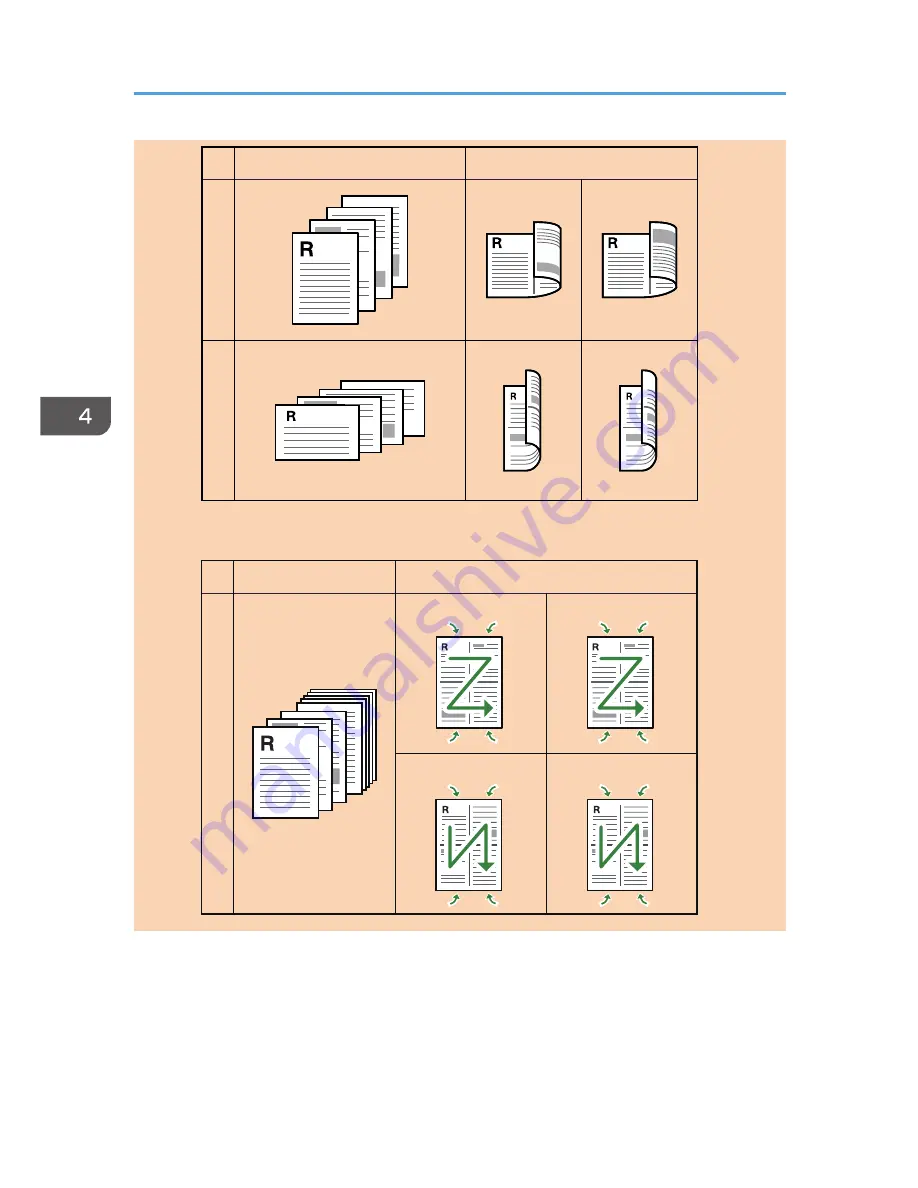
Ricoh SP 220SFNw User Manual Download Page 85

Portrait

Landscape

Original

Copy

Top to Top

Top to Bottom

Top to Top

Top to Bottom

CMF254

• 1Sd 8Orig->Comb 4on1 2Sd

8

7

6

5

8

6

7

5

6

5

8

7

7

5

8

6

Portrait

Original

Copy

Left to Right, Top to Top

Left to Right, Top to Bottom

Top to Bottom, Top to Top

Top to Bottom, Top to Bottom

DCT003

4. Copying Originals

84

opal-p3_mf3_com_user_guide_gb_00228444_eng.xml

Summary of Contents for SP 220SFNw

Page 1: ...For safe and correct use be sure to read Safety Information before using the machine User Guide...

Page 2: ...t Models 16 1 Guide to the Machine Guide to Components 17 Exterior 17 Exterior 21 Interior 22 Control Panel When Using SP 221S SP 220SNw or SP221SNw 22 Control Panel When Using SP 221SF SP 220SFNw or...

Page 3: ...ns of Paper Types 56 Non Recommended Paper Types 58 Paper Storage 59 Print Area 59 Placing Originals 62 Placing Originals on the Exposure Glass 62 Placing Originals in the Auto Document Feeder 62 Abou...

Page 4: ...Computer 91 Scanner Mode Screen 92 Registering Scan Destinations 93 Modifying Scan Destinations 98 Deleting Scan Destinations 99 Testing Transmission 99 Basic Operation of Scan to Folder 101 Step 1 Pr...

Page 5: ...ng Size According to the Size of the Original 125 Adjusting Image Density 125 Specifying Resolution 126 6 Sending and Receiving a Fax What You Can Do with the Fax Function 127 Fax Settings Workflow 12...

Page 6: ...172 Fax Transmission Features Settings 174 Fax Features Settings 176 Address Book Settings 181 System Settings 182 Tray Paper Settings 187 Administrator Settings 189 Printing Lists Reports 195 Printi...

Page 7: ...n Tab 216 DNS Tab 217 Auto E mail Notification Tab 218 SNMP Tab 218 SMTP Tab 219 POP3 Tab 220 Wireless Tab only SP 220SNw SP 221SNw SP 220SFNw and SP 221SFNw 221 Google Cloud Tab 222 Configuring the I...

Page 8: ...g the Print Cartridge 253 Cautions When Cleaning 255 Cleaning the Inside of the Machine 256 Cleaning the Exposure Glass 257 Cleaning the Auto Document Feeder When Using SP 221SF SP 220SNw SP 221SNw SP...

Page 9: ...Scanning Is Not Done As Expected 290 Fax Problems 291 When You Cannot Send or Receive Fax Messages As Wanted 291 When an error code appears on the fax journal or transmission status report 292 Common...

Page 10: ...y mainly Europe 314 Environmental Advice for Users mainly Europe 314 Notice To Wireless LAN Interface Users mainly Europe 315 Notes to users in the state of California Notes to Users in USA mainly Nor...

Page 11: ...MF Initial Guide for FAX only SP 221SF SP 220SFNw and SP221SFNw MF This manual explains how to set up the machine It also explains how to remove the machine from the packaging and how to connect it t...

Page 12: ...uring the Machine Using Utilities P For details about using Web Image Monitor see page 233 Using Web Image Monitor Printer driver 1 Click Help on the printing preferences dialog box For the procedure...

Page 13: ...kely causes of paper misfeeds damage to originals or loss of data Be sure to read these explanations Indicates supplementary explanations of the machine s functions and instructions on resolving user...

Page 14: ...ts Disclaimer To the maximum extent permitted by applicable laws in no event will the manufacturer be liable for any damages whatsoever arising out of failures of this machine losses of the registered...

Page 15: ...iguring the machine using Web Image Monitor You can configure the machine using Web Image Monitor without a password by factory default The setting for creating a password can be found in Administrato...

Page 16: ...F Not available Available Standard Available Standard Available Standard PCL driver Not available Available Not available Available Ethernet Port Network Not available Available Not available Availabl...

Page 17: ...lows you to store faxes in memory and print only the ones you want thus saving paper Paperless FAX refers to Reception File Processing and Notify Forward Status that can be specified using the machine...

Page 18: ...s MF Exterior DCT067 2 8 1 6 3 7 4 5 9 10 11 14 13 12 16 15 17 No Name Description 1 Exposure Glass Place originals here sheet by sheet 2 Control Panel Contains a screen and keys for machine control 3...

Page 19: ...ally This tray can hold up to 35 sheets of plain paper 11 Tray Cover Attach this cover when you extend the tray 12 ADF Cover Open this cover to remove originals jammed in the ADF 13 Rear Cover Open th...

Page 20: ...e Exposure Glass Open this cover to place originals on the exposure glass 6 Tray 1 This tray can hold up to 150 sheets of plain paper 8 Handset Enables you to use the machine as a telephone 10 Auto Do...

Page 21: ...face Connector For connecting a telephone line 15 USB Port For connecting the machine to a computer using a USB cable 16 Ethernet Port For connecting the machine to the network using a network interfa...

Page 22: ...er 6 Rear Cover Open this cover to deliver sheets face up or remove jammed paper 7 USB Port Use a USB cable to connect the printer to the host computer 8 Ethernet Port Use a network interface cable to...

Page 23: ...oner Paper End indicator flashes red For details about replacing the cartridge see page 253 Replacing the Print Cartridge MF Control Panel When Using SP 221S SP 220SNw or SP221SNw DSH107 1 2 3 4 5 6 7...

Page 24: ...key This indicator lights up blue when the machine is turned on It flashes when a print job is received and during printing scanning or fax transmission reception 12 Wi Fi Direct key only SP 220SNw an...

Page 25: ...Description 1 On Hook Dial key Press to use on hook dialing to check the destination s status when sending a fax 2 Address Book key Press to select a scan or fax destination from the Address Book 3 Im...

Page 26: ...display the last used scan or fax destination 16 Shift key Press to use the Quick Dial numbers 5 to 8 when specifying a scan or fax destination using the One Touch buttons 17 Wi Fi Direct key only SP...

Page 27: ...ings and specified values or to move to the next menu level 25 Start key Press to start fax transmission reception scanning or copying P Control Panel This section introduces the names of the parts of...

Page 28: ...lights blue when the network is connected 4 Stop key Press this key once to pause a job that is currently printing To cancel a job press it again 5 Start key Press to restart the printing job 6 Data...

Page 29: ...inting a list of the machine s configurations or about doing a test print using Smart Organizing Monitor see page 246 Using Smart Organizing Monitor 1 Guide to the Machine 28 opal p3_mf3_com_user_guid...

Page 30: ...DSH140 Function Priority By default copy mode is selected when the machine is turned on or if the preset System Auto Reset Timer time passes with no operation while the initial screen of the current...

Page 31: ...Printing a fax received in the machine s memory Printing Receiving a LAN Fax job from a computer LAN Fax transmission Scanning a fax into the machine s memory before transmission Fax memory transmissi...

Page 32: ...ory Scanning 1 Scanning a fax into the machine s memory before transmission Fax immediate transmission Fax memory transmission Receiving a LAN Fax job from a computer LAN Fax transmission Printing Sca...

Page 33: ...l at the same time especially when scanning multiple pages using the exposure glass If you try to use a function that cannot be performed simultaneously you will hear a beep sound from the machine or...

Page 34: ...nd then press the OK key 5 Press the or key to select the setting you want to configure and then press the OK key 6 Press the User Tools key to return to the initial screen A password for accessing th...

Page 35: ...Function Assigned to the Short Cut Key 1 Press the Shortcut to Func key DSH141 The function assigned to the Shortcut to Func key is displayed 1 Guide to the Machine 34 opal p3_mf3_com_user_guide_gb_00...

Page 36: ...Press Pause Press the Pause Redial key P appears on the screen Space Press the key To enter a name Letters numbers and symbols can be entered using the number keys To enter two characters consecutivel...

Page 37: ...too small for the setting it will not be accepted If you press the OK key the machine will increase or decrease the number to the minimum or maximum value for the setting 1 Guide to the Machine 36 opa...

Page 38: ...on your computer from the included CD ROM before using it Using Smart Organizing Monitor you can check the machine s status configure its settings and use other functions For details about how to use...

Page 39: ...1 Guide to the Machine 38 opal p3_mf3_com_user_guide_gb_00228422_eng xml...

Page 40: ...oad paper into the paper tray P 2 Specify the paper type and size using Web Image Monitor or Smart Organizing Monitor P 3 Specify the paper type and size on the printer driver For details about the pr...

Page 41: ...e page 54 Specifying Paper Type and Paper Size Using the Printer Driver For details about supported paper see page 55 Supported Paper 2 Paper Specifications and Adding Paper 40 opal p3_mf3_com_user_gu...

Page 42: ...per type for the bypass tray and Tray 1 When printing a document specify the paper size and paper type and select the paper tray in the printer driver so that the settings configured when paper is loa...

Page 43: ...DCT031 When loading A5 SEF A4 or letter size paper align the paper guide to the following position DCT871 4 Fan the paper before loading it in the tray 5 Load the new paper stack print side down Make...

Page 44: ...s both side and end paper guides DCT049 7 Carefully push Tray 1 straight into the machine DCT011 To avoid paper jams make sure the tray is securely inserted To deliver the sheets face up open the rear...

Page 45: ...Tray 1 to load paper This section explains how to load paper longer than A4 297 mm into the machine 1 Remove the tray cover by pushing its center DSG116 2 Pull Tray 1 out slowly and then remove it usi...

Page 46: ...aligned You can adjust the length of the extender in three steps When using A5 SEF A4 or letter size paper adjust the length to the position indicated by the mark in the tray DCT042 When using legal...

Page 47: ...than A4 must be loaded without attaching the tray cover only Loading Paper into the Bypass Tray MF Do not load paper in the bypass tray unless the message Ready is displayed P Do not load paper in th...

Page 48: ...d load paper with the print side up and then push in until it stops against the machine DCT013 3 Adjust the side guides to the paper width DCT014 To deliver the sheets face up open the rear cover Load...

Page 49: ...DCT037 Sheets can be delivered face down from the output tray without opening the rear cover 2 Paper Specifications and Adding Paper 48 opal p3_mf3_com_user_guide_gb_00228426_eng xml...

Page 50: ...er type size error is detected The printing restarts automatically with the settings made with the control panel after about ten seconds For details about Auto Continue see page 182 System Settings Sp...

Page 51: ...Tools key to return to the initial screen You can press the Back key to exit to the previous level of the menu tree Specifying a Custom Paper Size This section describes how to specify a custom paper...

Page 52: ...or key to select mm or inch and then press the OK key 6 Enter the width using number keys and then press the OK key To enter a decimal point press 7 Enter the length using number keys and then press...

Page 53: ...ick OK The default access code is Admin 8 Select the paper type and paper size and then click OK 9 Click Close Specifying a Custom Paper Size 1 On the Start menu click All Programs 2 Click Smart Organ...

Page 54: ...tray 4 Enter the administrator password if required 5 Click OK 6 Close the web browser Specifying a Custom Paper Size 1 Start the web browser and access the machine by entering its IP address 2 Click...

Page 55: ...ing Preferences dialog box from the printer driver For information of how to open the printer driver properties from Devices and Printers see page 70 Displaying the Printing Preferences Dialog Box 2 C...

Page 56: ...ze Weight Capacity Plain Paper Recycled Thick Paper 1 Thin Paper Letterhead Preprinted Paper Prepunched Paper Bond Paper Cardstock Color Paper A4 81 2 11 B5 JIS B6 JIS A5 LEF A5 SEF A6 81 2 14 81 2 13...

Page 57: ...ecommended paper contact your sales or service representative Plain Paper Item Description Paper thickness 65 to 99 g m2 17 to 27 lb Supported paper tray Tray 1 and bypass tray Thick Paper 1 Item Desc...

Page 58: ...r 1 Thick Paper 1 or Thick Paper 2 Preprinted Paper Item Description Paper thickness 75 to 90 g m2 20 to 24 lb Supported paper tray Tray 1 and bypass tray Notes If the paper thickness is outside the s...

Page 59: ...d range select Thin Paper Plain Paper 1 Thick Paper 1 or Thick Paper 2 Cardstock Item Description Paper thickness 100 to 130 g m2 27 to 35 lb Supported paper tray Tray 1 and bypass tray Notes If the p...

Page 60: ...er is exposed Paper with clips or staples When loading paper take care not to touch the surface of the paper Even if paper is adequate for the machine poorly stored paper can cause paper misfeeds prin...

Page 61: ...direction 3 Approx 4 2 mm 0 2 inches 4 Approx 4 2 mm 0 2 inches MF Copier function MF CHZ904 2 3 3 1 4 4 1 MF Print area 2 MF Feed direction 3 MF Approx 4 0 mm 0 2 inches 2 Paper Specifications and A...

Page 62: ...CHZ904 2 3 3 1 4 4 1 MF Print area 2 MF Feed direction 3 MF Approx 4 2 mm 0 2 inches 4 MF Approx 2 0 mm 0 08 inches The print area may vary depending on the paper size printer language and printer dri...

Page 63: ...in the ADF and on the exposure glass Because colors made by marker or highlighter pen on originals are difficult to reproduce they might not appear on copies 1 Lift the ADF Be careful not to hold the...

Page 64: ...he cover of the input tray for the ADF and adjust the guides according to the size of the original DPH050 2 Place the aligned originals face up in the ADF The last page should be on the bottom DPH051...

Page 65: ...ginal might be damaged or become jammed or result in gray or black lines appearing on prints Originals larger or heavier than recommended Stapled or clipped originals Perforated or torn originals Curl...

Page 66: ...S107 Margins when using exposure glass In copier mode In scanner mode In fax mode Top 4 mm 0 mm 0 mm Right 3 mm 0 mm 0 mm Left 3 mm 0 mm 0 mm Bottom 3 3 mm 0 mm 0 mm Margins when using ADF In copier m...

Page 67: ...2 Paper Specifications and Adding Paper 66 opal p3_mf3_com_user_guide_gb_00228431_eng xml...

Page 68: ...print documents What You Can Do with the Printer Function Combined printing You can consolidate multiple pages and print them on a single sheet This saves paper and documents require less shelf space...

Page 69: ...protocol is used When using the IPP protocol the IPP port name must include the IP address When connected with USB The machine must be connected to the computer s USB port using the USB interface cab...

Page 70: ...ection describes how to set up option and setting of paper size for each tray on your computer manually The following procedure is explained using Mac OS X 10 11 as an example 1 Start System Preferenc...

Page 71: ...this dialog box are used as the default 1 On the Start menu click Devices and Printers 2 Right click the icon of the printer you want to use 3 Click Printing Preferences Displaying the Printing Prefe...

Page 72: ...Using Mac OS X The following procedure is explained using Mac OS X 10 11 as an example 1 Open the document to print 2 Select Print on the File menu 3 Check that the machine name or IP address you are...

Page 73: ...nting stops after the current page has been printed out After the jammed paper is removed printing restarts from the jammed page automatically For details about how to remove the jammed paper see page...

Page 74: ...hed paper If the paper is too small for the print job the printed image will be cropped 1 If the error message is displayed press FormFeed P Continuing printing using mismatched paper If the paper is...

Page 75: ...a few pages before being canceled It may take a while to cancel a large print job MF Canceling a print job while printing 1 Press the Clear Stop key DSH144 P Canceling a print job while printing 1 Pre...

Page 76: ...multiple pages onto a single sheet This saves paper and documents require less shelf space for storage For details about the settings see page 82 Making Combined 2 sided Copies ID card copying ID car...

Page 77: ...t status or messages Displays the current status or messages 2 Current settings Displays the current tray reproduction ratio and scan settings 3 Selection key items Displays the functions you can use...

Page 78: ...e number keys 4 Press the Start key DSH147 The maximum number of copies is 99 You can change the paper tray for the current job by pressing the or key You can also select to change the paper tray auto...

Page 79: ...ing jam occurs in the ADF copying is canceled immediately In this case copy the originals again starting from the jammed page For the direction to remove the jammed paper see page 273 Clearing Misfeed...

Page 80: ...2 Press the Clear Stop key DSH144 Basic Operation of Copying opal p3_mf3_com_user_guide_gb_00228442_eng xml 79...

Page 81: ...a customized ratio Preset ratio CES103 mainly Europe and Asia 50 71 82 93 122 141 200 400 mainly North America 50 65 78 93 129 155 200 400 50 71 82 93 122 141 200 400 Custom ratio CES106 25 to 400 in...

Page 82: ...m For Reduce or Enlarge press the or key to select the desired ratio For Zoom specify the desired ratio using the number keys 3 Press the OK key Making Enlarged or Reduced Copies opal p3_mf3_com_user_...

Page 83: ...on the exposure glass To use this function the paper size used for printing copies must be set to A4 Letter or Legal There are following copy modes Select a copy mode according to your original and h...

Page 84: ...th sides In this mode a multiple page original is combined and printed on both sides of paper 1 Sided Orig 2 Sided Copy Portrait Landscape Original Copy CMF260 Top to Top Top to Bottom Top to Top Top...

Page 85: ...Bottom CMF254 1Sd 8Orig Comb 4on1 2Sd 8 7 6 5 8 6 7 5 6 5 8 7 7 5 8 6 Portrait Original Copy Left to Right Top to Top Left to Right Top to Bottom Top to Bottom Top to Top Top to Bottom Top to Bottom D...

Page 86: ...to Top Top to Bottom Top to Bottom DCT004 2 sided copy In this mode one sided pages are printed on the front and back sides of paper without being combined Portrait Landscape Original Copy CMF260 Top...

Page 87: ...Combine 4 Press the or key to select the desired copy mode and then press the OK key 5 Press the or key to select paper orientation and page order and then press the OK key The screen will show the se...

Page 88: ...posure glass not when it is set in the ADF To use this function the paper size used for printing copies must be set to A6 A5 A4 Half Letter or Letter Printed paper size Scanned paper size A4 A5 148 21...

Page 89: ...tart key A message prompting you to place the original back side down on the exposure glass appears on the display 5 Place the original on the exposure glass back side down and with the top to the rea...

Page 90: ...th a specific density level For details see page 168 Copier Features Settings Selecting the Document Type According to Original There are three document types Mixed Select this when the original conta...

Page 91: ...1 Press the Image Quality key DSH148 2 Press the or key to select the desired document type and then press the OK key You can change the machine s default Original Type setting to always make copies w...

Page 92: ...or details see page 101 Basic Operation of Scan to Folder Send Scanned Documents by E mail You can use this function to scan handwritten materials such as meeting materials to distribute as a file att...

Page 93: ...3 2 1 Current status or messages Displays the current status or messages 2 Current settings Displays the current scanning mode and scan settings When Specify Dest is displayed Scan to E mail Scan to...

Page 94: ...ination information In such cases after registering destinations check that the user name and password are correctly entered by sending test documents to those destinations The Address Book can contai...

Page 95: ...in up to 64 characters Subject Required Subject of the e mail Can contain up to 64 characters Sender s Name Optional Name of e mail sender The name specified here will be shown under From or a similar...

Page 96: ...ecify the image density by clicking the right or left buttons is the lightest and is the darkest Scan to FTP Settings Item Setting Description Quick Dial Number Optional Select when setting the destin...

Page 97: ...haracters Directory Optional Name of the FTP server directory where scanned files are stored Can contain up to 64 characters Notification E mail Address Optional E mail address to which a notification...

Page 98: ...der can contain up to 32 characters Domain Optional Specify the name of the domain to which the computer belongs Can contain up to 15 characters Login User Name Optional User name for logging in to th...

Page 99: ...s is the lightest and is the darkest To send files via e mail SMTP and DNS settings must be configured properly If you are using the Scan to E mail function select a time zone according to your geogra...

Page 100: ...b browser and access the machine by entering its IP address 2 Click Scan Destination 3 Click the E mail Address FTP or Folder tab 4 Select the entry to delete and then click Delete 5 Confirm that the...

Reviews: