Ricoh PRIPORT JP1210 Operating Instructions Manual Download Page 68

Optional Functions

48

2

F

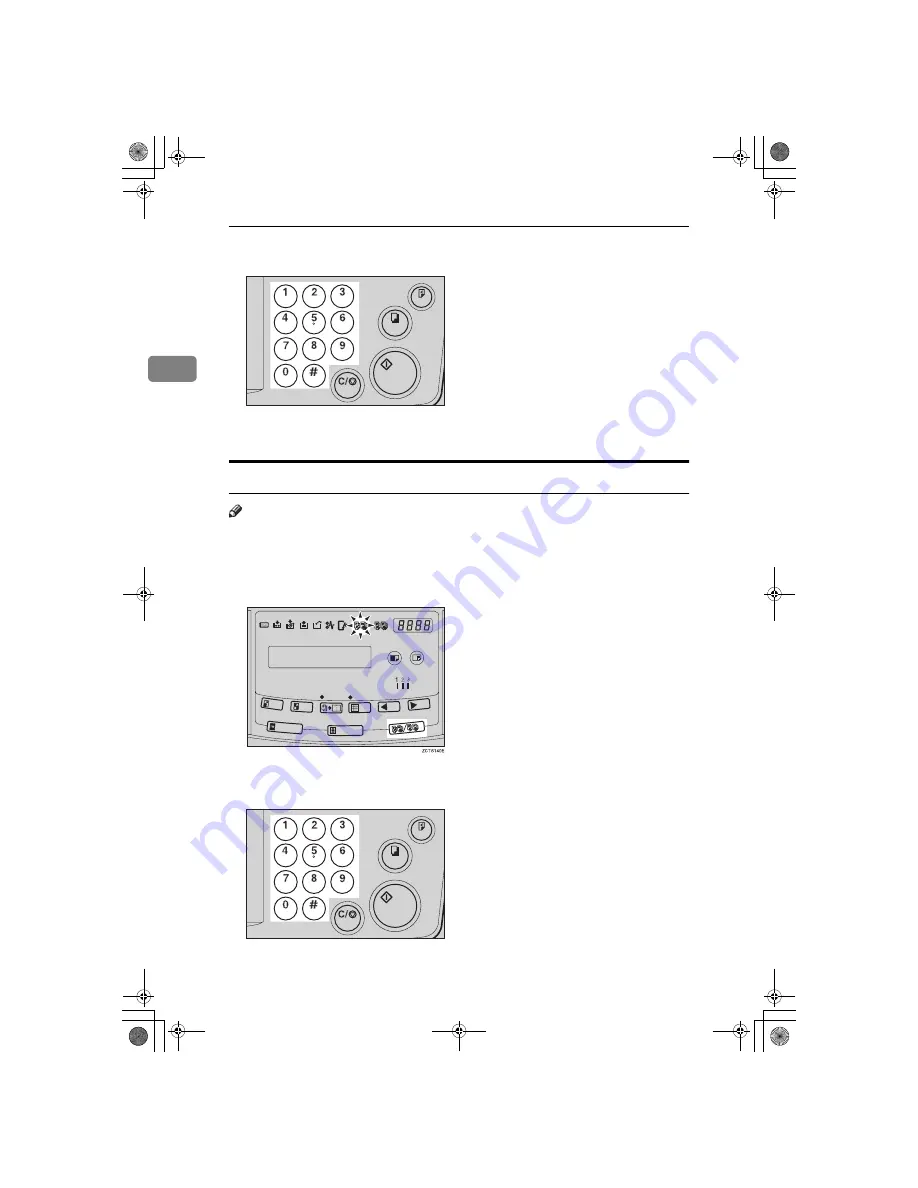
Enter the number of prints with the number keys.

G

Make your prints.

Memory Mode with the Document Feeder

Note

To prevent original misfeeds, do not set originals of different sizes.

Do not set more than 30 originals at one time in the optional 30 originals doc-
ument feeder.

A

Press the 

{{{{

Memory/Class

}}}}

 key to light the Memory indicator.

B

With the number keys, enter the desired number of prints for the first orig-
inal.

TSLS011E

TSLS011E

SilverV-gb.book  Page 48  Monday, May 15, 2000  3:32 PM

Summary of Contents for PRIPORT JP1210

Page 1: ...ing Instructions Read this manual carefully before you use this product and keep it handy for future reference For safety please follow the instructions in this manual SilverV gb book Page 1 Monday Ma...

Page 2: ...GmbH Mergenthalerallee 38 40 65760 Eschborn Phone 49 0 6196 9060 France RICOH FRANCE S A 383 Avenue du G n ral de Gaulle BP 307 92143 Clamart Cedex Phone 33 0 1 40 94 38 38 Spain RICOH ESPA A S A Avd...

Page 3: ...names of the machines do not appear in the following pages Check the type of your ma chine before reading this manual LG drum Not Available A4 drum JP1210 B4 drum JP1250 Certain types might not be ava...

Page 4: ...MC Directive 89 336 EEC and the Low Voltage Directive 73 23 EEC In accordance with IEC 60417 this machine uses the following symbols for the main switch a a a a means POWER ON b b b b means POWER OFF...

Page 5: ...njury or damage to property Connect the power cord directly into a wall outlet and never use an ex tension cord Disconnect the power plug by pulling the plug not the cable if the power cable or plug b...

Page 6: ...mall metallic objects to fall inside the equipment For environmental reasons do not dispose of the equipment or expended supply waste at household waste collection points Disposal can take place at an...

Page 7: ...Be sure to read the instructions all of which are described in the Safety Information section The statements above are notes for your safety Important If this instruction is not followed paper might...

Page 8: ...Position Adjusting the Print Image Density See P 11 Adjusting the Print Image Density Halftone Printing See P 12 Tint Mode Halftone Printing Making Clear Prints See P 13 Use the Fine key to make clear...

Page 9: ...nals Printing on Thick or Thin Paper See P 23 Printing on Thick or Thin Paper Selecting Original Type See P 24 Selecting Original Type Saving Ink See P 25 Economy Mode Saving Ink Printing from Several...

Page 10: ...ee P 37 Skip Feed Printing Storing Your Print Settings in Memory See P 38 Program Storing Your Print Settings in Memory Printing Secret Documents See P 42 Security Mode Printing Secret Documents Makin...

Page 11: ...nit when installing the master 5 Feed roller pressure lever Use to adjust the contact pressure of the paper feed roller according to paper thickness 6 Paper feed side plates Use to prevent paper skew...

Page 12: ...side plates Use to align the prints on the paper deliv ery tray 3 Paper delivery end plate Use to align the leading edge of prints 4 Paper delivery tray Completed prints are delivered here 5 Main swi...

Page 13: ...Options 30 Originals document feeder Note Other options Colour Drum LG drum Colour Drum A4 drum Colour Drum B4 drum Tape Dispenser Key Counter TSLP015E SilverV gb book Page ix Monday May 15 2000 3 32...

Page 14: ...ore of these functions is selected even if the cover is lowered 6 Skip Feed key Press to select skip feed printing See P 37 Skip Feed Printing 7 Center Edge Erase key Press to print book originals tha...

Page 15: ...ly See P 26 Auto Cycle Printing from Several Originals at Once 19 Proof key Press to make proof prints 20 W W W W and V V V V keys Speed keys Press to adjust the printing speed See P 14 Changing the P...

Page 16: ...ator Shows the number entered in Memory or Class mode 3 Speed indicators These indicators show the printing speed that is selected 4 Counter Displays the number of prints entered While printing it sho...

Page 17: ...ou Want to Stop the Machine during the Multi print Run and Print the Next Original 15 When You Want to Change the Number of Prints Entered or Check the Completed Prints 15 Preset Reduce Enlarge Reduci...

Page 18: ...Programs 57 Changing the Settings of Service Programs 58 Service Program Menu 59 User Codes 66 How to Set User Code Mode 120 66 How to Use User Code Mode 67 How to Check the User Code Counter 121 68...

Page 19: ...r the Paper Delivery Tray 101 Poor Printing 102 Dirt on the Back Side of Paper 102 Dirt on the Front Side of Paper Black Line Stain 104 White Prints or Incomplete Prints 105 6 Remarks Operation Notes...

Page 20: ...xvi SilverV gb book Page xvi Monday May 15 2000 3 32 PM...

Page 21: ...n the same stack Buckled or curled paper Low stiffness paper Correct curls in the paper before setting it in the machine When you cannot cor rect the paper curl stack the paper with the curl face down...

Page 22: ...kness of the paste up original is more than 0 1mm and the space between the pasted parts is less than 2mm 0 08 a shadow might appear on the prints If you use originals that have bold letters or solid...

Page 23: ...Paper Feed Side Plates Lock Le ver C Place the paper on the paper feed tray Note Correct the paper curl before setting the paper If you cannot do so stack the paper with the curl face down as shown D...

Page 24: ...ack see P 101 When the Prints are Thrown Over the Paper Delivery Tray B Lift the paper delivery side plates and adjust them to the paper size C Lift the paper delivery end plate and move it to match t...

Page 25: ...de This ma chine however scans in your original once and makes multiple prints from this master This chapter describes the basic pointing operations that your ma chine is capable of A Lift the platen...

Page 26: ...the Print Image Density F Enter the number of prints re quired with the number keys Note Up to 9999 prints can be entered at one time To change the number entered press the Clear Stop key and enter t...

Page 27: ...tray will lower B Turn off the main switch C Close the paper feed tray D Move the end plate until the plate handle is flush with the end of the tray E Lower the end plate F Move the side plates to the...

Page 28: ...s Energy Saver key for three seconds the panel display turns off and the machine enters Energy Saver mode When you press the Clear Modes Energy Saver key again the machine returns to the ready con dit...

Page 29: ...ge Position Forward or Backward Paper feed direction A Press the left Image Position key to move the image forwards the right key to move it backwards Note When you shift the image for wards leave a m...

Page 30: ...g the image to the right Shifting the image to the left Note The image position can be shift ed up to about 10mm 0 4 each way Each division on the scale is 2mm 0 08 B Adjust the paper delivery side pl...

Page 31: ...e image density using the W W W W or V V V V key Before Making a Master A Use the Image Density key before pressing the Start key After Making a Master A Press the W W W W or V V V V key To in crease...

Page 32: ...he Start key D Check the image position of the trial or proof print Note If the image position is not cor rect adjust it using the Image Position keys see P 9 Ad justing the Print Image Position or th...

Page 33: ...Start key Check the image position of the trial or proof print Note If the image position is not cor rect adjust it using the Image Position keys see P 9 Ad justing the Print Image Position or the si...

Page 34: ...o increase the speed and press the W W W W key to re duce the speed Note The following speeds are avail able Setting 1 80 sheets minute Setting 2 100 sheets minute Setting 3 130 sheets minute As a def...

Page 35: ...the number of prints and press the Start key When You Want to Change the Number of Prints Entered or Check the Completed Prints A Press the Clear Stop key B Change the number of prints or check the co...

Page 36: ...r printing paper With some ratios parts of the image might not be printed or margins will appear on prints Prints can be reduced or enlarged as follows Reduction Metric version 1 Select this ratio whe...

Page 37: ...Start key E Check the image position of the trial or proof print Note If the image position is not cor rect adjust it using the Image Position keys see P 9 Shift ing the Print Image Position For ward...

Page 38: ...using Service Program mode See P 59 Service Program Menu The margin width to be erased can be adjusted with Service Program mode See P 59 Service Program Menu A Press the Center Edge Erase key twice...

Page 39: ...of the trial or proof print Note If the image position is not cor rect adjust it using the Image Position keys see P 9 Ad justing the Print Image Position or the side tray fine adjusting dial see P 1...

Page 40: ...ith Service Program mode See P 59 Service Program Menu A Press the Center Edge Erase key to select Edge Erase mode Check Indicator is blinking and is shown in the guidance dis play Note To cancel this...

Page 41: ...is not cor rect adjust it using the Image Position keys see P 9 Ad justing the Print Image Position or the side tray fine adjusting dial see P 10 Shifting the Print Image Position to the Right or Left...

Page 42: ...shadow of pasted originals follow the steps be low A Set the original on the exposure glass B Press the Paste Shadow Erase key C Press the Start key D Enter the number of prints with the number keys E...

Page 43: ...Thick paper position When you use paper heavier than 52 3g m2 13 9 lb and light er than 127 9g m2 34 0 lb posi tion pressure lever to the Standard paper position When you use paper heavier than 47 1g...

Page 44: ...o tographs the letter will appear lighter To avoid this select Let ter Photo mode with the Type of Original key A Press the Type of Original key to select Photo mode B Press the Image Density key to a...

Page 45: ...ss or in the optional document feeder C Press the Start key D Check the image position of the trial or proof print Note If the image position is not cor rect adjust it using the Image Position keys se...

Page 46: ...rinting group A Set the original on the exposure glass or in the optional document feeder Note You can set up to 30 originals into the optional document feeder B Enter the number of prints re quired w...

Page 47: ...re printed when you set originals on the expo sure glass If you set originals into the op tional document feeder origi nals are fed and prints are completed automatically After the last page of each s...

Page 48: ...ng groups on the paper delivery tray Up to 20 sets of prints can be select ed for one original A Press the Memory Class key to light the Class indicator B With the number keys enter the number of prin...

Page 49: ...adjusting dial see P 10 Shifting the Print Image Po sition to the Right or Left I Make your prints Note After the last page of each print ing set is fed out to the paper de livery tray the tape dispen...

Page 50: ...rinting groups on the paper delivery tray A Press the Memory Class key to light the Memory indicator B With the number keys enter the desired number of prints for the first original C Press the q q q...

Page 51: ...20 originals the memory number returns to 1 It is not necessary to press the q key G Set the first original face down on the exposure glass Note Set originals one sheet at a time in the same order tha...

Page 52: ...Print key Note After the first set is fed to the pa per delivery tray the optional tape dispenser drops a strip of paper on the top of the paper stack M After the first set is completed set the secon...

Page 53: ...tion ratios used Metric version Inch version If the master length of the first original is longer than the maxi mum allowable length or shorter than the minimum allowable length Combine Copies mode is...

Page 54: ...plates touch the paper lightly when using the Combine Copies function If they do not the two original images will not appear at the proper position on the prints Reference For how to use the optional...

Page 55: ...sounds after the first original is on the master Set the second original face down E Press the Start key F Check the image position of the trial or proof print Note If the image position is not cor re...

Page 56: ...Operation 36 1 G Enter the number of prints with the number keys H Make your prints TSLS011E SilverV gb book Page 36 Monday May 15 2000 3 32 PM...

Page 57: ...ile holding down the Skip Feed key select the number of rotations of the drum while one sheet of paper is fed with the number keys Note You can select from 1 to 9 rota tions The beeper sounds after yo...

Page 58: ...s you want to put into memory B Press the Program key Numbers already containing a program are displayed on the guidance display C Enter 0 with the number key D Press the q q q q key Note The program...

Page 59: ...Press the q q q q key Recalling a Program A Press the Program key Note Numbers already containing a program are displayed on the guidance display B Select the program number you want to recall with th...

Page 60: ...r Stop key press the Program key B Enter 1 with the number keys C Press the q q q q key Note The numbers of the programs which are not protected will be displayed in the guidance dis play D Select the...

Page 61: ...key B Enter 0 with the number key C Press the q q q q key Note If no program number is pro tected the machine returns to the ready condition D Select the program number you want to remove protection...

Page 62: ...ter making your prints so that nobody can access that master again A Make your prints B Hold down the Security key for at least 5 seconds Note If you press the Proof key or the Print key after setting...

Page 63: ...ically Document Feeder Exterior 1 Original tray Original used to make masters are deliv ered to this tray 2 ADF unit Feeds the original to the master making position 3 Original guides Adjust these gui...

Page 64: ...ted for ring binders Book originals Originals written with a pencil or ball point pen Originals smaller than 148mm 105mm 5 8 4 1 Originals larger than 257mm 364mm 10 2 14 4 Folded curled creased origi...

Page 65: ...first A Adjust the guide to the original size B Insert the aligned originals face up in the document feeder until they stop Limitation Approximately 30 originals 64g m2 17 lb can be inserted at one ti...

Page 66: ...eted Check the image position of the trial print of the next original If necessary make proof prints using the Proof key to check the image position again Combine Copies with the Document Feeder A Ins...

Page 67: ...is not correct adjust it using the Image Position keys see P 9 Shifting the Print Image Position Forward or Backward or the side tray fine adjusting dial see P 10 Shifting the Print Image Position to...

Page 68: ...l misfeeds do not set originals of different sizes Do not set more than 30 originals at one time in the optional 30 originals doc ument feeder A Press the Memory Class key to light the Memory indicato...

Page 69: ...nts for each group in memory Simply select Auto Cycle mode and enter the desired number of prints once D Set your originals face up into the document feeder Note When you use the optional 30 originals...

Page 70: ...the Print Image Position Forward or Backward or the side tray fine adjusting dial see P 10 Shifting the Print Image Position to the Right or Left G Turn on the optional tape dispenser power switch H P...

Page 71: ...51 2 I Press the Print key Note After the last page of each set is fed out to the paper delivery tray the tape dispenser drops a strip of paper on the top of the paper stack The next cy cle begins TSL...

Page 72: ...in the guidance display B Press the Start key C Check the image position of the trial or proof print Note If the image position is not cor rect adjust it using the Image Position keys see P 9 Shift in...

Page 73: ...he drum unit from the machine while holding the upper drum stay Note Be careful not to let the drum unit fall F Insert the colour drum unit along the guide rail G Slide in the drum unit until it locks...

Page 74: ...urs at one time A Prepare the two originals Set the first original on the exposure glass B Press the Start key C Check the image position of the trial or proof print Note If the image position is not...

Page 75: ...et them on the paper feed tray again as shown in the illustration G Exchange the drum unit See P 52 Changing the colour Drum Unit H Set the second original and press the Start key I Check the image po...

Page 76: ...Optional Functions 56 2 SilverV gb book Page 56 Monday May 15 2000 3 32 PM...

Page 77: ...he guidance display Note If you press the wrong key try pressing the above keys from the beginning C With the number keys enter the desired service program number SP No Reference For the SP No see P 5...

Page 78: ...idance display Note If you designate the wrong SP No press the Clear Modes Energy Saver key Then re enter the desired SP No B Enter the desired value or mode with the number keys C Press the q q q q k...

Page 79: ...hether the optional tape dispenser can be used Note Default 0 Adjustment value 0 No 1 Yes 10 Min Print Specifies the minimum number of prints that can be input with the number keys Note Default 0 Adju...

Page 80: ...F Note Default 0 Adjustment value 0 No 1 Yes 21 Prints Master Cost The optional key counter usually counts the number of prints made regardless of the number of masters used For accounting purposes it...

Page 81: ...ails about Combine Copies see P 33 Combine Combining 2 Originals onto One Print 29 Pht Backgrnd Cor rect When you make prints in Photo or Letter Photo mode the background of the prints might become di...

Page 82: ...ion the bold let ter or solid images might be light Note Default 1 Adjustment value 0 to 3 times 82 Skip Feed No When you use the Skip Feed Printing function you can select how many times the drum rot...

Page 83: ...nds after one set of prints are completed in Memory mode and Class mode This gives you the chance to separate each set when you do not have an optional tape dispenser For example you can remove prints...

Page 84: ...r code Note M Number of masters P Number of prints 122 Clear UC Count Clear each user code counter Note Default 0 Adjustment value 0 No 1 Yes 123 Total UC Count Display the total number of masters and...

Page 85: ...Erase mode Note Default Metric version 10mm Inch version 0 4 Adjustable value Metric version 4 60mm Inch version 0 2 2 3 162 Horizontal Ers Adjust the default horizontal edge top and bottom margin in...

Page 86: ...237 228 219 Note To prevent unauthorized users from accessing the machine note down the codes and then black out the codes from this manual How to Set User Code Mode 120 The following procedure expla...

Page 87: ...user code with the number keys then press the q q q q key B Make your prints C After you have finished press the Clear Stop key while holding down the Clear Modes Energy Sav er key Note This prevents...

Page 88: ...er key B Hold down the Clear Stop key for at least 3 seconds C Enter 121 with the number keys and press the q q q q key The number of masters and prints made under the user code 382 will be displayed...

Page 89: ...y B Hold down the Clear Stop key for at least 3 seconds C Enter 122 with the number keys and press the q q q q key D Keep pressing the q q q q key until desired user code is displayed E Enter 1 Yes wi...

Page 90: ...p key for at least 3 seconds C Enter 123 with the number keys and press the q q q q key The total number of masters and prints made under all user codes will be displayed in the guidance display M Num...

Page 91: ...n the Clear Stop key for at least 3 seconds C Enter 124 with the number keys and press the q q q q key D Enter 1 Yes with the number keys and press the q q q q key E Press the Clear Modes Energy Sav e...

Page 92: ...Service Program Mode 72 3 SilverV gb book Page 72 Monday May 15 2000 3 32 PM...

Page 93: ...un to replenish paper B Press the Paper Feed Tray Down key Note The paper feed tray will lower without the key being pressed when the printing paper runs out The top sheet might remain be tween the fe...

Page 94: ...ed side plates to match the paper size 1 Paper Feed Side Plates Lock Le ver C Place the paper on the paper feed tray Note Correct any paper curl before setting the paper Make sure that the side plates...

Page 95: ...inse immediately in running water In the case of any abnormal symptoms consult a doctor Keep the ink or ink container out of the reach of children If ink is ingested force vomiting by drinking a stron...

Page 96: ...until it clicks Note Always supply ink of the same colour Make sure to firmly insert the part indicated by the arrow mark into the guide F Close the front door The machine will start idling to supply...

Page 97: ...e right side cover C Open the plotter cover D Remove the used master roll and pull out both spools Then insert both spools into a new master roll Note When the Master End indicator lights it is necess...

Page 98: ...ll as shown Note Rotate the spools backward to take up any slack in the master G Close the plotter cover H Close the right side cover I Return the original tray to its orig inal position TSLH01UE TSLH...

Page 99: ...ote Make sure that the tape is in stalled in the proper direction If it is not in the correct direction the tape dispenser will not work correctly C Feed the leading edge of the roll in the dispensing...

Page 100: ...Replenishing Supplies 80 4 SilverV gb book Page 80 Monday May 15 2000 3 32 PM...

Page 101: ...D JAM REMOVE JAMMED PAPER REMOVE JAMMED PAPER P 87 x PAPER FEED JAM RE MOVE JAMMED PAPER x MASTER FEED JAM REMOVE JAMMED MASTER REMOVE JAMMED MASTER P 90 x MASTER FEED JAM REMOVE JAMMED MASTER x PAPER...

Page 102: ...THE COVER Close the original tray unit Close the front door P 97 When the Open Cover Unit In dicator M Lights CLOSE THE PLOTTER COVER Close the right side cover and the plotter cover CLOSE THE ADF COV...

Page 103: ...case turn off the main switch and wait for a while Guidance Display Meaning RE ENTER COPY NUMBER MAXIMUM IS XXX The maximum number of prints that can be entered is specified by the Service Program mo...

Page 104: ...are cleared After clearing misfeeds Press the Clear Modes Energy Saver key to reset the error indicators x x x x ORIGINAL JAM REMOVE ORIGINAL Note These indicators will light when your machine is equ...

Page 105: ...original from the side of the original tray and remove the original D If you still cannot remove the misfed paper press the ADF open lever and open the ADF unit to remove the original E Close the ADF...

Page 106: ...originals Bound stapled or clipped originals OHP transparencies Translucent paper Pasted originals Note If you use paste up originals make sure the pasted parts hold firmly to the base sheet and press...

Page 107: ...owly but firmly pull out the paper Paper is wrapped around the drum A Pull out the drum unit B Remove the misfed paper Be careful not to cut yourself on any sharp edges when you reach inside the machi...

Page 108: ...put the lever back in place D Close the front door To prevent paper misfeeds If the paper is curled or the originals leading edge margin is too narrow the fol lowing action is necessary When you use...

Page 109: ...wn as shown When the leading edge margin of the original is less than 5mm 0 2 or there is a solid image on the leading edge insert the original with the widest mar gin first or make a leading edge mar...

Page 110: ...REMOVE JAMMED MASTER A Open the original tray Note Lift the original tray release lever and slide the original tray all the way to the left B Open the right side cover C Open the plotter cover TSLH01...

Page 111: ...t see P 52 Changing the colour Drum Unit E If the original misfeeds in the optional document feeder press the ADF open lever and open the ADF unit to remove the misfed sheet F Return the original tray...

Page 112: ...drum unit and remove the misfed paper from the drum C Re install the drum unit locks in position and put the lever back in place Note If you followed step B or C close the front door Be careful not to...

Page 113: ...l s leading edge margin is too narrow the fol lowing action is necessary When you use curled paper correct the curl as shown If you cannot correct the paper curl stack the paper with the curl face dow...

Page 114: ...t the original with the widest mar gin first or make a leading edge margin by making a copy x x x x MASTER EJECT JAM REMOVE JAMMED MASTER A Check where the misfed master is Remove the misfed master as...

Page 115: ...box to its original position When a master misfeed occurs on the drum A Lift the lever to unlock the drum unit and pull out the unit Reference For how to remove the drum unit see P 52 Changing the col...

Page 116: ...the lever back in place x x x x DELIVERY JAM REMOVE JAMMED PAPER A Remove the misfed paper Note Make sure that the paper delivery end plate and paper delivery side plates are in the proper position I...

Page 117: ...ke sure that the following door units are closed Original Tray Close the original tray until it locks in position Front Door Close the front door completely ADF Unit Option Close the ADF unit until it...

Page 118: ...to do If Something Goes Wrong 98 5 Make sure that the drum is completely set in position Set the drum unit completely until it locks in position TSLH028E SilverV gb book Page 98 Monday May 15 2000 3 3...

Page 119: ...ct box or when you need to set the master eject box A Take out the master eject box and remove the used masters Note Spread an old newspaper then turn the master eject box upside down on it to remove...

Page 120: ...What to do If Something Goes Wrong 100 5 When Other Indicators Light u Set the key counter The key counter option is not set Insert the key counter SilverV gb book Page 100 Monday May 15 2000 3 32 PM...

Page 121: ...101 5 When the Prints are Thrown Over the Paper Delivery Tray A Reduce the printing speed by pressing the W W W W key Note If a jam occurs with the current printing speed reduce the paper delivery sp...

Page 122: ...d prints When you use postcards and the like the background might be dirty because postcards do not absorb ink well You might get prints with dirty background when printing at high speed and under hig...

Page 123: ...clean cloth remove any ink that has accumulated on the trailing edge of the drum unit E Insert the drum unit until it locks in position then lower the drum unit lock lever F Close the front door TSLH...

Page 124: ...e If there is no margin or if there is a solid image area near the leading edge of the original make a margin of at least 5mm 0 2 at the leading edge Other wise the paper exit pawl might become dirty...

Page 125: ...tional document feeder make sure that the original guides contact the originals lightly When you get white or incomplete prints even if you check the items above per form the following procedure A Pul...

Page 126: ...r from the drum C Remove paper that is stuck to the drum D Insert the drum unit until it locks in position then lower the drum unit lock lever E Close the front door TSLH02BE 1 2 2 TSLH031E TSLH028E T...

Page 127: ...hine might be damaged because for exam ple dust or the like might get inside Since some parts of the machine are sharp and might cause injury touch only the parts specified in this manual If you clean...

Page 128: ...increase the room temperature The paper exit pawl might contact the printing paper and cause black lines on the prints In this case increase the printing speed or make a new master with lighter image...

Page 129: ...side of a printed sheet or overprinting on a printed sheet be sure that the ink on the first print is adequately dry P 113 Paper Feed Roller paper feed tray Print Paper When the paper is curled stack...

Page 130: ...a master anyway When you set a dark original on the exposure glass When the original is not centred according to the size marks on the right scale If you do not open the platen cover at an angle of m...

Page 131: ...ions exposed to direct sunlight or strong light more than 1500 lux Locations directly exposed to cool air from an air conditioner or heated air from a heater Sudden temperature changes might cause con...

Page 132: ...the power cord directly into a wall outlet and do not use an extention cord Do not damage break or make any modifications to the power cord Do not place heavy objects on it Do not pull it hard nor ben...

Page 133: ...glass marks on the glass will be printed Platen Cover A Lift the platen cover B Clean the platen cover with a damp cloth and wipe it with a dry cloth Note If you do not clean the platen cover marks on...

Page 134: ...on Roller A Open the ADF unit B Clean the separation roller with a damp cloth and wipe it with a dry cloth Note If you do not clean the separa tion roller original misfeeds tend to occur TSLH016E Silv...

Page 135: ...gether means that these modes cannot be used together 1 2 3 4 5 6 7 8 9 10 11 12 13 14 1 Reduction 2 Enlargement 3 Auto Cycle 4 Memory mode 5 Class mode 6 Combine Copies 7 Centre Edge Erase 8 Type of...

Page 136: ...Remarks 116 6 SilverV gb book Page 116 Monday May 15 2000 3 32 PM...

Page 137: ...0dpi Image Mode Photo mode Sand pattern Letter mode Standard mode Letter Photo mode Reduction Ratios Inch version 93 77 74 65 Metric version 93 87 82 71 Enlargement Ratios Inch version 155 129 121 Met...

Page 138: ...e glass Second Copy Time First Print Time Less than 31 0 seconds A4L 81 2 11 L When setting an original on the exposure glass Colour Printing Drum unit replacement system black red blue green brown ye...

Page 139: ...the inside front cover of this manual Width Depth Height Stored 607mm 23 9 651mm 32 6 567mm 22 4 Stored with document feeder 607mm 23 9 651mm 32 6 617mm 24 3 Set up 1 187mm 46 8 651mm 32 6 567mm 22 4...

Page 140: ...Drum B4 Drum Key Counter Tape Dispenser 30 Originals Document Feeder Stand by Less than 0 01kW Master Making Less than 0 24kW Printing Speed 1 Less than 0 14kW Printing Speed 2 Less than 0 16kW Printi...

Page 141: ...time 40 120g m2 10 6 31 9 lb Original Size Max 257mm 364mm 10 2 14 4 Min 148mm 105mm 5 8 4 1 First Copy Time Master Process Time Less than 34 seconds A4L 81 2 11 L Second Copy Time First Print Time L...

Page 142: ...ase 260 masters can be made per roll Ink Black 600ml pack 5 packs case Environmental conditions 5 to 40 C 10 to 95 RH Ink Red 600ml pack 5 packs case Ink Blue 600ml pack 5 packs case Ink Green 600ml p...

Page 143: ...Paper Black Line Stain 104 Document Feeder 43 Document feeder viii Document Feeder Exterior 43 Drum unit viii Drum unit lock lever viii E Economy Mode 25 Edge Erase 20 Enlarge key x 17 Enlargement 16...

Page 144: ...xi Program 38 Program key xi 38 Proof key xi Protecting a Program 40 R Recalling a Program 39 Reduce key x 17 Reduction 16 Removing Program Protection 41 Replenishing Paper 73 Restoring Paper Feed and...

Reviews: